

Some links in this post are affiliate links. This means I may earn a small commission if you make a purchase, at no extra cost to you. I only recommend products I use and genuinely enjoy in my own cardmaking. Read more here.
Three little pups peeking out from a wreath of handmade flowers always makes me smile. I started thinking about this handmade Easter card when I wondered how twine might work for the wreath instead of die-cut pieces. If you are looking for more handmade Easter card inspiration, you can find a variety of other designs to explore.
Shape the flowers from paper scraps using a bone folder, then shade them with distress ink. You do not need anything special. Use whatever bits you have nearby. I coloured the Easter pups in the centre with alcohol markers, choosing two fur colour combinations so each one feels a little different but still fits with the rest of the card.
This project works well as a low-energy, mindful making activity. Working with twine and paper scraps allows you to create in small, manageable steps. Take your time, pause whenever you need, and pick it up again later. Enjoy the process at your own pace.
This card was made for the monthly challenge by All Dressed Up Stamps, where the theme was “It’s an Animal Thing.” If you have been looking for a way to use their Easter Pups stamp, this tutorial walks you through the whole card from background to sentiment.
This tutorial guides you through the entire card, from background to sentiment. Let’s get started.
What You Need for this handmade easter card
Card dimensions
- card base 13 by 13 centimetres.
Stamps and dies
- Easter Pups digital stamp (All Dressed Up Stamps)
- Flower dies in three different sizes are needed for this project.
- Circle die
- Leaf die
Paper and cardstock
- White paper for the circle base
- Pink cardstock, 12 x 12 cm
- Design paper, 11.5 x 11.5 cm
- Paper scraps in white, pink, light yellow, and yellow (for the flowers)
- Green wallpaper sample (for the leaves)
Inks and markers
- Distress Ink. Mowed Lawn, Pine Needles, Tumbled Glass, Salty Ocean
- Distress Ink. Mustard Seed, Squeezed Lemonade, Stormy Sky, Picked Raspberry
- Ohuhu alcohol markers (see Step 5 for full colour list)
Tools and adhesives
- Blending brushes
- Bone folder
- Foam mat
- White gel pen
- 3D pearl paint
- Tacky glue
- Hot glue gun
- Foam tape
- Scissors
- Twine
Core materials
You only need a few basic supplies to get started, and you probably already have most of them. Everything else can be swapped for simple alternatives, so you can enjoy making your card without worrying about the materials.
- Twine for the wreath base
- A circle base (die-cut, punch, or hand-cut)
- Cardstock or paper for the base and flowers
- Adhesive (glue, tape, or hot glue)
- A colouring medium (alcohol markers, pencils, or inks)
Alternatives
- No wallpaper sample? Use green cardstock, construction paper, or even the reverse side of an old greeting card for the leaves.
- No circle die? Try a circle punch, draw around a cup, bowl, or even an empty tape roll for a guide, then cut by hand.
- No bone folder? A dotting tool, the rounded end of a pen, the handle of a paintbrush, or even a plastic spoon can help shape flowers.
- No foam mat? A folded towel, mousepad, or stack of felt scraps will work just as well.
- If you do not have hot glue, strong craft glue or double-sided tape can substitute for attaching twine and paper elements.
How to Make This Stunning Handmade Easter Card
This handmade Easter card comes together in three main stages: creating the inked background circle, building the twine and paper flower wreath, and colouring the pups. You can work on each stage separately, so take your time, pause if you need a break, and enjoy the process. This Easter card tutorial will lead you through al the steps.
Take a deep breath, grab your supplies, and see how the layers and colours gradually bring your card to life.
Step 1. Ink the Background Circle
Begin with the inking to create a soft, dreamy base where the pups will later stand out beautifully.
Die-cut a circle from white paper. This is the foundation of the card, so it is worth taking a little extra time to get the blending right.
- For the grass at the bottom of the circle, apply Mowed Lawn in the lower half and deepen the very bottom edge with Pine Needles. Blending the two together where they meet gives the grass a sense of shade and depth, which will make the scene feel more natural.
- For the sky in the upper half, apply Tumbled Glass in the centre and build outward toward the edges with Salty Ocean. The middle of the sky stays lighter, creating the impression of sunlight and giving your card an airy, spring feel.
Tip. Start blending the sky from the centre of the circle and work your way outward, keeping the lightest point in the middle for a natural gradient.

Tip for Beginners
If blending inks feels tricky, start with a small piece of scrap paper to practice your gradient before working on your main circle. Uneven blending or visible lines are completely normal at first, and they often soften as you build up layers.
Step 2. Build the Twine Wreath for Your Card
Cut two lengths of twine and twist them loosely together. This technique creates a beautiful rope wreath card effect that adds a natural touch to your design.
Apply hot glue along the outer edge of the circle and press the twisted twine into place. Work in small sections so the glue does not dry before you can position the twine.
Troubleshooting tip for your wreath.
If the twine does not stick well, add small dabs of hot glue underneath in sections, letting each part set for a few seconds before pressing down. Gently loosen any tight twists to keep the wreath looking natural.
Tip:
You can sit comfortably, work at your own pace, and leave sections to adjust later without feeling rushed.

Step 3. Make Paper Flowers Using Scrap Papers
Die-cut flowers in three sizes from your paper scraps. Use white, pink, light yellow, and yellow paper and cut multiples of each size so you have plenty to work with when arranging the wreath.
Place each flower on a foam mat and use a bone folder to shape it. Press the centre gently downward with the tip of the bone folder, then curl the petal edges slightly. This transforms a flat die-cut into something with real dimension.
This is one of my favourite cardmaking with paper scraps and a bone folder techniques because it turns flat paper into dimensional blooms


Beginner Reassurance Tip
You don’t need to press hard; gentle pressure is enough to shape the petals without flattening them. Take your time and enjoy how each flower “comes to life” under your fingertips.
Add a touch of shading in the centre of each flower using a small blending brush and distress ink. Match the ink to the flower colour for a natural result.
Distress Ink colours per flower
- White flowers: Stormy Sky
- Light yellow flowers: Squeezed Lemonade
- Yellow flowers: Mustard Seed
- Pink flowers: Picked Raspberry
Apply the ink only to the very centre of the flower so the outer petals stay light and fresh. Finish each flower with a small drop of 3D pearl paint in the middle.
This step is perfect for a low-energy, mindful crafting session. You can make a few flowers at a time, take breaks, and return to your work later without losing progress. Enjoy the process rather than rushing to finish the wreath.
Tip: Let the pearl paint drops dry fully before handling the flowers. Touching them too soon will cause the drops to flatten.
Step 4. Add Leaves and Arrange the Wreath
Before adding the flowers, start with the leaves. Die-cut them from a green wallpaper sample, which adds a subtle texture that plain cardstock lacks. Place a few leaves around the twine frame, overlapping and turning them in different directions as if they grew there naturally. Don’t worry about being perfect, leaving small sections of twine visible adds life and movement.

Once the leaves are in place, add the flowers. Mix sizes and colours across the wreath and use tacky glue so pieces can still be repositioned before they set. Scatter a few small flowers loosely around the circle on the background for a playful, drifting effect.
When you arrange the leaves and flowers, you can see your floral wreath card really starting to take shape.
Arrangement Guidance
Start with the largest flowers and place them evenly around the wreath. Then fill the gaps with medium and small flowers, alternating colours to create balance. Let some small flowers “drift” slightly off the wreath for a natural, lively look. Small imperfections, such as slightly overlapping petals or uneven spacing, can actually make the wreath feel more organic and charming.
Tip for Beginners
Take your time and enjoy placing each piece. Working slowly and in stages keeps the process relaxing and makes it easy to pause and pick up where you left off — perfect for a mindful, low-energy crafting session.

Step 5. Colour the Easter Pups with Ohuhu Markers
Print the Easter Pups digital stamp from All Dressed Up Stamps onto smooth white paper. If you’re new to digital stamps, print a test copy first to check the size and contrast. For a complete beginner-friendly guide on using digital stamps, you can download my free guide here:
Choose a limited and warm colour palette for the pups and their accessories so that the images form a calm, cohesive look with the soft tones of your flower wreath.
The three pups are coloured in two different fur combinations, so the darker centre pup reads as a natural focal point while the lighter pair frames the design on either side. Build the fur in thin layers, starting with the lightest colour and adding mid-tones and shadows gradually. The darkest colour should only appear in the smallest shadow areas, under the head, between the paws, along the sides, and beneath any accessories.
Fur colours, light pups (left and right)
- Base layer with Y55 Golden Champagne
- Mid tones with Y59 Marigold Yellow
- Shadow with Y49 Autumn Leaf
- Deepest shadow with E415 Cedar Brown, used sparingly.
Fur colours, dark centre pup
- Base layer with YR213 Squash Orange
- Mid tones with YR515 Burnt Sienna
- Deepest shadow with E415 Cedar Brown, used sparingly.
Pink details, all three pups (ears, bow, accents)
- Base with R23 Sakura
- Mid tones with R28 Pink Carnation
- Shadow with R410 Raspberry
Easter egg colours
- Yellow eggs with Y59 Marigold Yellow base, Y49 Autumn Leaf for shadow, R28 Pink Carnation for small accents
- Blue eggs with B28 Smoke Blue base, BV315 Cobalt Blue for shadow
Why? Layering the colours in thin steps builds a soft, natural fur texture. Keeping the dark shades to a minimum preserves the gentle, Easter-appropriate look. Matching pink accents across the ears, bow, and egg ties the whole colour palette together.
Repeating the pink colours from the ears and bow in the Easter egg accents ties the whole colour palette together. Add white gel pen highlights on the eyes, nose, and eggs to bring the image to life.
Cut out the pups carefully with scissors. Leaving a thin white border around each one helps them stand out from the background once they are placed on the card.
Tip
Use your darkest colour sparingly. Keeping the shadows small and soft is what gives these pups their gentle, Easter-appropriate feel. Rotate the paper as you cut rather than moving the scissors, and you will get a much cleaner line.
Tip for Beginners
Use light layers first and don’t worry about perfection. You can gradually build up colour and shadows; it’s easier to add than to remove.

Step 6. Build the Card Layers
Adding layers creates subtle frames that naturally draw attention to the wreath and pups. Start with the 13 x 13 cm card base. Layer the pink cardstock (12 x 12 cm) on top, then the design paper (11.5 x 11.5 cm). These layers frame the circle, adding depth to the card before any dimensional elements are attached.
Place the inked background circle slightly above the centre of the card. This shifts the visual weight upward, creating a clear space at the bottom for the sentiment.”
Tip
Place the circle lightly without glue first to see how it looks. A few seconds adjusting now saves frustration later and helps everything sit neatly.
Beginner Tip
Take your time moving the layers and circle around until it feels balanced. This gentle, step-by-step approach builds confidence and helps the card look balanced and polished.
Step 7. Place the Pups and Add the Sentiment
Position the three pups in front of the wreath.
The darker centre pup is glued directly onto the background.
The two lighter pups on either side sit on foam tape, raising them slightly forward and creating depth across the group.
Let the pups overlap each other slightly at the edges. This makes the scene feel natural and connected rather than three separate images sitting next to each other.
Add the sentiment to the lower edge of the twine frame. ‘Have a wonderful day’ sits neatly at the bottom of the wreath, linking the circle with the rest of the card. Step back and review the card to make sure everything is balanced before completing it. If any colours feel uneven, add a small flower or leaf in the right spot to bring it all together.
Tip
Once the pups are in place, look at the card from a slight distance. Small adjustments at this stage can make a bigger difference to the final result than they appear when viewed closely.
Mailing Tip
This card has a raised twine wreath and layered flowers, which can make it too bulky for standard mailing. To send it by post, use thinner twine, reduce the layers, or place the card in a padded envelope for extra protection.

Tips and Alternatives
- Scrap paper for flowers. Any paperwork here, including old design paper, wrapping paper, or pages from a paper pad. If the paper is very thin, layer two pieces together before die-cutting for a sturdier flower.
- No bone folder? A dotting tool or the blunt end of a pen pressed into a foam mat works as well for shaping flowers.
- Twine alternatives. Baker’s twine, thin jute, or a strip of ribbon all give a different feel to the wreath. A thicker twine creates a bolder frame, while ribbon gives a softer result.
- No flower dies. Pre-made paper flowers or fabric flowers work as a substitute. Look for a mix of sizes for the most natural arrangement.
- Change the season. Swap the Easter pups for a different animal stamp and adjust the colour palette. Greens and yellows work beautifully for a general spring card. Warm oranges and rusts turn this into an autumn version.
- No wallpaper sample? Plain green cardstock works perfectly well for the leaves. To add texture, run the cardstock through an embossing folder before die-cutting.
Let’s Get Creative Together
This card offers so many ways to make it your own. The twine wreath, paper scrap flowers, layered dimension, and coloured pups each give you a chance to explore a technique in your own style. I’d love to see your version, no matter your experience level. Share your card in the All Dressed Up Stamps Facebook group or tag me so I can celebrate your creation and cheer you on.
Try These Variations
- Create a mini wreath with fewer flowers for a simple, low-energy project.
- Use other cute animals such as bunnies, kittens, or woodland creatures.
- Experiment with different wreath bases such as ribbon, thin jute, or braided paper.
- Add sparkle with mica sprays, glitter pens, or small sequins for a festive twist.
- Swap the colour palette for a non-Easter version — think warm oranges for autumn or soft pastels for spring birthdays.
Join the All Dressed Up Stamps Challenge
This card was made for the monthly challenge in the All Dressed Up Stamps Facebook group. The theme this month is “It’s an Animal Thing”, and the group is open to anyone who wants to join in.
It’s easy to take part. Head over to the All Dressed Up Digital Stamps Facebook group and find the album for the April 2026 challenge, “It’s an Animal Thing.” Add a photo of your card to the album, and you’re in.
Take a look at what others have shared too; it’s a great place to find inspiration and new ideas.
Button joins the challenge.
Related Posts

Easy Easter Elegance: Creating Your Simple Easter Card
This project shows how to combine soft colours and clean die-cuts for an elegant Easter greeting. It is a wonderful choice for crafters who want a polished result using straightforward techniques. You can follow the guide to see how these layers create a graceful seasonal design.
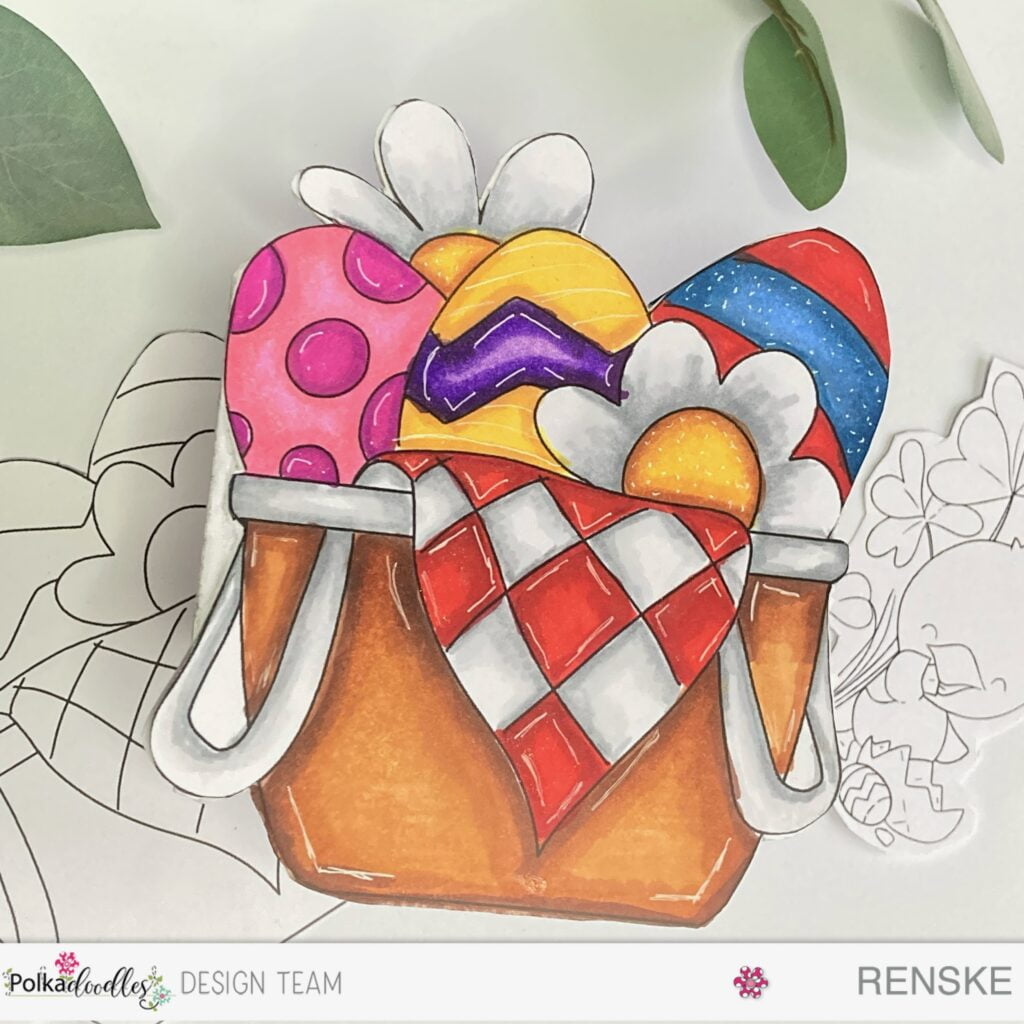
Easter Card Tutorial: Create A Charming Easter Basket Card
Learn how to turn a simple card into a charming Easter basket filled with colourful treats. This shaped card tutorial offers a fresh approach to seasonal greetings and works well for all skill levels. It is a great project to try if you enjoy building scenes with paper layers
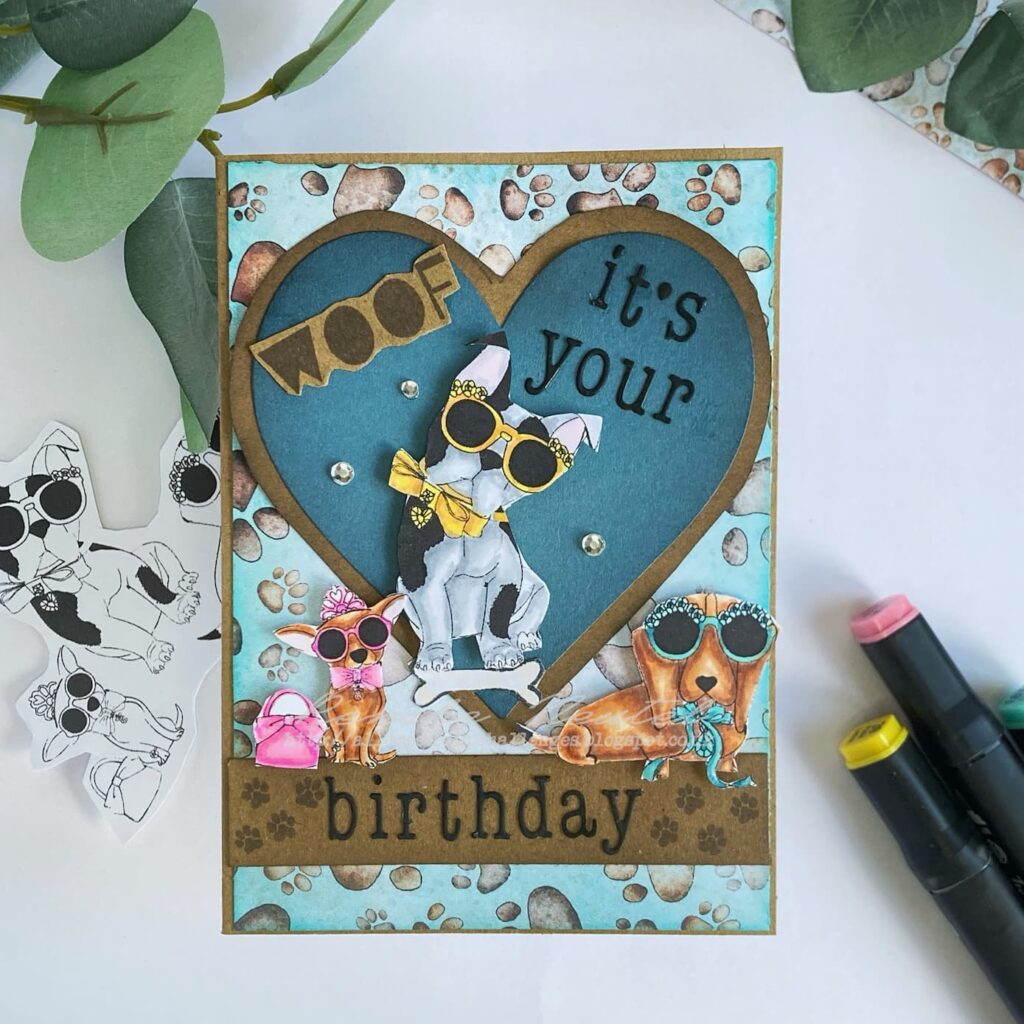
Handmade Dog Birthday Card Tutorial | All Dressed Up Stamps
If you love the All Dressed Up pups, this dog-themed birthday card offers more colouring inspiration and layout ideas. The design focuses on a playful scene that is fun to put together for any dog lover. You can adapt the colours to match your own favourite breeds
Products used for this handmade easter card
This post contains affiliate links. If you purchase something through one of these links, I may earn a small commission at no extra cost to you. I only share products I genuinely use and love.
Products with affiliate links
Easter Pups digital stamp all dressed Up stamps

Distress Ink Mowed Lawn

Distress Ink pine needles

Distress ink tumbled Glass

distress ink salty Ocean

Distress Ink mustard Seed

Distress ink Squeezed lemonade

Distress ink stormy Sky

Distress ink Picked raspberry

Blending brushes StudiolightNL

White gelpen

I would like to enter my card in the following challenges
- Try it on Tuesday: Make it cute
- Passion for Markers: Dies and punches
- Fab ‘n’ Funky Challenges: Easter/Spring
- The Paper Funday Challenges: Anything goes + dies and punches
- Word Art Wednesday: Anything goes
- CREATIVE INSPIRATIONS: Easter/Spring
- Cardz 4 Galz: Spring Flowers
- Craft Rocket Challenges: Layer it up
- Crafty Catz: Anything goes
- Allsorts challenge blog: It’s spring time
- Lil Patch of Crafty Friends Challenge …: Anything goes
- A Perfect Time To Craft Open Challenge: Anything goes
- Crafts Galore Encore Challenge Blog: Anything goes
- Critter Crazy CHALLENGE BLOG: Anything goes + featured critter
- Crafty Animals: Anything goes + must use an animal
Wonderful creation! Thank-you for joining us at the Crafts Galore Encore Challenge April “ATG”. Ileanaxx
Thank you
Super cute!
Thanks for playing along at Cardz 4 Galz!
hanks
This is an adorable card, Renske! I love the total design, but those dogs wearing Easter hats are just so cute. Thanks so much for playing along with us at Word Art Wednesday. We appreciate your participation!
So cute and beautifully embellished! Thanks so much for sharing at Allsorts challenge!
Thank you so mucht.
A gorgeous card, gorgeous colours. I love all the flowers around the image. Marlene
Thank you so mucht. Glad you like it.
A beautiful wreath surrounding a cute scene. Such a lot of work, but it shows. Thanks for sharing with us at Allsorts challenge.
Thank you so much. Yes a lot of work, but totally worth it. Glad you like it.
A lot of work went into designing and creating this beautiful card, super cute pups and a fabulous floral wreath. Thank you for joining us at Fab’n’Funky.
Chris x
Thank you so much. Yes lot of work, but fun to do.
What a great card. Colouring is lovely. Thanks so much for playing along with The Paper Funday Challenges.
Thank you so much.