
Some links in this post are affiliate links. This means I may earn a small commission if you make a purchase, at no extra cost to you. I only recommend products I use and genuinely enjoy in my own cardmaking. Read more here.
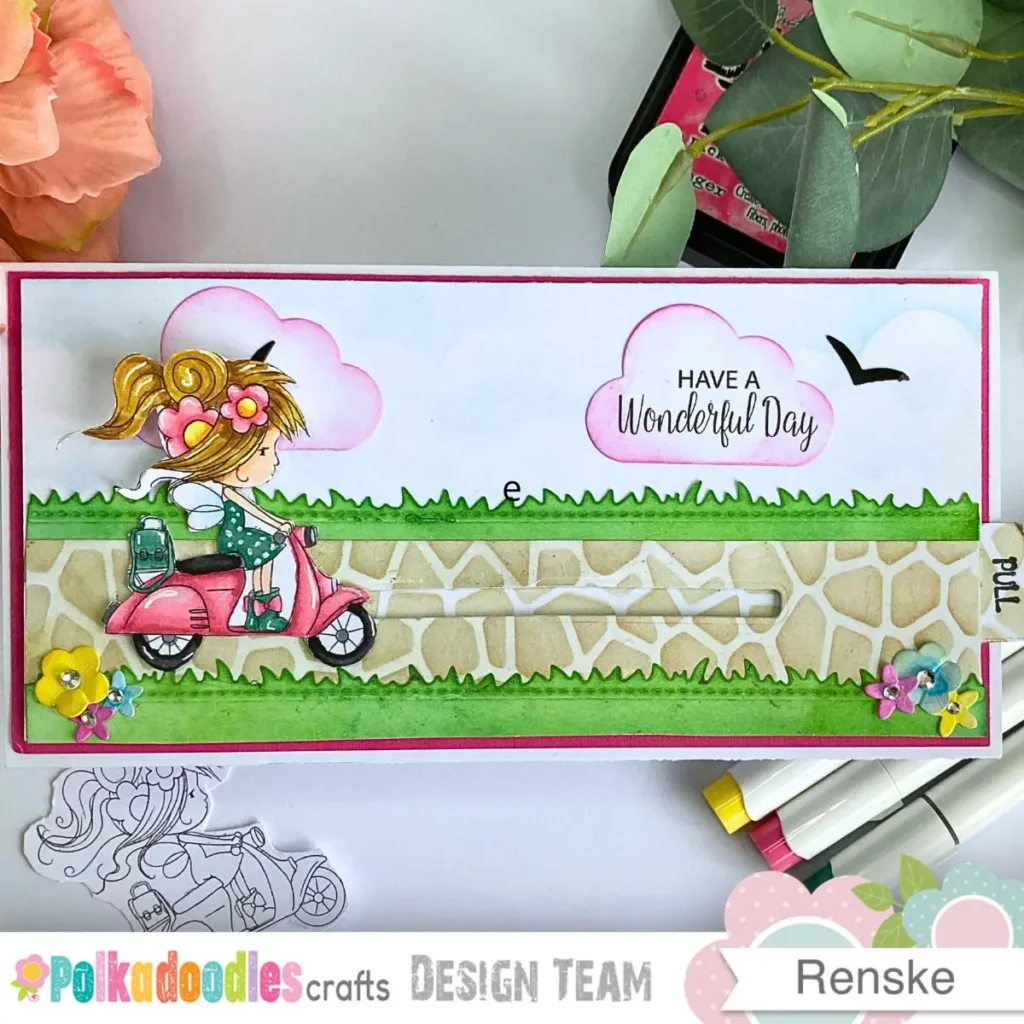
I’m so happy to share this interactive slimline card tutorial with you, as seeing this little Flower Fairy move across the page really makes the scene feel alive. A character on a scooter is made for movement, so I built her a path where she can glide along when you pull the tab. In this tutorial, I’ll show you how to make a slider card with a Flower Fairy digi stamp from Polkadoodles, including a soft spring background and a practical mechanism.
The sentiment I chose is ‘Have a wonderful day,’ making it perfect for birthdays, Mother’s Day, or just sending a little joy. This tutorial is for everyone, maybe it’s your first interactive card or you’re looking for a new idea. Take your time, enjoy the process, and know that every card you make is a chance to experiment and have fun.
Let’s get started and have fun bringing your own interactive slimline card to life. Grab your favourite supplies and get ready to play with colours, layers, and little moving details. Every step is a chance to get creative and make it uniquely yours.
Shop the Main Supplies
I used these Polkadoodles products as the heart of this interactive card. Since they are digital downloads, you can get started immediately without any shipping costs or waiting time
Flower Fairy on a Scooter digital stamp

This image is the star of the project. I chose her because her pose on the scooter is perfect for an interactive slider card. A great advantage of using a digital image is that you can resize her to fit the slimline path.
Pre-coloured Flower Fairy on a Scooter digital stamp

If you want to focus on building the slider mechanism and skip the colouring, this version is ideal. It features the same beautiful artwork and is ready to print and use right away.
Spring Flower Mother’s day greetings

I chose these sentiments because they fit beautifully into the cloud-shaped die-cuts. They are versatile enough for birthdays, Mother’s Day, or simply sending a little joy to a friend
What Is an Interactive Slimline Card?
A slimline card is long and narrow, 10,5 by 21 cm, perfect for wider scenes or landscapes. It gives your stamps room to tell a story and lets you build a path for the Flower Fairy to travel along.
You can make your base from a standard A4 sheet. Cut it to 21 by 21 cm and score at 10.5 cm to create a sturdy foundation. These cards also fit into DL or business envelopes, so you often won’t need extra postage to send your handmade creation. Even a simple design looks polished thanks to the elegant proportions.
An interactive card adds a moving element to this tall base. Here, the Flower Fairy sits on a strip that slides through a slot in the background. Pull the tab, and she glides along the path, bringing the scene to life.
Materials and Tools Needed for This Cute Slider Card
I have listed the supplies I used for this interactive slimline card below. While you can often swap these for items in your stash, I’ve found that using specific tools makes the process much easier. I am currently building a ‘Supplies I Use’ page where I will soon share all my go-to basics in one place.
Polkadoodles supplies
- Flower Fairy on a Scooter digi stamp. This digital image is easy to scale for a slimline scene.
- Pre-coulord Flower Fairy on Scooter digital stamp. This is a great alternative if you want to skip the colouring and focus on building the slider mechanism.
- Spring Flower Mother’s Day Greetings digital sentiment set. I used the sentiment “have a wonderful day”. This is easy to use for multiple occasions.
Paper and Cardstock
- Card base and background: I used 250gsm white cardstock. I prefer this weight because it stays perfectly flat even with the weight of the slider mechanism. If you don’t have this, any sturdy cardstock is fine, but thinner paper might bend slightly when you pull the tab.
- Layers and flowers: I used a pink cardstock for the middle layer and smooth cardstock for the die-cut flowers. Feel free to swap the pink for any colour that matches your chosen palette.
Colouring Materials
- Ohuhu Alcohol Markers: These are my primary colouring tools because they blend very softly on smooth cardstock. If you prefer a different look, you can certainly use coloured pencils or watercolours. The result will be a bit more textured, which adds a lovely handmade feel.
Inks for the scene
- Sky: I used Distress Ink in Tumbled Glass for a light, spring feel.
- Path: A base of Antique Linen with Vintage Photo for shading creates a realistic stone effect.
- Grass and Flowers: I used Mowed Lawn and Pine Needles for the grass, and Picked Raspberry, Mustard Seed, and Salty Ocean for the flowers. You can easily swap these for any ink or colouring medium you have on hand.
Tools and Dies
- Die-cutting: I used a die-cut machine with a slider slot die and various shapes for the grass, clouds, and birds. If you don’t own these dies, you can cut the slot with a craft knife and ruler, and hand-cut the clouds and grass for a more organic look.
- Stencils: A cloud stencil and a texture stencil for the path add depth. You can also create clouds freehand with a blending brush or leave the path plain for a cleaner style.
Other Supplies
- Foam tape: This is essential to raise the panel so the slider can move freely. Any double-sided foam tape works, as long as it is thick enough for the mechanism to glide underneath.
- Embellishments: I used transparent pearls for the flower centres. Small rhinestones or even dots of a white gel pen are great alternatives.
Card Dimensions
- Card base: 10.5 x 21 cm
- Pink middle layer: 10 x 20.5 cm
- Background panel: 9.5 x 20 cm
- Path strip: 4 x 20 cm
- Slider strip: 2.5 x 18 cm
- Focal image height: approximately 6 to 7 cm
With your supplies ready, you’re all set to start. Follow the steps at your own pace and have fun bringing the Flower Fairy and her sliding path to life.
Step-by-Step Interactive Slimline Card Tutorial
This interactive slimline card tutorial has five steps tos follow. Each one builds on the last, so follow them in order. I’ll also point out little choices that make a big difference to the finished card.
Step 1 – Preparing and Colouring Your Flower Fairy Card
First, let’s print and colour the Flower Fairy digi stamp. Take your time preparing the image carefully; it makes putting the rest of the card together much easier and more enjoyable.
If you’re using the black and white digital stamp, this is where you can colour your Flower Fairy with your colouring medium. If you’re using the pre-coloured version, you can skip this step and move straight on to assembling your card.
Printing the Digital Stamp
Open the Flower Fairy on a Scooter digital stamp on your computer. I chose this image because her pose is ideal for a moving card. The best part of using a digital image is being able to scale it to exactly 6.5 cm, ensuring she fits the path on a slimline card perfectly. As this is an instant download, you can start your project right away without any shipping delays.
If you’re new to digital stamps, check my free guidefor a step-by-step walkthrough.
Colouring the Digital Stamp
Decide on your colours before you start. I chose soft spring shades, pink for the scooter, sage green for the dress, and warm skin tones. Picking your palette first will help you keep the colours balanced and make colouring easier.
Colouring Materials
I used Ohuhu alcohol markers to bring the Flower Fairy to life. These markers blend beautifully on smooth cardstock, allowing you to create soft transitions and depth. Here are the specific shades I chose for each part of the image.
Skin colours
- YR00 Barely Blush
- YR04 Pastel Peach
- YR11 Peachy Blush
Hair shades
- Y06 Butter
- Y311 Termite Beige
- Y413 Fawn
- Y515 Light Walnut
Scooter and flowers
- R22 Ballet Pink
- R25 Tender Pink
- R28 Pink Carnation
- R210 Deep Blush
Dress, shoes and bag
- G112 Pale Cobalt Green
- G012 Mineral Green
- G113 Dusty Jade Green
- G114 Aged Pine Green
Wings
- B21 Porcelain Blue
- Colourless blender
Flower centres
- Y03 Pastel Yellow
- Y06 Butter
- YR111 Persimmon
Tyres
- CG28 Web Grey
- CG17 Cool Grey
- 120 Black
Keep the wings light and soft so they look delicate. For the flower centres, use warm yellows like Pastel Yellow Y03, Butter Y06, and Persimmon YR111. Colour in thin layers and build up slowly; it’s easier to add more than to fix too much.

Finish with a few highlights using a white gel pen on the hair, scooter, dress, and flower centres to make your Flower Fairy really pop.

After adding the highlights, cut out the image, leaving a thin white border to make it stand out on the card.

Tip
Don’t have alcohol markers? Coloured pencils, watercolour pencils, brush markers, or light watercolour with a brush can be used. The effect will look a bit different, but the soft spring palette still works beautifully.
Once your Flower Fairy is coloured and cut out, you’re ready to start on the background and card layers. Take it step by step and enjoy seeing the scene come together around your little fairy.
Step 2. Build the Background and Card Base
Now we’ll build the base of your card. We’ll layer the sky, path, and grass so the Flower Fairy has a little world to travel through. Picture soft clouds above, a winding path below, and gentle grass along the sides to give your slider a full, springtime scene.
Cutting the Layers
Start by cutting your card base to 10.5 x 21 cm, the pink middle layer to 10 x 20.5 cm, and the background panel to 9.5 x 20 cm. These layers will sit on top of each other to create a gentle border and add a little depth to your card. Take your time to line them up neatly so everything looks tidy.
Creating the Sky
Take your background panel and hold a cloud stencil near the top. Use a blending brush with Tumbled Glass ink and softly dab or swirl over the stencil, moving it each time. Build up the clouds gradually so they look light and fluffy, giving your sky a fresh, springtime feel.
Making the Path
- Cut a strip of white cardstock to 4 x 20 cm.
- If you have a texture stencil, place it over the strip and lightly blend Antique Linen ink as a base.
- Add some shading to the recesses. Apply Vintage Photo to give a gentle stone-like effect.
Once you’re happy with the look, set the strip aside for later.
Adding the Grass
- Cut two strips for the grass. You can use a slimline grass die or hand-cut gentle wavy edges if you prefer.
- Blend Mowed Lawn and Pine Needles inks across the strips for a soft, layered look.
- Next, attach the path strip along the bottom of the background panel
- Layer the grass strips over and slightly behind the path so they neatly fit between them, creating a natural scene for the slider.

Tip
If you do not have a stencil for the path, you can colour a plain strip with Antique Linen and lightly shade the edges with Vintage Photo. This gives the scene a calm and finished look without needing extra tools. For more ink blending ideas, you can check my other inkblending tutorial.
With your background in place, it’s time to add the interactive slider. Take it step by step and follow along at your own pace so your Flower Fairy can start moving across her little scene.
Step 3. How to Make a Slider Card Mechanism
This is the part that makes your card move. I will show you how to make a slider card mechanism using basic supplies It might seem tricky at first, but take it one step at a time, and you’ll see the slider is more straightforward than it looks. You can also find more tips on building this movement in my other slider card tutorial.
Creating the Slot
You need a die that makes a narrow rectangle. If it’s too short, run it through your machine, shift slightly so the new cut overlaps the previous one, and run it again. Repeat until you have a smooth, continuous slot.


No die? You can also cut the slot by hand using a craft knife and ruler. Measure carefully and score lightly first, then cut along the line. This works as well and gives you full control over the slot length.
Cutting and Decorating the Slider Strip
Cut a strip of cardstock measuring 2.5 x 18 cm. Then decorate it with the same inks and stencil you used for the path so it looks like your Fairy is gliding along a continuous route.

Adding the Pull Tab
Add a small tab to one end of the strip. It can be a tiny rectangle or circle that sticks out slightly. Mark it with “pull” by stamping or writing so it’s clear the card can slide.
Attaching the Panel
Turn your background panel over and place foam tape around the edges, leaving the slot completely clear. Slide your strip through the slot and gently move it back and forth to make sure it glides smoothly. Check that the tape isn’t too close and the strip isn’t bending.

When the slider moves freely, press the panel carefully onto your pink middle layer. Use a small piece of foam tape to attach the coloured Flower Fairy to the strip. Ensure it matches the thickness of the tape you used on the panel.


Tip
Test the slider before pressing everything down permanently. If it feels tight, trim a tiny sliver from each side. Make sure the strip lies flat. A few moments of testing and editing now will make the card move perfectly when finished.
Now that the base and slider are ready, we can add a sentiment to bring the scene to life.
Step 4. Add the Sentiment
Now it’s time to add your sentiment. Choose a spot near the top of the card so it looks part of the scene but doesn’t block the slider path. This way, your Flower Fairy can move freely while your message stands out.
Printing and Cutting the Sentiment
I chose the ‘Have a wonderful day’ sentiment from the Spring Flower Mother’s Day Greetings set. These cloud-shaped designs work well for scene cards. They blend naturally into the sky background without blocking the path where the Flower Fairy moves
Print the sentiment Have a wonderful day from the Polkadoodles Spring Flower Mother’s Day Greetings set onto white cardstock. Then carefully cut it out using a cloud-shaped die so it blends nicely with the sky and feels part of the scene. Take your time to apply the sentiment so everything looks balanced and harmonious.
Blending the Edges
Take a blending brush and softly apply Picked Raspberry ink around the edges of your cloud. Work lightly so the colour frames the sentiment and helps it stand out, but doesn’t draw attention away from the scene below.
Adding a Second Cloud
Cut a second plain cloud from white cardstock and add a soft pink edge. Place both clouds near the top of your card so they create gentle movement in the sky, while keeping the slider path clear. This way, the Flower Fairy can travel smoothly, and your scene feels lively and balanced.

With your sentiment in place, let’s add the finishing touches. These embellishments will bring your card to life and make the scene feel complete.
Step 5. Finish with Embellishments
The final details really make your card shine. Let’s add some flowers, a few little birds, and make sure the slider moves smoothly so your scene comes alive. Take your time and enjoy adding these finishing touches.
Die-Cut and Colour the Flowers
Die-cut two sizes of flowers from white cardstock. Colour them with Picked Raspberry, Mustard Seed, and Salty Ocean. Gently press the centre with a bone folder so the petals lift up a little
Add Centres
Add a small transparent pearl to the centre of each flower. I tried 3D drops first, but they sank a bit as they dried. The pearls are easier to use and give a neat, consistent look every time.
Arrange the Flowers
Arrange your flowers in two small clusters, one at each end of the panel. Leave the centre open so the slider can move freely, letting the Flower Fairy travel across her path without anything in the way. This way the motion stays the star of your card while the flowers frame the scene beautifully.
Add Extra Details
Cut two small birds from black cardstock. Place one on the plain cloud and the other near the sentiment cloud so they look like they’re playfully flying across your sky. This adds a little extra charm and keeps the scene lively.
")

If you’re sending your card by post, choose a slightly larger envelope or slide a piece of cardstock on top to protect the slider. Keep the card flat while storing or mailing it so the mechanism keeps moving smoothly and doesn’t get bent.
Make This Interactive Card Your Own
This interactive slimline card is friendly for every skill level. If you’re starting out, don’t worry about every detail. You can keep it simple by using a plain background, swapping in ready-made embellishments, or making the slider shorter so it moves freely.
Alternative Materials and Techniques
- Use a ready-made embellishment instead of die-cutting.
- Swap stencilling for a lightly inked background.
- A basic pull tab works perfectly if you don’t have a stamp.
- If you don’t own a grass die, cut freehand strips with slightly uneven edges for a more natural look.
- A soft, uneven blend with a brush works as well as a cloud stencil.
Creative Choices
- You don’t need a Polkadoodles stamp. Any image that suggests movement works, a bicycle, a running dog, a paper boat, a flying bird, a car, a balloon, or a character walking along a path.
- For experienced makers, add depth by placing a small background element behind the slider, like a tree, lamppost, or flower stem.
Take your time with each step and be flexible. Focus on making the card work for you and enjoy the process. Remember, there’s no rush; keeping it fun is the most important part.
Multi-Occasion Flower Fairy slider card
The sentiment Have a wonderful day works for so many occasions. You can send it for a birthday, to say “thank you”, for Mother’s Day, or when you want toto brighten someone’s day. The soft spring colours help it feel fresh and cheerful, so it’s not tied to one season.
If you want to make the card more personal, try swapping in a different sentiment from the Polkadoodles Spring Flower Mother’s Day Greetings set. Changing the text is enough to adapt the card for another occasion. You can also explore more ideas for using Polkadoodles digital stamps in this [Polkadoodles card tutorial].
Let’s Get Creative Together
I hope this tutorial inspires you to create your own interactive slimline card with confidence. You can follow the steps as they are or add your own twist with your favourite stamps, colours, and backgrounds. Trust your creativity and enjoy making it truly your own.
If you make this card, I’d really love to see your creation. Share your version on Instagram and tag me at @renskewishesyou so I can take a peek. You can also use #renskewishesyou to help others find your card, or save it to Pinterest and share it in your favourite crafting group. Seeing your work always makes me smile.
Join the Polkadoodles Challenge
I made this card as inspiration for the latest Polkadoodles challenge. If you enjoy Polkadoodles products, why not join in? It’s a fun way to get creative, share your work, and connect with a friendly crafting community.
The theme is always anything goes, so you can make the card however you like. To enter, share your card on your blog or social media and link to the challenge post. You don’t need Polkadoodles products to join, but using them gives you a chance to win Polkadoodles prizes.
Related Posts
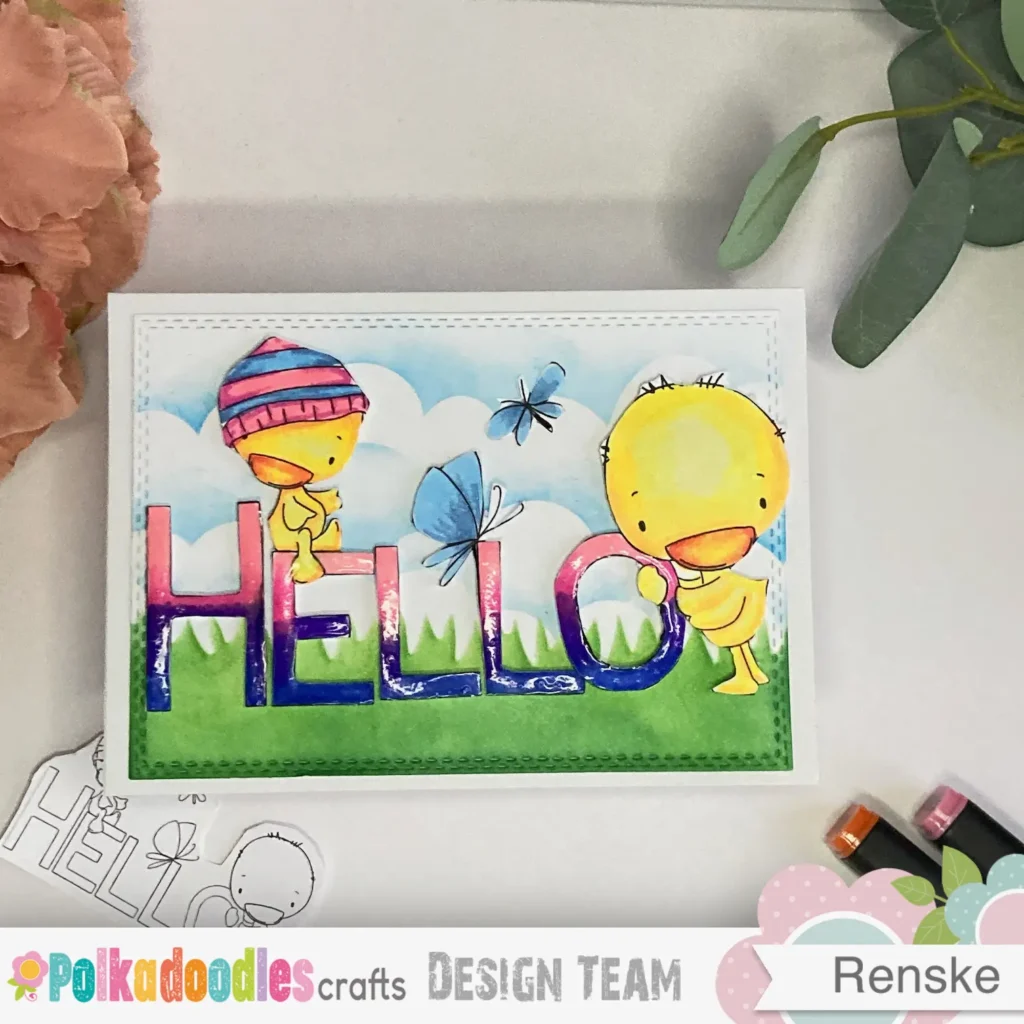
Hello Spring Card Tutorial – Fun & Colourful Spring Design
I you enjoyed the spring feel of this card, you might like my Hello Spring project. I used more Polkadoodles designs there to create a bright and cheerful look. It’s a great way to find more inspiration for your seasonal cards.
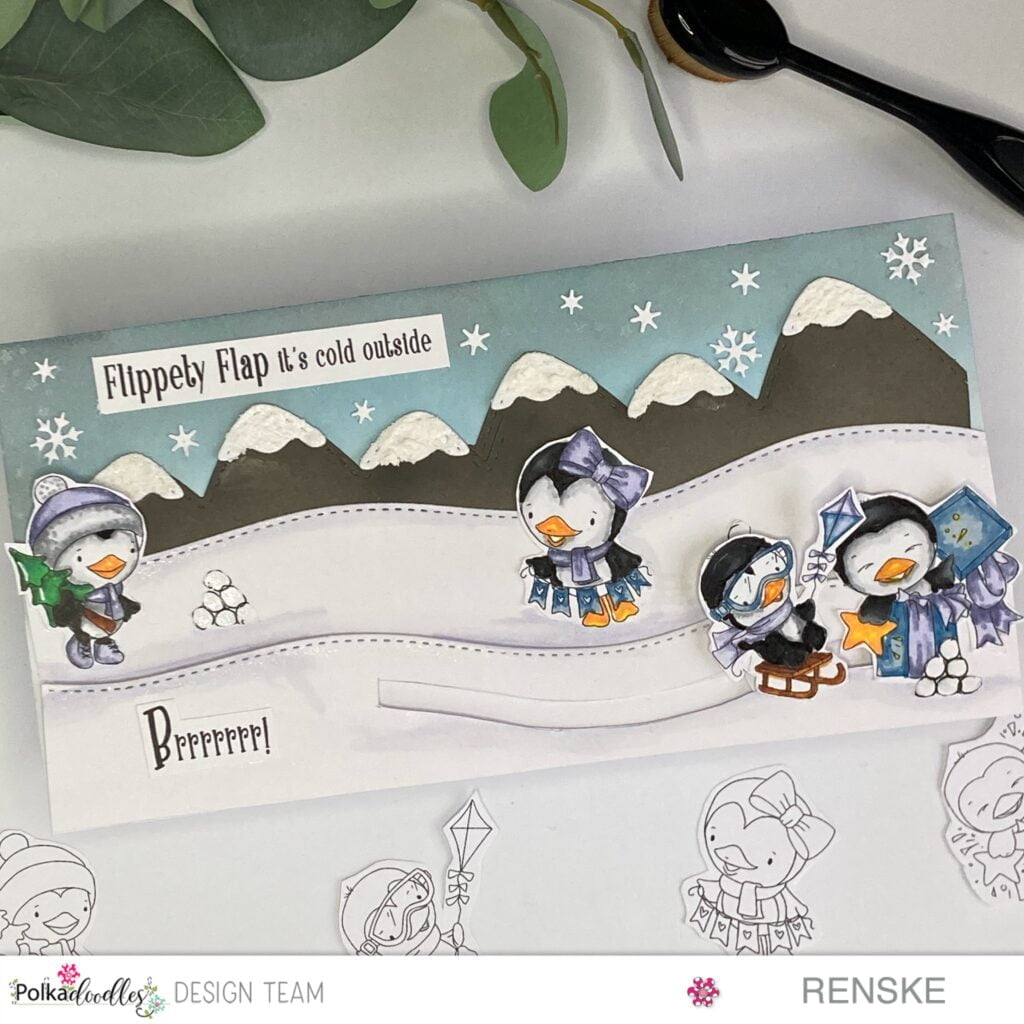
Crafting A Slimline Slider Card: Winter Penguin Magic
For another take on the slider mechanism, you can look at this winter theme. It uses the same interactive layout but with a different seasonal feel. You’ll see how these techniques work beautifully for any time of year
•
Polkadoodles products in the spotlight
Affiliate disclosure. This post contains affiliate links. If you purchase through these links, I may earn a small commission at no extra cost to you.
Flower Fairy on a Scooter digital stamp

This is the digital stamp I used for the focal image. I love that you can resize it to fit the slimline path perfectly before colouring it in your own style. As it is an instant download, you can start your project right away with no shipping costs
Pre-coloured Flower Fairy on a Scooter digital stamp
his is a ready-to-use version of the same fairy, which is ideal if you want to skip the colouring stage. It allows you to focus entirely on building the slider mechanism while still achieving a professional look
Spring Flower Mother’s day greetings
This set includes various sentiments that you can mix and match for different occasions. I chose the cloud-shaped greeting because it blends naturally into the stencilled sky without blocking the slider path
Polkadoodles shop for all the Products
You can find the full collection of digital stamps and sentiments at the Polkadoodles shop. It is a wonderful place to find more inspiration and unique designs for your next handmade card
I would like to enter my card in the following challenges
- Try it on Tuesday: Make it cute
- Unicorn Challenge Blog: use dies
- Crafty Gals Corner: Anything goes + spring
- Crafty Gals Corner: Easter/Spring
- The Paper Funday Challenges: Anything goes + die-cuts and punches
- Word Art Wednesday: Anything goes
- CREATIVE INSPIRATIONS: Easter Spring
- Allsorts challenge blog: It’s spring time or anything goes
- Lil Patch of Crafty Friends Challenge …: Anything goes
- A Perfect Time To Craft Open Challenge: Anything goes
- Crafts Galore Encore Challenge Blog: Anything goes
- Daisy Chain Challenges: No design paper
What a cute spring and interactive card. Thanks for joining the challenge at Crafty Gals Corner.
Thank you
That’s a very sweet card, someone is going to be very happy to receive that. Love the interaction too. Thank you for sharing at Allsorts.
thank you
Renske, this is an adorable card! I can just see that little girl sliding across on her bicycle. Someone will love getting this for sure. Thanks so much for playing along with us at Word Art Wednesday. We have a new challenge starting today and would love to have you join us again!
Wat een schitterende kaart Renske.
Mooie kleurtjes en deze digi past er perfect bij.
Ben dol op interactieve kaartjes en moest daarom wel even langskomen;)
Dank je wel. Ja interactieve kaarten geven net dat beetje extra he.
Ik hou er van om ze te maken. Leuk om te lezen dat jij er ook van houdt.
Beautiful card, I love the interactive element. Thank you for joining in the Allsorts Challenge.
Liz xx
Thank you. Glad you like it.