

Some links in this post are affiliate links. This means I may earn a small commission if you make a purchase, at no extra cost to you. I only recommend products I use and genuinely enjoy in my own cardmaking. Read more here.
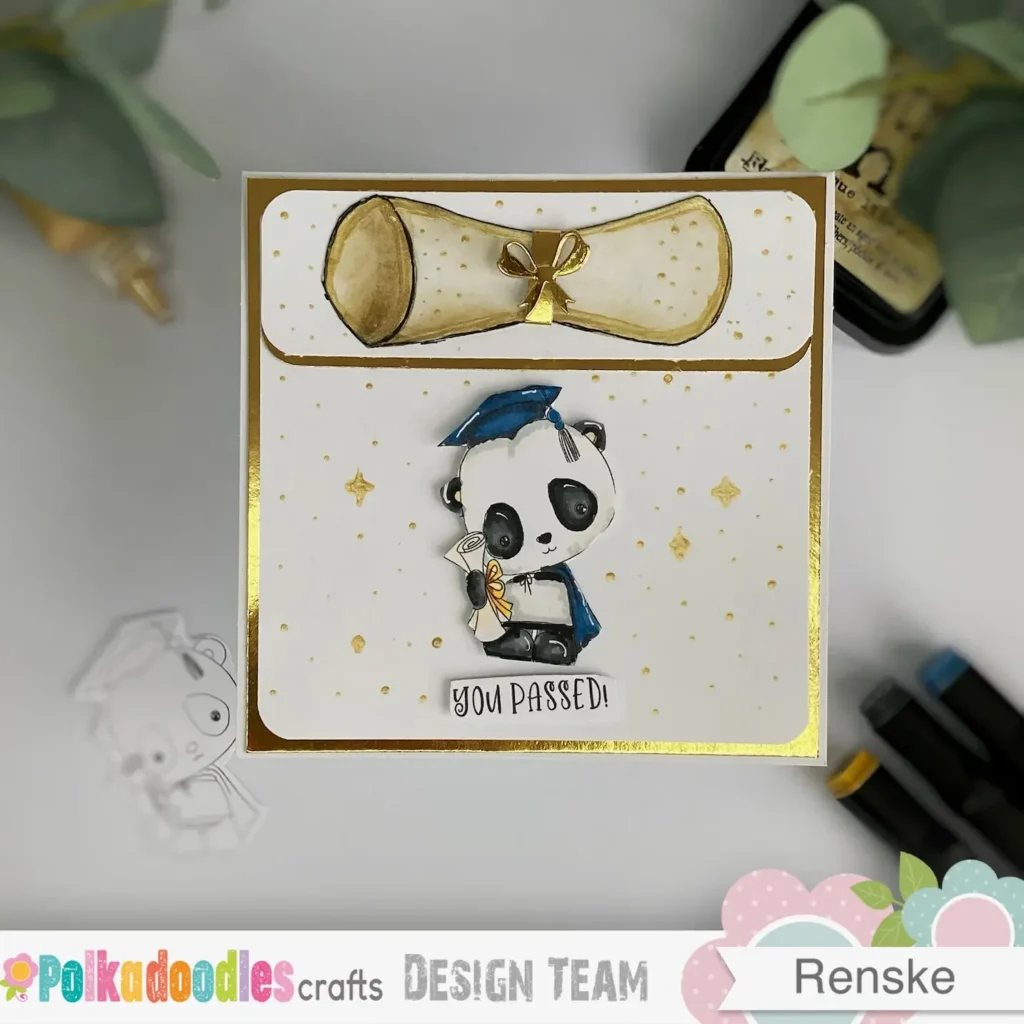
Gather our markers and cardstock, and let’s make a graduation slider card together. We’ll create an interactive card with a sweet panda and a hidden message that appears when you pull the tab. This is a gentle, personal way to celebrate a school or university milestone, and the process is calm and enjoyable.
While making this card, I asked my Instagram followers to help me choose between a patterned or plain background. Most people preferred a clean white version, and I think it was the right choice. It gives the panda space to stand out and helps the design feel balanced. I love including you in these small creative decisions as the card comes together.

I created this graduation slider card for a Polkadoodles design team project. The Noodle Panda digital stamp is the gentle focal point, dressed in a graduation cap and cape. When you pull the tab, a hidden message is revealed. The mix of blues, greens, yellows, and oranges keeps the design feeling fresh and cheerful.
In this tutorial, you’ll colour the panda first, then build the card base, the grass layers, the slider mechanism, and the finished scene. You can follow along with what you already have at home and adapt the design to feel right for you.
Take your time with this project so the process feels calm and steady. Moving gently through each step helps you enjoy the experience and keeps everything relaxed.
What do you need for this graduation panda slider card?
For this graduation slider card, I used a mix of Polkadoodles products and basic cardmaking supplies:
- Polkadoodles panda stamp
- Polkadoodles sentiment
- Polkadoodles patterned paper
All these items are from Polkadoodles collections, and they coordinate effectively without requiring additional matching or planning.
Here’s everything that I used, along with a few alternatives you can adapt to suit your own style.
What are the dimensions and layer sizes for this card?
Having your measurements ready before you start helps keep the process clear and makes assembly feel easier. It’s a small move that can make the whole project look more manageable.
- Card base 21 x 14.8 cm, scored at 10.5 cm on the long side.
- The Finished card size is A6 10.5 x 14.8 cm.
- Patterned paper layer 13.7 x 13.7 cm
- Background scene panel 7.8 x 11.8 cm
- Dark blue mat layer 8.3 x 12.3 cm, about 0.5 cm larger on each side
- Slider insert 6 x 9.8 cm
This size setup gives you enough space for the mechanism without the card feeling crowded. It helps everything stay balanced as you build.
These layers gently frame your scene and guide your eye towards the panda, helping the design feel mild and friendly.
Which Polkadoodles Stamps and Paper do you need?
- Graduation You Passed Noodle Panda digital stamp.
- Sentiment “You Passed” from the Winnie Daisy Greetings set
- Sentiment “You’re just pandastic” from the Noodle Panda Themed Messages set.
- Gnome Men Celebrations patterned paper, white with blue dots
Alternative
Any graduation-themed stamp or school-themed patterned paper in matching colours will work. If you are looking for budget-friendly options, you can use hand-drawn images, cut out pictures or backgrounds from magazines, or find free printable images and sentiments online that suit your theme. Try using stickers or washi tape for a quick decorative touch, or add simple doodles if you want to personalise your card in a few minutes. These easy swaps are great for when you want to create something custom without extra supplies or time. These alternatives work well and bring your own personal touch to the card, even if you do not have themed crafting supplies.
Cardstock and paper
Dark blue cardstock for base, mat layer, and pull tab heart
- White cardstock for the background panel and the inside layer
- DCP paper for printing the panda and sentiments
- Yellow cardstock for the pull tab
Colouring supplies
- Ohuhu alcohol markers
- Distress Ink Tumbled Glass and Salty Ocean for sky
- Distress Ink Mowed Lawn and Pine Needles for grass
- Blending brushes
- White gel pen for highlights and pull tab arrow
- Nuvo shimmer pen for finishing details
Alternative
Coloured pencils or water-based markers on smooth cardstock work well too, especially if you prefer a softer finish.
Tools and dies
- Paper trimmer or scissors
- Scoring tool and bone folder
- Craft knife and cutting mat
- Ruler
- Rectangle dies in three sizes.
- Grass border die
- Cloud or foliage dies.
- Small circle punch for slider notch
- Small heart punch
Alternative
You can cut shapes by hand if needed. For best results, lightly sketch your shape outline onto the cardstock first with a pencil. To get smooth curves or circles, use household objects like coins, lids, or small cups as tracing templates. Take your time and cut slowly with sharp scissors or a craft knife for cleaner edges. For the notch, a craft knife works well if you do not have a punch. Draw the semicircle first and cut along the line. These simple tips can help you feel more confident and get neat results even without specialty tools.
Adhesives
- Strong liquid glue
- Foam tape
Why these materials work together
Starting with Polkadoodles products helps everything feel naturally connected. The panda, papers, and sentiments already work well together, so you don’t need to overthink the combinations as you build your card.
The mix of dark blue cardstock and brighter school colours keeps the design balanced, with enough contrast to make the interactive parts stand out without feeling busy.
It’s a simple setup, but it gives you plenty of flexibility to create a graduation card that appears personal and fun to make.
How do I make a graduation slider card with an interactive pocket mechanism?
This graduation slider card is built up in layers, so each part has its own place in the design. You start with the focal image, then move on to the background and grass scene, followed by the slider mechanism, and finally the full assembly.
Working this way keeps everything manageable, so you can focus on one step at a time without feeling like you need to figure out the whole card all at once.
It also helps the design come together more naturally, as each layer supports the next while you build.
Step 1. Colour the graduation panda with Ohuhu alcohol markers
Colouring the panda first gives you a clear focal point before you build the rest of the card. The colours you choose here help shape the rest of your palette, so it’s a gentle way to begin building your design in a natural flow.
The panda sets the mood for the whole card. Soft, warm shades keep the look friendly and calm, which suits a gentle graduation theme well.
Printing the digital stamp
You can find the Graduation You Passed Noodle Panda digital stamp here which has clean outlines that make alcohol marker colouring very manageable. I love how these digital images allow you to resize the character to fit your layout perfectly. It is a practical way to ensure your focal point is the exact size you need for an A6 card
Print the Noodle Panda on smooth DCP paper, as this produces clean results with alcohol markers. For this card, I printed the image at 7.2 cm high and 4.78 cm wide so it remains the focal point without dominating the layout. Before printing on your good paper, test the size on regular paper to ensure it fits your A6 card. When resizing the digital stamp, use editing software to maintain the original aspect ratio, as adjusting width and height proportionally prevents image distortion and facilitates precise sizing for your project.
I have a freebie on how to use digital stamps. A digital stamp is a printable image file you can use like a regular stamp, but you print it out from your computer instead. Download it here.
P
rint the Noodle Panda on smooth DCP paper to achieve clean results with alcohol markers. For this card, I printed the image at 7.2 cm high and 4.78 cm wide, ensuring the panda remains the focal point without dominating the layout.
It helps to test the size on regular paper first, so you can check the fit on your A6 card before printing on your good paper.
Colouring the digital stamp
Start with the lightest tones and work through each colour group. This keeps everything soft and easy to blend.
Light fur tones
- YR00 Barely Blush, base layer
- Y62 Sandy Beige, mid shadow
- Y69 Milk Tea, deeper shading in corners
Start with a light hand and build slowly around the edges, then blend back with your base colour for a smooth transition.
Dark fur details
- CG24 Grey, base
- CG28 Web Grey, mid shadow
- BGY18 Graphite Grey, deepest areas
Use soft greys instead of black so the panda looks natural and blends gently with the rest of your card.
Graduation cap and cape
- BV310 Brilliant Blue, base
- BV315 Cobalt Blue, shadow
- BV35 Arctic Blue, blending
These blues complement your card base and help keep the design balanced.
Cheeks
- YR00 Barely Blush
- YR03 Pastel Blush
- YR11 Peachy Blush
Keep the cheeks soft and light so they don’t take over the face. Gentle colour here helps the panda look friendly.
Yellow accents
- Y26 Light Gold
- Y28 Corn Yellow
- Y213 Dark Marigold
These tones add a warm contrast and tie into the graduation theme.
Diploma
- CG01 Cloud Grey
- CG02 Light Grey
- CG24 Grey
Keep the diploma neutral so it supports the panda without drawing attention away. This helps the scene feel balanced.
Finishing the colouring and cutting
Add soft highlights with a white gel pen once everything is dry. Then gently soften them with your lightest marker in each colour group so the highlights blend in naturally.
Cut the panda closely along the outline, leaving no white border. This helps the image blend gently into your scene and avoids a cut-out look.
Take your time with this step so the edges stay clean and neat. Moving slowly here helps you get a gentle, tidy finish.

A gentle tip for smooth blending
Try your colour combinations on a scrap piece of DCP paper before you start your final image. This gives you a sense of how the colours work together and helps you build gentle confidence as you go.
Earlier I also created a graduation card using this same panda stamp. This will show you how different the results can look with a few small change. You can find it here.
Step 2. Make the card base and prepare the layers
With the panda ready, you can start building the base of your card. This step creates the structure for everything else, so it helps to work calmly and build each layer at your own pace.
Cutting the card base
- Cut your dark blue cardstock to 21 x 14.8 cm.
- Score it at 10.5 cm on the long side, then fold to create your A6 card base.
This gives you a firm foundation for your design, and the dark blue adds a calm contrast with the brighter colours you’ll add later.
Preparing the layers
Next, cut your main layers. You can use dies or cut them by hand, whichever feels most comfortable for you.
- Patterned paper layer 13.7 x 13.7 cm
- Background scene panel 7.8 x 11.8 cm
- Slider insert 6 x 9.8 cm
For the patterned layer, I used the Gnome Men Celebrations paper because the soft blue dots create a quiet atmosphere for the scene. This printable paper is a great addition to your stash since you can print exactly what you need whenever inspiration strikes. Using coordinating patterns helps the whole project feel naturally connected.
Why do these layers work together?
These layers gently add depth to your design and guide your eye towards the centre of the scene, helping everything feel balanced.
The combination of patterned paper and clean white areas keeps everything balanced, so the interactive parts stand out without feeling busy.
A gentle tip for this step
If you are unsure about your paper choices, lay everything out before glueing. This gives you a moment to adjust spacing and see how the colours feel together.
It keeps the process calm and helps you build confidence as you go. Trusting your eye here can make a big difference.
Step 3. Create the ink-blended background
The background sets the mood for your graduation scene. It creates a soft atmosphere behind the panda, without taking attention away from the focal point.
Take your time here. Gentle blending makes a big difference to the final look.
Blending the sky
Begin with your background panel oriented vertically, measuring 7.8 cm wide by 11.8 cm high.
Apply Distress Ink in soft circular motions across the top two-thirds of the panel. Leave the lower third free for the grass layers.
- Tumbled Glass, light base across the sky area
- Salty Ocean, gently added at the top for depth.
Build the colour slowly with light pressure. This helps you keep the sky soft and even, instead of too strong or patchy.
A calm tip for blending
If you are unsure about pressure or colour intensity, test your blending brush on a scrap piece of paper first.
This helps you get a feel for the ink flow, so you can move on to your main panel with more confidence.
Keeping the background balanced
A soft sky works best when it supports the scene instead of competing with it. The mild blue tones create space for the panda and interactive parts to stand out later.
You don’t need a strong contrast here. Subtle layers will give you the most natural result.
Step 4. Make the grass and foliage layers
The grass layers bring your scene alive and give the panda a natural place to stand. This is where your background starts to feel like a real little setting.
You are building depth here, so work layer by layer and keep things light as you go. There’s no need to rush.
Cutting the grass and foliage
Cut both shapes from white cardstock.
- Grass border die for the foreground layer.
- Cloud dies for the background foliage.
If you do not have dies, you can cut a soft, curved edge by hand or use a stencil for a similar effect.
These shapes don’t need to be perfect. Soft edges actually help the scene look more natural.
Colouring the grass
Now bring both pieces to life with Distress Ink.
- Mowed Lawn, base layer across both shapes
- Pine Needles, added to the lower edges and deeper areas for shadow
Start light and build slowly. This holds the colour soft and prevents the grass from feeling too heavy.
You are aiming for gentle variation rather than strong contrast.

Placing the layers
Start with the background foliage layer. Glue it directly onto your scene panel, keeping it low enough so the upper space stays open for your panda and sentiment later.
Then add the foreground grass border using foam tape. This lifts the layer slightly and adds a gentle sense of depth to your scene.

A gentle tip for depth
If your layers feel too flat, add a little more shadow with a second light pass of ink along the edges. Small touches like this can make a big difference.
Small adjustments like this help the scene look more dimensional without adding extra complexity.
Step 5. Build the slider mechanism
Take your time here and build it slowly so everything stays easy to control. If you run into issues, here’s an expanded troubleshooting checklist for a smooth slider. And if you still get stuck after trying these tips, don’t hesitate to leave a comment below or email me for extra support. I’m happy to help you troubleshoot so you can finish your card with confidence.
- Check that the foam tape is not too tight around the slider insert. There should be enough space for movement, but not so much that it wobbles.
- Make sure the adhesive is close enough to guide the slider but not pressing against it.- Run a piece of folded scrap paper through the slider track to catch any debris or test the smoothness.
- Remove and adjust the slider before final assembly if it feels sticky or stiff.- Make small tweaks now for the best movement later.
Here are some extra tips for fixing common slider issues.
- Adhesive sticking. If you notice the slider sticking or catching, check for stray glue or tape along the slider edges. Use a craft knife or tweezers to remove excess adhesive. Try applying a small amount of powder (such as cornstarch or an anti-static tool) to non-visible sticky areas so the slider insert glides smooth.
- Misalignment:. If your slider insert leans or catches on one side, double-check that your foam tape lines are straight and parallel to each other. If needed, carefully peel back the panel and realign your track before pressing it back down firmly. Test movement before securing everything in place.
- Warped cardstock: Using heavy or warped cardstock can make the mechanism stick. Try gently pressing your panels with a bone folder to flatten them before assembly, or place them under a stack of books for a few minutes.
- Rough slider edges: If movement is not smooth, check that your slider insert edges are cut straight. Trim any rough or uneven edges with sharp scissors or a craft knife for a cleaner fit.
- Slider too loose: If your slider feels too loose and shifts around, add an additional thin strip of foam tape beside the track and test again until you achieve steady, guided movement.
Simple fixes at this stage help your card work beautifully and bring that satisfying interactive reveal.
Making the notch
Take your background scene panel measuring 7.8 x 11.8 cm. Use a small circle punch to create a notch at the top centre of the panel. This small opening shows where to pull and makes it clear that the card is interactive.
Creating the slider track
- Place your background panel face down.
- Position your slider insert (6 x 9.8 cm) in its closed position so you can see exactly where everything will move.
- Now add foam tape around the edges:
- Left side
- Right side
- Bottom edge
- Leave the top open so the slider can move freely upward.
This creates a U-shaped track that gently guides the movement.

A gentle tip for stability
Use continuous strips of foam tape instead of small pieces. It keeps the track strong and helps the slider move smoothly. Keep the tape close enough to guide the insert, but not so tight that it blocks movement.
Testing the movement
Before pressing everything down firmly, slide the insert up and down a few times. This is your chance to adjust the fit while everything is still flexible. Once it moves smoothly, you can secure the structure onto your dark blue mat layer (8.3 x 12.3 cm).
A calm variation if this feels too complex
If the full slider feels a bit much, you can simplify it by making a folded flap instead. Fold a strip of cardstock and tuck your sentiment inside. You still get a hidden-message reveal, but with a simpler structure to build.
Other easy alternatives for beginners include adding a small pocket to the front of your card, where you can slip in a decorated tag with a message. You can also attach a pull-out tag behind your main scene by adheringt three sides of a panel, leaving the tag free to slide in and out. Both methods are quick and forgiving, letting you create an interactive element with minimal effort and basic supplies.
Step 6. Make the pull tab
The pull tab is the small detail that shows the recipient the card is interactive. It also gives them something to hold when they pull to reveal the hidden message.
This step is simple, but it connects the colours and gives the mechanism a finished touch.
Cutting the pull tab
- Cut a strip of yellow cardstock measuring 4 x 1.5 cm.
- Fold it in half to create a small, reinforced tab.
- Slide it over the top edge of your slider insert and check the placement before glueing it down.
The yellow colour links back to the tassel and ribbon details on the panda, bringing the whole design together.
Adding detail and direction
Punch a small heart from dark blue cardstock and attach it to the front of the tab. Then draw a small upward arrow using your white gel pen. This will clarify where the movement occurs.

A gentle tip for balance
Try to keep the pull tab centred so it feels balanced when the card is closed.
Small alignment choices like this help your finished card look neat and intentional without extra effort.
Step 7. Prepare and place the sentiments
The sentiments bring your graduation card message together. This is where the design starts to feel complete, as image and words come together as one.
Take your time with placement. Small adjustments can make a big difference to the balance of your scene.
Preparing the sentiments
Set up your sentiments in a word processing programme and print them on DCP paper.
You will use two phrases:
- You passed the front panel.
- You’re just pandastic for the slider insert
Test the sizing on regular paper first. This helps you avoid wasting your good paper and makes it easier to find the right scale for your card.
Creating the main sentiment
Cut You Passed using a die or scissors.
Mount it onto dark blue cardstock and trim a narrow border by hand.
This gives the sentiment a clean frame and helps it stand out against the background without taking away from the panda.
Place it on the background panel after checking the position with your panda first.

Adding the hidden message
Cut. You’re just pandastic closely around the text.
Split the phrase across two lines so it fits neatly on your slider insert.
Attach it under the pull tab so it stays hidden until the card is opened.
This is the surprise moment of your design, so make sure it sits securely before moving on. Little details like this add to the fun.
A gentle tip for placement
Lay everything out before glueing anything down. This gives you space to adjust and see how the panda, sentiment, and slider work together visually.
Small shifts at this stage help the whole design feel more balanced.
Step 8. Assemble the graduation scene
This is the moment where all your separate pieces come together. Your card starts to feel complete as the layers, panda, and slider each find their place.
Work slowly and lay everything out first so you can adjust before glueing anything down.
Checking the composition
Before you attach anything, place all your elements loosely on the card base.
Check:
- The balance of the panda
- the space for the pull tab
- the visibility of the sentiment
- the movement of the slider
This helps you make small adjustments early, which keeps the final assembly calm and easy.
Placing the panda
Position the panda slightly lower on the panel.
This leaves enough space above for the pull tab and the You Passed sentiment.
Attach the lower part with liquid glue and the upper part with foam tape.
This small height difference helps the panda sit naturally across the grass layers and helps the design feel balanced.
Building the full card structure
Once the panda is in place, build your layers in steps.
- Attach the background panel to the dark blue mat layer.
- Mount this onto the patterned paper layer.
- Glue everything onto the folded card base.
Take your time here so each layer lines up neatly. Moving slowly helps you get a tidy finish.
Adding the inside layer
Cut a piece of white cardstock to 10 x 14.3 cm. Glue it inside the card to create a space for your personal message. It keeps the inside clean and gives the recipient a gentle space to write.
A gentle tip for alignment
If anything appears slightly off, adjust it before the glue sets fully.
Small corrections at this stage help your finished card look more polished without extra effort. Little adjustments can make a big difference.
Step 9. Add the finishing details
The finishing touches bring everything together and give your graduation card its final polish. This is where you add small accents that help the scene seem complete and considered.
Take your time and build these details gently so they enhance the design without taking over.
Grounding the panda
Add a soft shadow under the panda’s feet using CG01 Cloud Grey and CG24 Grey.
This helps anchor the character into the grass so it doesn’t look like it’s floating.
Keep the shading light and subtle for a natural finish.
Adding celebratory details
Scatter small stars around the panda in yellow, green, and orange.
You can use a white gel pen or coloured pens for this step.
Place them lightly across the scene so they add energy without making the background feel too busy.
Adding light shimmer
Use a Nuvo shimmer pen on the tassel and the bow of the graduation cape.
Apply it sparingly so it catches the light in a subtle way.
This adds a soft highlight and improves the celebratory feel of the card.
A gentle tip for balance
Step back from your card once the details are added. This helps you see if everything feels balanced or if one area needs a gentle adjustment. Often, less is more at this stage. A few small details can make your card feel finished.


Why does this graduation slider card work for any occasion?
This design works because it combines a character with personality, an interactive slider, and a hidden message that makes the moment of giving feel extra special. The Noodle Panda brings a friendly feel, making this card suitable for school leavers, university graduates, or anyone celebrating an exam result. It keeps the design light while still feeling meaningful and personal.ul.
The slider mechanism makes it fun, and the project is gentle to build. You can follow the steps at your own pace and still create a polished result using basic craft supplies.
This layout is also easy to adapt. Changing the colours to match school or university themes is a gentle way to personalise the design.
Because the slider structure is reusable, you can use this idea again for birthdays, celebrations, or other milestones where a hidden message adds a special touch.
By transforming a handmade card into a moment of surprise, this approach not only enhances the experience of giving but also provides an opportunity to share your creative results with others. Sharing your finished card can inspire fellow crafters and foster community engagement.
Look how it slides:
What are frequently asked questions about a graduation card?
The most frequently asked questions about graduation slider cards cover how to ensure a smooth movement and which basic supplies are necessary for a stable mechanism. I have collected these specific queries from our creative community to help you navigate the trickier parts of the assembly process. These honest answers provide the guidance you need to finish your interactive project with confidence and at your own pace
How do I make a slider card as a beginner?
Start with a simple foam tape track and a straight slider insert. Keep your layers minimal and test the movement before decorating.
Build one section at a time so you can adjust things as you go. This makes the graduation slider card easier to manage and more relaxed to create.
What materials do I need for a pocket slider card?
You only need a few basics to get started. Simple supplies can go a long way.
- Sturdy cardstock
- Strong adhesive
- Foam tape
- A focal image
Ink blending and die cuts can improve the design, but they’re optional for your first project.
Can I make this design without stamps or alcohol markers?
Yes, you can adapt it. Printed images, die cuts, or handwritten sentiments all work well as alternatives to a digital stamp. Use what feels right for you.
Coloured pencils or water-based markers are also good options if you prefer a softer finish.
What size should I print the panda?
For this card, I printed the panda at 7.2 cm high and 4.78 cm wide.
This fits well within an A6 layout and leaves enough space for the slider and sentiment above the image.
It is advisable to test the image size by printing it on plain paper first, as described earlier in the tutorial, before producing the final version on high-quality DCP paper.
Let’s get creative together
This graduation slider card is a gentle way to mark a big milestone with a handmade, personal touch. The Noodle Panda and hidden message make it a fun design to give and receive.
You can adapt the idea in lots of ways. Change the colours to match school or university themes, or switch the sentiment to suit your recipient. The slider mechanism also works well for birthdays, congratulations, or other celebrations. There’s plenty of room to make it your own.
I would love to see your version of this project. Share your makes with me on Instagram so we can celebrate your creativity together. You are also welcome to share your creations via email, leave a comment on the blog, or post on any social platform you enjoy. If you are part of the Polkadoodles team, remember to use our team hashtag #PolkadoodlesTeam or tag your project in the official Polkadoodles gallery. This makes it easier for us all to find, share, and celebrate each other’s creations. However you choose to share, I look forward to seeing your unique take. Enjoy the process and have fun making.
Join the Polkadoodles challenge
I created this graduation slider card for the latest Polkadoodles design team challenge.
You are welcome to take part by sharing your own version on the Polkadoodles challenge blog. It is a lovely way to connect with other crafters and see how different everyone’s take on the same idea can be.
Where can you find more inspiration for interactive cards and versatile stamps?
You can find more ideas for interactive designs and character-based cards in my creative archives to help build your confidence. These tutorials offer different ways to use slider mechanisms and cute characters for special milestones. Each project is designed to be manageable so you can enjoy the making process at your own pace.

Make a handmade football birthday card with a cool slider effect.
This interactive birthday card uses a similar sliding mechanism to create a moving scene for sports fans. You can discover how the football glides across the field to add a playful surprise to your handmade projects. This layout is achievable for beginners and offers a lovely way to practise your skills in building layers
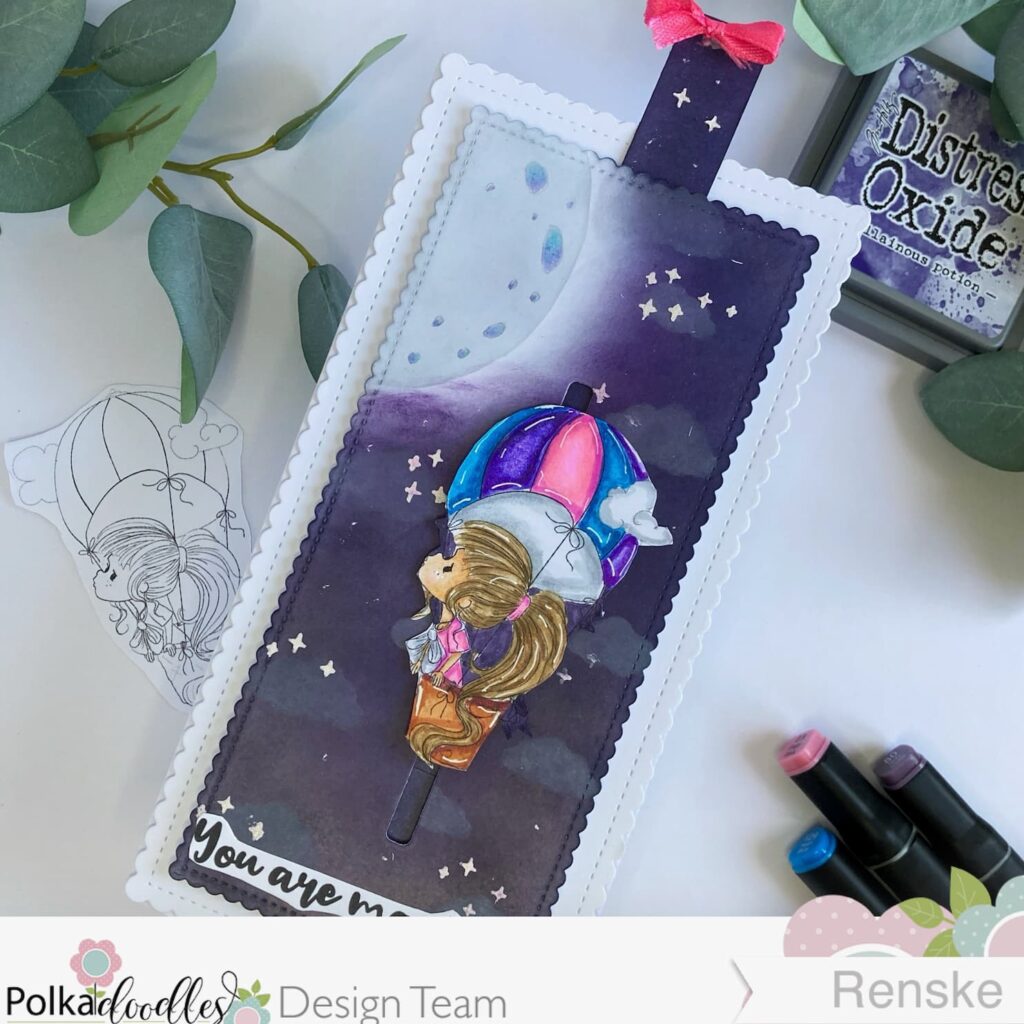
Elevate Your Crafting Skills with this DIY Hot Air Balloon Slider Card Tutorial
You might enjoy creating a magical night scene with this tutorial for a hot air balloon slider that has a vertical movement. This project explains how to use stencils and ink blending to build a mystical atmosphere for your interactive elements. It is a thoughtful choice if you want to try a different direction for a slider while keeping the process calm and enjoyable
Make a Fun DIY Graduation Card With This Cute Panda Twist
This alternative graduation card demonstrates how versatile a single digital stamp can be when you change your approach. I chose a different colour palette and a refined layout to create a completely new look for the same cute panda. This variation is manageable for those days when you want to create a meaningful gift at a gentle pace
Enjoy your crafting.
Before you go, I would love to see how your graduation slider cards turn out! Share your creations in the comments below, tag me in your photos, or mention a friend who would enjoy trying this project. Your ideas and results can inspire others in our community, so let’s celebrate your creativity together. I can’t wait to see what you make!
Polkadoodles products in the spotlight.
This project features a curated selection of digital stamps and papers that coordinate naturally to help you achieve a polished result. I chose these specific items because they work together to create a fresh and cheerful scene for any graduate. Each product is selected to make the making process feel manageable and enjoyable.
Graduation You Passed Noodle Panda Digital Stamp

I recommend this stamp because the character brings a friendly personality to the card without being overly complex to colour.
Noodle Panda Themed Messages

I included this sentiment set because the playful phrases are specifically designed to coordinate with the panda character for a cohesive and professional look. This collection provides a range of messages that help you find the perfect words to celebrate a graduation or school milestone. It is a practical resource for adding a gentle touch of personality to your interactive cards at your own pace
Winnie Daisy Greetings Sentiment Set

This set is a useful resource because it offers a variety of clear sentiments that fit perfectly within interactive card designs. I used the passed message to ensure the focus remains on the celebratory milestone. Having a digital set means you always have the right words ready for your projects.
Gnome Men Celebrations Printable Pape

I chose this patterned paper because the muted colours provide a soft background that does not compete with the focal image. Printable papers are a practical choice for mindful making as you avoid the clutter of a large paper stash. You can print this design as many times as you like for different cards
Which creative cardmaking challenges is this graduation project joining?
- Unicorn Challenge Blog: Use dies
- Passion for Markers: Dots and Or Stripes
- Crafty Gals Corner: Anything goes + spring
- Word Art Wednesday: Anything goes
- Crafty Catz: Anything goes
- Lil Patch of Crafty Friends Challenge ...: Anything Goes
- A Perfect Time To Craft Open Challenge: Anything Goes
- Classic Design Challenge Blog: Anything goes + furry friends
- Crafts Galore Encore Challenge Blog: Anything goes
- Critter Crazy CHALLENGE BLOG: Anything goes + featured critter
- Crafter’s Cafe: Anything goes + no squaresCrafty Animals: Anything goes + must use an animal
Fabulous creation! Thanks for sharing with us at Crafty Gals Corner!
Thanks a lot
Hi Renske, a gorgeous gift card for the graduate. Love the detailed information you have given to inspire us to create our own slider card. Thank you for joining us at Lil Patch of Crafty Friends and good luck in the prize draw…
Megan DT LPoCF
Thank you so much and so glad you liked the tutorial.
Renske, this is an adorable card! That panda is so very cute, and that slide up tab really makes it extra special. Thanks so much for playing along with us at Word Art Wednesday. We appreciate your participation!
Thank you. Glad you like it.
An amazing card. I love everything about it. Thanks for joining Passion for Markers. Elaine
thank you so much
What a fabulous slider card! Thank you so much for joining in my challenge at PFM
Natx
Thank you. Sliders are so fun.