
Some links in this post are affiliate links. This means I may earn a small commission if you make a purchase, at no extra cost to you. I only recommend products I use and genuinely enjoy in my own cardmaking. Read more here.
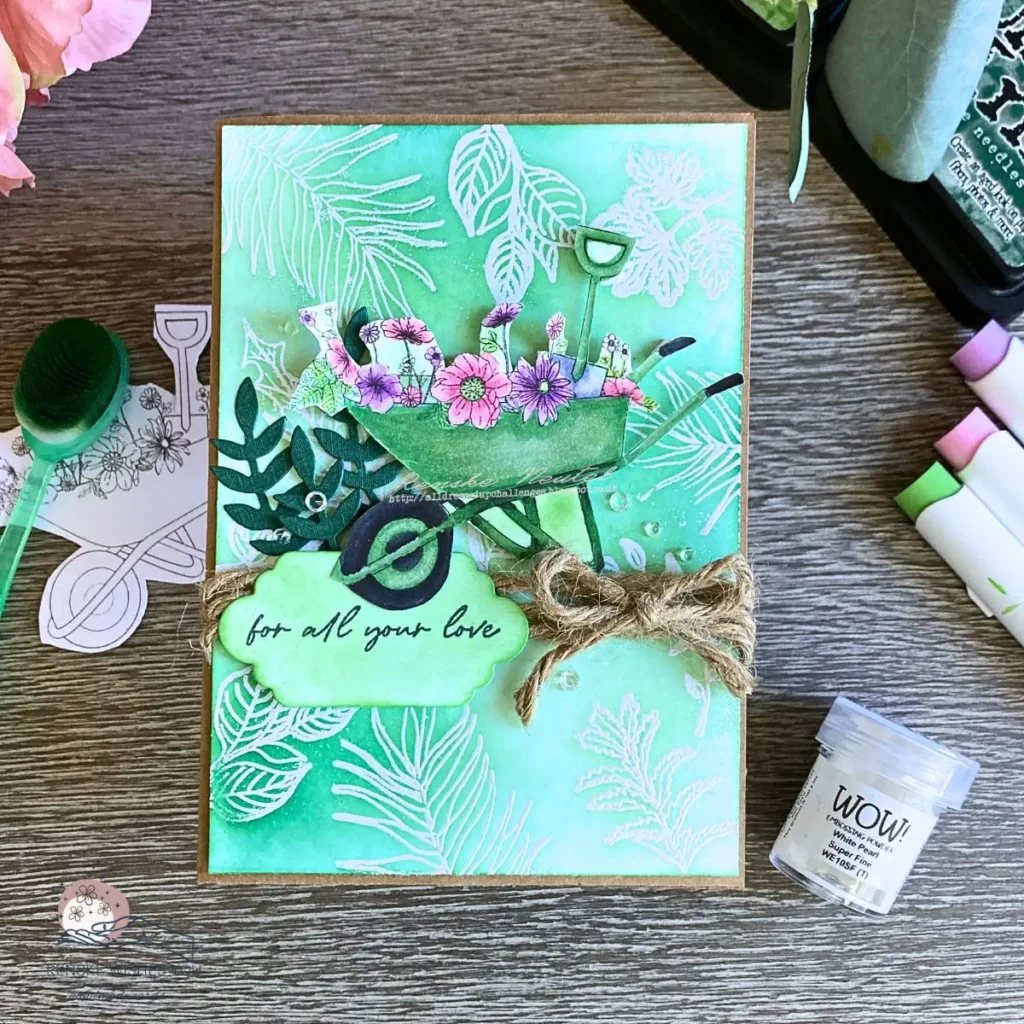
I recently spent a quiet morning in my studio, surrounded by various shades of green ink and botanical stamps. There is a specific kind of peace in creating a card that reflects the natural world. This project started as my response to the “Your Favourite Colour” challenge for the All Dressed Up Stamps team, and I decided to focus entirely on building a layered garden scene.
In this tutorial, we explore the emboss resist technique to keep our stamped leaves crisp and white against a blended background. It is an achievable way to add dimension. I will also show you how I coloured the digital wheelbarrow stamp.
I kept this design manageable for those days when you might need a gentler pace. Feel free to customise the botanical theme using whichever green inks and stamps you have in your craft stash. We can start by looking at the supplies.
What materials do you need to make a green wheelbarrow card?
You’ll need a digital wheelbarrow stamp, some botanical leaf stamps, green Distress Inks, and white embossing powder. These are the basics for creating a textured, layered botanical card. Feel free to swap in any stamps or shades of green you already have to make the project your own.
Stamps and Digital Stamps
- Digital stamp: Garden Wheelbarrow by All Dressed Up Stamps
- Leaf stamps: Bugs 2 (Carla Creaties), Alina Cuttle, and Tropical Take Me to the Ocean (Studiolight)
- Flower stamps: Say It with Flowers sets 525 and 527 (Studiolight)
- Sentiment stamp: Essentials Collection 387 “For All Your Love” (Studiolight)
Inks, Markers, and Colouring Tools
- Ohuhu Honolulu Markers (360 set) for colouring the digital stamp
- Distress Ink in Mowed Lawn and Pine Needles for the background
- Nuvo Clear Mark Embossing Pad for applying embossing powder
- WOW! White Pearl Embossing Powder for heat setting
- Memento Tuxedo Black ink for the sentiment text
Cardstock and Paper
- Kraft cardstock (21 x 14.8 cm)
- White cardstock or DCP paper (10 x 14.3 cm)
- Scraps of dark green cardstock for your die-cuts
Embellishments and Tools
- Foam tape or 3D squares
- Natural jute twine
- A few transparent rhinestones
- Leaf die cuts (Aveccreative) or hand-cut elements
- Blending brushes (Studiolight)
- Heat tool
- Sticky glue and double-sided tape
- White gel pen for details
Alternative Materials You Can Use
If you don’t have the exact supplies, swap them with these alternatives:
- Use any leaf or botanical stamps instead of the specific ones listed.
- Try Copic, Alcohol, or even quality watercolour markers instead of Ohuhu.
- Substitute Distress Ink with any blendable green ink.
- Use regular, clear embossing powder if WOW White Pearl isn’t available.
- Replace jute twine with baker’s twine, ribbon, or thin yarn.
The technique is the same no matter what supplies you use. What matters most is how the layers come together to create your own look.
How do you make a wheelbarrow card using the emboss resist technique?
Making a wheelbarrow card with the emboss resist technique requires stamping botanical motifs with clear ink, heat-setting white powder, and blending green inks over the panel.
The embossed areas act as barriers, keeping the stamped details white as the surrounding spaces take on the ink colour. This process is an achievable way to add professional depth to your handmade cards without complicated tools.
Step 1. Prepare the kraft card base and design panel layout
Start by cutting your kraft cardstock base to 21 x 14.8 cm. Fold it in half to create a standard A6 size. This neutral foundation works well with the different green tones we are using for this project.
Next, cut a piece of white DCP paper to 10 x 14.3 cm for your design panel. This leaves a small kraft border around the edges of your work. You can lightly mark your margins with a pencil.
I like to rest my printed wheelbarrow on the white panel before I begin stamping any leaves. This helps me plan a scattered background that leaves enough white space for the focal point. You can adjust the layout as you go to make the project your own
Step 2: Create the botanical resist background with white powder
I start by stamping individual leaf motifs across the white panel using a clear embossing pad. It is helpful to work on one or two leaves at a time to ensure the ink stays tacky for the powder. I prefer this steady pace as it prevents the ink from drying too quickly during the process.
I prefer to stamp my leaves one at a time. This holds the clear ink wet, so the powder sticks properly to every detail. It is a much calmer way to build up the botanical background across your cardstock.
Move your heat tool constantly to melt the powder evenly. You will notice the white surface turn into a glossy, raised texture as it sets. This is the part where the resist layer starts to take shape on the panel.
I stamp the leaves in a scattered pattern across the white cardstock. Leaving some areas bare keeps the background clean. You can add more flowers until you like the look.

Step 3. Blend green Distress Inks to build botanical depth
Use a blending brush to apply Mowed Lawn Distress Ink between the embossed leaves. A gentle dabbing motion helps build the colour slowly across the white panel. This approach ensures the ink stays soft as you find the right balance for your scene.
Then add Pine Needles Distress Ink over the lighter green in a few specific areas. Adding this darker tone toward the edges helps build natural depth in the botanical background. The two shades blend well.
The white embossed leaves remain visible through the ink blending, creating soft contrast and depth in the background.
Let the inks dry slightly between applications for sharper transitions, or keep blending while damp for softer edges. There’s no wrong choice, only your preference.

Step 4. Print and colour the digital wheelbarrow stamp
Start by resizing the digital wheelbarrow to 8.5 cm wide in a word processor before printing it onto DCP paper. This specific paper is a good choice for alcohol markers as it prevents the ink from spreading too much. If you feel unsure about the technical side, you can find my free guide on using digital stamps below to help you through every step.
Once the image is ready, I use the mid-tone, highlight and shade method to build realistic depth. I colour the entire wheelbarrow with a base layer of beige-green markers to establish the primary tone. This is a great way to turn a flat digital image into a focal point that has real presence on your botanical card.
Ohuhu Marker Colour Combinations
- Wheelbarrow: YG36 (Beige Green & Artichoke Green) and YG413 (Fern Green).
- Wheel & Handles: 120 (Black), GG16 (Dark Anchor Grey) and GG15 (Dark Neutral Grey).
- Leaves: G34 (Pale Green), YG012 (Yellow Green) and G410 (Grass Green).
- Pink Flowers: R22 (Ballet Pink), R25 (Tender Pink) and R210 (Deep Rush).
- Purple Flowers: RV34 (Faded Lilac), RV57 (Dark Lilac) and V010 (Faded Violet).
- Spade: CG01 (Cloud Grey), CG02 (Light Grey) and CG17 (Cool Grey).
Add highlights using lighter greens and soft yellows. These go on the top edges and surfaces that naturally catch the light. Adding a few small dots with a white gel pen in the flower centres also helps the design feel more finished.
Finish the colouring by adding darker greens and browns to the deepest shadows. This creates depth and defines the wheelbarrow’s shape. I then fussy-cut the image with sharp scissors, leaving a small white border.

Step 5. Add die-cut leaves and jute twine for texture
Built up the botanical scene by adding die-cut leaves and natural jute twine for extra physical depth. Cut three leaves from dark green cardstock and used small foam tape squares to lift them from the background. This creates subtle shadows that help the garden feel more natural.
Arrange these leaves around the wheelbarrow, slightly overlapping. They should look as if the wheelbarrow is partially set in foliage, not sitting on a flat background.
Wrap jute twine around the composition in a loose curve. The twine adds a tactile, garden-themed quality and helps guide the eye around the design. Secure it with a tiny dab of glue underneath so it sits naturally.
Stamp your sentiment onto white cardstock with Memento Black ink. Keep the text simple and uncluttered. Mount this sentiment label with foam tape so it has the same depth as your leaves.


Step 6. Assemble the final botanical wheelbarrow card
Attach your coloured wheelbarrow to the background panel using foam tape. The foam gives it height so it sits within the garden scene.
Position it so it overlaps slightly with some of your die-cut leaves and interacts with the background. This visual connection makes the composition feel intentional.

I use foam tape to fix the background panel onto the kraft card base. Press the edges down firmly to keep the layers flat. This neutral border frames the green design.
I like to scatter a few transparent rhinestones around the wheelbarrow. Placing them in small groups adds a soft glint to the botanical scene. You can add as many or as few as you like to complete your project.
Let everything set for a few minutes before handling. Your green wheelbarrow card is now complete.

What are the key techniques for creating a layered botanical card?
The key techniques for creating a layered botanical card are emboss resist for the background and the mid-tone, highlight, and shade method for colouring focal stamps. Using these methods together makes sure that your design has both visual interest and physical dimension. Layering die-cut elements and natural textures, such as jute twine, further improves the garden-inspired scene.
Key Techniques in This Botanical Card
These techniques work together to create the layered botanical look in this wheelbarrow card. Each one adds something different to the finished design, from contrast and depth to texture and dimension.
What is the Emboss Resist Technique in Cardmaking?
The emboss resist technique uses heat-set embossing powder to protect stamped areas from ink. Once melted, the powder creates a smooth, raised surface that resists Distress Ink during blending.
In this card, the white embossed leaves stay visible against the layered green background. This creates soft contrast and helps the botanical details stand out without adding extra colour.
Common Emboss Resist Troubleshooting
If the embossed images look patchy, the powder may not have fully covered the stamped ink. Applying the powder generously and tapping away the excess usually gives a cleaner result.
If your cardstock warps, keep the heat tool moving and avoid heating one area for too long. Letting the panel cool slightly between sections can also help.
You may also notice stray embossing powder around the design. Using an anti-static powder tool before stamping helps prevent this and keeps the background cleaner.
How Do You Use Distress Ink with Embossing Powder?
Always emboss first and let the panel cool before blending ink over the surface. The embossed areas naturally resist the ink, which keeps the stamped details crisp and visible.
For this background, I blended the mowed lawn first and added Pine Needles in selected areas for extra depth. Using light pressure with the blending brush helps create softer transitions between the greens.
How Do You Colour Floral Digi Stamps with Alcohol Markers?
Alcohol markers work well for floral digi stamps because they layer smoothly and dry quickly. I used the mid-tone, highlight, and shading method to give the wheelbarrow and flowers more shape and dimension.
Start with your mid-tone colours, then gradually add lighter highlights and darker shadows. Working in layers creates softer transitions and helps the stamped image feel less flat.
How Do You Make a Green Handmade Card Look Balanced?
Using different shades of green helps prevent the design from feeling too heavy or flat. The lighter and darker Distress Ink tones create variation, while the kraft card base adds warmth and balance.
Texture also plays an important role in the composition. The embossed background, layered leaves, twine, and raised wheelbarrow all help break up the larger green areas and keep the design interesting.
How can you personalise this botanical card design for different occasions?
You can personalise this botanical card design by changing the ink colour palette or swapping the sentiment to suit birthdays, thank-you notes, or seasonal greetings. Shifting the greens to warm oranges and browns creates a beautiful autumn card using the exact same steps. This flexible approach makes it a useful design to keep in your creative repertoire year-round.
Colour Variations for This Botanical Design
This wheelbarrow card doesn’t have to be green. The same emboss-resist and blending technique works beautifully with warm autumn tones. Try Distress Ink in Gathered Twigs and Walnut Stain for a brown, earthy wheelbarrow card. Or shift to cool tones using blue and teal inks for a different seasonal feel.
You could even create a monochromatic series, making the same card in three different colour families. Each one follows the same technique but has a completely different mood.
Occasions This Card Works For
The garden theme naturally makes this card feel like a thank-you or encouragement card. You can adapt the sentiment to say thank you, congratulations, or thinking of you. It’s an all-occasion handmade card that works whenever you want to send something with thoughtful detail.
The botanical theme also suits birthday wishes, especially for the gardeners and nature lovers in your life. Swap the sentiment, and you’ve instantly created a birthday wheelbarrow card instead.
Adding Even More Dimension
If you want extra depth, add multiple layers of foam tape to some elements to make them stand significantly taller. You could also add small stamped florals on separate pieces of cardstock, die-cut them, and layer them at different heights around the wheelbarrow.
Subtle texture stamping on the kraft base (in the same colour as the base) adds visual interest without overwhelming the design. A delicate background pattern frame makes the whole card feel more intentional.
Your questions about creating this botanical wheelbarrow card answered.
I find that most questions about this project focus on keeping the embossed leaves white or blending the green inks smoothly. These small details help create the natural depth that makes a botanical card special. I have gathered the most helpful answers here to help you get started with your own design.
How do I make my embossed background look less busy?
To stop an embossed background from looking too busy, use negative space intentionally across your white panel. Avoid filling every inch with stamped leaves and leave some white areas bare so your eye has a place to rest. This approach makes the embossed elements feel intentional.
Can I use regular stamping ink instead of embossing ink for this technique?
Regular stamping ink often dries too quickly to hold the embossing powder properly. I prefer using a dedicated clear embossing pad because the tacky surface keeps the powder in place while you work. This procedure helps you avoid a patchy look on your botanical leaves. But you can do that when you don’t have the clear embossing pad. You have to stamp it multiple times and get the powder onto the stamped image immediately.
What should I do if my cardstock warps during heat setting?
If your cardstock warps during heat setting, keep your heat tool moving constantly instead of focusing on one spot. Letting the panel cool for a few seconds between sections also helps the paper fibres settle. Using an anti-static powder tool before you start stamping prevents stray powder from sticking where it is not wanted.
Let’s Get Creative Together
I would love to see how you adapt this garden scene using the stamps and inks you already have in your craft stash. You can change the green tones or the sentiment to make the project your own. This tutorial is meant as a guide that you can adjust to suit your own technique and timing.
Please tag me on Instagram if you share your finished wheelbarrow card. I find it very helpful to see the different ways these botanical techniques can be used.
Join the “Your Favourite Colour” Challenge
If you’ve made this card for the All Dressed Up Stamps design team challenge, share your version with us. The challenge celebrates how one colour can be interpreted in infinite ways. Your unique approach adds to that conversation.
More Botanical Card Inspiration
I have shared a few teacher tutorials below that apply similar stamps and ink techniques. These tutorials offer more ways to build garden scenes on your cardstock.
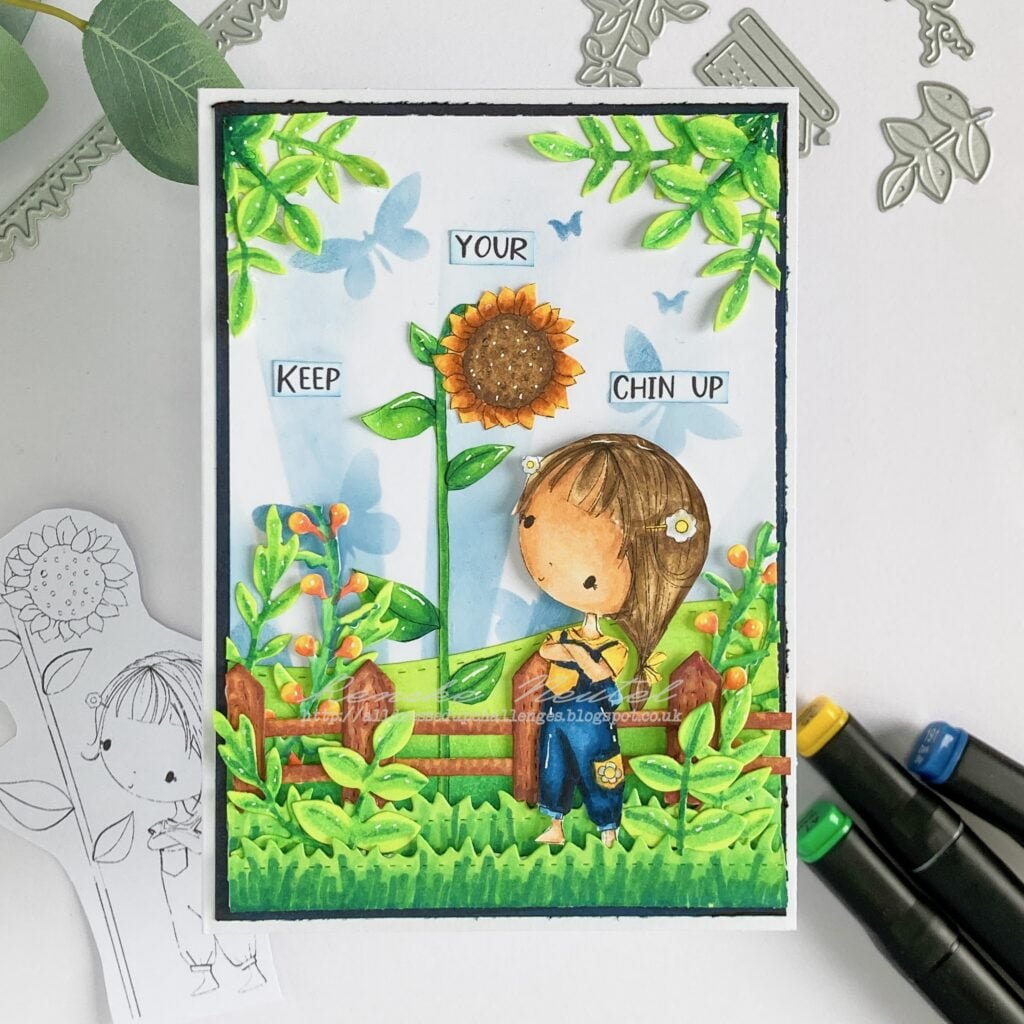
Inspirational Handmade Sunflower Card Tutorial: Crafting a Beautiful Scene
This sunflower tutorial is helpful if you enjoy garden scenes and botanical stamps. It offers more ways to build a natural layout for your projects.
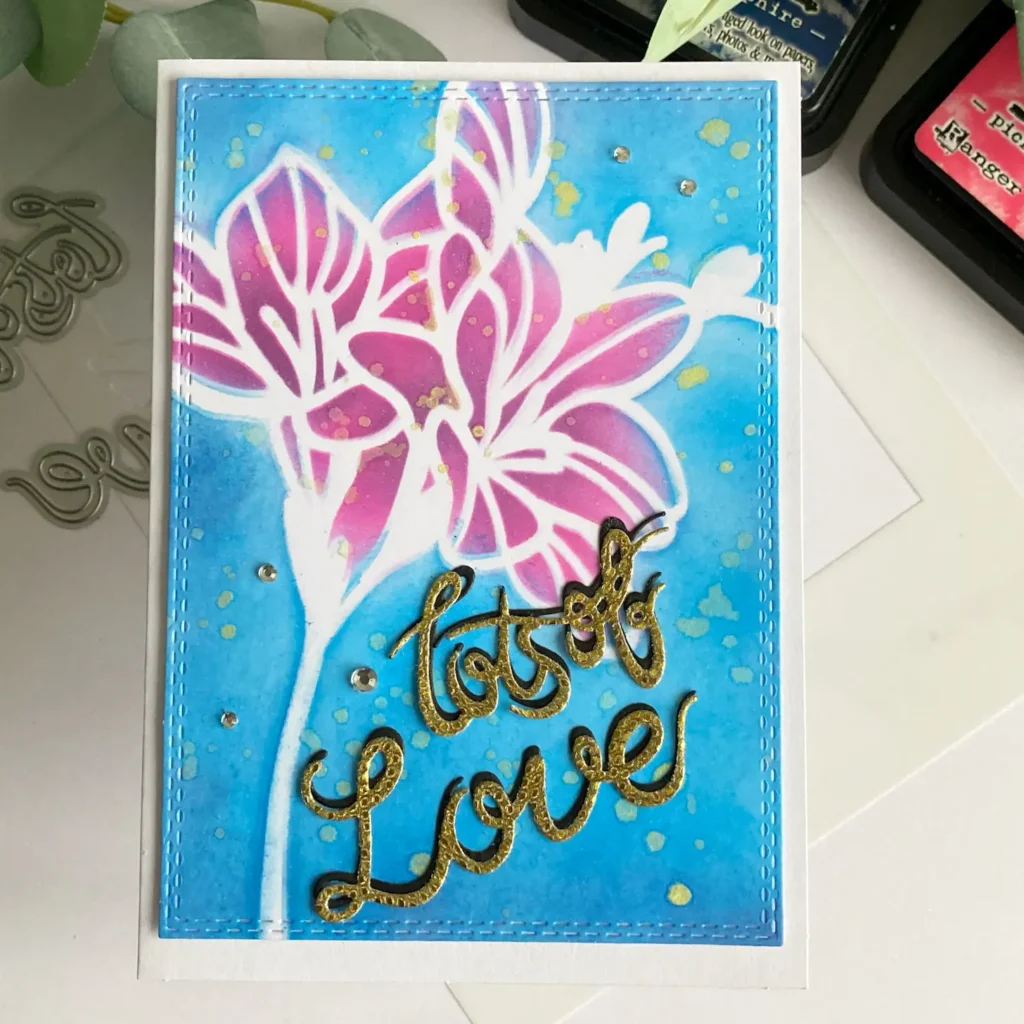
Create an Irresistible Handmade Spring Flower Card with Ink Blending
I share another way to blend with inks for floral cards in this spring tutorial. It matches the ink techniques used for our wheelbarrow card.
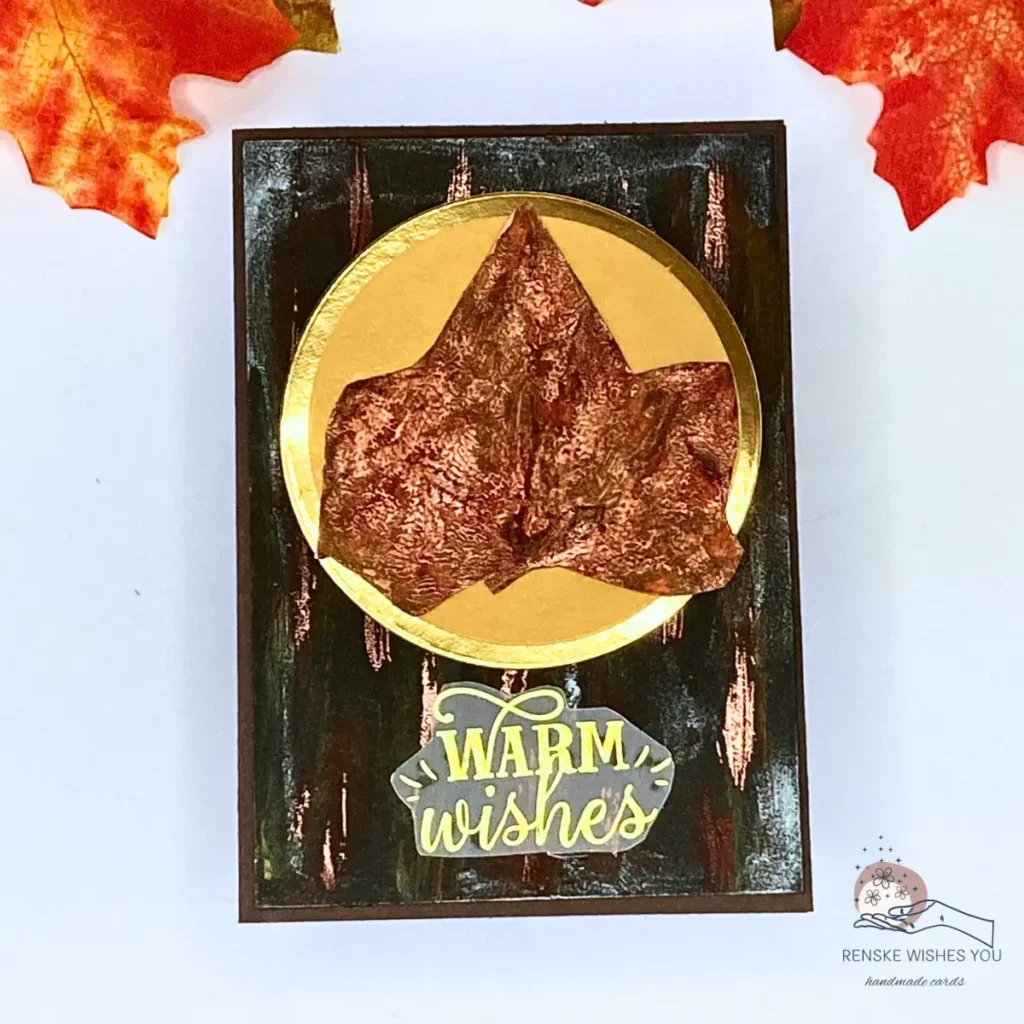
Step-by-Step Real Leaf Stamping Card with Chic Autumn Background
This autumn project uses real leaves to create unique textures on cardstock. It is an achievable experiment for crafters who love nature-inspired designs.
Create a Beautiful Mixed Media Flower Birthday Card with Easy Techniques
You can build on your colouring and layering skills with this mixed media birthday card. It is a beautiful way to adapt floral designs for special occasions.
Happy making, and enjoy capturing nature in your cards.
Where can I buy the supplies for this botanical wheelbarrow card?
You can purchase the stamps and materials for this project using the links below. The Amazon links automatically redirect you to the shop in your own country. This approach helps you find the correct Ohuhu markers or DCP paper for your card.
I have included specific links to Hobbyshoponline for my Dutch readers. Clicking a link is costs you nothing extra but supports the free tutorials on this blog.
Garden Wheel Barrow digital stamp

Distress Ink Mowed Lawn

For my Dutch Readers you can also find this at Hobbyshoponline.
Distress Ink Pine Needles

For my Dutch Readers you can also find this at Hobbyshoponline
WOW Embossing Powder White Pearl super Fine

For my Dutch Readers you can also find this at Hobbyshoponline.
Blending brushes StudiolightNL

For my Dutch Readers you can also find this at Hobbyshoponline.
Memento Tuxedo Black ink

For my Dutch Readers you can also find this at Hobbyshoponline.
White gelly Roll Pen 08

For my Dutch Readers you can also find this at Hobbyshoponline.
I would like to enter my card in the following challenges
- Word Art Wednesday: Anything goes
- Krafty Chicks Challenge: Anything goes + Colouring a image
- Crafty Catz: Anything goes
- Lil Patch of Crafty Friends Challenge ...: Anything goes
- A Perfect Time To Craft Open Challenge: Anything goes
- Crafts Galore Encore Challenge Blog: Anything goes
- Crafter’s Cafe: Anything goes + no squares
Spectacular card! Love that you used the COLOUR AN IMAGE twist. Such a pleasure having you join the Anything Goes challenge with Krafty Chicks this week.
Diane – DT KCC
a perfect background for your wheelbarrow, thank you for sharing on Craft Catz challenge, Tilly