

Some links in this post are affiliate links. This means I may earn a small commission if you make a purchase, at no extra cost to you. I only recommend products I use and genuinely enjoy in my own cardmaking. Read more here.
About a year ago, I got the Studio Light Nature Lover Flower Bouquet set, but I had not used it until now. With spring arriving, it felt like the perfect moment to try a fresh colour palette for a new spring card with flowers. This project is a wonderful way to celebrate the changing seasons.
This card was made for the Rediscovery Hop on Instagram. Each month, crafters pick supplies they have owned for at least six months or stamps they have never used and try something new with them. It is a gentle challenge that helps you see your stash with fresh eyes. You might even find something you forgot you had.
In this tutorial, I will show you how to create a soft mixed-media background using the smooshing technique, colour your stamped flowers with Ohuhu alcohol markers, and assemble a layered card with depth and contrast. The steps are easy and work well for both beginners and more experienced makers.
The card came together soft and fresh, which was exactly the look I had in mind. The mixed-media background, hand-coloured flowers, and simple sentiment give it a light spring feel.
Have a look at your own stash before you start. You might already have the perfect stamps waiting for you.
What You Need for This Spring card
Here is a list of everything I used for this project. You can use alternatives from your own stash to adapt this spring card with flowers to your style.
Paper
- Watercolour paper cut to 10 x 14.3 cm for the background or any heavyweight paper suitable for ink and water
- DCP paper or smooth white cardstock
- Dark pink cardstock for the card base and sentiment mat or any coloured cardstock you like
- White paper for the inside of the card or any light-coloured paper you have
Stamps
- Studio Light Nature Lover Flower Bouquet (SL-NL-STAMP592), clear stamps or any flower stamps in a similar size
- Studio Light sentiment stamp “Live life in full bloom” or any sentiment stamp you like, or hand-lettered sentiment
Ink
- Memento Tuxedo Black for stamping
or any fast-drying black ink suitable for alcohol markers - Distress Ink in Salty Ocean, Picked Raspberry, Mustard Seed for the background
or any water-reactive dye inks you have, for example Versafine or other craft inks
Colouring
- Ohuhu alcohol markers in pink, purple, green, and gold (see Step 3 for colour codes)
or water-based brush pens, coloured pencils, or any alcohol markers you already have
Other Materials
- White gel pen for highlightsor any gel pen or white paint pen
- Foam tape for raising the bouquet or any double-sided foam or dimensional tape
- Tape runner or liquid glue or any adhesive you prefer
- Acrylic paint spray for subtle texture on the background or ink spray or watered-down acrylic paint
- Baby wipe or damp cloth
- Water and spray bottle or any fine mist spray bottle
- Kitchen paper or any paper towel for lifting colour
Tools
- Glass mat or the back of a smooth tile, non-stick craft sheet, or any flat non-absorbent surface
- Stamp positioneror any stamping platform
- Scissorsor craft knife
- Heat tool for drying (optional)or let paper air dry
Card Dimensions
- Card base 10.5 x 14.8 cm
- Background panel 10 x 14.3 cm
- White inner panel 10 x 14.3 cm
How to Make a Spring Card with Flowers
In this tutorial, you’ll turn a blank sheet of watercolour paper into a soft spring card with flowers and layered depth. Follow the steps in order and take your time. A slow, layered approach works best for the background and colouring.
Step 1. Create the Watercolour Background with ink smooshing
The watercolour background sets the colour mood for the whole spring card with flowers. I recommend using the ink smooshing technique for a soft and airy look.
What you need for this step
- Watercolour paper, cut to 10 x 14.3 cm
- Glass mat, non-stick craft sheet, or the back of a smooth tile
- Distress Ink: Salty Ocean, Picked Raspberry, and Mustard Seed
- Water and spray bottle
- Kitchen paper
- Heat tool (optional)
- Acrylic paint spray
- Baby wipe
Creating the watercolour background with the ink smooshing technique
The background sets the mood for your card. Aim for something soft and light, with gentle colour transitions. This will create a soft spring feel, as the ink spreads slowly and the colours blend on their own.
Start by pressing the distress ink pads onto your glass mat. Keep Salty Ocean, Picked Raspberry, and Mustard Seed in small areas, not covering the whole mat. Spritz lightly with water, you want colour, not puddles.

Press your watercolour paper onto the ink in small sections. Start with one colour, then move to the next, letting them overlap slightly for a soft blend. Keep alternating between the pink, yellow, and blue areas until the whole panel is covered.
Dry with a heat tool or leave it to air dry. Repeat it for a second or third layer if you want depth. After each layer, check the background; you want it light and airy, with some white still showing. When it looks right to you, it’s ready.
Troubleshooting tips
If the watercolour background turns out too dark or patchy, you can gently lift excess colour with kitchen paper while it is still damp. Adding a soft wash of water or a touch of white acrylic paint or ink spray can brighten and even out the background. Remember, experimenting is part of the fun, and most backgrounds can be improved with a few extra steps.
Add Acrylic spray
Once the last layer is dry, add a little acrylic spray in matching colours. Hold the can a bit further back so the paint forms fine spatters instead of a solid spray. Work in small areas, then soften immediately with a baby wipe.
This gives the background a gentle texture without covering up the soft colours.
When the background is dry, you can move on to the flowers.
Tip for beginners
Start light with this ink smooshing technique. You can always add more layers, but you can’t remove ink. Stop a little earlier than you think and take a step back to check the result.
If the colours start to look muddy, you may have added too many layers before the paper dried. Let each layer dry completely. Keep colours in the same family, warm tones together and cool tones together, to prevent them from turning brown or grey.

Step 2. Stamp the Flower Bouquet
A clean, sharp stamp impression makes everything that follows much easier. Take your time here and let the ink dry fully before you move on.
What you need for this step
- Studio Light Nature Lover, Flower Bouquet (SL-NL-STAMP592)
- Studio Light sentiment stamp, “Live life in full bloom”
- Memento Tuxedo Black ink
- DCP paper or smooth white cardstock
- Stamp positioner
Stamp the flower bouquet and any individual flowers from the Studio Light Nature Lover set onto DCP paper using Memento Tuxedo Black ink. Use a stamp positioner for clean, sharp lines, and allow the ink to dry fully before you start colouring.
Stamping on DCP paper rather than watercolour paper gives you a smoother surface for the alcohol markers.
Stamp the “Live life in full bloom” sentiment onto a separate piece of white paper, also with Memento Tuxedo Black. Set this aside to dry while you work on the flowers.
Once the bouquet and sentiment are dry, your images are ready to colour.
Tip
Stamping on DCP paper gives you a smooth surface that is ideal for blending alcohol markers later. Apply Memento Tuxedo Black ink to your stamp and press it firmly and evenly onto the paper. Avoid rocking the stamp from side to side. Lift the stamp straight up in one clean motion.
This dye-based ink dries quickly on DCP paper and will not smudge when you colour over it with alcohol markers, but give it a full minute before you touch the stamped area to be sure. If your stamp impression is too light, let it dry completely and stamp in the same position.
A crisp black outline makes the colouring stage much easier.
Step 3. Stamp the Sentiment
The sentiment is stamped separately, so it remains clean and readable against the soft background.
What you need for this step
- Studio Light sentiment stamp “Live life in full bloom”
- Memento Tuxedo Black ink
- White paper
- Stamp positioner
Stamp the sentiment onto a piece of white paper using Memento Tuxedo Black ink. Use a stamp positioner to make sure the impression is crisp and even.
Press the stamp down firmly without moving it, then lift it straight up. Allow the ink to dry completely before handling the paper or moving to the next step.
Set the sentiment aside for now. You will trim and mat it later when you assemble the card.
Tip
If the stamped image is a little light, stamp again in the same position for a stronger result. A clean, dark sentiment will stand out better once placed on the background.
Step 4. Colour the Flowers with Ohuhu Markers
This is where the flowers really come to life. The colouring gives the flowers their depth and softness, and the layered approach adds depth and warmth, helping the bouquet stand out.
What you need for this step
- Ohuhu alcohol markers (colour codes listed below) or any colouring medium you like.
Colour reference
Pink flowers
- RV04 Light Orchid
- RV08 Pastel Pink
- R014 Deep Vermillion
- R212 Mulberry
Purple flowers
- V14 Pale Purple
- V18 Bright Lavender
- V112 Vivid Violet
Leaves
- G410 Grass Green
- G312 Emerald Green
Ribbon
- Y26 Light Gold
- Y410 Goldenrod
- Y216 Caramel
How to colour the spring flowers
Colouring stamped flowers with alcohol markers is about building up gradually. I used my ohuhu markers, but you can use any colouring medium you like.
Building up the colour in layers is a calming and restful process. You can put your markers down and return to the project whenever your energy allows. This mindful approach helps you enjoy the creative moment at your own pace.
Always start with the lightest shade and work from light to dark. This gives you control over where the shadows fall and keeps the colours from becoming muddy.
For the pink flowers, start with Light Orchid RV04 across the whole petal, then add Pastel Pink RV08 for the mid-tones. Use Deep Vermillion R014 to build shadow in the flower centre, and finish with Mulberry R212 for the deepest shadows.
For the purple flowers, begin with Pale Purple V14, layer Bright Lavender V18 in the middle, and deepen with Vivid Violet V112 to create shadows. Colour the leaves with Grass Green G410 as your base, then add Emerald Green G312 at the edges where leaves overlap.
For the ribbon, start with Light Gold Y26 as your base, add Goldenrod Y410 for the mid tone, and use Caramel Y216 in the deepest shadow areas.
Focus on the darker shades in the flower centres and anywhere one element overlaps another. This is where depth really builds and what makes the bouquet feel three-dimensional. For a full guide on colouring stamped images with alcohol markers, see [link: colouring stamped images with alcohol markers].
When the colouring is dry, you are ready to add the finishing details in the next step.
Tip
Any brand of alcohol markers will work here. Match the colours by feel rather than by number. A soft pink, a medium pink, and a deep rose are all you need for the pink flowers.
The same approach works for the purple flowers, leaves, and ribbon.


Step 5. Add Highlights and Fussy Cut the Flowers
Small details make a big difference. The white gel pen highlights and the narrow white border from fussy cutting are what give the flowers their fresh, finished look.
What you need for this step
- White gel pen
- Scissors
Adding Highlights
Once the colouring is dry, add small highlights with a white gel pen. Add short strokes along the outer edges of the petals, a few small strokes radiating from the flower centres, and a couple of accents on the leaves. Keep the highlights light and subtle, as they help lift the image without overpowering it.
Fussy cut the flowers
Cut out the flowers carefully with scissors, leaving a narrow white border all the way around each stamped element. This white border is important because it helps the flowers read as separate from the background when they are placed on the card. Take your time with this step, especially around the smaller details.

With the flowers cut out and ready, you can now prepare the sentiment before bringing everything together.
Step 6. Prepare the Sentiment
You prepare the sentiment at this stage so it fits perfectly with the rest of your card design.
What you need for this step
- Stamped sentiment from Step 3
- Dark pink cardstock
- Scissors
- Tape runner or liquid glue
Cut out the sentiment with a narrow white border around the text. This keeps it light and easy to read against the background.
Matting the sentiment onto dark pink cardstock creates a frame that pulls the words forward. This helps the text remain clear and readable against the busy flower bouquet. It is a small step that makes a big difference to the final look of your card.
Using the same dark pink for the mat and the card base creates a sense of harmony. This ties all the different elements together into one cohesive project. It gives the design a professional finish that feels balanced and intentional.
Tip
Keep the border narrow. A small frame is enough to make the sentiment stand out while keeping the overall design light.

Step 7. Compose and Assemble the Card
This is where everything comes together. Take your time arranging the elements before you glue anything down, and enjoy watching the design come together.
What you need for this step
- All completed elements from Steps 1 to 5
- Foam tape
- Tape runner or liquid glue
- Bone folder
- Dark pink cardstock for the card base, 10.5 x 14.8 cm
- White paper for the inside, 10 x 14.3 cm
Composition
Before you attach anything, lay all the elements loosely on the watercolour background and move them around until the composition feels balanced. Aim for a soft diagonal line with the flowers, which gives the arrangement a natural, flowing look. Place the sentiment above the flowers in the open space at the top.
Once you are happy, take a photo of the layout so you can refer back to it. Then start attaching. Use foam tape to raise the main flower bouquet off the background, which adds depth and a layered effect.
Attach the individual loose flowers flat with a tape runner or glue. Attach the sentiment last.
Troubleshooting
If your background panel shifts when you press it onto the card base, use a bone folder to smooth it down from the centre outwards. If the foam tape shows from the side, trim a little off each piece so it sits inside the edge of the fussy-cut image. If the sentiment does not sit straight, peel it back and reposition before the adhesive sets fully.
Assembly
Cut the card base from dark pink cardstock to 10.5 x 14.8 cm. Cut a white inner panel to 10 x 14.3 cm and attach it to the inside of the card.
Finally, attach the completed background panel to the front of the card base. Check that everything is straight and well-adhered, your handmade spring card with flowers is finished and ready to send.

Tips and Alternatives
If you don’t have a glass mat, the back of a smooth ceramic tile or a non-stick craft sheet works as well. The key is a flat, non-absorbent surface that lets the ink spread gently before you press the paper into it.
You can skip the acrylic spray entirely and still get a beautiful background. The glass mat layers alone give a soft, watercolour look that works well for spring cards. The spray adds an extra layer of texture.
For a different colour palette, try soft peach instead of Picked Raspberry and a muted sage green instead of Mustard Seed. This keeps the fresh spring feeling but adds a warmer touch. You could also experiment with lilac and soft yellow or coral and mint for other spring-inspired combinations.
DCP paper can be replaced with any smooth white cardstock you already have. The smoother the surface, the better the alcohol markers will blend, so avoid textured or fibrous papers for the stamped elements.
Frequently Asked Questions
What can I use if I do not have a glass mat?
A non-stick craft sheet or the back of a smooth ceramic tile works perfectly for the ink smooshing technique. Any non-porous surface that does not absorb the ink will allow you to mix it with water and press the paper into it.
Which inks work best on watercolour paper?
Water-reactive dye inks such as Distress Inks are the best choice for these backgrounds. They react beautifully with water, and allow you to build soft layers of colour without the background becoming too dark or muddy.
How do I stop my background colours from becoming muddy?
Let each layer dry completely before adding the next colour. Working in the order of light blue, yellow, and then a touch of pink also helps to keep the spring palette fresh and bright.
Let’s Get Creative Together
I would love to see what you make with this technique. Have a look at your own stash and see which flower stamps you have not used in a while. You might be surprised by what you find.
Share your spring card in the comments below or tag me on Instagram at @Renske.Wishes.You.
find the other crafters on the hop too
The Rediscovery Hop is a monthly Instagram event for cardmakers who want to dust off supplies they have not used in a while. The theme changes each month, and cards are shared using the hop hashtag. It is a relaxed and creative community event. There are no rules beyond using something from your own stash.
Follow the hop on Instagram to find the current theme and hashtag, and share your card when it is ready. The community is warm and encouraging, and it is a lovely way to get inspired by what other crafters are making.
Related Posts
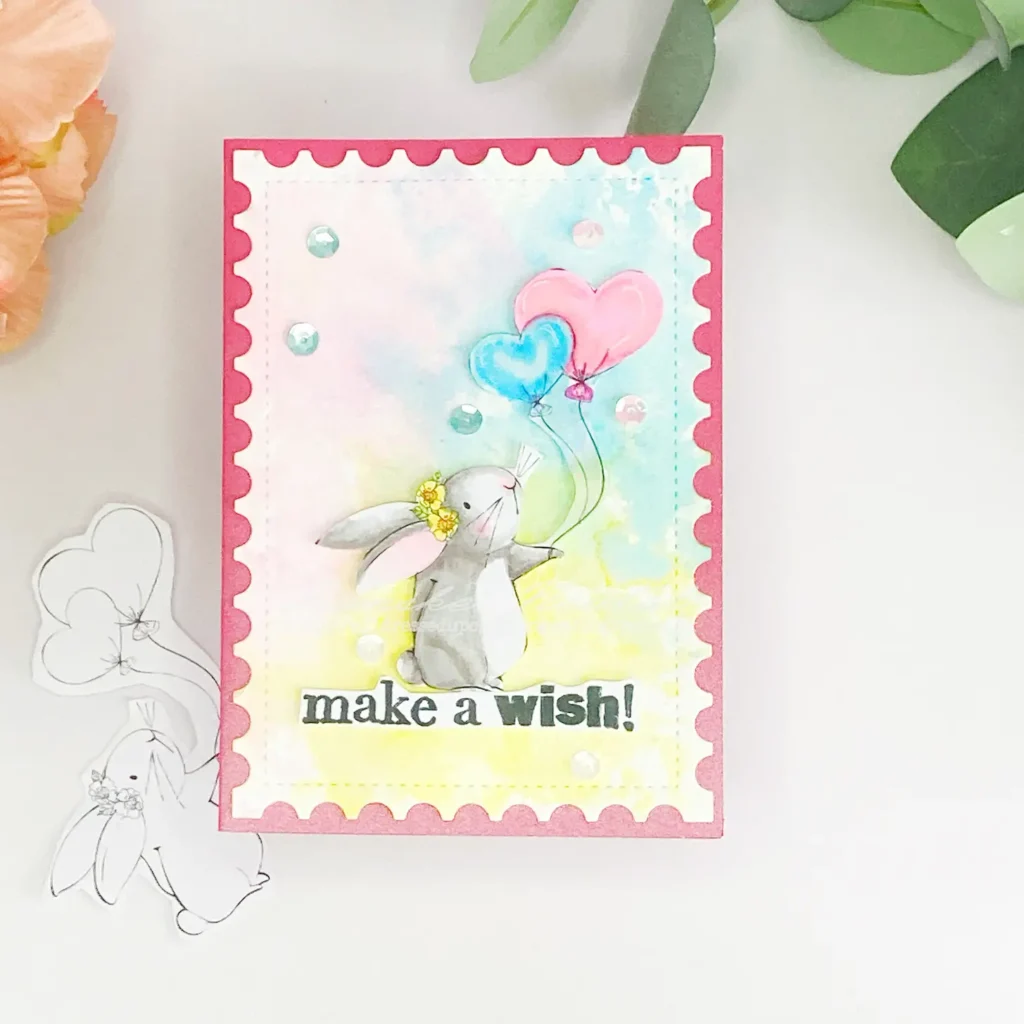
Handmade Bunny Card – Easy Ink Smooshing Background
Another card with the ink smooshing technique. Fro more ideas
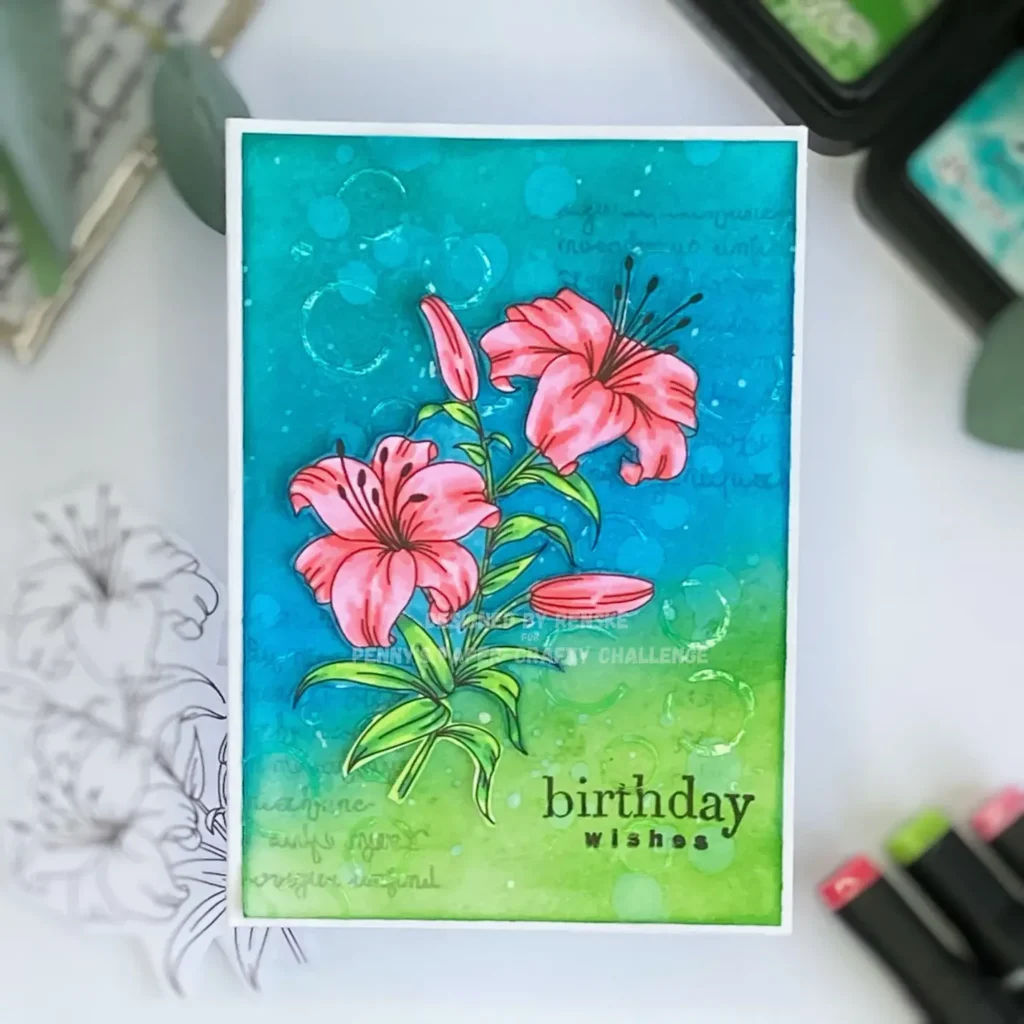
Create a Beautiful Mixed Media Flower Birthday Card with Easy Techniques
Another flower card with a mixed media background perfect for spring.
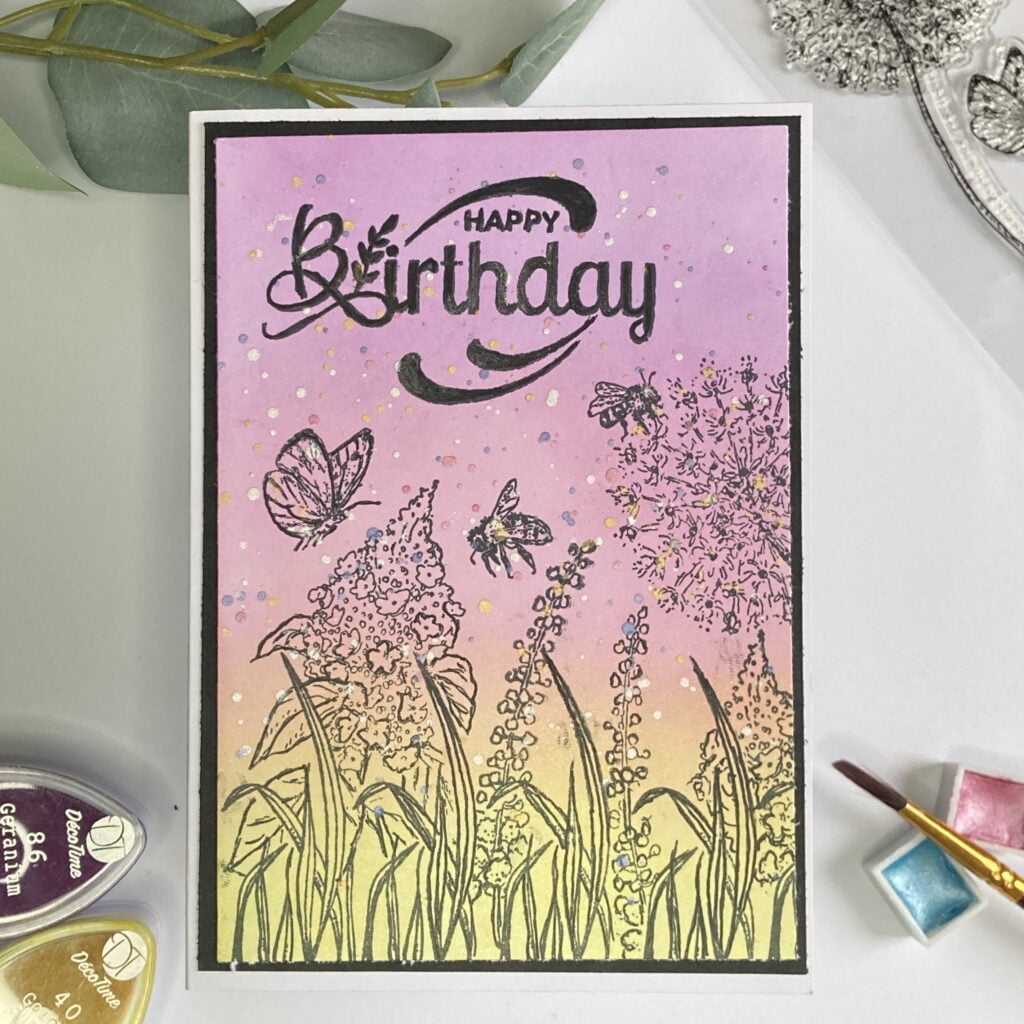
Spring Flower Card: Mixed Media Birthday Celebration
Another spring flower card with different mixed media techniques.
Products Used For This Spring Card
Some of the links below are affiliate links. If you choose to purchase through them, I may earn a small commission at no extra cost to you. This helps me keep sharing tutorials and inspiration.
Products with affiliate links
Distress Ink Salty Ocean

Distress Ink picked Raspberry

Distress Ink Mustard Seed

Memento Tuxedo Black Ink

White gelpen

Glass mat from tonic studios

Products without affiliate links
Studio Light Nature Lover, Flower Bouquet (SL-NL-STAMP592)

I would like to enter my card in the following challenges
- Word Art Wednesday: Anything goes
- CREATIVE INSPIRATIONS: Easter/ Spring
- Crafty Catz: Anything goes
- Allsorts challenge blog: Springtime or Anything goes
- Lil Patch of Crafty Friends Challenge ...: Anything goes
- 613 Avenue Create: Anything goes
- A Perfect Time To Craft Open Challenge: Anything goes
A lovely and colourful card.
We’re always thrilled to see each entry arrive in our mailbox at 613 Avenue Create.
We do hope you’ll return!
Wishing you the very best of luck with your entry.
Warm Wishes, Jackie,
DT member at 613
Thank You
What a lovely card. I’m so grateful to have you share your talents with us and I really appreciate you taking the time to play along with us at Word Art Wednesday. Thanks so much, and have a blessed week. I look forward to seeing more of your wonderful art.
Thank you so much.
So beautifully done with all the gorgeous flowers and a great design. Thanks so much for sharing at Allsorts challenge!
Thanks a lot
Renske, this is such a beautiful and vibrant card! I absolutely love all of the colors in those flowers. Thanks so much for playing along with us at Word Art Wednesday. We appreciate your participation!
Thank you so much. Glad you like it.
Stunning card, beautiful image and background. Glad you shared with us at Allsorts challenge!
Thank you.