
Some links in this post are affiliate links. This means I may earn a small commission if you make a purchase, at no extra cost to you. I only recommend products I use and genuinely enjoy in my own cardmaking. Read more here.
Looking for a simple and fun technique for your next handmade bunny card? Ink smooshing can give you a soft, blended colour without the need for precise blending, creating an organic, watercolour-like effect. If you enjoy working with inks but prefer to keep things a bit more relaxed, this technique might be just what you’re looking for.
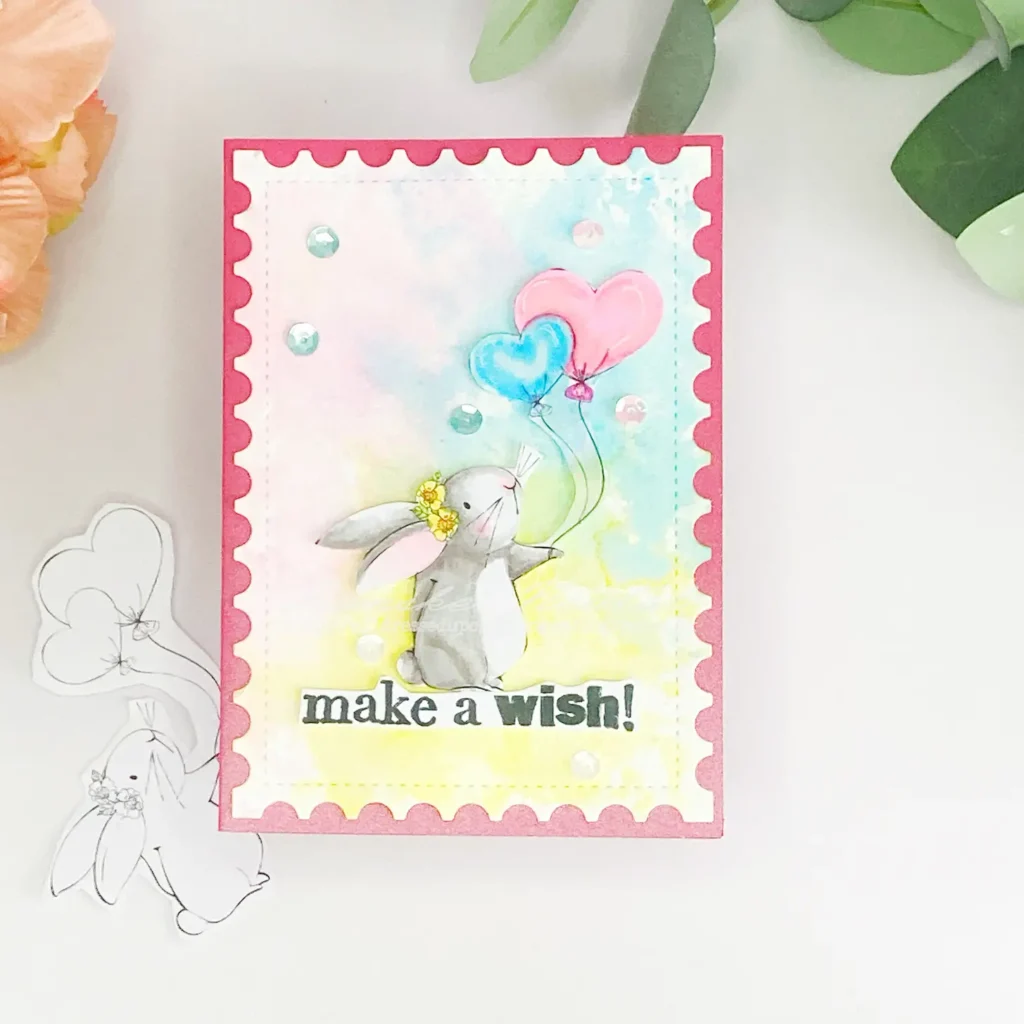
This card features the Bunny Heart stamp from All Dressed Up Stamps. I’ll walk you through how to create a soft background with the ink smooshing technique and add life to this cute bunny.
You’ll get to explore how to create a watercolour effect with inks, layer colours, and make your focal image stand out. Whether you’re just starting or have some experience, this technique is a fun way to play with your inks.
Curious to give it a try?
- New Release from All Dressed Up Stamps – Check Out These Cute Digital stamps
- Materials and Alternatives
- Step-by-Step Tutorial – Create Your Handmade Bunny Card
- Let’s Get Creative Together
- Products used for this handmade bunny card
- I would like to enter my card in the following challenges
New Release from All Dressed Up Stamps – Check Out These Cute Digital stamps
Every month, All Dressed Up Stamps releases new digital stamps, and this time, Wendy got three really sweet designs. If you enjoy making cute and whimsical cards, you might want to check these out.


In this tutorial, we’ll be using the Bunny Heart digital stamp to create a bunny card with a soft, textured background using the ink smooshing technique
If you like the other designs, feel free to use the same technique and create something special with them.
Which stamp from this release catches your eye? Let me know in the comments below, I’d love to hear which one you’re planning to use next.

Having trouble editing or colouring digital stamps? Download my free guide for extra tips and tricks to help you perfect your digital stamps!
Materials and Alternatives
Here’s what you need to recreate this handmade bunny card. I’ve also included some alternatives so you can work with what you have.
Stamp and Colouring Supplies
- Bunny Heart Digital Stamp—All Dressed Up Stamps | This is the main image for the card. An alternative is any digital or clear stamp with a cute character.
- Alcohol Markers – Decotimecrafts | Used to colour the bunny and balloons. You can swap these for coloured pencils or watercolour markers if preferred.
- White Gel Pen | Adds highlights to the balloons and bunny. A white paint marker or fine brush with acrylic paint works too.
- Paper Glaze: This gives extra shine to the balloons.
Ink Smooshing Background
- Distress Ink (Salty Ocean, Picked Raspberry, Mustard Seed) | Reacts with water to create the ink-smooshing effect. Any water-reactive ink is a good alternative.
- Glass Mat – Tim Holtz | Used for applying and mixing ink. A craft mat, plastic sheet, or even a ceramic tile can work instead.
- Plastic for Ink Smooshing | Helps transfer ink to the paper. A plastic sleeve, acetate, or even leftover packaging does the trick.
- Aquarel Paper | Ideal for ink-smooshing, as it absorbs water well. If you don’t have watercolour paper, try heavy mixed media or smooth cardstock.
- Postage Stamp Die – Aveccreative | Gives the background panel a decorative edge. If you don’t have this, use any die shape or trim the panel with scissors.
Card Assembly
- Pink Card Base | The foundation of the card. Choose any colour that complements your design.
- Make a Wish Clear Stamp Set | Stamps the sentiment. If you don’t have this exact set, handwrite the message or print one out.
- Memento Tuxedo Black Ink | A crisp, alcohol-marker-friendly ink. VersaFine or StazOn are great alternatives.
- Embellishments – Alina Cuttle | Adds extra detail. Use enamel dots, sequins, or Nuvo Drops instead.
Now you have everything you need to make this bunny card—or adapt it to your own style!
Step-by-Step Tutorial – Create Your Handmade Bunny Card
Ready to create your handmade bunny card?
I’ll walk you through each step and show you how to use the ink smooshing technique. “It’s a simple and fun way to add a unique touch to your handmade bunny card. Let’s get started!
Step 1 – Printing and Colouring the Bunny Heart Digital Stamp
Let’s start by printing and colouring that cute bunny stamp.
Printing the Bunny Heart Digital Stamp
I downloaded the Bunny Heart stamp from All Dressed Up Stamps and inserted it into a Word document.
I set the height to 9 cm, and the width adjusted automatically. Once that’s ready, print the image onto DCP paper, it’s great for alcohol markers.
If you’re using something else, just make sure to choose a paper that works with your chosen medium.
Colouring the Bunny
Now, it’s time for the fun part: colouring your bunny! I used alcohol markers, but feel free to use whatever you’re comfortable with. Here are the colours I used:
- Bunny: Warm Grey 5 (WG5), Warm Grey 4 (WG4), Warm Grey 2 (WG2), and Colourless Blender (0)
- Bunny’s ears: Medium Pink (137), and Blush (136)
- Blushes: Blush (136)
- Blue balloon: Mint Blue (143), Baby Boy (144), and Phthalo Blue (183)
- Pink balloon: Pastel Pink (17), Pale Pink (09), Rose Pink (08), and Peony Purple (282)
- Flowers: Lemon Yellow (35), Yellow (34)
- Leaves: Yellow Green (48)
Adding Details
Once you’ve finished colouring, grab a white gel pen to add some highlights to the balloons. For an extra touch, apply some Paper Glaze to the balloons to give them a shiny finish. Let it dry properly before moving on.
Cutting Out the Image
Once everything’s dry, carefully cut around the image with scissors.

Now, your Bunny Heart image is ready to be added to your card!
Step 2 – Creating the Background with the Ink Smooshing Technique
Let’s create a vibrant background for your handmade bunny card with the ink smooshing technique. It’s a quick and easy way to add texture and colour.
Preparing the Background
I’m using Aquarel paper for the background and die-cutting it with a postage stamp die for a nice edge. But feel free to use any die shape, or just leave it square or rectangular.
Applying the Ink with the ink smooshing technique
For the ink smooshing technique, I’m using Distress Inks, but any ink that reacts with water works. I’ve gone for Picked Raspberry, Mustard Seed, and Salty Ocean for a bright, fun effect. Here’s how to apply the ink:
- Place the ink pads on a glass mat, pressing each pad to release a good amount of ink onto the surface.
- Add a bit of water to each ink spot to make it more reactive. Add a little water to each ink spot to make it more reactive.
- Take a piece of plastic—I’m using a plastic sleeve from card storage, but you can also use acetate or any smooth plastic. Press it onto the ink, then gently press the plastic onto your watercolour paper, starting with the yellow at the bottom.
- Work your way up, pressing the plastic into the ink for each colour—start with yellow, followed by blue, and finally pink.
Layering the Colours
If you’re not quite satisfied with the colour intensity, feel free to go over it again with the plastic. This technique is all about building layers and blending colours together. Don’t worry if it’s not perfect. The more layers you add, the more depth and interest you’ll get.
Let the background dry
Once you’re happy with the colours, let the panel dry completely before moving on. You can use a heat tool to speed things up, but let it cool before touching it.
Step 3 – Assembling the Card
Now that the background’s done, it’s time to put the handmade bunny card together. This part’s quick and simple, and soon enough, you’ll have a cute birthday card ready to share with someone special.
Creating the Card Base
Begin with a dark pink card base measuring 10.5 cm by 14.8 cm. Then, attach your inked background panel to it.
Stamping and Adding the Sentiment
Next, stamp ‘Make a Wish’ on white paper using Tuxedo Black ink. Trim it and attach it to the bottom of the background panel with foam tape for some added dimension.
Adding the Bunny and Embellishments
Now it’s time to add the bunny! Attach the bunny holding balloons above the sentiment with foam tape. This adds some height and creates a focal point against the background.
Let’s make the card even more fun with some embellishments. Place two pink ones in the blue area, three blue ones in the pink section, and two white ones in the yellow part. This adds balance and enhances the overall look.
Finishing Touches
To finish it off, apply glossy accents to the balloons or use a gel pen to highlight parts of the bunny or sentiment. This adds shine and dimension to your design.

That’s it, your card’s ready! You’ve made a cute birthday card featuring a bunny, perfect for any occasion., you’ll have a cute birthday card ready to share with someone special.
Let’s Get Creative Together
I hope you enjoyed making this cute handmade bunny card as much as I did! Crafting is a great way to express your creativity and unwind.
Whether you’re creating a DIY birthday card for someone special or simply enjoying the process, your design will definitely bring a smile to whoever receives it.
And remember, there’s no right or wrong way to do it—feel free to experiment with colours or add your personal touch to make it uniquely yours.
More related Blogposts
Did you enjoy the ink smooshing technique or love working with cute bunny designs? You’re in the right place.
Below, you’ll find more card ideas that combine both the ink smooshing technique and adorable bunny themes. Whether you want to explore ink smooshing further or create more bunny cards, there’s plenty of inspiration waiting for you.
Products used for this handmade bunny card
Affiliate disclosure: This post contains affiliate links. If you purchase through these links, I may earn a small commission at no extra cost to you. I only recommend products I use and love. Your support helps me continue creating free tutorials and card-making inspiration. Thank you!
Products with affiliate links
Bunny Heart Digital stamp from All Dressed up Stamps

Salty Ocean Distress Ink from Ranger

Picked Raspberry distress ink from Ranger

Mustard Seed Distress Ink from Ranger

Glass Matt Tim Holtz Tonic Studios

White gel pen

Memento Tuxedo Black ink

Products without affiliate links
- Alcohol markers from Decotimecrafts
- Paper Glaze from Alenee’s
- Aquarel Paper
- Postage Stamp die from Aveccreative
- Pink Card base (brand Unknown).
- Embellishments from Alina Cuddle.
I would like to enter my card in the following challenges
- Cardz 4 Galz: Embellishments
- 613 Avenue Create: Anything goes + any occasion
- A Perfect Time To Craft Open Challenge: Anything goes
- Daisy Chain Challenges: Animals
- Critter Crazy CHALLENGE BLOG: Anything goes + featured critter
- Crafty Animals: Anything goes + must use an animal
We love rabbits at Critter Crazy! Thanks for sharing this sweet mixed media card with us! — Becca
Thank you so much
Great card! Thank you for entering our challenge at 613 Avenue Create. Looking forward to see you again next challenge.
Regards,
Mia
Designer for 613 Avenue Create
craftartista.blogspot.com {My Blog}
Thank you
So pretty, Renske! Thanks for joining us at 613 Avenue Create. I hope we see you on the front porch again soon!
Hugs, Em
613 Avenue Create Co-Owner
Creative Em my blog
Creative Em on YouTube my Youtube channel
Thanks