
Some links in this post are affiliate links. This means I may earn a small commission if you make a purchase, at no extra cost to you. I only recommend products I use and genuinely enjoy in my own cardmaking. Read more here.
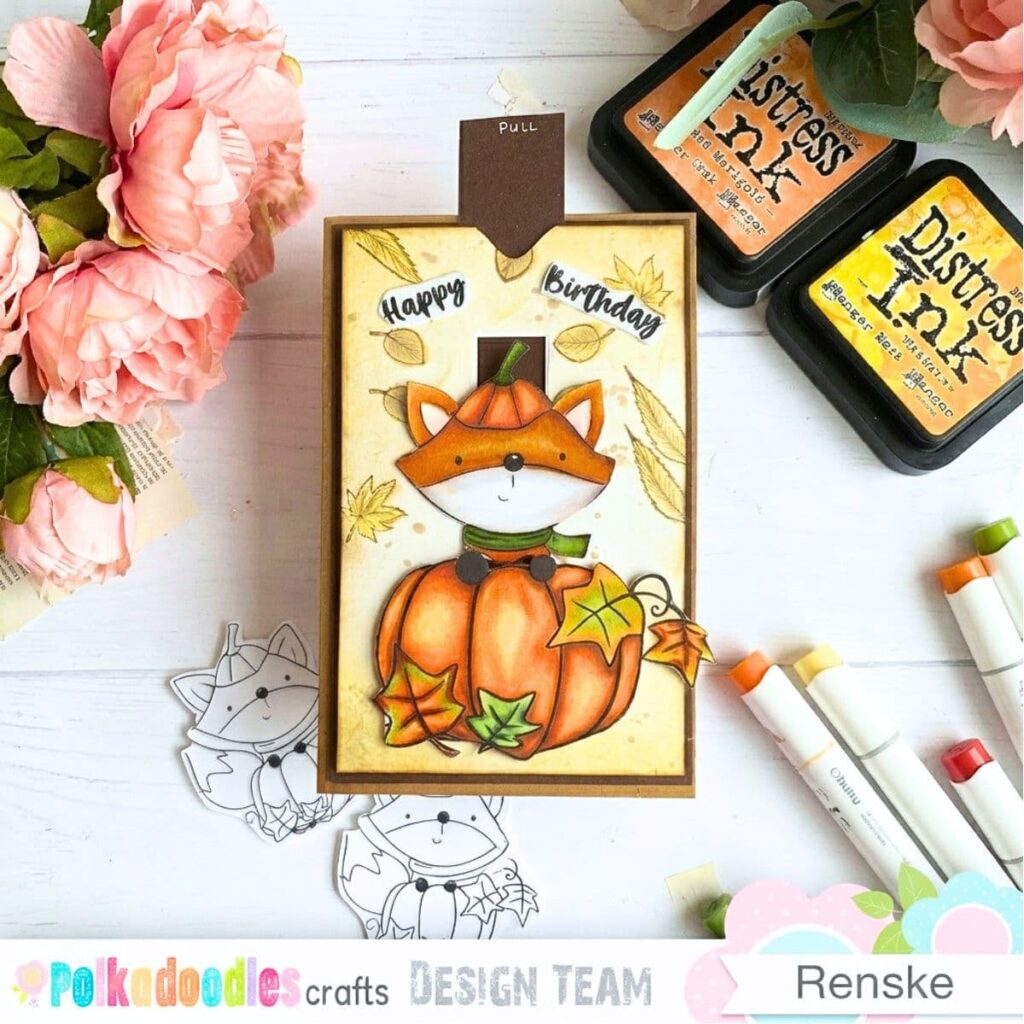
If you want to learn how to make a slider card, this autumn fox design is a fun place to start. When you pull the tab, Freddy the fox pops up from behind the pumpkin. Slide the tab back down, and he disappears again. It’s a lovely surprise that adds an interactive element to opening the card.
For this Polkadoodles design team challenge, I used the digital stamp as my starting point. I wanted Freddy to peek out from behind the pumpkin, so I worked out how to make the two images move together with a pull-tab mechanism. It might look a little tricky at first, but don’t let that put you off. We’ll build the mechanism step by step, and you can take your time with the placement and test the movement as you go.
In this tutorial, I’ll walk you through the steps I followed to make this slider card, from preparing the digital images and creating the autumn background to putting the mechanism together. I’ll share a few things I kept in mind when arranging the layers and testing the movement, so you can follow along and adapt the idea to your own cards.
Materials for Your Slider Card
Before you get started, let’s look at the supplies I used to make this autumn slider card. I’ve included the two Polkadoodles digital products that inspired my design, along with the cardstock, colouring materials and tools I used to create the pull-tab mechanism.
You can follow along with the same products or adapt the project using supplies you already have. I’ll also share the measurements and materials you need to recreate the card.
Polkadoodles Digital Products
- Pumpkin Autumn Fall Fox digital stamp – I used this image to create Freddy the fox and build the interactive design around him. [Shop the digital stamp]
- Everyday Sentiments and Quotes set – Use a sentiment from this set to finish your card. [Shop the sentiment set]
Other Materials and Tools
- Kraft cardstock. For the card base. If you don’t have kraft cardstock, another neutral colour will work just as well
- White cardstock. For printing the digital stamps and creating the background panel. Choose cardstock suitable for your printer and colouring medium.
- Dark brown cardstock. For the mat and slider strip. Another dark, contrasting colour would work if you want a different look.
- Ohuhu alcohol markers. For colouring the fox and other images, use your preferred colouring medium. If you don’t have the same markers, use another set or choose coloured pencils or watercolours instead.
- Distress Ink in Antique Linen, Dried Marigold, Mustard Seed and Vintage Photo to create a warm autumn background. You can use similar ink colours from your stash.
- Leaf stamps. To add an autumn pattern to the background. If you don’t have leaf stamps, you could use another small autumn-themed stamp set.
- Foam tape. Create space between the layers where needed.
- Adhesive. To assemble the card layers. Use a tape runner or liquid glue, depending on what you have and what works with your cardstock.
- A craft knife or suitable cutting tool. For cutting the opening for the slider. A craft knife gives you control over a straight cut, but always use a cutting mat.
- A die-cutting machine and a banner die about 2 cm wide to cut the slot for the slider strip. If you don’t have a suitable die, you can carefully measure and cut the opening with a craft knife and ruler.
- A punch or small die to make the notch that helps you pull the slider tab. Choose a small shape that suits your design and leaves enough room for the mechanism to move.
- A brush, water and a glass plate. For adding splatters to the background. Use a washable craft mat or another suitable surface if you don’t have a glass plate.
- A scoring tool and paper trimmer to score the card base and cut the cardstock to size. If you don’t have a paper trimmer, you can use a ruler and craft knife to cut straight edges.
Card Dimensions
These are the measurements for making this card.
- Card base before folding is 21 × 14.8 cm
- Score line at 10.5 cm
- Finished folded card is 10.5 × 14.8 cm.
- Dark brown mat is 10 × 14.3 cm.
- White panel is 9,5 x 13,8 cm
- Slider strip – 3 × 20 cm
A note about the slider slot
The slot needs to be long enough for Freddy to move smoothly between his hidden and visible positions. You can use a banner die about 2 cm wide to cut the opening, or carefully make the slot by hand with a craft knife and ruler.
How to Make a Slider Card Step by Step
In this tutorial, you’ll make a slider mechanism that allows Freddy the fox to appear from behind the pumpkin. You’ll start by colouring the images and creating the autumn background. Then you’ll put the card layers together and add the slider mechanism. Take your time when positioning the pieces, and test the movement before gluing everything in place.
Step 1. Prepare and resize the digital stamp
I used the Polkadoodles Pumpkin Autumn Fall Fox digital stamp and prepared the image in Word. I cropped the pumpkin and Freddy Fox into two separate pieces, then resized them. The pumpkin is 8.5 cm high, and Freddy Fox is 6.5 cm high.
I placed Freddy behind the pumpkin to check how the two pieces would overlap and look together. I also removed the unwanted visible part of his tail before printing. Taking a little time to adjust the size and positioning on screen makes it much easier to get the result you want before cutting out the images.
New to working with digital stamps? I’ve created a free guide that explains how to crop and adjust digital stamps so you can prepare your images for your own card designs. It’s a handy place to start if you’d like a little extra help with this step.
Step 2. Colour and Cut Out Freddy and the Pumpkin
Colour Freddy the fox and the pumpkin with your Ohuhu alcohol markers, or use another colouring medium you enjoy. I chose warm orange and rust shades for Freddy’s fur and the pumpkin, with green accents for his scarf and the pumpkin stem. Feel free to choose your own colours to create a different look.
Ohuhu marker combinations
I’ve listed the current Ohuhu colour names and numbers, with the older marker numbers in brackets where applicable. This makes it easier to follow along, whether you have the newer or older Ohuhu marker set.
Freddy’s orange fur
- Y69 Milk Tea (E210)
- Y412 Apple Cider (E490)
- Y213 Dark Marigold (YR2)
- YR19 Marigold Orange (YR170)
- YR112 Orange (YR3)
- E58 Fawn Brown (E170)
Freddy’s white fur
- CG01 Cool Grey 01 (CG020)
- YGY02 Abalone Grey (RG030)
- YGY17 Platinum Grey (WG070)
The pumpkin
- Y59 Marigold Yellow (Y130)
- YR17 Sunset Orange (Y4)
- YR111 Persimmon (Y10)
- YR213 Squash Orange (YR180)
- E69 Russet Brown (E120)
The green stem and Freddy’s scarf
- YG29 Apple Green (260)
- YG015 Dark Olive (GY42)
- YG414 Dark Fern Green (GY43)
Autumn leaves
I used three colour combinations for the leaves, mixing greens with warm autumn shades.
- Green and yellow-green – YG415, G410, G49 and YG06
- Red, orange and green – R514, YR19, G410 and G49
- Warm autumn colours – R514, YR112, YR19, Y28 and G49
You can use my Ohuhu marker combinations as a starting point if you have the same markers. If you use a different brand, choose similar shades or try another colour combination. I went with warm oranges and rust tones for this autumn card, but you could give it a different shade or try an unexpected colour for Freddy.
You don’t need alcohol markers to colour these images, either. Coloured pencils, watercolours or another colouring medium from your stash will work, too. Use whatever you enjoy colouring with and see how it changes your card.
Once you’re happy with the colours, carefully cut out Freddy and the pumpkin, following the outlines of both images.
Step 3. Create a soft autumn background
I wanted a warm autumn background that would work well with Freddy Fox and the pumpkin without taking attention away from them. The background needed to complement the coloured images while leaving Freddy and the moving element as the main focus.
With a large focal image and an interactive element, it helps to keep the background from becoming too busy. You can still add colour and texture while giving the main images room to stand out.
Blend the autumn inks
I started by blending Antique Linen over most of the white background panel. I kept the area around the left-centre lighter to help the main image stand out.
Next, I blended Dried Marigold in from the edges, followed by Mustard Seed around the corners and outer edges. I finished with a light touch of Vintage Photo to deepen the edges and add a little extra warmth.
You can build up the colours gradually until you’re happy with the result. If you prefer a softer background, use less ink around the edges and leave more of the lighter area showing through.
Add splatters and leaf details
Mix Vintage Photo and Dried Marigold with water on a glass plate, then flick the diluted ink onto the panel with a brush to create soft splatters.
Stamp leaf shapes in the upper corners and bring a few down towards the middle. Colour the leaves softly with diluted Dried Marigold, Vintage Photo and Mustard Seed.
I kept the leaves fairly subtle so they would add a little autumn detail without drawing attention away from Freddy Fox and the pumpkin. You can add more leaves if you like a busier background, or keep them sparse for a softer look. I’d let the main images guide how much detail you add.

Step 4. Create the slider mechanism
Before you glue the layers together, take a moment to work out how you want Freddy to move. Decide where he should sit when the card is closed and how far he needs to slide up when you pull the tab.
Try both positions with the images in place. This gives you a chance to check where the slot needs to go and where the stops should sit, so Freddy can move between the two positions without getting stuck.
Plan the movement and cut the slot
Place the pumpkin over the background and try the slider strip in the planned position. Mark the beginning and end of the slot.

I used a banner die about 2 cm wide to cut the opening with my die-cutting machine. It was a handy way to create the slot for Freddy’s movement. If you don’t have a suitable die, you can make the opening with a craft knife and ruler instead.

To do this, mark the position and length of the slot on your cardstock first. Take a moment to check that it lines up with the slider mechanism before cutting. This little check can save you from having to adjust the opening later.
Use the ruler to guide your craft knife and make several light passes rather than trying to cut through the cardstock in one go.
Place a cutting mat underneath to protect your work surface, then check that the slider strip moves freely through the opening before assembling the layers.
Check that the slot gives Freddy enough room to move without letting him travel too far. The exact position depends on how much of the fox you want to reveal.
Make the slider strip and foam-tape guide
Cut a strip of dark brown cardstock measuring 3 × 20 cm. I deliberately left it longer so I could trim it to the right length after testing the mechanism.
Turn the background panel over and place foam tape along both sides of the strip. This creates a guide tunnel that keeps the strip in place while allowing it to slide. Add foam tape at the bottom to act as the lower stop.

Make sure the slider strip has enough room to move freely. The foam tape should hold the strip in place without pressing too tightly against it, and keep glue away from the moving parts.
Before glueing the remaining layers in place, pull the tab back and forth to test the mechanism. If the strip catches or feels stiff, check whether the foam tape is too close to the strip or if any glue is in the way. Adjust it until the slider moves smoothly.

Step 5 Attach Freddy and the pumpkin, then set the stops
Start with Freddy in the closed position. Place the pumpkin temporarily where it will sit on the front, then pull the slider up to decide how much of Freddy’s head should appear. The upper stop should leave him peeking out around the pumpkin lid.

Attach Freddy to the moving strip with foam tape, taking care that no adhesive gets in the way of the mechanism. The pumpkin needs to stay still, so raise it with foam tape and attach it to the background separately.

I found it helpful to check the movement before pressing the pumpkin down firmly. With the layers still loose, you have a little more room to adjust the placement if needed.

I’d also suggest putting the moving image in its closed position before fixing the foam tape in place. That way, you can check how everything lines up before securing the layers.
Step 6. Add the pull tab, sentiment and card layers
Make a small notch at the top of the background panel, above the slot, so the pull tab is easy to grasp. I used a punch for this, but a small die or careful hand-cutting can work as well.
Write “Pull” on the visible tab with a white gel pen. It’s a small detail that gives the recipient a gentle hint about how to make Freddy appear.
Mat the panel with dark brown cardstock measuring 10 × 14.3 cm. For the sentiment, I used “Happy Birthday” from the Polkadoodles Everyday Sentiments and Quotes set. I cut the words apart and placed “Happy” diagonally in the left corner and “Birthday” in the upper-right corner.
To make the card base, cut kraft cardstock to 21 × 14.8 cm, score at 10.5 cm and fold in half. The finished card measures 10.5 × 14.8 cm. Mount the completed panel onto the card base once you’re happy with the slider action.
Step 7. Test the finished slider card
Pull the tab up and check that Freddy appears from behind the pumpkin. Push it down again and make sure he disappears into the closed position.
Test the mechanism a few times before you call the card finished. The slider should move without catching, and the stops should keep the strip from travelling too far in either direction.
The warm ink blending and small leaf details set the autumn mood, while the moving fox adds a playful surprise. That simple movement is what makes the card feel interactive without needing a complicated mechanism.

Let’s Get Creative Together
An interactive handmade card can be simpler to make than you might think. Choose an image that you’d like to bring to life, decide where it should sit when the card is open and closed, and test the slider before glueing everything in place. Taking a little time to check the movement can make assembling your card much easier.
You could adapt this idea for all sorts of occasions. For a birthday card, you might have a character pop up from behind a present, or let an animal peek out from behind a tree. You could even hide a little surprise behind a flower. Have a look through your stamp collection and see which images might work with a slider mechanism.
Have you tried making a pull-tab or slider card before? I’d love to hear which image you would choose to bring to life with this technique.
Join the Polkadoodles Challenge
If you feel like sharing a project, you can take part in the latest Polkadoodles challenge. The theme is always Anything Goes, so you’re free to enter any type of craft project and use a design or technique you enjoy.
You don’t have to use Polkadoodles products to take part, so feel free to use stamps and supplies from your own collection. Of course, we always love seeing what you create with Polkadoodles images, too.
It’s also a chance to share your work, see what other crafters are making and perhaps find a little inspiration for a future project.
More Pull-Tab Slider Card Inspiration
If you enjoyed this interactive autumn card, take a look at these other pull-tab and slider card projects for more ideas and inspiration.


Polkadoodles products Used
Pumpkin Autumn Fall Fox Digital stamp

Everyday Sentiment Set

Card Challenges I’m Entering
- Make My Monday Challenge Blog: Use the colour Orange
- Unicorn Challenge Blog: Autumn and/or Halloween
- Passion for Markers: Autumn Colours
- The Paper Funday Challenges: Pumpkin spice anything nice
- The Sisterhood of Crafters: Fall Challenge
- Word Art Wednesday: Anything goes
- CREATIVE INSPIRATIONS: Anything goes
- Cardz 4 Galz: Add an animal
- Craft Rocket Challenges: Autumn and Halloween
- Lil Patch of Crafty Friends Challenge …: Anything goes
- We Love Stamping: Shades of autumn
- A Perfect Time To Craft Open Challenge: Anything goes
- Daisy Chain Challenges: Autumn and Halloween
- Let’s Craft and Create: Anything goes + colours of Fall
- Critter Crazy CHALLENGE BLOG: Anything goes + featured critter
- Crafty Animals: Anything goes + must use an animal

Thanks for joining us at The Paper Funday Challenge, and we hope you’ll play again soon.
Donna xx
The Paper Funday Challenge
The Inspiration Station Challenge
The Pick 3 Challenge
The Beautiful Blossoms Challenge
Thanks
This is so sweet. Who wouldn’t mind him popping up from behind the pumkin. Thanks for joining us at Make My Monday. Love Dawn x
Thanks a lot
Sweet card with a cute image. Thank you for joining our challenge over at Passion for Markers.
Love n hugs
Marie
Thank you so much
A fun interactive card, great colours and tutorial. Many thanks for sharing at We Love Stamping. Sarah
Thank you. Glad you like it.
A cute autumnal slider card with beautiful colouring. Thanks for sharing with us at We Love Stamping.
Thank you
Oh so cute. Love the fox (and where were you few months back when I needed a slider and had no idea who to create it.. I have to remember this now)
I love you card and so glad you shared over at Cardz 4 Galz, MMM
Haha, hope you you have somthing about it for the next one.
OMG he is so, so cute! GREAT job! Thanks so much for joining in the fun at the Sisterhood of Crafters challenge! Good Luck and we hope you’ll come back often. Darlene . . . Sisterhood of Crafters Owner
Thank you so much.