
Some links in this post are affiliate links. This means I may earn a small commission if you make a purchase, at no extra cost to you. I only recommend products I use and genuinely enjoy in my own cardmaking. Read more here.
Meowy Christmas, everyone! Today, I’m excited to share how you can create a festive Meowy Christmas card. It’s perfect for cat lovers. It’s also great for holiday enthusiasts alike! This project features the adorable Meowy Christmas digital stamp from All Dressed Up Stamps.
I made this card for the new challenge in the All Dressed Up Stamps Facebook group. This time, the theme is Celebrations.
In this tutorial, I’ll guide you step-by-step through the card-making process. I will share helpful tips and I will explain how you can add your personal touch. So, let’s get started on creating this delightful Meowy Christmas card together.
The Digital Stamp – Meowy Christmas
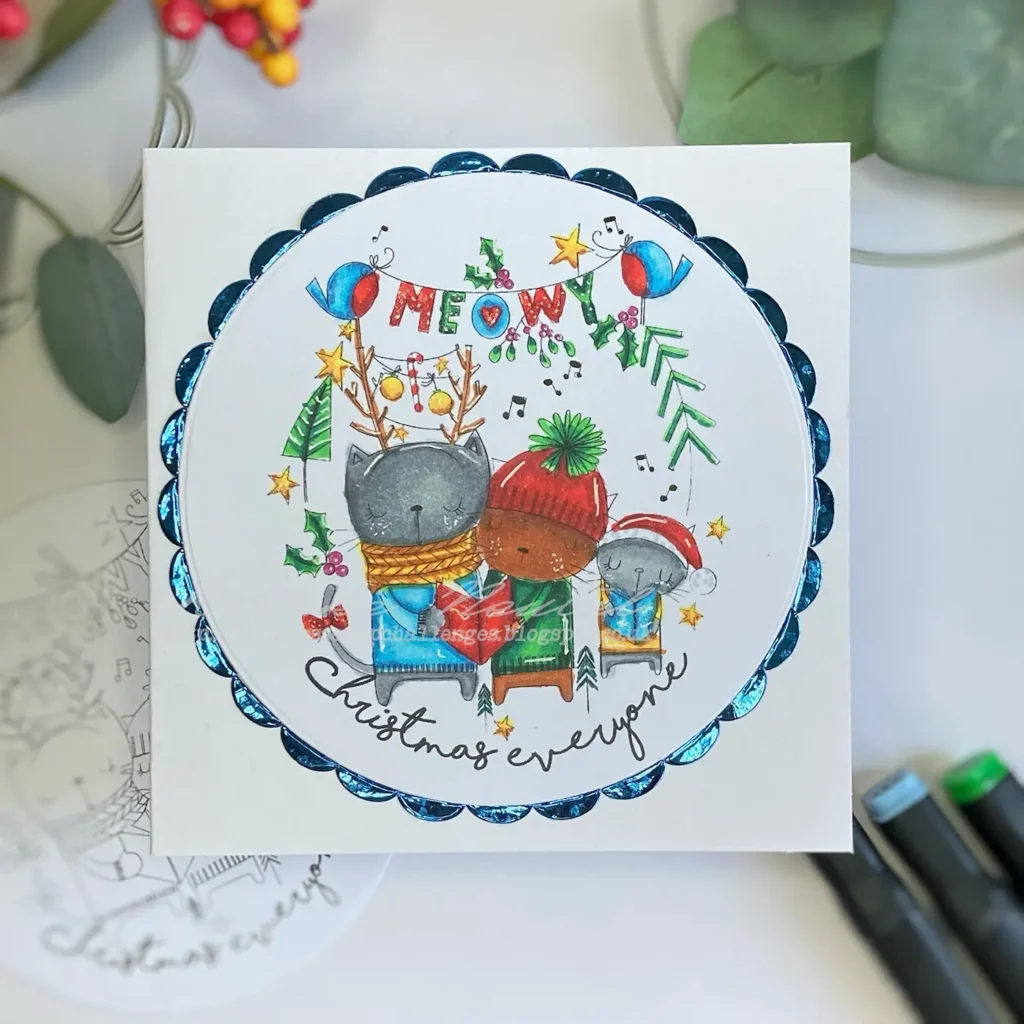
At the heart of this project is the Meowy Christmas digital stamp. It features a festive scene with three singing cats. They are surrounded by holiday elements like holly and musical notes. The scene includes accessories including reindeer headbands and Christmas hats.
Why I like this Meowy Christmas digital stamp
The Meowy Christmas stamp instantly puts me in the Christmas spirit with its charming and festive scene. I’m not particularly a cat lover. Still, there’s something about these singing cats that resonates with me. Holiday details like holly, music notes, and fun accessories truly capture the essence of Christmas!
Why I have chosen this digital stamp for this project
I selected this stamp for its intricate design, which allows for a variety of colouring techniques. The scene within the stamp naturally tells a story, making it an ideal focal point for my card.
I intentionally kept the design simple so that the stamp shines and its details are appreciated fully. This simplicity ensures that every element of the stamp stands out.
I needed to keep this straightforward approach. This allowed all the festive components to take centre stage. The result is a card that’s not just a greeting but a delightful piece of Christmas cheer.
Why it’s perfect for you
If you’re new to using digital stamps, explore their possibilities. If you’re looking for inspiration, think about how this stamp can be applied to various projects. You craft a card for a friend who loves cats. Or, you want to add a festive touch to your collection. The Meowy Christmas stamp is an excellent starting point.
The key is to capture and keep the joyful, festive mood that the stamp embodies. Craft a card that serves not only as a keepsake but also as a reflection of your unique style.
Materials Used for the Card
To create the Meowy Christmas card, here’s a clear list of the materials you’ll need, along with reasons for their choice and alternatives if you don’t have the exact items:
- Digital Stamp – Meowy Christmas: This stamp is the focal point of our card.
- Alcohol Markers: These are used for colouring the digital stamp. If you don’t have alcoholic markers, you can substitute them with coloured pencils or water-based markers.
- White Gel Pen: This is used to add highlights and details to the stamp. If you lack a white gel pen, you can use a fine-tip white marker. A white paint pen or even white acrylic paint are also other options.
- Nuvo Aqua Pen: This adds shimmer and glitter to the designs. You can substitute this with a water-based shimmer pen or clear glitter glue.
- Circle Die and Circle Die with a Wavy Edge: These frame the stamp. They make it the centre of attention on the card. If you don’t have these dies, you have other options. You can use a large round punch. You can also use a craft knife. Alternatively, cut a circle freehand for a similar effect.
- Metallic Card Stock: This adds a touch of luxury and contrasts nicely with other elements of the card. If unavailable, glitter card stock or plain-coloured card stock that complements the digital stamp can be used instead.
- White Card Stock: This serves as the card base. You can choose to use coloured card stock if you prefer.
This summary provides all the necessary information about the materials used in this project and easy alternatives for each item. Let me know if you need further clarification or extra suggestions!
Create Your Festive Meowy Christmas Card: A Step-by-Step Tutorial
Let’s explore the process of creating a festive Meowy Christmas card. In this tutorial, we’ll go step by step. We will use the Meowy Christmas digital stamp from All Dressed Up Stamps. Are you ready to bring some holiday cheer to your crafting projects? Let’s get started!
Step 1: Preparing and printing the digital stamp
To get started, let’s print the Meowy Christmas digital stamp. This stamp serves as the heart of our card, so it’s important to get this step just right.
- Start by printing the Meowy Christmas digital stamp on high-quality paper suitable for alcohol markers, like DCP paper. This paper type helps make the lines crisp and the colours blend smoothly.
- Choose the largest size that fits your desired die cut. I accidentally printed mine at the perfect size. It matched the largest circle die I had on hand—about 10 centimetres in height. Checking the size beforehand will save you from printing multiple copies!
- Make sure to set your printer to the highest quality setting to make a crisp image. Once printed, you can move on to the colouring process.

Having trouble editing or colouring digital stamps? Download my free guide for extra tips and tricks to help you perfect your digital stamps!
Step 2: Colouring the digital stamp Meowy Christmas
Now it’s time to bring the stamp to life with colour!
I used the next combinations of alcohol markers:
- The two outermost cats: Cool Grey 7, Cool Grey 5, Cool Grey 4, and Cool Grey 3
- The middle cat: Burnt Sienna (95), Rose Beige (97), and Sand (107)
- Sweater for the left cat and book for the right cat: Midi Sky (190), Neon Blue (129), Baby Boy (144), and Mint Blue (143)
- Green sweater and green tuft on the hat: Dark Green (51), Forest Green (50), and Grass Green (47)
- Red hats and book: Cardinal (244), English Red (249), and Burgundy (247)
- Sweater for the smallest cat: Primary Yellow (221), Golden Yellow (222), and Barn Red (245)
- Outside birds: Midi Sky (190), Neon Blue (129), Baby Boy (144), and Mint Blue (143)
- Tummies of the birds: Cardinal (144), English Red (249), and Burgundy (247)
- Holly leaves and berries: Dark Green (51), Forest Green (50), Grass Green (47), and Old Red (02)
- Reindeer headband: Sand (107) and Rose Beige (97)
- Stars: Primary Yellow (221), Golden Yellow (222), and Barn Red (245)
- Music notes: Black (120)
Adding Highlights with a White Gel Pen
To add depth and dimension, use a white gel pen to add highlights to the stamp. This includes the cats, the clothing, and the hats. I also added streaks to the trees and white dots to the music notes and the cheeks of the cats.
Adding Shimmer with the Nuvo Aqua Pen
For that extra festive touch, use a Nuvo Aqua shimmer pen to add sparkle to your card. This pen is perfect for highlighting letters, bird tummies, stars, books, and Christmas baubles. The subtle shimmer gives a sense of magic to the final design.

Now that your stamp is ready, we can move on to the next step. We will bring the scene to life with layers and dimensions. Are you ready to take your card-making skills to the next level?
Step 2: Creating the Card Base
Before we can continue with our card, we need to create the base.
The foundation of this project starts with a card measuring 13 cm x 13 cm. To make it, cut a piece of white cardstock to 26 cm x 13 cm. Then, score it at 13 cm and fold it in half. Use a bone folder to create a sharp crease for a clean fold. This will give your card a professional and polished finish.
Now that you have your card base, we can continue to step 3. Choose the perfect die cuts and elements. They will frame our “Meowy Christmas” digital stamp. This will make it the star of the show. Are you ready to add more dimension and detail to your card?
Step 3: Framing the Digital Stamp
To make your “Meowy Christmas” stamp truly stand out, we need to add a decorative frame around it. This final step will give your card a polished, finished look.
Cutting Out the Stamped Image
Start by using the largest circle die you have to cut out your stamped image. Position the die around the stamp. Use a bit of tape to secure it. This will keep it in place while you run it through your die-cutting machine. Make sure to position it carefully so that your stamp fits perfectly within the die-cut circle.
Creating the Decorative Frame
Next, use a wavy-edged circle die to create a frame. Since the original circle die isn’t large enough to fit around the stamped image, we need to get creative.
Cut half circles from blue metallic cardstock. Use the wavy-edge die for this. Arrange them around the circle to create a continuous border. This extra step not only enhances the design but also adds colour and texture, making the card pop. Re.
To attach the half circles, apply a strip of double-sided tape to the back of your circle die-cut. Then, carefully position and press the half circles into place using a pair of tweezers. Work your way around the circle until it is fully framed.
Attaching the Framed Image
To add an extra dimension to your card, attach the framed image to the card base using foam tape. This lifts the stamped image slightly off the base. It creates a layered effect that enhances the card’s visual appeal.

Your “Meowy Christmas” card is now finished! This final step adds that extra special touch, making it perfect for the holidays.
Let’s Get Creative Together
Your Meowy Christmas card is finished—congratulations! If you enjoyed making this festive card, why not take your creativity a step further? This month, All Dressed Up Stamps is hosting a challenge-themed ‘Celebrations.’
This is the perfect opportunity to showcase your card-making skills and win some lovely prizes! Click the button below to learn more and join the fun.
More Related Blog Posts
Products used for this Meowy Christmas card
I’ve shared all the materials I used to create this Gingerbread Christmas card below, including affiliate links. If you choose to buy through these links, I earn a small commission at no extra cost. Thank you for supporting my work and creativity!
Products with affiliate links
Meowy Christmas digital Stamp
(oct. 2025 digital stamp not available anymore)

Nuvo Aqua Shimmer Pen

White Gelly Roll pen 08

Products without affiliate links
- Twin Markers (alcohol markers) from ActionNL
- Circle die from Craft & Deco
- Shaped circle die from Aveccreative
- Metallic card stock (brand unknown).
- White card stock (brand unknown).
I would like to enter my card in the following challenges:
- A Place To Start: Anything goes + Happy Holidays
- Fab ‘n’ Funky Challenges: Christmas animals
- Krafty Chicks Challenge: Stamps
- Crafty Catz: Anything goes
- Alphabet Challenge Blog: The R is for round
- Allsorts challenge blog: It’s beginning to look like Christmas
- Lil Patch of Crafty Friends Challenge ...: Anything goes
- 613 Avenue Create: Anything goes + any winter holiday
- Dragonfly Dreams: Christmas
- A Perfect Time To Craft Open Challenge: Anything goes
- Critter Crazy CHALLENGE BLOG: Anything goes + featured critter
- Crafty Animals: Anything goes + must use an animal
- Sparkles Christmas Challenge: Christmas carol
Adorable! Thanks so much for sharing with us at A Place to Start! Happy New Year!
We look forward to a creative and inspiring 2025!
Hugz,
Chana Malkah, Owner
A Place to Start
613 Avenue Create
Thank you. Happy New Year to you too
This is adorable! Thank you for sharing with us over here at the Critter Crazy Challenge and best of luck with your entry. Love to see you join in each month. Thank you.
Gale DT for
https://2craftycrittercrazies.blogspot.com/
Thank you so much
Cute card! Thanks for sharing at Sparkles Christmas Challenge!
Thank you
Sweet card!! Thanks so much for participating in our 613 AVENUE CREATE challenge!!! I appreciate that you play along and I enjoy visiting your blog!! Have a happy crafty day!! Deanne at A Little Bit O’ Paper
Thank you so much
Beautifully coloured and showcased.
Thanks for joining us at the Allsorts Challenge.
Helen x
DT
Thank you Helen.
What a cute holiday card! Any animal lover would treasure this sweet card that is perfectly colored. Perfectly done! Thank you for playing with us at the Alphabet Challenge. I hope you can join us again soon.
Debbie, DT
Secrets To Stamping
Join my Creative Creases Challenge for fun folds!
Thank you so much for your lovely comment.
So much detail in this beautiful card, lovely colouring and image, and I like the mirror card. Thank you so much for joining us in our challenge at We Love Stamping. Good Luck and I hope you will join us in our next challenge.
Faith A DT
Oops I made a mistake in my last comment, I meant to say – Thank you so much for joining us in our challenge at Critter Crazy Challenge this week. Good Luck. I hope to see you again in our next challenge.
Faith A DT
Thank you so much.
What a sweetie this image is! GORgeous colours and design too.
Thank you so much for joining us at Crafty Catz.
Chrissyxx
Such a sweet image, lovely design and beautiful colouring. Many thanks for joining us at Fab’n’Funky.
Chris
x
Thank you
Thank you so much for your lovely comment.
Cute little kitties, love all the details in your coloring and such a perfect bordering die! Thanks for sharing with us at The Alphabet Challenge!
Thank you so much
Such festive cats and they are so adorable! And you created a beautiful card with it, perfect for any cat lover! Thank you so much for sharing with us this week at Allsorts challenge!
Ellie
http://www.simplyellibelle.com
Thanks a lot.
A really cute trio on your pretty card, many thanks for sharing at Allsorts and following the Christmas theme.
B x
Thank you
Your trio of cats is cute!
Very colorful!
Thank you for joining us at Allsorts!
Thanks a lot.
Caroling kitties is just the thing, lol. Love your pretty coloring and fun shape for this one! So elevated! Thanks so much for playing at Sparkles!
Thank you so much.