
Some links in this post are affiliate links. This means I may earn a small commission if you make a purchase, at no extra cost to you. I only recommend products I use and genuinely enjoy in my own cardmaking. Read more here.
Affiliate Disclosure: In this blog post, I may use affiliate links. That means if you purchase through the links on this page, I may earn a small commission, at no extra cost for you. This helps us maintain this website and continue to provide valuable content. Thank you for your support!
Hey everyone! I’m excited to share a tutorial. It will show you how to make a beautiful handmade cat card using the digital stamp “Cat Lover” from All Dressed Up Stamps. This card is designed to showcase the latest release from All Dressed Up Stamps.
I’m thrilled to introduce three new stamps this month: “Water Lily,” “Make Do and Mend,” and “Cat Person.” Here are the images of the new stamps:

Cat Lover. Not available anymore (sept 2025)


Make Do & Mend. Not available anymore (sept 2025).
Whether you’re making a card for a birthday or a special occasion, this guide will help you. Even if it’s just because you love cats, you’ll be capable of creating a beautiful and unique card.
Crafting Essentials and Creative Substitutes for Your Handmade Cat Card Materials
Before we start making the card, it’s important to gather the necessary materials. Here is a list of the materials you will need, along with other options in case you don’t have them at home:
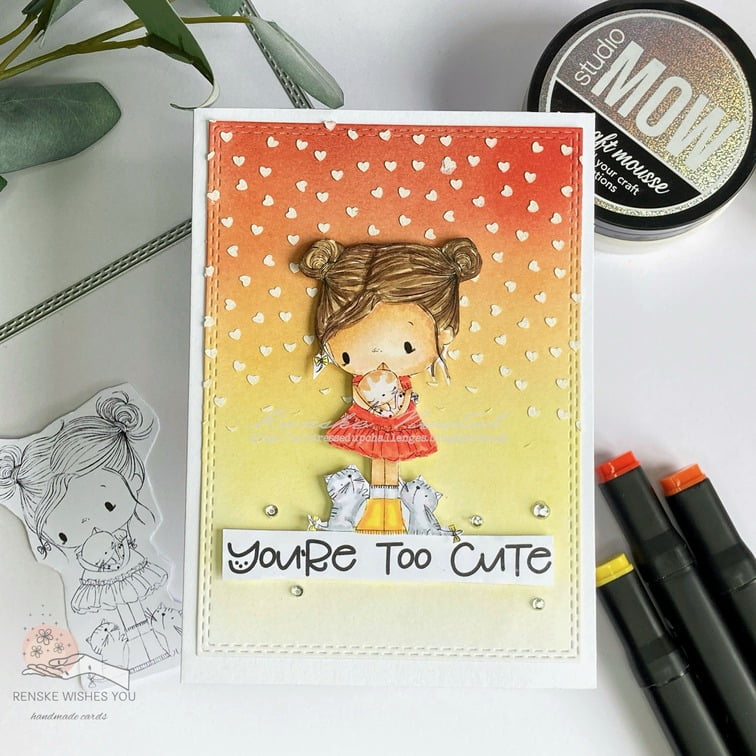
- Cat Person Digital Stamp: This digital stamp features a girl with adorable cats. It will be the focal point of your card design.
- DCP Paper: DCP paper is ideal for use with alcohol markers. It’s used for printing and colouring the digital stamp. If you’re using a different colouring medium, you need a different type of paper.
- Alcohol Markers: These are used for colouring the digital stamp. If you don’t have alcohol markers, you can use other colouring mediums. Try using coloured pencils, watercolour paint, or regular markers.
- Chalk Ink and Blending Brushes: These are used to create a soft, blended background for your card. If you don’t have chalk ink, you can use other types of ink, like dye ink or pigment ink.
- Craft Mousse and a Stencil: These are used to add texture and dimension to the background of your card. If you don’t have craft mousse, consider using other textures. You can try glitter paste or thinned paint to achieve a similar effect.
- Rectangle Dies with a Double-Stitched Edge: These are used to die-cut a rectangle with a double-stitched edge. If you don’t have this, you can cut a rectangle to size yourself.
- Die-Cutting Machine (optional): This is needed if you have dies and want to die-cut the shape.
- Sentiment Set (“You’re Too Cute” from the Noodle Panda Sentiment Set): This set helps you add a heartfelt message to your card. You can also stamp or write your sentiment.
- Embellishments: These are used to give your card a playful, personalized look. Think sequins, enamel dots, or other decorative elements to add that extra touch of charm to your card.
Now that we have gathered all the materials, we can start making the card.
Step-by-step tutorial for crafting Your Handmade Cat Card
Let’s dive into the crafting process! Follow these simple steps to create your adorable handmade cat card featuring the Cat Person digital stamp. Each step will guide you through the process, from preparing the materials to assembling the final card. Let’s get started!
Step 1: Printing and colouring the Digital Stamp Cat person
Start by printing the Cat Person digital stamp on DCP paper. Colour the image with alcohol markers using the following colour combinations:
- Skin: Pale Cream, Salmon Pink, Peachy Blush, Tanned Skin
- Hair: Buttercup Yellow, Brown Grey, Walnut, Clay
- Dress: Cherry Pink, French Vermillion, Vermillion, Orange
- Kitten in her hands: Sand, Pale Cream
- Boots: Pastel Lemon, Lemon Yellow, Deep Yellow
- Socks: Cool Grey 3, Cool Grey 1
- Kittens: Cool Grey 4, Cool Grey 3, Cool Grey 1
Once you’ve coloured the stamp, carefully cut it out. This beautifully coloured image will be the centrepiece of your handmade cat card. Let’s move on to the next step!


Having trouble editing or colouring digital stamps? Download my free guide for extra tips and tricks to help you perfect your digital stamps!
Step 2: Creating the Background
In this step, we will create the background for our card. I chose to use chalk ink, but feel free to use any ink you have on hand. I don’t recall the exact colours I used for this background. However, I remember using shades of red, orange, and yellow.
- Die-cut a rectangle: Start by die-cutting a rectangle from white paper with a double-stitched edge. This will serve as the base for our card’s background.
- Add colour to the background: Next, add some colour to the background. Use chalk ink in shades of red, orange, and yellow to create a vibrant gradient. Blend the colours seamlessly using blending brushes. If you don’t have chalk ink, you can use Distress Inks or any other blendable ink you prefer.
- Add texture to the background: Once the ink is dry, it’s time to add some texture. Grab a stencil and some craft mousse. Apply the craft mousse over the stencil onto the upper portion of the panel using a palette knife. This will create charming heart shapes on your background. If you don’t have craft mousse, you can achieve a similar effect using texture paste or embossing paste.
This background technique adds depth and interest to your card. It provides the perfect backdrop for the adorable Cat Person digital stamp. Let’s move on to the next step!
Step 3: Crafting the Sentiment
Print the sentiment “you’re too cute” from a sentiment set. Cut it out into a rectangular shape. If you don’t have a sentiment set, you can also stamp or write your sentiment.
Adding a heartfelt message to your handmade cat card adds a personal touch that will surely make the recipient smile. Let’s proceed to the next step!
Step 4: Assembling the Card
Before we begin assembling our handmade cat card, let’s bring all the elements together to create a charming final product. Follow these simple steps to assemble your card and add the finishing touches
- Attach the Background Panel: Adhere the background panel onto a card base measuring 10.5 cm by 14.8 cm.
- Add Dimension with Foam Tape: Use foam tape behind the digital stamp image. This adds dimension and visual interest. Use foam tape behind the digital stamp image and the sentiment for added dimension and visual interest.
- Position the Elements: Place the girl slightly below the centre of the card, overlapping the sentiment.
- Embellish the Card: Enhance the card’s charm by adding transparent embellishments. You can also use sequins, enamel dots, or other decorative elements to complete the look.
By following these steps, you’ll create a delightful handmade cat card suitable for any occasion. Now, let’s admire your finished creation!

Let’s Get Creative Together
As we conclude this tutorial, it’s time to contemplate the artistic journey. We meticulously chose our materials. Each delicate finishing touch was carefully applied. We have fashioned a heartfelt handmade cat card, following every step with precision. Throughout this process, we have explored printing and colouring digital stamps. We composed a textured backdrop. We skillfully arranged various elements.
Now that our handmade cat card is finished, it’s your turn to craft.
More handmade cat card ideas to discover
Seeking additional ways to spread love and warmth through your handmade creations? Explore these related articles for more card-making inspiration:

Exploring Crafting Mousse Studio Mow: A Versatile Addition to Your Crafting Arsenal
I wrote a review about using the Crafting Mousse from Studio Mow. Here I will tell you what I think about it and give ideas of what you could do with it.
Products use for this handmade cat card
Affiliate Disclosure: In this blog post, we may use affiliate links. That means if you purchase through the links on this page, we may earn a small commission, at no extra cost to you. This helps us maintain this website and continue to provide valuable content. Thank you for your support!
Products used with affiliate links
Cat person Digital stamp All Dressed Up Stamps

Unfortunately, this is no longer available (sept 2025)
Noodle Panda sentiment set Polkadoodles

Products used without affiliate links
- Alcohol markers by Decotimecrafts
- Chalk Ink by Decotimecrafts
- Craft Moose by Studio Moo
- Stencil with hearts by Craftsensations
- Rectangle die from Craft and Deco
- Embellishments (brand unknown).
I would like to enter my card in the following challenges
- Krafty Chicks Challenge: All occasions
- My Time To Craft!: Super cute
- Allsorts challenge blog: Anything goes + or blast for the past
- Lil Patch of Crafty Friends Challenge ...: Anything goes
- Dragonfly Dreams: Use a stencil
- Pearly Sparkles Challenge Blog: Cats and Dogs
- SheepSki Designs Challenges: Anything goes
Beautiful colours and I love your background.
Thanks for joining us at the SheepSki Designs Blog Challenge.
Helen x
DT
Thank you so much
Sweet card!!! Thanks so much for participating in our DRAGONFLY DREAMS challenge!!! I appreciate that you play along and I enjoy visiting your blog!! Have a happy crafty day!! Deanne at A Little Bit O’ Paper
Thank you so much
What a sweet image – love all the hearts in the background. Thanks for sharing with us at MTTC :)
Thank you
A sweet image against the stencilled hearts, many thanks for joining us at Allsorts challenge.
B x
Thank you
What a spectacular card!! Love that background, like it’s raining love with all those hearts. Thank you for playing with the All Occasion theme with the Krafty Chicks Challenge.
Diane – KCC DT
Thank you so much for your lovely comment