
Renske Wishes You uses affiliate links. If you buy something through one of these links, I may earn a small commission at no extra cost to you. I only recommend products I use or believe in. Read my Copyright and Disclosure for details.
Get ready to add a delicious twist to your card-making projects! Join me in a fun and creative tutorial where I’ll guide you in creating a unique handmade fast food card using fabulous Polkadoodles products.
In this tutorial, I’ll take you through the entire process, from selecting and colouring digital stamps to adding layered elements and embossing details. You’ll learn new techniques, gain inspiration from fresh ideas, and discover just how versatile and fun Polkadoodles products can be. So, grab your crafting supplies and let’s embark on this delightful journey together!
Materials and Tools Needed
Before we begin crafting, let’s make sure we have all the necessary materials and tools. Gathering the right supplies will ensure a smooth and enjoyable crafting process. Here’s what you’ll need:
Required Polkadoodles Products
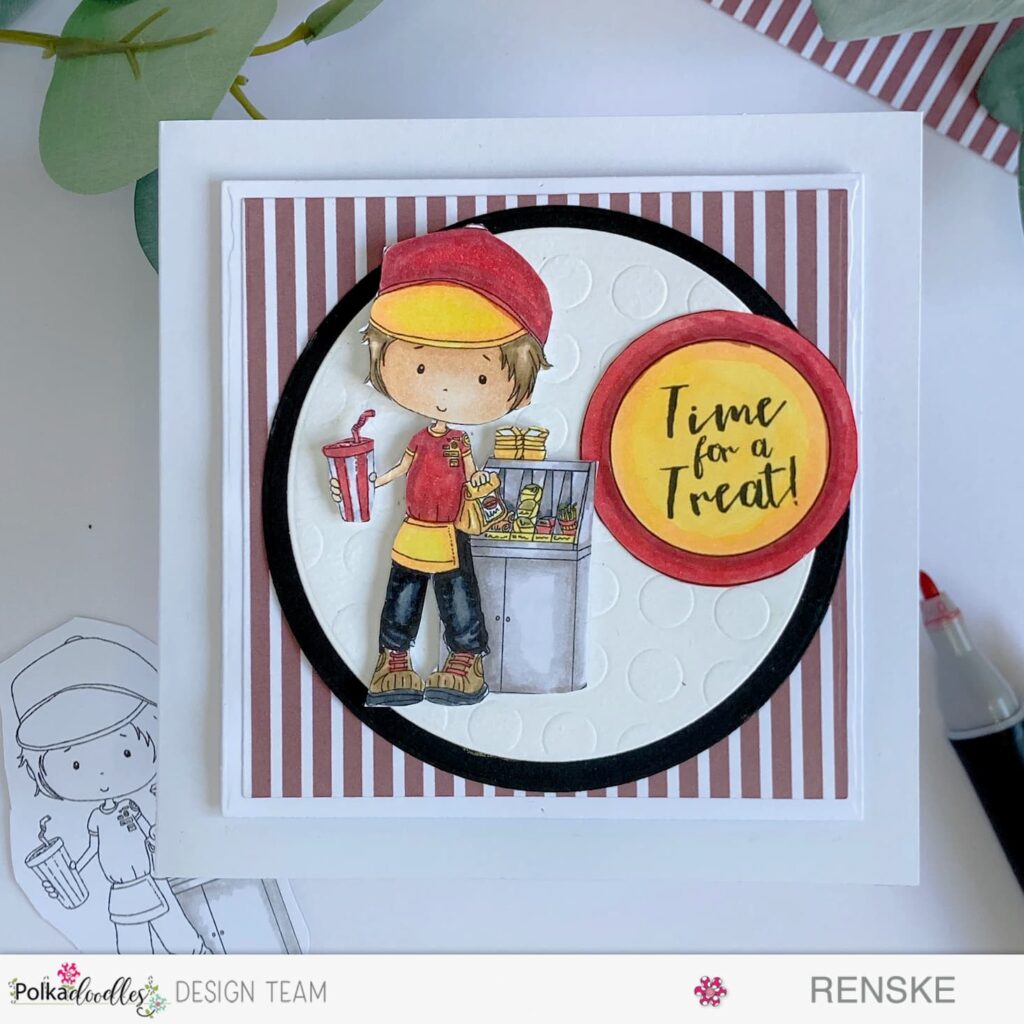
- Fast Food/Waiter/Burger Digital Stamp: This digital stamp features the charming fast food delivery character that will be the star of the card.
- Elvis Wesley Moose Themed Papers: These patterned papers will add a vibrant and playful background to your card. Although these papers have a Christmas theme, the red and white abstract pattern can be used all year round for a cheerful touch.
- Quotes and Sentiments Digital Stamps for Card Making Hippo Helga: This set includes the perfect sentiment, “Time for a treat,” to complement your fast food theme.
Additional Materials
- Alcohol Markers: Essential for colouring your digital stamps. They provide smooth, vibrant colours and blend beautifully.
- Scissors: For fussy cutting your coloured digital stamp.
- Round Dies: To create perfectly shaped circles for layering elements.
- Die-Cutting Machine: Necessary for cutting out your die shapes.
- Stencil with Dots: This adds embossed details to your card.
- Square Card Base (13×13 cm): The foundation of your card.
- Foam Tape: Adds dimension by elevating elements of the card base.
- Glue: For adhering to all your layers and elements securely
By gathering these materials and tools, you’ll be well-prepared to follow along with the tutorial and create a stunning handmade fast food card. Let’s get everything ready and start crafting!
Step-by-Step Tutorial of this handmade fast food card
Let’s dive into the crafting process! Follow these simple steps to create your adorable handmade fast-food card featuring the Fast Food/Waiter/burger digital stamp. Each step will guide you through the process, from preparing the materials to assembling the final card. Let’s get started!
Step 1: Printing and Coloring the Digital Stamp Fast Food/Waiter/burger
In this step, we will print and colour the digital stamp.
Printing the digital stamp
- Adjusting the Size: Open a Word document and insert the Fast Food/Waiter/Burger Digital Stamp. Adjust the stamp height to 8 cm, perfect for a 13×13 cm card base.
- Printing: Print the digital stamp on DCP to ensure the best colouring results with alcohol markers. If you use a different colouring medium, consider using a different type of paper.
Colouring the digital stamp
I chose to use my alcohol markers for colouring. But of course, you can always use a different colour medium. I used the following colour combinations to colour this stamp.
- Skin: Tanned Skin, Peachy Blush, Salmon Pink, Pale Cream
- Hair: Pale Cream, Brown Grey, Walnut, Clay
- Red Shirt, Cap, Stripes on Cup, Straw: Cardinal, English Red, Burgundy
- Cap Brim, Bag: Pastel Lemon, Lemon Yellow, Yellow
- Pants: Black, Cool Grey 9, Cool Grey 8, Cool Grey 5
- Cabinet: Warm Grey 9, Warm Grey 8, Warm Grey 5, Warm Grey 4, Warm Grey 2
- Shoes: Brown Grey, Sand
After colouring, carefully cut out the digital stamp using scissors.
Now that our picture is ready we can go to the next step, creating the square panel.

Step 2: Creating the Square Panel
Next, we’ll create the background panel for our card.
- Cutting the Papers: Use your square dies to cut a piece of white cardstock and a slightly smaller piece of the red and white striped patterned paper from the Elvis Wesley Moose Themed Papers.
- Layering: Adhere the striped paper onto the white cardstock, centring it for an even border.
- Adding Dimension: Apply foam tape to the back of the white cardstock and adhere it to the centre of your 13×13 cm square card base. This will add dimension and interest to your card.
You can also experiment with different colour and pattern combinations to create a variety of looks.
Now, you’re ready to start creating the circles.
Step 3: Making the Circles
Let’s add some circular elements for extra flair.
- Creating the Circles: Use your round dies to cut one larger circle from black cardstock and one smaller circle from white cardstock.
- Dry Embossing: To add texture, dry emboss the white circle using a stencil with dots. Lightly mist both sides of the white cardstock with water, then sandwich it between the stencil and an embossing mat, and run it through your die-cutting machine.
- Layering the Circles: Adhere the embossed white circle onto the black circle. This combination adds texture and a professional touch to your card design.
Now that we have the circles ready, we can start creating the text for our card.
Step 4: Adding the Sentiment
Let’s prepare the sentiment to complement our design.
- Printing the Sentiment: From the Quotes and Sentiments Digital Stamps for Card Making Hippo Helga set, print the “Time for a Treat” sentiment.
- Colouring: Colour the sentiment using the same red and yellow markers you used on the digital stamp (Cardinal, English Red, Burgundy for the outer ring, Pastel Lemon, Lemon Yellow, and Yellow for the inner circle).
- Cutting the sentiment: Cut out the sentiment with your scissors.
Now that we have all the elements for our card ready, we can start putting the card together.
Step 5: Assembling the Card
Finally, let’s put everything together.
- Positioning the Elements: Place the coloured digital stamp on the left side of the circle element. Use foam tape to adhere to it, adding depth.
- Adding the Sentiment:: Position the sentiment on the right side of the circle, securing it with glue.
Your stunning handmade fast food card is now complete! This project showcases how versatile and fun card-making with Polkadoodles products can be. Here’s an image of the final assembled card to inspire you:

Let’s Get Creative Together
As we wrap up this delightful journey of crafting a handmade fast food card, let’s recap the main steps and key techniques we’ve used:
- Printing and Coloring the Digital Stamp:: We printed and colored the Fast Food/Waiter/Burger digital stamp using vibrant alcohol markers. Blending and shading techniques brought our character to life.
- Creating the Square Panel: We created a layered square panel using white cardstock and red and white striped patterned paper from the Elvis Wesley Moose Themed Papers, adding dimension with foam tape.
- Making the Circles: We added texture and interest with embossed circles, using round dies and used dry embossing with a dot stencil to achieve a professional look.
- Adding the Sentiment: The “Time for a Treat” sentiment from the Quotes and Sentiments Digital Stamps for Card Making Hippo Helga set was coloured and cut out, perfectly complementing our fast food theme.
- Assembling the Card: Finally, we positioned the coloured digital stamp and sentiment on the card using foam tape to create depth and interest.
Experimenting with different colours and patterns can yield a variety of unique and beautiful cards. Don’t hesitate to try out new combinations and make each card your own.
would love to see your versions and adaptations of this handmade fast-food card. Share your creations and inspire others in the crafting community. Let’s keep the creativity flowing!
More Masculine Card-Making Inspiration
Looking for more card-making ideas? Check out these related projects to keep your creative juices flowing:
Thank you for joining me on this crafting adventure. I can’t wait to see the amazing cards you’ll create using Polkadoodles products. Let’s get creative together!
Polkadoodles products in the Spotlights
Fast Food/Waiter/burger Digital Stamp

Elvis Wesley Moose-themed papers

Quotes and Sentiments Digital Stamps for card making,

I would like to enter my card in the following challenges
- Try it on Tuesday: Emboss it
- Fab ‘n’ Funky Challenges: Square
- The Sisterhood of Crafters All about the men
- Krafty Chicks Challenge: Anything goes
- Crafty Catz: Use a stencil
- Cut It Up: Anything goes
- Alphabet Challenge Blog: E is for embossing wet or dry
- Kaartjes Inspiratie Challenges Blog: Mannen kaart
- Lil Patch of Crafty Friends Challenge …: Anything goes
- Classic Design Challenge Blog: Anything goes + Masculine
This is one superb masculine card, the image is adorable,
Thank you so much for joining us at Crafty Catz Challenge,
we hope to see you in future challenges.
Keep it Crafty
Hugs Bridget CCDT
Thank you
What a fun card Renske. The image is adorable and I love your embossed circle. Thank you for sharing with us at Krafty Chicks challenge. Hugs, Denise x
Thank you
Thanks for all the details. Red and Yellow are to catch the eye of a fella.