
Some links in this post are affiliate links. This means I may earn a small commission if you make a purchase, at no extra cost to you. I only recommend products I use and genuinely enjoy in my own cardmaking. Read more here.
If you want to make this Mother’s Day extra special, consider creating a handmade Mother’s Day card that is both personal and charming. A cute bunny card is a fun way to show your love. This card is a heartfelt gesture and a chance to try new techniques and show your style.
In this guide, I will walk you through making a cute bunny handmade Mother’s Day card. I created this card using Polkadoodles products, and I’m excited to share the step-by-step instructions with you. So grab your materials, and let’s begin creating a unique card that’s perfect for Mother’s Day!
Gather Your Supplies for This Bunny-Themed Mother’s Day Card
Before we start crafting your cute bunny handmade Mother’s Day card, let’s gather all the materials you’ll need.
Having everything on hand will help things go smoothly and ensure you’re not scrambling for supplies halfway through the process. Whether you’re working with Polkadoodles products or using alternatives from your stash, this is the fun part where you can really start planning out your design.
Let’s check out the materials I used, you can swap them with what you have on hand.
Polkadoodles Products Used
Here’s what I used from Polkadoodles to bring this card to life. Feel free to mix and match with your supplies!
- Digital stamp Bunny Rabbit with Bunch of Flowers: This is the focal point of the card—the adorable bunny with flowers adds that sweet, whimsical touch perfect for Mother’s Day.
- Sentiment Set Flowers Mother’s Day Friends Greetings: The sentiment set provides a heartfelt message that complements the bunny design and ties the whole theme together.
I used Distress Inks to blend soft colours and add depth. You can find these in the Polkadoodles shop too.
- Picked Raspberry for the background
- Mowed Lawn for the grass
- Pine Needles for the grass

Having trouble editing or colouring digital stamps? Download my free guide for extra tips and tricks to help you perfect your digital stamps!
Other Materials You’ll Need
Alongside the Polkadoodles products, I used a few other materials to complete this handmade mother’s day card. These are essentials for crafting, and I’ll offer some alternatives for different preferences or supplies you might already have:
- Purple card base (10.5 cm x 14.8 cm): This is the base of your card, setting the tone with a soft, pastel feel. You can substitute it with any colour that suits your style.
- White background paper (10 cm x 14.3 cm): This keeps the background clean. Light cream or pale pink work just as well.
- Heart stencil: This adds texture and detail to the background. If you don’t have a heart stencil, any pattern stencil will suffice, or you can try a simple freehand design.
- Alphabet die: I used this for a personal touch, but it’s optional. If you don’t have one, use letter stickers or write the sentiment by hand.
- Grass die: This adds texture and dimension at the bottom of the card. If you don’t have a grass die, you can hand-cut a simple grass shape or use a floral die.
- Blending brush: This tool creates soft ink blends. If you lack one, sponges or foam pads can be alternatives.
- Alcohol markers: Great for colouring the bunny and flowers. Alternatively, you can use watercolour pencils or coloured pencils.
- Foam tape: This adds dimension to your card for a dynamic appearance. If you don’t have foam tape, thin strips of cardboard or chipboard can be used instead.
- Glue: A basic crafting glue for assembling the card.
Use what you have in your stash. cardmaking is all about creativity and making it your own.
Step-by-Step Instructions for Creating a Cute Handmade Mother’s Day Card
Now that you have all your materials ready, let’s get started!
In this section, I’ll guide you through each step of making a cute bunny-themed Mother’s Day card. Not sure about a technique or material? No problem. I’ll break it down and offer easy swaps so you can make this card your way. You can always customize this card, so feel free to make adjustments and add your personal touch as you go
We’ll go through each step together, so take your time and enjoy the process.
Step 1: Create the Base for Your Handmade Mother’s Day Card
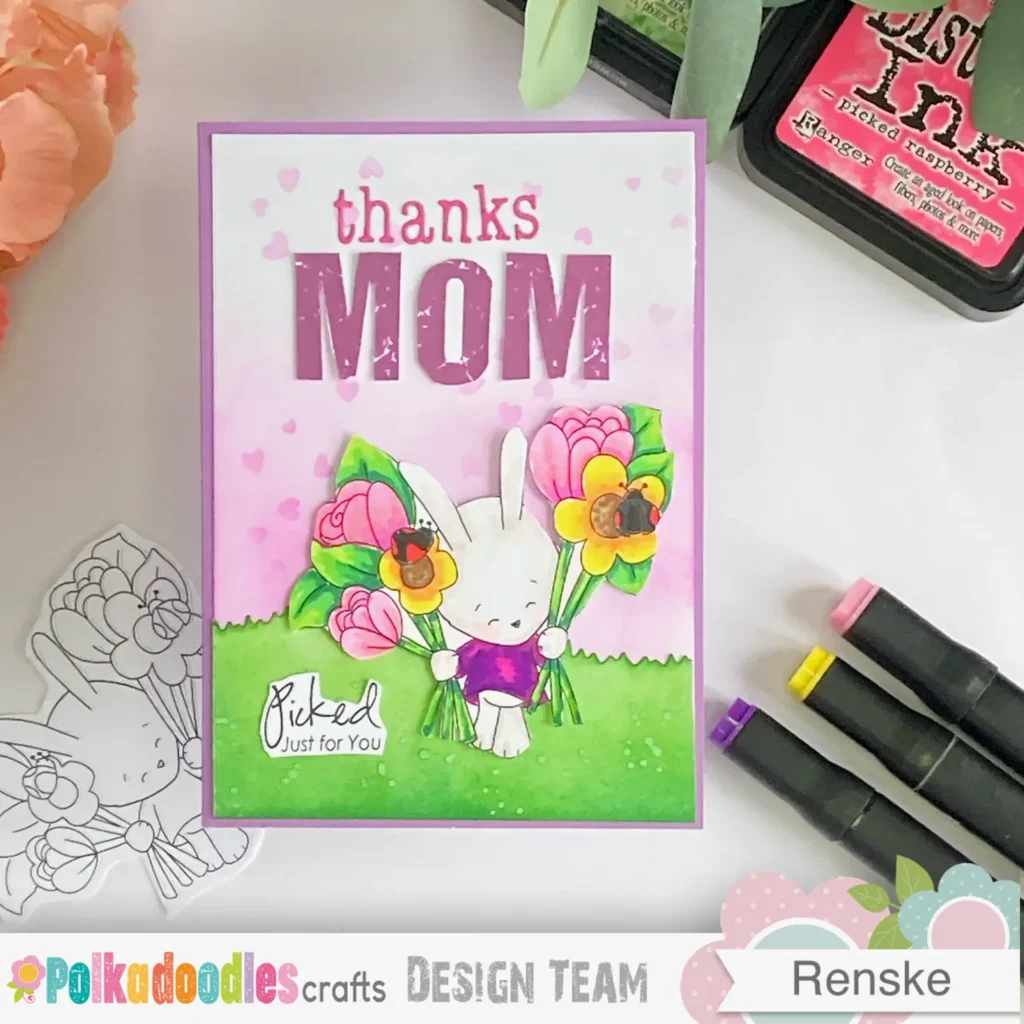
Let’s start with the base of your card. For this Mother’s Day card, I’ve selected purple cardstock for a soft yet vibrant look, but you can use any colour you prefer.
Cut your cardstock to 21 cm by 14.8 cm, then fold it in half for an A6 card, just the right size for this project.
Tip: Use a scoring tool to create a crisp, clean fold. This will ensure your card looks neat and professional.
That’s your base done. It is time for the next step.
Step 2: Print and Colour the Bunny Stamp for Your Handmade Mother’s Day Card
Now that your card base is ready, it’s time to bring the bunny to life. For this card, I used the Bunny Rabbit with a Bunch of Flowers digital stamp from Polkadoodles.
Print the bunny Image
- Print the bunny at 7 cm tall, the width will adjust automatically.
- Use DCP paper because it’s great for blending alcohol markers.
Colour the Bunny
Once the image is printed, it’s time to colour the bunny with your markers. Here are the colours I used for the bunny and flowers:
- Bunny: Pearl White, Pink Mauve
- Blush: Blush
- Shirt: Deep Violet, Vivid Purple, Peony Purple
- Leaves and Stems: Yellow Green, Grass Green, Forest Green
- Yellow Flowers: Orange, Yellow, Lemon Yellow, Pastel Lemon
- Centre of Yellow Flowers: Yellow Ochre, Brown Grey, Clay, Chocolate
- Pink Flowers: Peony Purple, Rose Pink, Pale Pink, Pastel Pink
- Ladybug Dots: Cardinal
- Ladybug Centre: Black, Cool Grey 9

Cut Out the Image
Once you’re happy with the colouring, cut out the bunny with scissors.
New to digital stamps or markers? No worries—just take your time and enjoy the process.
Once the bunny is coloured and cut out, we can move on to creating the background for our DIY Mother’s Day card.
Step 3: Blend the Background with Distress Inks for a Soft, Pastel Look
Now that the bunny is coloured, it’s time to focus on the background. In this step, you will create a soft, pastel backdrop that enhances the design without overpowering it. A soft, blended background helps tie everything together. Let’s create one.
Prepare the Background Paper
Begin by cutting a piece of white paper to 10 cm by 14.3 cm. This is the base for your background design.
Create the Grass Effect
Next, we will add some grass at the bottom of the card.
Use a grass die to cut out the shape from white paper, which we will colour with Distress Inks. Apply Mowed Lawn and Pine Needles using a blending brush. Work in small circular motions to achieve smooth, even coverage.
After you’ve blended the colours, lightly spritz the background with water for texture.

Add the Background Colour
For the background, use Picked Raspberry Distress Ink. I applied the ink with a blending brush, pressing harder near the grass to deepen the colour and lightening it as I moved upwards. This produces a soft gradient effect.
To add a whimsical touch, I used a heart stencil and applied more Picked Raspberry ink, creating the appearance of hearts floating upwards. Lightly press your blending brush over the stencil, applying just enough ink to create a subtle heart pattern.

Assemble the Background
Once the background and grass are prepared, glue the grass along the bottom edge of your background panel. Now the background is set—time to add the bunny

Step 4: Create the Sentiment for Your Mother’s Day Card
A Mother’s Day card needs a sentiment that fits the design. In this step, we’ll use the Sentiment Set Flowers Mother’s Day Friends Greetings, which has a few lovely phrases to choose from. Here’s how to do it.
Select the Sentiment
I chose two phrases from the sentiment set. The first one is “Picked just for you,” which is ideal because it complements the image of the bunny proudly showing off its flowers. The second one is ‘Home is where your Mom is,’ but I’m only using ‘Mom’ since I love the font.
Editing the Sentiment
To isolate the word “Mom,” I used Word.
First, I pasted the entire phrase into a Word document, clicked on the image, and went to the “Picture Tools” tab. From there, I selected the crop option and trimmed the text so only “Mom” was visible. I enlarged the text to about 2.7 cm in height and changed its colour to purple to match the rest of the card’s colour scheme.
Once you’re happy with the size and colour, print ‘Picked just for you’ and ‘Mom.
Cutting the Sentiments
Next, I carefully cut around the word “Mom” and the sentiment “Picked just for you.” To add a personal touch to the card, I wanted to include the word “Thanks” above the “Mom” text. I used an alphabet die to cut the letters out of pink cardstock to keep the colour scheme consistent.
Assemble the Sentiment
Once all your pieces are cut out, it’s time to arrange and glue them to your card. The “Mom” and “Thanks” will sit nicely above the bunny, completing your card with a heartfelt message.

This step is simple but important, take your time to get it right. You now have a lovely sentiment to match your adorable Mother’s Day card design!
Step 5: Assemble Your Mother’s Day Card
Now it’s time to put your card together and see all your work come to life.
Assemble the Components
Start by taking the background panel and attaching the coloured image to the centre of the grass area using foam tape. I placed mine slightly to the right to keep it balanced.
- Add the “Picked Just For You” sentiment in the bottom-left corner.
- Above the bunny, arrange and attach the word “Mom” with foam tape for added dimension.
- Then, place the word “Thanks” above “Mom,” sticking it directly to the background for a neat finish.
")
And that’s it! Our Mother’s Day card is finished and ready to send to someone special.
Let’s Get Creative Together
Now that your Mother’s Day card is finished, take a moment to enjoy what you’ve made. I hope this tutorial has given you ideas to try new techniques and make each card your own. Crafting is all about making it your own, try different ideas and see what works for you.
Join the Challenge
I’d love to see what you make. Why not participate in the Polkadoodles challenge? You can enter with your card and join the fun. Click the button below to join the challenge now!
more DIY Mothers Day card ideas

Polkadoodles products in the spotlight
Affiliate Links: The products mentioned in this post are affiliate links. If you decide to purchase through these links, I may earn a small commission at no extra cost to you. These commissions help keep my blog running, so I truly appreciate your support!
Bunny Flower Bunch digital stamp

Spring flower Mother’s day greetings

Birthday sentiments and Greetings

Bella Bear Gift Fuzzy Pufs

I would like to enter my card in the following challenges
- Simon Says Stamps Wednesday: Anything goes
- The Sisterhood of Crafters: Red or pink
- Crafty Catz: Anything goes + for the girls
- 613 Avenue Create: Anything goes + lots of love
- Creatalicious Challenges: Anything goes + use green
What a sweet card for Mum, lovely bright colours and flowers, thanks for sharing at Crafty Catz challenge, Tilly
Thank you so much
OMG … this is too, too cute! Thanks so much for joining in the fun at the Sisterhood of Crafters challenge! Good Luck and we hope you’ll come back often.
Darlene
DAR’S CRAFTY CREATIONS
Sisterhood of Crafters Owner
Thank you, glad you like it