
Some links in this post are affiliate links. This means I may earn a small commission if you make a purchase, at no extra cost to you. I only recommend products I use and genuinely enjoy in my own cardmaking. Read more here.
Picture making a handmade love card design that feels like it was made just for the person you’re giving it to. It’s easy to assemble, but the little touches you add make it special. Today, I’ll walk you through creating a simple but personal handmade I love you card that feels special, with little details that turn it from a greeting into a keepsake. Whether it’s for Valentine’s Day, an anniversary, or just because, this card will surely make an impression.
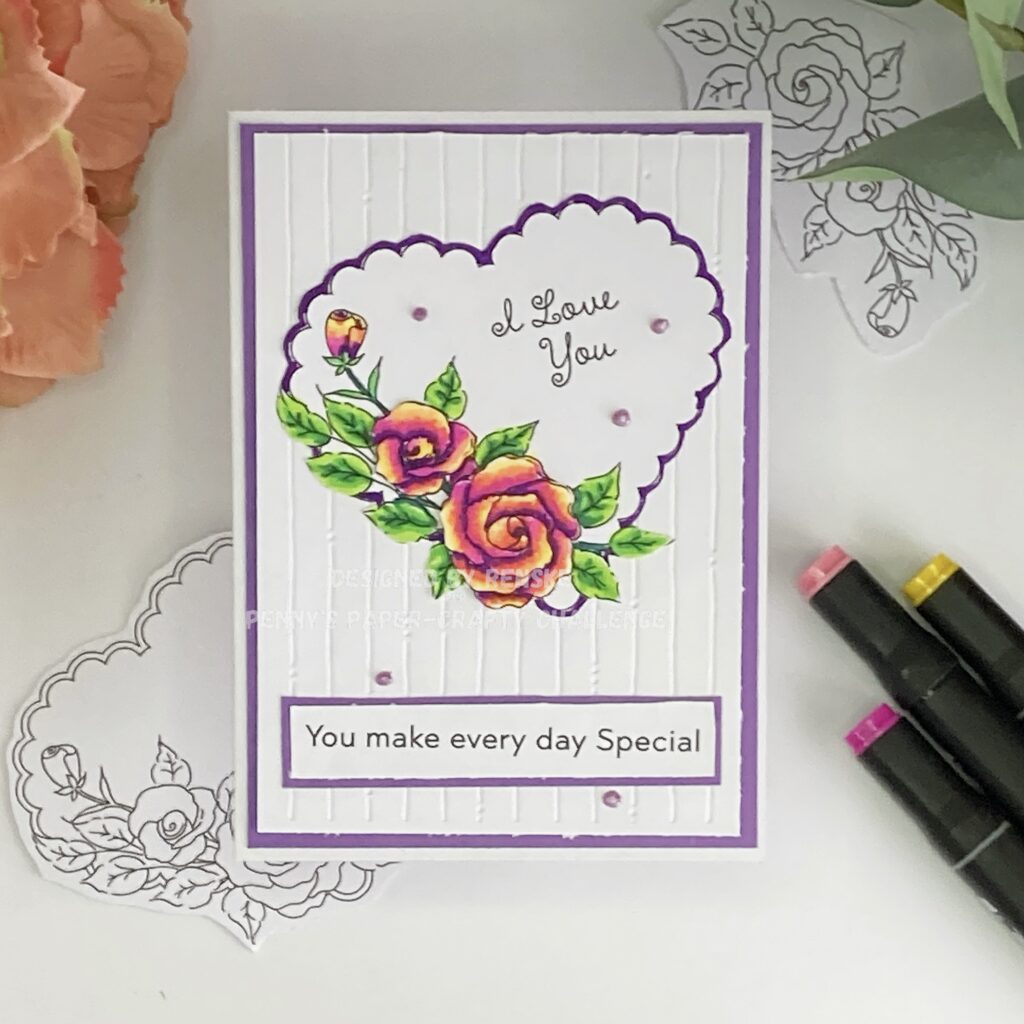
I’m excited to share my latest inspiration card for the new challenge over at Penny’s Paper-Crafty Challenge Blog – the theme is ‘Anything Goes Using Paper. For this card, I’ve used the Hearts and Roses Digi Set from Fred She Said – one of our sponsors. I’m looking forward to showing you how to take this digital stamp and create your unique love card design!
These are the sponsors of the challenge this time:

What I love about crafting cards is that they’re more than just greetings, they let you express feelings that words alone can’t capture. In just a few simple steps, you’ll create a card that feels special, from the design to the colours and embellishments that make it unique. This is a quick and easy handmade love card that will surprise your loved one.
- Materials for Your Handmade Love Card Design
- How to Design a Handmade Love Card Design Step-By-Step
- Let's Get Creative Together
- Products used for this handmade love card design
- I would like to enter my card in the following challenges:
Materials for Your Handmade Love Card Design
Creating a handmade love card is all about using materials that feel right for you. You don’t need loads of supplies to make something personal and special. Here’s what I used for this card, plus some alternatives if you don’t have everything.
- Hearts and Roses Digi Set (Fred She Said): I used this for the main image, a scalloped heart with roses and leaves. But feel free to use whatever image speaks to you.
- Winnie Daisy Sentiments Set (Polkadoodles): This was used for the sentiment “You make every day Special” at the bottom of the card.
- Alcohol markers (Decotimecrafts: I used these to colour the image and bring the flowers to life.
- 3D Foam Tape: This was used to add dimension by layering the flowers, giving the card a more tactile feel.
- Embossing Folder: This was used to create texture on the background.
- Cardstock (purple and white): This was used for the card base and to create the layers behind the image.
- Pearl Drops: These were used for embellishing the card and adding a little sparkle to the design.
Alternative Materials:
You probably don’t have all of these materials in your possession. That’s okay because you probably have alternatives you can use.
- If you don’t have alcohol markers, use watercolours or coloured pencils for a softer, more subtle look.
- Don’t have an embossing folder? Try using a stencil or masking technique to add texture, or even create your own background with stamps.
- If you’re out of Pearl Drops, try using gems, sequins, or even glitter glue to add some sparkle and shine.
The beauty of cardmaking is that you can always substitute materials to make it work for you. Don’t stress if you don’t have everything listed—just use what you’ve got and let your creativity shine.
How to Design a Handmade Love Card Design Step-By-Step
Ready to get started on your easy handmade love card design? Don’t worry if you’re new to this, it’s a simple process, and I’ll walk you through every step! You’ll be crafting something special in no time. Let’s get started!
Step 1: Print and Colour the Hearts and Roses Digital Stamp
Let’s start by printing and colouring your digital stamp. The Hearts and Roses Digi Set gives you plenty of options, whether you use just the heart with text or add separate flowers. I printed the whole A4 sheet with the heart and separate flowers. What’s great about this is that the flowers fit perfectly inside the heart, making it simple to create a 3D effect.
Print the Digital Stamp
First, print the Hearts and Roses Digi Set on DCP paper. This paper works best with alcohol markers and gives you smooth, consistent colouring
Colour the Image using alcohol-based markers
Once it’s printed, use your alcohol markers to colour it in. Here are the combinations I used:
- Leaves: Yellow Green (48), Grass Green (47), Forest Green (50)
- Flowers: Lemon Yellow (35), Rose Pink (08), Peony Purple (282), and Deep Violet (81)
- Heart outline: Deep Violet (81)

Create the 3D Flowers.
Once you’ve coloured the image, focus on the flowers. We are making the flowers 3d. Colour them again with the same colours to add depth. Next, carefully cut them out and use foam tape to raise them for that 3D effect. I used 1mm foam tape for the smallest flower and 1.5mm for the largest.

Your image is now ready for the next step. Let’s craft the background!

Having trouble editing or colouring digital stamps? Download my free guide for extra tips and tricks to help you perfect your digital stamps!
Step 2: Create the Background and Add Depth
Creating depth in your card is more than just the flowers, it’s about layering and texture. Let’s start with a simple background that will make your 3D flowers pop.
Create the Embossed Background
For the first layer, grab a piece of white paper and trim it to 9.5 cm by 13.8 cm. Next, run it through an embossing folder with vertical lines and small dots. This adds texture, giving your background an interesting look. Once done, you’ll have a simple embossed layer that works well.
Add a Purple Border
Next, cut a piece of purple paper to 10 cm by 14.3 cm to frame your embossed layer. Stick your white embossed layer onto the purple paper to create contrast and make the design pop.
Attach the Layers to the Card Base
Finally, take your card base (I used white paper cut to 10.5 cm by 14.8 cm) and attach the layers. Your background is now set, and you’re ready to add your coloured and layered flowers.
This background adds a nice touch to your card, setting the stage for the next step.
Step 3: Add the Final Touches to Your Card
The card looks good so far, but let’s add a few final details to make it complete. Let’s add the sentiment and some embellishments to tie everything together.
Add the Sentiment
I picked the sentiment “You make every day special” from the Winnie Daisy Greetings set by Polkadoodles.
Print the text on white paper and trim it into a rectangle.Next, cut a piece of purple paper and glue it around the text, trimming the edges to match.
Attach the Heart and Sentiment
For extra interest, I placed the heart at a slight angle instead of straight on. I attached the heart and sentiment, placing the sentiment at the bottom of the background panel.
Add the Final Embellishments
To finish, I used Pearl 3D Drops from Decotimecrafts for simple embellishments. I added three drops inside the heart and one above and below the sentiment.

And that’s it! A simple way to make a card with just the right amount of detail. Now you’re ready to send your creation!
Let’s Get Creative Together
Now you’ve finished your card, how about trying out a new design? Crafting is all about expressing yourself, and there’s always room to try new techniques and ideas. I’d love to see what you create, get crafting and share your creations!
Join the Challenge
Penny’s Paper-Crafty Challenge Blog has a new challenge, and the theme is Anything Goes Using Paper. You don’t need specific products to enter, but if you need inspiration, check out what I’ve used. Remember to submit your creation for a chance to be featured and maybe win prizes.
More Handmade love card designs
Products used for this handmade love card design
Affiliate Links: The products mentioned in this post are affiliate links. If you decide to purchase through these links, I may earn a small commission at no extra cost to you. These commissions help keep my blog running, so I truly appreciate your support!
Products with affiliate links
Winnie Daisy Greetings sentiment set

Products without affiliate links
Heart and Roses digital stamp set

- Alcohol markers from Decotimecrafts
- 3D foam squares JeJeproduct
- Embossing folder (brand unknown)
- Card Stock Aveccreative
- 3D pearl Drops from Decotimecrafts
I would like to enter my card in the following challenges:
- Try it on Tuesday: Boss it
- Unicorn Challenge Blog: Dots and/or stripes
- CREATIVE INSPIRATIONS: Love is in the air
- Lil Patch of Crafty Friends Challenge …: Anything goes
- 613 Avenue Create: Anything goes + lots of love
- A Perfect Time To Craft Open Challenge: Anything goes
- Pearly Sparkles Challenge Blog: Love is in the air
- Crafter’s Cafe: Anything goes + Spots and/or Stripes