
Hello everyone! Welcome to this hedgehog card tutorial. In this blog post, I will guide you through the steps of creating a charming handmade card featuring a cute hedgehog digital stamp.
In this tutorial, you will learn how to create a rainy background using Ecoline brush pens, colour the digital stamp, and craft a beautiful scene for the recipient of the card. So, let’s begin!
Materials needed
Before we start with the hedgehog card tutorial, let’s take a moment to gather all the materials we will need to bring our hedgehog card to life. So, let’s gather our supplies and embark on this crafting adventure together!
To create this hedgehog card, you’ll need the following materials from Polkadoodles:
- Polkadoodles Digital Stamp – Pickles Hedgehog Umbrella: This adorable digital stamp from Polkadoodles is the centrepiece of our card design, featuring a cute hedgehog holding an umbrella.
- Winnie Daisy Greetings: The heartwarming sentiment “You make every day special” from Polkadoodles’ Winnie Daisy Greetings set adds a touch of warmth to your handmade card.
In addition to these Polkadoodles products, you’ll also need:
- Cardstock: High-quality cardstock provides a sturdy base for your handmade card and ensures durability.
- DCP paper: Use DCP paper to print the digital stamp and any sentiments or text you want to include on your card.
- Alcohol Markers: These vibrant markers are perfect for colouring the digital stamp, adding depth and dimension to your design. You can use any colouring medium you like.
- Ecoline Brush Pens: Ecoline brush pens are ideal for creating a colourful and dynamic rainy background for your card. Their water-based formula allows for easy blending and layering.
- White Gel Pen: A white gel pen is handy for adding highlights and details to your coloured images, enhancing the overall look of your card.
- Scissors: Sharp scissors are essential for cutting out your coloured digital stamp and any other elements you want to include on your card.
- Adhesive: Use adhesive, such as double-sided tape or glue, to adhere the various components of your card together securely.
These materials, including the delightful Polkadoodles digital stamp and sentiment, will help you create a beautiful and heartfelt handmade card that’s sure to brighten someone’s day!
The hedgehog card tutorial
Let’s start our creative journey with a step-by-step guide to making a hedgehog card. In this section, I will guide you through each stage of the process, from preparing the base to placing the hedgehog stamp. Let’s begin with step 1 and create the card base.
Step 1: Preparing the Base
To start our card-making adventure, we need to prepare the base of our hedgehog card. You can either use a pre-made card base or create one from scratch. Either way, this step sets the foundation for our creative journey.
If you choose a ready-made base, make sure it measures 10.5 centimetres by 14.8 centimetres so that you have a standard base for our design. If you prefer to make the base yourself, grab a sheet of white paper measuring 21 by 14.8 centimetres. Score it at 10.5 centimetres to create a neat fold, and voila! You have a custom base ready for embellishment.
Whichever method you choose, a sturdy base ensures our hedgehog card stands tall and proud, ready to spread joy to the lucky recipient. Now that our base is prepared, let’s move on to printing and colouring our digital stamp.
Step 2: Printing and Coloring the Digital Stamp
Now let’s bring our hedgehog to life by printing and coloring the beautiful Polkadoodles digital stamp. First, print the “Pickles Hedgehog Umbrella” on DCP paper, which provides a smooth surface for colouring with alcohol markers.
Now, it’s time to add some colour to our charming hedgehog. Use the following colour combinations to bring out the intricate details of our hedgehog:
- Hedgehog: Hazelwood, Sand, Burnt Sienna, Chocolate
- Raincoat and Umbrella: Orange, Yellow, Lemon Yellow, Primary Yellow
- Accents: Cardinal, English Red, Burgundy
Let your creativity flow as you colour the digital stamp with alcohol markers. Once you’re finished, add some finishing touches with a white gel pen. Create subtle highlights on the raincoat and umbrella, and add white dots to the red stripes for a playful touch.
Now that our hedgehog is beautifully coloured, we can create a rainy background.

Step 3: Creating the Rainy Background
Let’s create a rainy background to set the scene for our cute hedgehog.
Creating the rainy background with ecoline brushpens
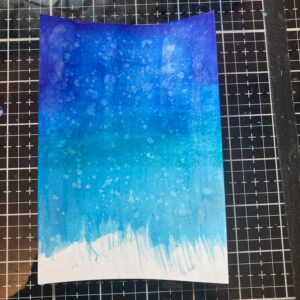
- Cut 10 centimetres by 14,3 centimetres panel from a smooth, thick paper that can show off the vibrant colours of our rainy scene.
- Use shades of purple, dark and light blue from the Ecoline Brush Pens to apply colours to the top of the panel, gradually blending them to create a gradient effect.
- Add water to the colours to blend them nicely. Use a paper towel or brush to pull down some streaks and create downward stripes, enhancing the feeling of rain.
- Wait for the background to dry, and then add some splashes to it. Dip your brush in water and tap it to create splatters. Press a paper towel onto the background to remove the ink from the wet places and reveal light splashes.
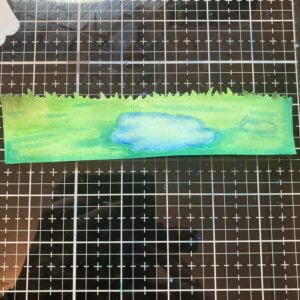
Creating the Grass with a Puddle of Water
- Use the dark blue Ecoline brush pen to outline the shape of the puddle where the hedgehog will stand.
- Fill the puddle with the light blue Ecoline brush pen, adding some green in the middle to create the illusion of grass underneath the water.
- Blend the colours with water to create a natural gradient effect.
- Use the light green and dark green brush pen to create the grass. Blend the colours with water.
Crafting the Clouds
- Use a cloud-shaped stencil or freehand draw clouds at the top of the panel.
- Cut out the clouds from white paper or cardstock and adhere them to the top of the panel. I used a die for this, but you can also cut this by hand.
- Use a grey marker or ink to add shading and dimension to the clouds, giving them a realistic appearance.
Once the clouds are complete, our rainy scene will be enhanced with fluffy clouds hovering above. Now, it’s time to create the text for this card.
Step 4: Adding the Text
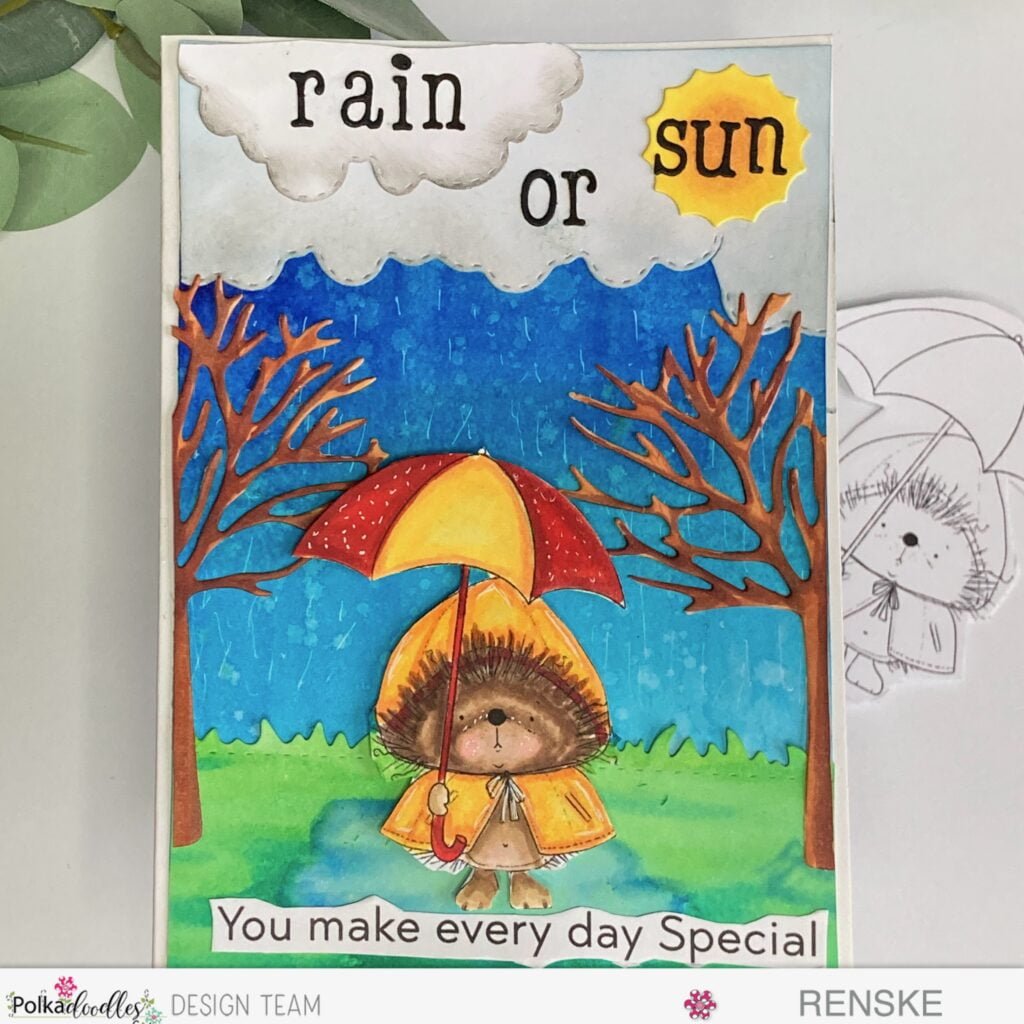
In Step 4, we will add a heartfelt message to our hedgehog card to make it more special. To do this, we will use the beautiful phrase “You make every day special” from the Winnie Daisy Greetings set by Polkadoodles, and add the words “rain” or “sun” to complete the sentence. So, the entire sentence becomes “Rain or Sun you make every day Special.” The top part contains the words rain or sun and the grass contains the sentence you make every day special.
Creating the words Rain or Sun
- Use black letter dies to cut out the words “Rain” and “Sun” from cardstock.
- Cut out a cloud shape with a die or by hand and ink it with grey ink to create a soft, cloudy effect.
- Cut out a sun with a die and colour it with an alcohol marker.
- Arrange the letters to spell out “Rain” within the cloud shape and “Sun” in the sun shape.
- Place the cloud with the word “Rain” in the top left corner of the card and the word “Sun” in the top right corner. Position the letters “O” and “R” between the words to form the conjunction “OR.”
Creating the sentence You make every day special
- Print the sentiment “You make every day special” onto DCP paper.
- Carefully cut out the sentiment using sharp scissors or a precision cutting tool to ensure clean edges.
- Position the sentiment strategically on our card. Placing it at the bottom of the grassy area will provide a charming focal point and enhance the overall aesthetic of the design.
- Securely adhere the sentiment to the card using adhesive, ensuring it lays flat and is firmly attached.
With the sentiment and playful phrase “Rain or Sun” integrated into our design, our hedgehog card now carries a touching message that will brighten anyone’s day. Now, we can move on to creating the trees to complete the scene.
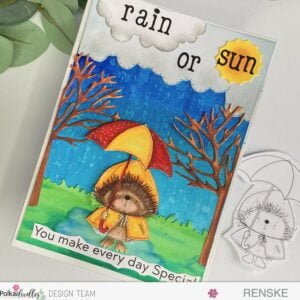
Step 5: Creating the trees
In this step, we will add the final details to our hedgehog card by creating trees. The trees will add depth and enhance the beauty of the scene, creating a charming environment for our cute hedgehog.
Here’s how you can create the trees:
- Cutting the Tree: Use tree dies to cut tree shapes from white card stock. You can use coloured paper as well. I decided to cut the trees from white paper and then colour them with my alcohol markers. I die-cut only one tree, as I am going to cut it in half.
- Colouring the Tree: Once the tree shapes are cut out, it’s time to add colour and dimension using alcohol markers. I selected the following colour combinations: Sand, Rose Beige, Burnt Sienna, and Natural Oak. Start by applying the lighter colours as a base layer and gradually build up depth and shading with darker shades. Blend the colours seamlessly to create a realistic and vibrant tree canopy.
- Cutting and placing the tree: After colouring the tree, carefully cut it in half using scissors or a craft knife. Place each half of the tree on either side of the panel, positioning them to frame the scene and create a sense of depth. You can experiment with the placement and angle of the trees to achieve the desired visual impact.
- Securing the Trees: Once you’re satisfied with the placement of the trees, use adhesive to secure them to the card base. Ensure that each tree is firmly attached to the card to prevent any accidental peeling or shifting. Press down firmly on the trees to ensure they adhere securely.
Now that the trees are in place, our hedgehog card has a charming forest background that perfectly matches the cute hedgehog stamp. Let’s move on to the final step and place the hedgehog stamp to complete our card design.
Step 6: Placing the Hedgehog Stamp
In this final step, we will bring our cute hedgehog to life by placing the digital stamp on the scene we created. Follow these simple instructions to complete our charming hedgehog card:
- Positioning the Hedgehog: carefully place the coloured hedgehog digital stamp onto the scene we have created, ensuring it fits well within our crafted environment. You can place the hedgehog in the puddle of water on the grass, ensuring it looks like it’s sheltering from the rain under its umbrella.
- Adding Dimension: To add depth and visual interest to our card, use foam tape or adhesive foam squares to raise the hedgehog slightly from the card base. This creates a subtle 3D effect and makes the hedgehog the focal point of our design.
- Ensuring Secure Attachment: Once you are satisfied with the placement of the hedgehog, firmly press it down onto the card base to ensure it is securely attached. Pay attention to the edges and corners to prevent any lifting or peeling.
With the hedgehog stamp in place, our charming card is now complete and ready to share with someone special. Let us take a moment to appreciate the creativity and effort that went into creating this heartfelt greeting.
Inspire, Create, Share, and More!
As we conclude this card-making tutorial, let’s take a moment to reflect on the creative journey we’ve embarked on together. Crafting this charming hedgehog card has been an enjoyable experience, filled with colour, imagination, and heartfelt emotions.
More scene card inspiration
Looking for more scene card inspiration? There’s more! Check out some of my other articles below for unique ideas, techniques, and projects to ignite your creativity and enhance your card-making skills.


Click the links for more craft inspiration and discover endless possibilities to express your creativity through handmade cards.
Thank you for joining me on this creative journey, and I look forward to sharing more crafting adventures with you in the future. Happy crafting!
Polkadoodles products in the spotlight
Disclosure: This article contains affiliate links. This means that if you purchase through these links, I may earn a small commission at no additional cost to you. Your support helps me continue creating content for fellow crafters. Thank you for your support!
Pickles Hedgehog umbrella Digital stamp

Winnie Daisy Greetings

I would like to enter my card in the following challenges:
- Dream Valley Challenges: Add a sentiment
- The Paper Funday Challenges: Anything goes + No patterned paper
- CREATIVE INSPIRATIONS: For someone you love. A special friend.
- Crafty Catz: Anything goes + Valentine, with love
- Lil Patch of Crafty Friends Challenge …: Anything goes
- Stamping Sensations: Animals, birds or other creatures
- A Perfect Time To Craft Open Challenge: Anything goes
- Classic Design Challenge Blog: Anything goes
- Crafts Galore Encore Challenge Blog: Anything goes
- Critter Crazy CHALLENGE BLOG: Anything goes + featured critter
- Crafty Animals: Anything goes + must use an animal
Beautiful creation! Wonderful scene!
Thank-you for joining us at the Crafts Galore Encore Challenge February “ATG”. Ileanaxx
Thank you
This is the sweetest little hedgehog and you’ve created a wonderful scene. Thanks for sharing your lovely card with us at The Paper Funday Challenge. We hope you’ll play again soon.
Donna xx
Paper Funday Challenge
Inspiration Station Challenge
Beautiful Blossoms Challenge
Thank you so much Donna.
So cute!!! Thanks so much for participating in our LIL PATCH OF CRAFTY FRIENDS challenge!!! I appreciate that you play along and I enjoy visiting your blog!! Have a happy crafty day!! Deanne at A Little Bit O’ Paper
Thanks
Very cute hedgehog image – and I love that you have given such a full explanation of how the card was made – so useful for new card makers!
Thank you so much for participating with us over at Dream Valley!
Sharon – Dream Valley Challenge Designer
http://glittertastic.blogspot.com/ – Stop by and see me!!!
Ah thank you so much for your lovely comment. Glad you like it
Great rainy background and love the cute hedgehog. Thank you for joining us at Stamping Sensations.
Carol DT x
Thank you
You have created such a lovely background scene for your cute hedgie- fabulous colouring! Thank you for sharing at Stamping Sensations.
Chris
x
Thank you so much ❤️