
Some links in this post are affiliate links. This means I may earn a small commission if you make a purchase, at no extra cost to you. I only recommend products I use and genuinely enjoy in my own cardmaking. Read more here.
This card started with the idea of creating something a father would pick up, open, and want to keep returning to.
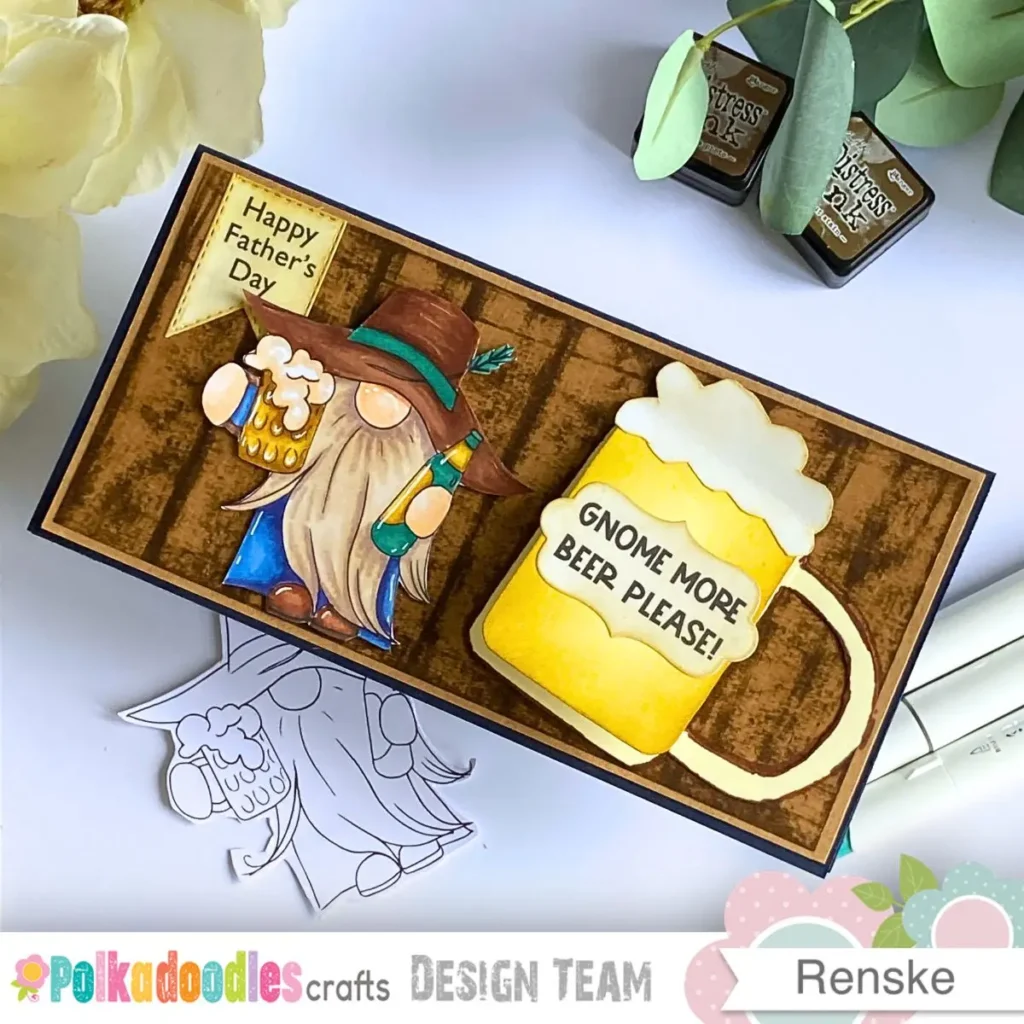
To achieve this, I designed a flap card with a beer mug reveal. When the mug-shaped flap is lifted, a hidden message appears underneath. The mechanism is achievable in structure but creates a result that feels both clever and warm. This flap card tutorial will learn you how to do it.
This project is part of my work with the Polkadoodles design team, using the “Dad Father Celebration Party Gnome” digital stamp from their collection. He wears a cowboy hat, has a long beard, and holds a beer mug in one hand and a beer bottle in the other. He is a natural fit for the rustic pub atmosphere that runs through the entire design.
The full step-by-step tutorial starts below.
What is a Flap card
A flap card is an interactive card with a panel attached on only one edge. The rest of the panel lifts freely to reveal text or an image underneath.
The mechanism becomes part of the design rather than something added at the end. In this Father’s Day card, the beer mug-shaped flap reveals a hidden message when lifted, making the opening feel like part of a rustic pub scene.
That detail helps the design feel natural and is one reason this type of mechanism works so well for masculine cards.
Which materials do I need for this flap card tutorial?
I use a mix of cardstock, digital stamps, inks, and basic tools to build this Father’s Day flap card with a beer mug reveal. Each material supports the structure, texture, or colour balance of the final design.
Polkadoodles digital stamps and sentiments
- Gnome with cowboy hat and beer digital stamp
- Gnome Men Greetings sentiment set including Gnome More Beer Please
Cardstock and paper
- Dark blue cardstock for the card base
- Light yellow cardstock for the beer mug flap and handle
- White cardstock for foam and printed digital images
- Kraft cardstock for the rustic background panel
Alternatives
- Any brown or golden cardstock from your scrap stash
- Patterned kraft-style paper for extra texture
Inks and colouring tools
- Mustard Seed Distress Ink for warm beer tones
- Vintage Photo Distress Ink for woodgrain edges and amber shading
- Walnut Stain Distress Ink for deeper shadows
- Antique Linen Distress Ink for sentiment softening and foam shading
- Alcohol markers for colouring the gnome image
Alternatives
- Any warm brown ink set for wood effects
- Water-based markers instead of alcohol markers
Tools and adhesives
- Banner die for sentiment labels.
- Die-cutting machine for partial die-cutting technique
- Foam tape for dimension on gnome and mug
- Liquid glue for flap mechanism and handle attachment
- Sharp scissors for fussy cutting images and sentiments
- Small rectangular box used as a mug template
Alternatives
- Hand-cut banners instead of dies
- Ruler and pencil instead of template box
Step-by-Step Flap Card Tutorial
This project is built in six steps. The background is created first, followed by colouring the gnome while the layers dry. The beer mug flap is constructed next before all elements are brought together.
Working in this order keeps the process calm and prevents finished elements from needing to be moved later.
Step 1. Build the Card Base and Layout Structure
Start with dark blue cardstock. Cut the cardstock to 21 cm by 21 cm. Score and fold it in half to create a landscape card base measuring 21 cm by 10.5 cm.
This creates a square sheet that folds into a landscape slimline-style card with a sturdy base that supports the layered design.
Cut a piece of kraft cardstock measuring 20.5 cm by 10 cm. Centre this on the folded card base as the first mat layer.
Cut a second kraft panel measuring 20 cm by 9.5 cm. This becomes the woodgrain background panel in the next step.
The kraft layers sit inside the blue card base, creating a clean framed border around the design. The slight size difference between the layers builds subtle depth and balance before any stamping or colouring begins. This structure also helps support the interactive flap later in the project.

Step 2. How to Create a Woodgrain Background on Kraft Cardstock
Take the smaller kraft panel and a Vintage Photo Distress Ink cube. The narrow edge of the cube helps create clean, controlled vertical lines.
Press the ink cube onto the kraft and pull it straight downward in one motion. Place each stripe directly beside the previous one and repeat across the full panel to build a plank effect. This repeating movement builds the look of wooden planks so your background feels like a rustic pub table
Ink Blending for Depth
Use a blending brush with Walnut Stain to darken selected areas. Focus on the spaces between the planks and the lower edge, where natural shadow would fall.
Depth and Ageing
Use a pick-up tool or a blunt needle to scratch fine lines across the surface after the ink has dried. Run the Vintage Photo cube over the panel again so the ink settles into those scratches and deepens them.
Finish with a dark horizontal ink line at the top and bottom edges of the panel. That framing detail adds pub atmosphere and grounds the whole composition. This is such a fun way to create your own woodgrain background.

Step 3. Prepare, Print and Colour the Gnome Image
Print your digital gnome stamp onto white cardstock. Before starting with markers, focus on keeping the colouring consistent across the full image so the gnome, beer mug, and bottle feel like they belong together.
The colour combinations below are structured per section of the image. This helps maintain harmony across skin tones, clothing, and accessories so nothing feels visually disconnected. So let’s do some gnome colouring.
Skin Colouring
- YR00 Barely Blush
- Y45 Cream
- Y46 Peach Yogurt
Begin with Y46 Peach Yoghurt on the shadow side of the nose. Keep a narrow highlight strip along the edge so the nose still reads as round.
Blend Y45 Cream inward and use YR00 Barely Blush on the brightest areas. Apply the same approach to the hands, placing slightly deeper tones underneath for natural form.
Beard Colouring
- Y62 Sandy Beige
- Y69 Milk Tea
- E97 Deep Rose Grey
Place E97 Deep Rose Grey in the deepest shadow areas, including under the nose, beneath the beer mug, under the bottle, and at the outer beard tips.
Pull short directional strokes outward from these points to follow the natural hair growth. This helps the beard feel textured rather than flat.
Soften the shadows with Y69 Milk Tea and build the lighter areas with Y62 Sandy Beige. Leave small highlights of white cardstock visible for a lighter, airy finish.

Colouring the hat
- E57 Light Walnut
- E37 Sepia Brown
- E79 Dark Cocoa.
The gnome’s cowboy hat was coloured with warm brown tones to match the rustic pub theme.
Use E57 as the base of the colour. Use the E37 for the midtones and use the E79 for the deepest shadows. I placed the darker shade along the edges, underneath the hat brim and in the folds to create more dimension.

Clothing Colouring
- BV48 Distressed Denim
- BV414 Denim Blue
- BV514 Vintage Navy
Apply BV48 Distressed Denim across the full coat as the base layer. This sets the overall denim tone.
Add BV514 Vintage Navy into the deepest shadow areas, especially under the beard, along the coat edges, and in the folds.
Blend BV414 Denim Blue between the two tones. Keep enough BV48 visible so the fabric still reads as denim texture rather than a solid dark shape.

Beer Mug and Bottle Colouring
Beer Mug
- Y26 Light Gold
- Y216 Caramel
- Y416 Golden Brown
Build the colour from light to dark. Leave a soft highlight strip in the liquid to create a glass effect and suggest transparency.
Beer Bottle
- G113 Dusty Jade Green
- G114 Aged Pine Green
- BG315 Castleton Green
Use G113 Dusty Jade Green as the base layer. Add G114 Aged Pine Green along the edges for depth and shadow.
Apply BG315 Castleton Green in the darkest areas, including the base, behind the hand, and along the back edge. Keep the label area in warm beer tones to repeat colour across the design.


Foam and Small Details
Foam
- Y45 Cream
- Y42 Warm Ivory
- Y62 Sandy Beige
Work in soft layers and ensure the white cardstock is visible in the brightest areas to keep the foam light and airy.
Small Details
Repeat tones from earlier sections in elements like the hat band and shoes. This repetition helps tie the full image together and keeps the design visually cohesive.


Step 4. How do I build the interactive beer mug flap?
This step is the heart of this flap card tutorial. Take your time here because the way the flap sits on the card affects everything that follows.
Mug Shape Construction
Find a small rectangular box with a lid. Trace the box on light yellow card stock. Trace around the lid, which is slightly larger, and around the base of the box, which is slightly narrower.
Draw the fold tab directly above the mug body before you cut anything out, so the whole piece comes out in one. Cut the complete shape.


Flap Movement System
Score the line between the mug body and the tab. Fold the tab back and test how the flap opens before moving on. The hinge should move smoothly and lie flat when closed.
Only glue the tab when attaching the mug later. The rest of the panel must remain free to lift.
How to Create a Realistic Beer Mug Effect with Ink Blending
Apply Mustard Seed across almost the whole surface. Leave a slightly lighter vertical strip in the centre to imply glass reflection. Do not add ink there.
Add Vintage Photo along both sides. Do the same thing below where the foam will sit. This will build the amber tone.
Finish with a thin line of Walnut Stain along the base. Build up in light layers. It is harder to remove ink than to add more.

Foam and Finishing Details
Cut an uneven foam shape from white cardstock. An imperfect edge looks more convincing than a perfectly clean one.
Blend a light touch of Antique Linen along the underside of the foam where it meets the beer. That soft shadow lifts the foam visually off the surface. Attach it to the top of the flap panel with liquid glue or foam tape.
The Handle
Draw a C shape on the light yellow cardstock, and a C within. This will be the handle of the beer pull. Glue only the top and bottom tips of the handle to the back of the mug body so it stands slightly proud of the surface.
Assembling Your Father’s Day Flap Card Design
Fold the tab and apply glue to its back surface. Position the mug on the right side of the card, angled very slightly for a less rigid composition. Press the tab down firmly and place something heavy on top while the glue dries. Test the flap once everything has fully set.
Step 5. Adding Sentiments and Personal Touches
Print all three sentiments from the Gnome Men Greetings set. The set includes “Happy Father’s Day”, “Gnome More Beer Please”, and “Love you dad”.
Sentiment Preparation
Die-cut “Happy Father’s Day” using a banner die. If the sentiment is slightly too long for your die in one pass, use the partial die-cutting technique. Score the top half through the die first, reposition carefully so the cut lines align, then complete the bottom half. The result is a banner sized exactly to the text.
Die-cut “Gnome More Beer Please” into a label shape. Cut “Love you dad” by hand for a looser, more personal feel.
Cohesion Finishing
Blend all three pieces lightly with Antique Linen, focusing on the edges. The warm tint brings the white labels closer to the kraft and amber tones already on the card so nothing appears too stark or disconnected.


Step 6 Final Assembly and Composition
Attach the woodgrain panel to the kraft mat and secure both layers to the card base. Arrange your elements before committing any glue.
Focal Point Placement
Place “Happy Father’s Day” in the upper left area. Position the gnome to the right of the banner using foam tape. Check that his hat does not overlap the text and that his feet land at the bottom edge of the panel for visual grounding.
The beer mug flap is added in step 4. Attach “Gnome More Beer Please” to the front face of the closed flap. Tuck “Love you Dad” inside the mug so it only appears when the flap is lifted.
Layer Balancing
The gnome acts as the main character, the beer mug as the interactive feature. The sentiments as supporting detail.
If a corner feels too empty, a soft shadow blended under the gnome adds quiet weight. If the card feels crowded, nudging an element back a few millimetres before the glue dries is worth the adjustment. Getting the balance right at this stage is the detail that makes the finished card feel intentional.

Frequently Asked Questions
How do I make a beer mug shape without a template?
Use a small rectangular box from your desk or kitchen. Trace around the lid for the wider top and the base for the narrower bottom, then connect the shapes on light yellow cardstock. Add the handle freehand to keep the design personal and flexible.
What if my brown ink goes too dark?
Apply ink with a very light touch using a blending brush. Start slightly off the edge of the paper and move in small circles toward the centre. Building up gradually gives you control and stops the colour from becoming heavy or muddy.
How do I make the flap sturdy enough to open and close repeatedly?
Use medium-weight cardstock for the mug shape rather than thin paper. Scoring the fold line cleanly before you fold it makes a real difference to how the hinge behaves. If the tab feels weak, back it with an extra layer of cardstock before attaching it to the card.
A Technique Worth Keeping
The beer mug shape is what makes this handmade Father’s Day card feel complete, but the flap mechanism works on many other outlines. A football, cowboy hat, toolbox or book could all become a flap design in future masculine or birthday projects.
The woodgrain background also works beyond Father’s Day. It pairs well with fishing themes, pub birthday cards and autumn-inspired designs. This technique does not need to be rebuilt each time.
If this is your first flap card tutorial, there is no need to overthink it. A scored fold and one glued edge are enough to create the moving flap.
Let’s Get Creative Together
You have finished a handmade Father’s Day card with a beer pull flap on it. The gnome is a real character, and a woodgrain background that carries the rustic pub mood. That is a satisfying afternoon of making.
Share your version in the comments or tag me on social media so the community can see what you made. It is always interesting to see how others interpret the mechanism and add their own details.
If you want to explore more colouring ideas or interactive card formats, there are more tutorials in the archive worth a look.
Join the Polkadoodles challenge
This project fits perfectly within the Polkadoodles challenge theme. You are invited to share your creation, and you can make anything you like. Using Polkadoodles products is optional, but always a fun addition if you have them in your stash.
More Handmade Father’s day card ideas
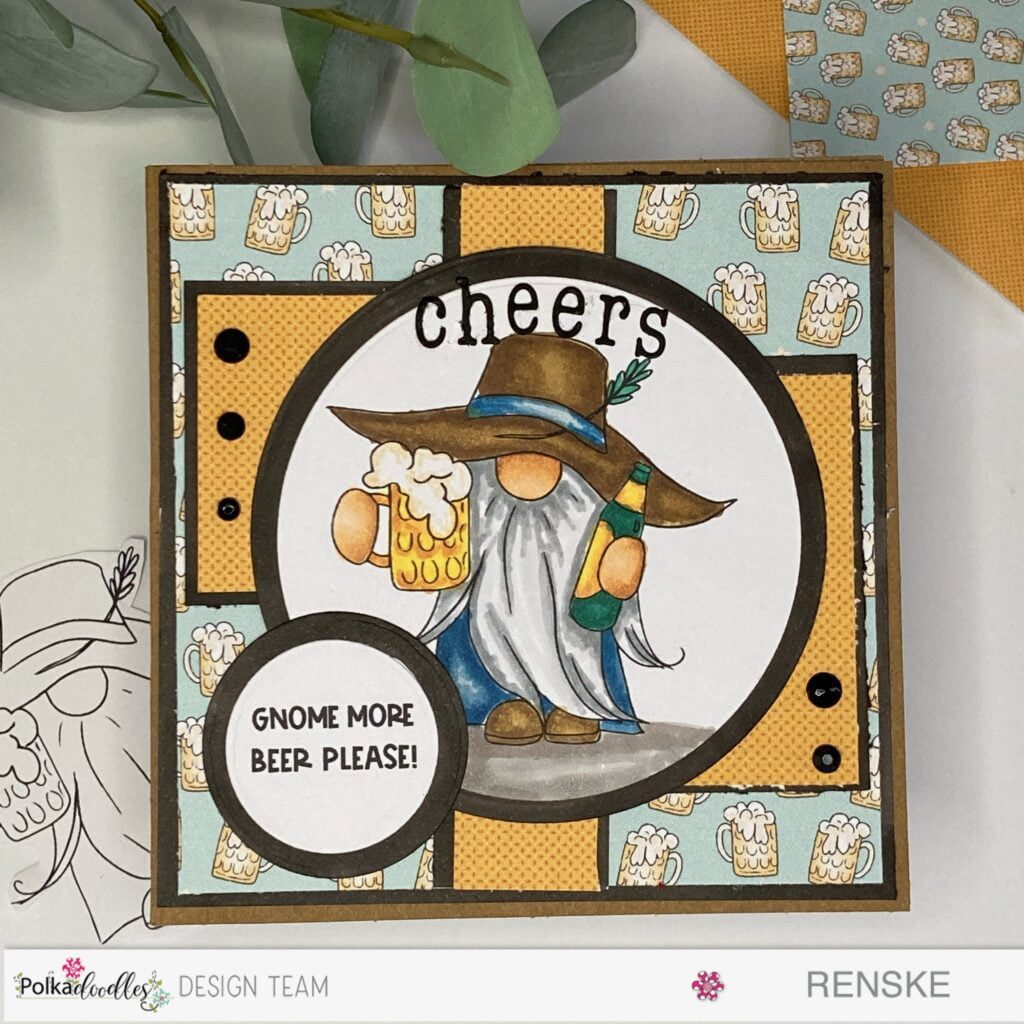
Masculine Birthday Card With Gnome Charm And Beer Accents | Renske Wishes You
You can see a completely different way to use this same digital stamp in my birthday card for men. This tutorial shows how to use a sketch to create a layout with our beer loving gnome.
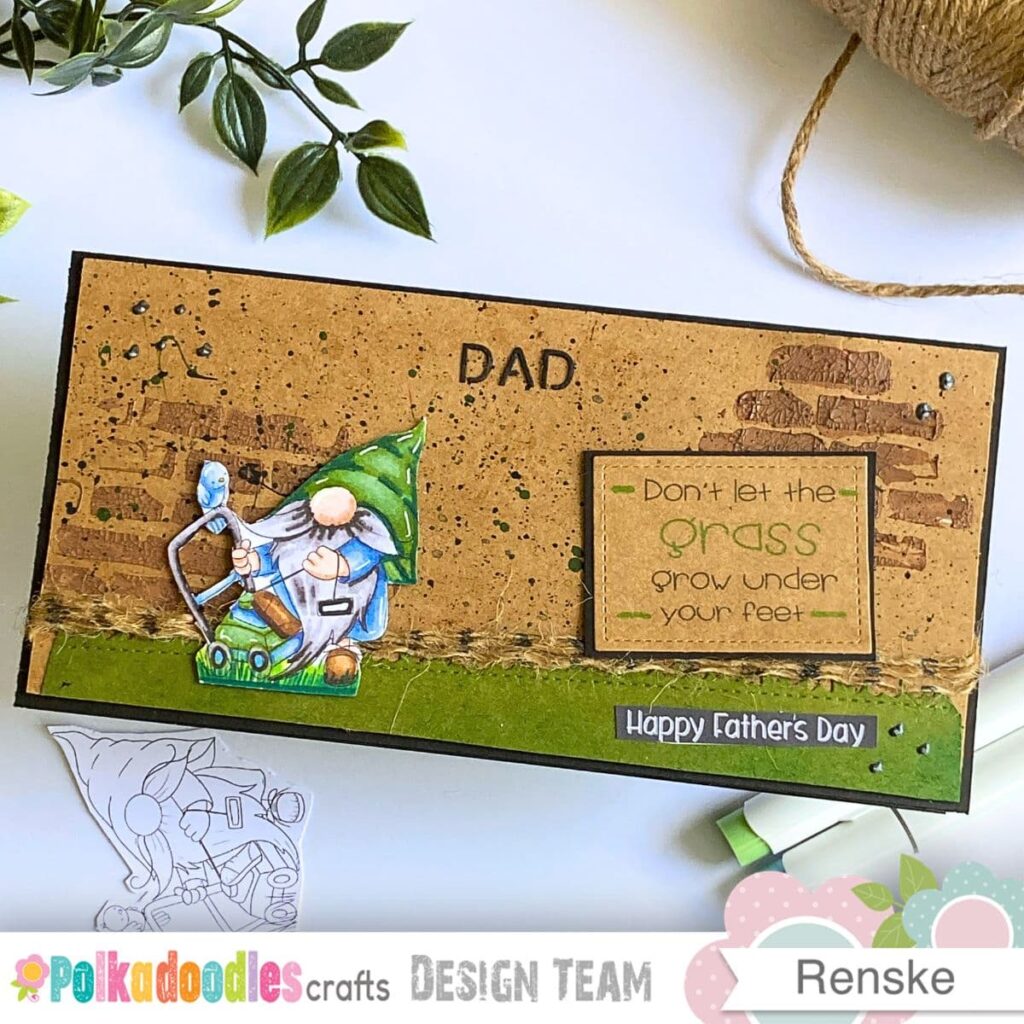
Masculine Father’s Day Card Tutorial With Lawn Mower Gnome
If your recipient enjoys spending time outdoors, you might like this gardening themed slimline design. It uses earthy colours and mixed media to create a rugged look for a father who loves his lawn.
Polkadoodles Products in the Spotlight
Dad Father Celebration Party Gnome For Men

I chose this digital stamp because the character adds a playful pub vibe to the rustic design. You can resize him easily to fit your project before printing on marker paper. This is a digital image so you can avoid shipping costs and start making today.
Gnome Men greetings, quotes and sentiments

These sentiments are perfect for interactive and masculine cards. I used them because the text matches the style of our gnome friend. You can print them on white cardstock or use a dark background for a different look.
I would like to enter my card in the following challenges
- Word Art Wednesday: Anything goes
- Crafty Catz: Anything goes
- Cut It Up: one for the boys/men
- Dragonfly Dreams: Masculine
- A Perfect Time To Craft Open Challenge: Anything goes
- Crafts Galore Encore Challenge Blog: Anything goes
- Daisy Chain Challenges: Not square
- Let’s Craft and Create: Anything goes + penny for your thoughts
- Crafter’s Cafe: Anything goes
Renske wow that was incredible