

Imagine the excitement of crafting a special birthday card filled with creativity and love for someone dear to you. Today, we will be creating an extraordinary birthday shaker card designed specifically for the upcoming challenge on Penny’s Paper-Crafty Challenge blog.
This challenge is made possible by the generous support of our sponsors, The Paper Nest Dolls and Colour of Love, whose creative products have inspired this delightful project. [Insert logos of The Paper Nest Dolls and Colour of Love here, with appropriate attribution].
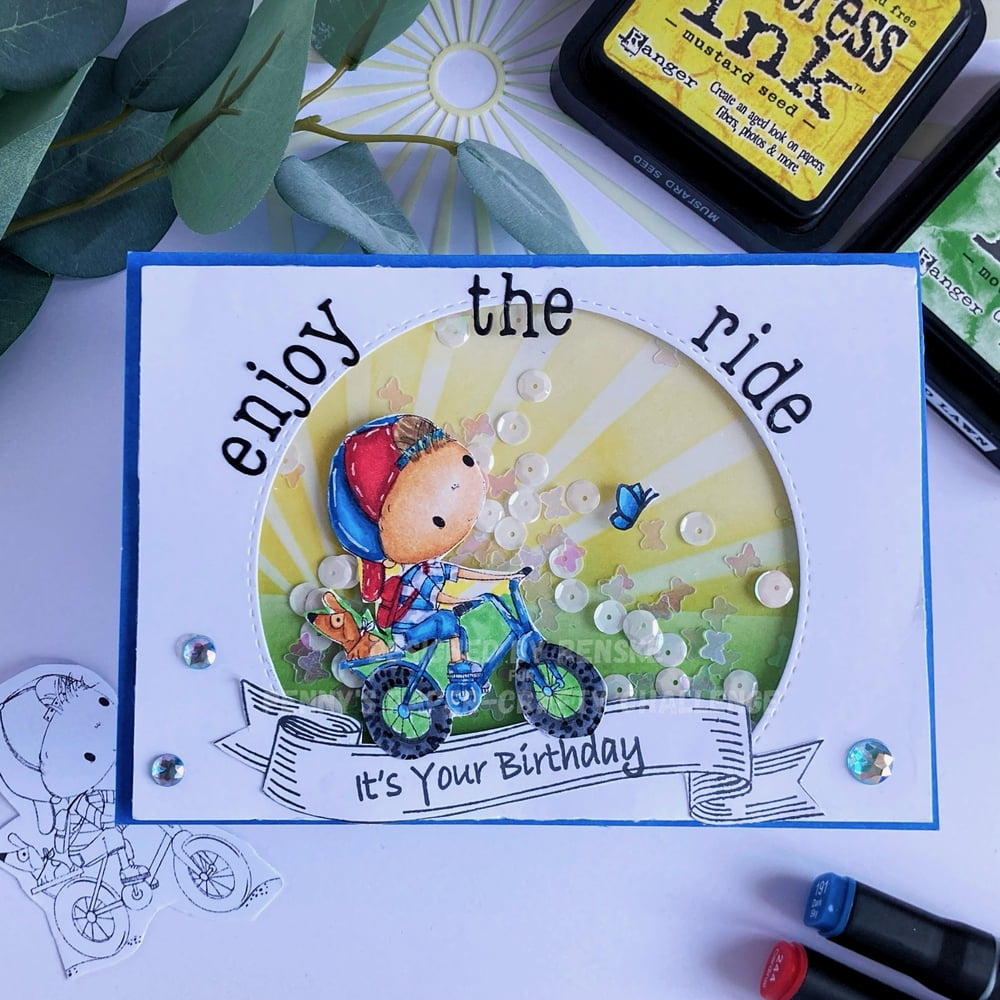
Card-making is a fantastic way to express your creativity and send a personalized message. In this blog post, I’ll guide you step-by-step through making this beautiful shaker card with the “Birthday Owen” digital stamp from The Paper Nest Dolls.
Let’s create this stunning ‘Birthday Owen’ shaker card and bring a smile to both your face and the recipient’s!
Essential Materials and Tools for Your Birthday Shaker Card
Creating an amazing birthday shaker card requires a variety of materials and tools. Here’s an overview of everything you’ll need, explanations for each item and possible alternatives to help you get started even if you don’t have all the materials.
- Digital Stamp ‘Birthday Owen’ from The Paper Nest Dolls: This is the focal point of our card, adding a personalized touch. You can purchase this digital stamp here. You can also use any other digital or rubber stamp that fits your theme.
- Colouring medium: I used alcohol markers to colour the image for vibrant and blendable hues. You can also use any colouring medium like coloured pencils, watercolour paints, or other markers.
- White Gel Pen: Adding highlights and details to your coloured image.
- Paper Glaze: To give a glossy finish to certain elements like the balloons. You can also use glossy accents.
- Scissors: Cutting out the coloured digital stamp and other elements.
- Rectangle Die from Card Deco: Use a precise rectangle for the shaker window. You can also use a craft knife and a ruler if you don’t have a die.
- T-Ruler: Ensuring straight lines and accurate measurements. You can also use a regular ruler.
- Pencil: Marking measurements and guidelines. You can use any marking tool.
- Craft Knife: Cutting precise shapes and details.
- Blue Paper: For our background layer. You can use any coloured or patterned card stock you like.
- White Paper
- Card Base (10.5 cm x 14.8 cm): This is the foundation of the card.
- Happy Birthday Clear Stamp: Adding the birthday sentiment. You can also handwrite the sentiment or use a different sentiment.
- Acrylic Block: Holding the clear stamp for stamping.
- Paper Trimmer: Cutting the paper to size.
- Die-Cutting Machine: Using dies to cut shapes. You can also cut it by hand with scissors or a craft knife.
- DCP Paper: Printing and colouring the digital stamp.
Now that we have all the materials and tools ready, let’s dive into the step-by-step tutorial on creating this beautiful birthday shaker card! beautiful birthday shaker card!
Step-by-Step Tutorial for Creating a Birthday Shaker Card
It’s time to start the creative process. Follow these simple steps to create your handmade birthday shaker card. Each step will guide you through the process, from preparing the materials to assembling the final card. Let’s get started!
Step 1 Printing and colouring the digital stamp
In this step, we will print and colour our digital stamp.
Printing the digital stamp in the right size
First, determine the design of the card and how large you want to print the digital stamp. Once decided, paste the stamp into Microsoft Word, adjust the dimensions, and print it on DCP paper that complements alcohol markers.
Colouring the Digital Stamp ‘Birthday Owen’
After printing it, I colour the picture using the following colour combinations:
- Skin: Tanned Skin (260), Peachy Blush (259), Salmon Pink (25), and Pale Cream (142).
- Blushes: Blushed Skin (257), and Blush (136).
- Hair: Pale Cream (142), Brown Grey (104), Walnut (100), and Clay (116).
- Pants and Gift: Neon Blue (129), Cerulean Blue (63), and Indian Blue (64).
- Yellow balloon, and ribbon around present: Pastel Yellow (39), Lemon Yellow (35), Yellow (34), Deep Yellow (32).
- Green balloon and hat: Apple Green (160), Weeds Green (162), Grass Green (47), and Forest Green (50).
- Red shirt and dots on hat: Cardinal (244), English Red (249), and Burgundy (247)
- Shoes: Black (120), Cool Grey 7 and Cool Grey 5
Adding highlights to the digital stamp
“After colouring, apply highlights with a white gel pen, adding highlights to the red dots on the hat, the balloons, and the pants. Add white dots to the red t-shirt and white stripes to the gift. Apply paper glaze over the balloons for shine. Once dry, cut out the picture to proceed with the shaker.


Having trouble editing or colouring digital stamps? Download my free guide for extra tips and tricks to help you perfect your digital stamps!
Step 2: Creating the shaker
In this step, we will create the shaker component of the card.
Creating the Shaker frame
We are making a rectangular shaker. I have decided on the design and the rectangular die I will use. Begin by die-cutting a rectangle out of white paper. This will not be the frame itself, but we will create a frame using this piece. Using a T-ruler, mark a line one centimetre from the edge on all sides and then connect the lines. Carefully cut along these lines with a craft knife to create the frame
Assembling the shaker frame using foam tape and acetate
Apply double-sided tape to the back of the frame and ensure a piece of acetate that fits behind the rectangular frame. Once in place, attach the acetate to the frame. After this, add foam tape to the back of the frame.
Filling the shaker
After attaching the foam tape, fill the shaker with the shaker elements, such as white, blue, and green. Add enough shaker elements, but not too many to avoid jamming.
Sealing the shaker window
Finally, you can close the back of the shaker with a rectangle of the same size as the front. Create this by die-cutting another white rectangle and attaching it to the back of the shaker. This completes the shaker component.
Step 3: Create a blue border around the shaker element
We are making a blue border around the shaker, to make the shaker stand out. The shaker measures 8 centimetres by 12 centimetres. To create the border, you will need blue card stock with dimensions 8.5 centimetres by 12.5 centimetres. Attach the shaker to the blue card stock to make the border.
Step 4: Assembling the card
Now it’s time to bring all the elements together.
- Adhering the shaker element to the card base: First, stick the shaker on the base card, placing it in the centre of the card.
- Positioning the coloured stamp: Place the boy on the shaker, positioning his feet in the centre of the frame on the bottom edge. He should cover the middle and right with the balloons on the shaker.
- Adding a sentiment: The digital stamp Birthday Owen is perfect for a boy’s birthday card. Therefore, the text “Happy Birthday” is very appropriate for this card. I have a small stamp with this text. I stamped it with Memento Tuxedo Black ink on white paper, and then cut the text into a rectangle.
Your stunning birthday shaker card is now complete! This project showcases how versatile and fun a shaker card can be.

Let’s Get Creative Together
We’ve journeyed through the exciting process of creating a stunning birthday shaker card using the ‘Birthday Owen’ digital stamp from The Paper Nest Dolls. From printing and colouring the digital stamp to assembling the intricate shaker element, each step has been a blend of creativity and fun. We’ve learned to use foam tape, acetate, and various colouring techniques to bring our shaker card to life. Now, it’s your turn to get creative and make your birthday shaker card!
Using the techniques and tips provided, you can craft a personalized and unique card that will surely bring a smile to someone’s face. Experiment with different colour schemes, shaker elements, and sentiments to make each card your own. Remember, the joy of card-making lies in the personal touch you add to each creation.
Join the Challenge
Ready to show off your new skills? Participate in the upcoming challenge on Penny’s Paper-Crafty Challenge blog! This challenge is a wonderful opportunity to share your handmade birthday shaker card with a community of fellow crafters. Click the button below to join the challenge and showcase your creativity!
More Birthday Shaker Card Inspiration
If you enjoyed this tutorial, check out these related blog posts for more card-making inspiration:
By exploring this additional post, you’ll find even more ways to enhance your card-making skills and create beautiful, heartfelt cards for any occasion. Let’s keep crafting together and continue to bring joy through handmade cards!
Products used for this Birthday Shaker Card
Affiliate Disclosure: In this blog post, we may use affiliate links. That means if you purchase through the links on this page, we may earn a small commission, at no extra cost to you. This helps us maintain this website and continue to provide valuable content. Thank you for your support!
Products with affiliate links
White gelly roll pen 08

Products used without Affiliate links

- Alcohol markers from Decotimecrafts
- Paper Glaze
- Scissors bought at ActionNL
- Rectangle die from Craft and Deco
- Clear stamp Happy Birthday from Alina Cuddle
I would like to enter my card to the following challenges
- Make My Monday Challenge Blog: The B is for …… birthday card for a boy
- Through The Purple Haze Challenges: Anything goes
- Krafty Chicks Challenge: Anything goes
- Cut It Up: Anything goes
- A Perfect Time To Craft Open Challenge: Anything goes
- Classic Design Challenge Blog: Anything goes + masculine
Adorable card!!! Thanks so much for participating in our CUT IT UP challenge!!! I appreciate that you play along and I enjoy visiting your blog!! Have a happy crafty day!! Deanne at A Little Bit O’ Paper
Thank you
So cute, Renske – I love a good shaker card! Your coloring on “Owen” is just right, lol, perfect birthday boy! Thanks so much for playing at Make My Monday!
How sweet and adorable! Such a wonderful shaker card! Thanks so much for joining the Anything Goes challenge with Krafty Chicks this week.
Diane – DT KCC