
Some links in this post are affiliate links. This means I may earn a small commission if you make a purchase, at no extra cost to you. I only recommend products I use and genuinely enjoy in my own cardmaking. Read more here.
I wanted to make a card that feels soft and thoughtful for a friend today. I started looking for a round object in my craft room. This arch card tutorial shows how to create a beautiful shape using common items from your home.
I struggled to get the arch shape perfect at first. I decided to let go of that pressure and enjoy the unique handmade look of my work. This approach helps you feel more relaxed while you are creating at your own table.
I do not own special dies for this shape so I looked for a round object in my room. I found a small cat bowl that usually holds my tiny die cut pieces. The top of this bowl was a manageable size for a curved card base
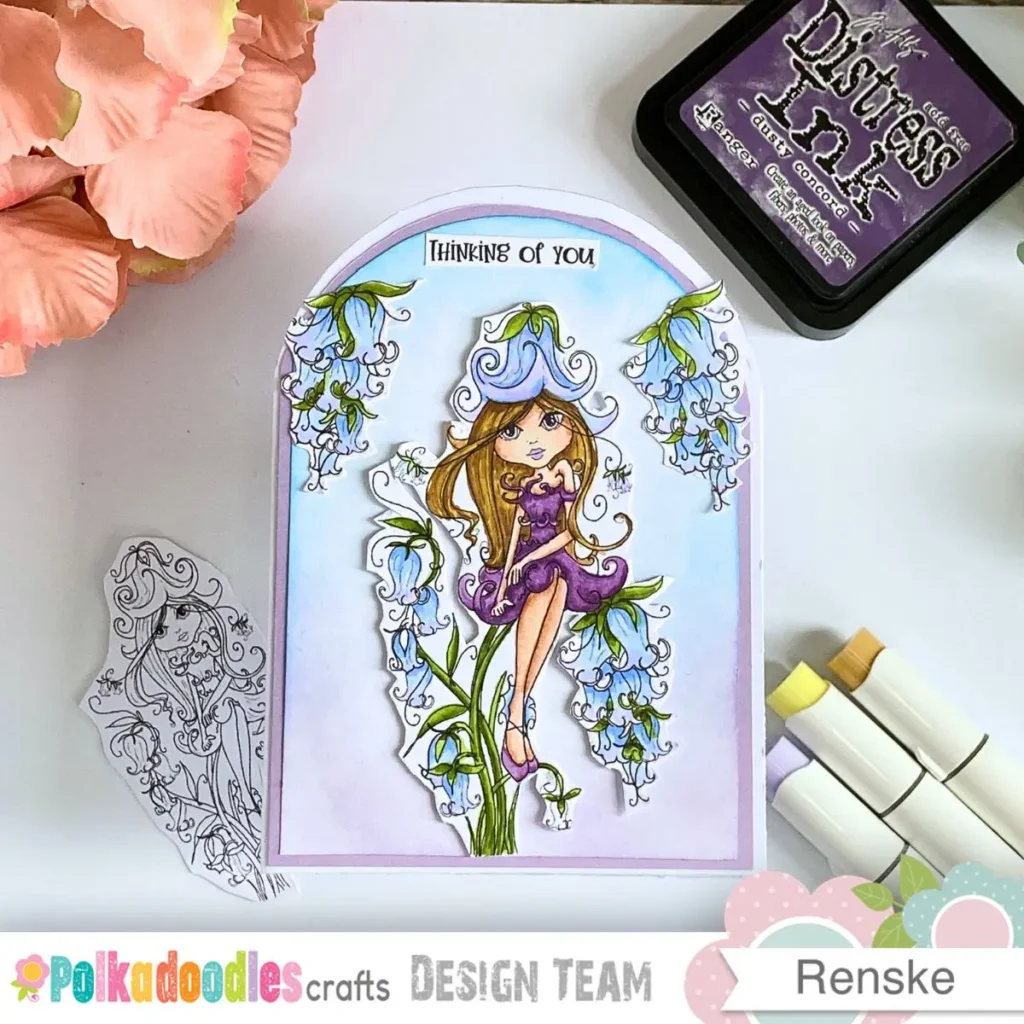
I made this project for a Polkadoodles design team challenge with a shaped cards theme. I used the Bluebell Flower Girl digital stamp from the Darling Buds collection to match the soft lines. These images are achievable to use with a standard printer and basic software like Microsoft Word
Every step is manageable and allows you to enjoy the process at your own pace. We can now look at how this curved design comes together for your next project.
What is an arch-shaped card?
An arch-shaped card has a rounded top instead of standard straight corners. The curved line gives your project a soft appearance. You can create this look by using items from your own kitchen.
Why are arch cards so popular?
An arch-shaped card replaces straight corners with a rounded top. This gives your design a softer appearance.
Rounded lines feel calmer than square card shapes. This is especially true when you use florals and pastel colours. The style works well for soft and gentle designs.
I also think arch cards have a more finished look. It feels more natural, even before you start decorating them. The shape already does part of the work for you.
Why this shape works perfectly for a thinking of you card?
Softer shapes help create a gentle mood for a thinking-of-you card. The curved top gives the design a calm appearance. This works well with floral images and blended backgrounds.
This floral arch-shaped card also feels personal. The design is not too busy. That balance can sometimes be difficult.
Which materials do I need for this arch card tutorial?
I gathered a few soft cardstock colours and blending inks for this arch card tutorial. Using what you already own is a wonderful way to enjoy your supplies at your own pace.
You can swap these items for any similar colours you already have in your craft stash. Using what you already own is a wonderful way to enjoy your supplies without any extra cost.
Polkadoodles Supplies for this Project
Before we begin, I want to share a small note about the links in this post. It costs you nothing extra but supports the free tutorials I share here on the blog.
- Bluebell Flower Girl digital stamp. This charming image from the Darling Buds collection is the heart of the design. You can download it instantly and resize it to fit your card base perfectly. Shop at Polkadoodles
- Winnie Daisy greetings and quotes. A versatile set of 55 sentiments that provide the right words for many different occasions. The transparent backgrounds make it achievable to layer them with your digital images. Shop at Polkadoodles.
Cardstock and papers
I used white cardstock for the base and lilac for the mat layer. If you do not have these shades, any scrap paper or patterned pages work well. White smooth cardstock is helpful for the background and the colouring.
- White cardstock for the card base
- Lilac cardstock for the mat layer
- White smooth cardstock for the background and colouring
The finished project is approximately 10.5 x 14.8 cm.
Inks and colouring supplies
I chose three soft distress ink shades to create a distress ink background. If you do not have blending inks, you can use watercolours or markers. These alternatives help you enjoy the process of what you already own.
- Distress Ink Tumbled Glass
- Distress Ink Salty Ocean
- Distress Ink Dusty Concord
- Blending brushes
I used Ohuhu alcohol markers to bring the digital stamp to life. Coloured pencils or water-based markers are a wonderful alternative for this style. You should use the tools that feel most comfortable to you today.
- Ohuhu alcohol markers from the 360 set
Basic Tools
You will also need a few basic tools from your craft room. A small bowl or a glass works perfectly for tracing the arch shape. A nail file is a handy tool for smoothing any uneven edges.
- Scissors
- Foam tape
- Glue
- A round object to draw the arch shape
- Nail file for smoothing edges
How do I use digital stamps for this card?
I use the Bluebell Flower Girl digital stamp from Polkadoodles because her calm expression and floral surroundings bring a peaceful mood to the design. The image contains many lovely details, which allows the rest of the card to remain quiet and balanced. Choosing a soft colour palette for the flowers ensures the overall appearance stays manageable and serene for the recipient.
I use Microsoft Word to scale the main image and crop specific elements. I cropped the side flowers before printing. To do this, you don’t need complex software, you can do this in Microsoft Word. It allows you to focus on the quiet joy of colouring and assembly at your own table.
In my free guide about digital stamps, you will find more advice about digital stamps. You can find out how to adjust the size of individual flowers to fit your hand-drawn arch perfectly. This preparation makes the creative process feel much more achievable on a low-energy day.
How can I make an arch-shaped card without using dies?
You can create a curved shape by tracing around a round household object, such as a bowl or a plate. You can use items you already have at home.
Step 1. Creating a Manageable Arch Shape
I started with a white side-fold card base in A6 size (10,5 by 14,8 cm). A side-fold works best here because it avoids that flat section you sometimes get at the top of shaped cards.

I traced around a small bowl to create the rounded shape. You can also use a plate or a glass.

After tracing the arch, I cut the shape out with small snips instead of long cuts. I always rotate the paper rather than the scissors because it gives much more control around curves.

Tips for smoother arch shapes
I often make a small mistake with my scissors when my hands feel a bit tired. A little wobble in your arch is a lovely sign that a real person made this card.
I used a nail file to gently sand the edges using very soft pressure. This hides any tiny mistakes and makes the line smooth without damaging the paper fibres.
It is an easy way to get a smooth finish with a common household tool.
A tip for a steady hand
If you find it difficult to trace a smooth line, try using a pencil with a soft lead. This requires less pressure on your paper and makes it easier to follow the curve of your bowl.
You can erase any pencil marks once you finish cutting your shape.
Step 2. Make layered panels for the arch card
Trace the card shape onto your layers and cut them out. Trim each layer about 2 to 3 mm smaller than the previous one.
The lilac mat layer repeats the colours used later in the colouring. This approach helps the card feel connected and visually balanced without adding extra elements.

Step 3. Create a soft distress ink background
Working on the smallest white panel gives you a soft colour transition that draws attention to your digital stamp. Keep the centre mostly white and blend the colours around the outer edges instead. This placement helps the focal point stand out later in the process.
You can blend two soft blue shades at the top of the panel.
- Tumbled Glass
- Salty Ocean
Apply a soft purple shade to the bottom area.
- Dusty Concord
I used soft circular motions to build the colour on the smallest white panel. This rotating movement is important because it prevents hard lines or spots from forming on your paper. It helps you achieve a dreamy, soft transition between the different ink shades.

I share more advice in this blog post “Create an Irresistible Handmade Spring Flower Card with Ink Blending” if you want to practice your blending technique.
Tips for blending distress inks
If your blending looks a little patchy at first, you can continue adding light layers. Distress inks usually smooth out with a bit more work, so be patient as you build the colour.
You should avoid rushing darker colours. We are using Dusty Concord, and that shade becomes overpowering quickly if you apply too much ink too fast.
Your background needs a few minutes to settle and dry. This is a lovely point to take a break. You can pick up the next step whenever you feel ready.
Step 4. Colour the digital stamp with alcohol markers
I chose soft blue and purple markers to match the background and create a calm feeling. Repeating these colours throughout the design helps the flowers flow naturally into the ink blending. This keeps the card soft and balanced.
I used warmer tones for the skin so it stands out gently against the cooler blues and purples. This helps the face stay a clear focal point without overpowering the soft colour palette. I found the tiny flowers a bit difficult to colour because it was hard to see where each petal ended.
I decided to let go of perfection and focus on the general flow of the lavender and blue shades. This approach keeps the process mindful and prevents frustration with the small details. I selected these specific alcohol marker shades for the different parts of the image.
Skin colours
- YR00 Barely Blush
- PYR04 Pastel Peach
- YR11 Peachy Blush
- YR312 Light Earth Brown
Hair colours
- Y06 Butter
- Y311 Termite Beige
- Y413 Fawn
- Y515 Light Walnut
Flower colours
- V22 Lavender Wisp
- BV32 Pale Sky Blue
- BV38 Sky Blue
Dress and shoes
- V13 Greyed Lavender
- V18 Bright Lavender
- V010 Faded Violet
I did not use a colourless blender for this project as I wanted to keep the layers manageable. Building up the colour slowly with your lightest shades helps you achieve a smooth look without needing extra tools.

A gentle tip for tiny details
If you struggle to see where the small flowers begin and end, you can use a fine liner or a sharp pencil to trace the lines first. This extra bit of definition makes it much more manageable to stay within the lines while you are colouring. It is a lovely way to feel more confident when your eyes or hands feel a little tired.
Step 5. Cut out the digi stamp
I cut a thin white border around the image to help it stand out from the ink background. This outline prevents the digital stamp from disappearing into the darker colours. Turning the paper instead of the scissors gives you a much smoother edge.
Cutting this border is often a relaxing task that helps you focus on the creative moment. You might find some tiny details a bit stressful if you worry about cutting something off. It is important to remember that a handmade card does not need to be flawless to be special.
I move the paper around and cut around the tiny flower petals and hair sections. This technique allows you to get smoother curves. It also prevents the cardstock from fraying at the edges of your focal image.
A tip for fussy cutting
If you are worried about the difficult parts, you can leave a slightly wider white border. This extra space gives you a manageable cushion and reduces the pressure of getting too close to the lines.
Step 6. Build the card composition
I placed the girl slightly below the centre to create a balanced feel for the eye. Her face sits inside the lightest part of the background, which helps the focal point stand out. Arranging the pieces loosely before glueing allows you to find the most peaceful composition.
I do not follow a specific order when I place the flowers around the girl. I prefer to use my intuition and see what feels right at the table today. This freedom allows you to build a design that reflects your own creative choices.
The flowers follow the curve of the arch shape to create a soft flow across the card. I usually take a moment to shift elements slightly until everything feels balanced before adhering them. You can explore more handmade thinking of you card ideas to see how different layouts create a calm mood.
How to stay calm during assembly
I suggest taking a photo with your phone before you start glueing your flowers in place. This helps if you move something during the final assembly while your hands or eyes are tired. I often lose things on my desk, so this small step keeps the process manageable.
Step 7. Add dimension and finishing touches
Once I was happy with how everything looked, I started putting the card together. I used foam tape behind the girl to lift the main image from the card surface. This extra height creates soft shadows that give your design more depth.

It makes the project feel alive and interesting without making the composition look busy.
Finishing with a Meaningful Sentiment
The sentiment comes from the Winnie Daisy set by Polkadoodles. This collection is a great resource because it covers many occasions. I placed the “Thinking of You” greeting near the top.

Step 8. Keep the embellishments minimal
I chose to keep this card free from extra decorations. The layered shape and soft colours already add enough detail to the composition. Adding gems or sequins would have made the card feel busier than I wanted
Sometimes it helps to stop before adding one more thing. I do not always follow that advice myself, but this time it felt right. Every card you finish is a wonderful creative win for your day.
Every project you make helps you find your own creative confidence. I hope you enjoy the quiet satisfaction of seeing your handmade arch card come together.

How does this curved shape work for a thinking-of-you card?
Curved lines and pastel colours work beautifully for a thinking-of-you card because they create a calm mood. These softer shapes feel much less formal than a standard rectangle and carry a sense of peace.
A curved design provides a lovely frame for floral images. The arch shape keeps the entire composition light and thoughtful.
Soft colours and curved shapes create calm
Pastel shades and curved lines naturally work well together. They soften the design and create a gentle mood without extra decoration.
This style is perfect for thinking-of-you cards or supportive floral designs. It helps you create a project that feels personal and meaningful for a friend.
A shape for many different occasions
Although I used a thinking-of-you sentiment here, this same layout can naturally work for different occasions. The flexible design provides a lovely foundation for many seasonal projects.
- A birthday card
- A friendship card
- A sympathy style card
- A soft spring design
You can change the sentiment and colour palette to see how it shifts the feel of your card. Experimenting with these small details is a lovely way to find your own creative confidence.
What are the best tips for making a successful arch card?
Testing your layout before glueing anything helps you find a peaceful balance for your design. This small step allows you to move elements until they feel right for your composition. Don’t use too many embellishments on shaped cards, this holds the unique arch as the focal point.
Leaving some white space in the background creates a rest for the eyes and keeps the card feeling light. I suggest taking a photo of your arrangement before you start adhering the pieces to the paper. This keeps you calm during the final assembly if a small flower moves by accident.
Common mistakes to avoid
A small round object often creates a steep arch that looks awkward on larger cards. You should choose slightly wider curves to help the design feel more natural and gentle. This avoids a shape that feels too narrow for your side-fold card base.
Darker distress ink colours can take over your background if you apply too much at once. You should build the colour gradually to achieve a dreamy transition between the different shades. This patient approach prevents hard lines or spots from forming on your smooth white cardstock.
Harsh lines often happen with alcohol markers when too much ink is added to the paper. Thin layers blend better and give you more control over the shading of your digital stamp.
How can I customise this tutorial?
You can customise this tutorial by choosing new colours or different digital stamps to suit your mood. Changing from soft blues to warm autumn tones creates a unique feeling for your handmade card. This flexible layout provides a wonderful foundation for many different occasions.
Try different colour palettes
You might enjoy trying this tutorial with various colour palettes to see how the look changes. Experimenting with new combinations helps you discover which shades feel most peaceful for your crafting session. Using a handmade fall card tutorial approach with warm tones can bring a cosy feel to your design.
- Soft peach and pink tones
- Warm autumn colours
- Vintage neutrals
- Fresh spring greens
The arch shape is manageable to revisit whenever you want to try a new colour mix. Reusing the same layout reduces the pressure of making new design choices when you feel tired.
Use the arch shape for other card styles
You can use this curved card design for many different moments throughout the year. A shaped card adds visual interest, so you might notice you need fewer embellishments than usual. This makes the project much more achievable when you have limited energy for detailed decorating.
- Birthday cards
- Romantic cards
- Clean and simple layouts
- Other shaped cards
A shaped card already adds visual interest, so you might notice you need fewer embellishments than you first think.
Let’s Get Creative Together
This arch card tutorial shows that you do not need special dies or complicated techniques to create a soft and elegant design. The curved shape and the ink background work together while the floral digital stamp keeps the design personal. Every card you finish is a lovely, creative win for your day.
Do you enjoy making shaped cards, or do you prefer to stick with standard bases? I would love to hear which shapes you find most peaceful to create at your table. We can learn from each other as we explore new ways to be creative.
If you make your own version of this card, please feel free to share it with me. I enjoy seeing how different colour choices change the mood and feel of the design. Every project is a new chance to enjoy the process and create something personal for a friend.
Join the Polkadoodles Challenge
I made this card for the Polkadoodles design team project. The theme for the design team was to create a shaped card. You are welcome to join our creative community by entering the latest Polkadoodles challenge on their blog. It is a lovely way to share your work and find fresh inspiration from other crafters.
More Shaped card ideas with Polkadoodles
If you enjoyed this project, you might like exploring these other ideas from my craft room.
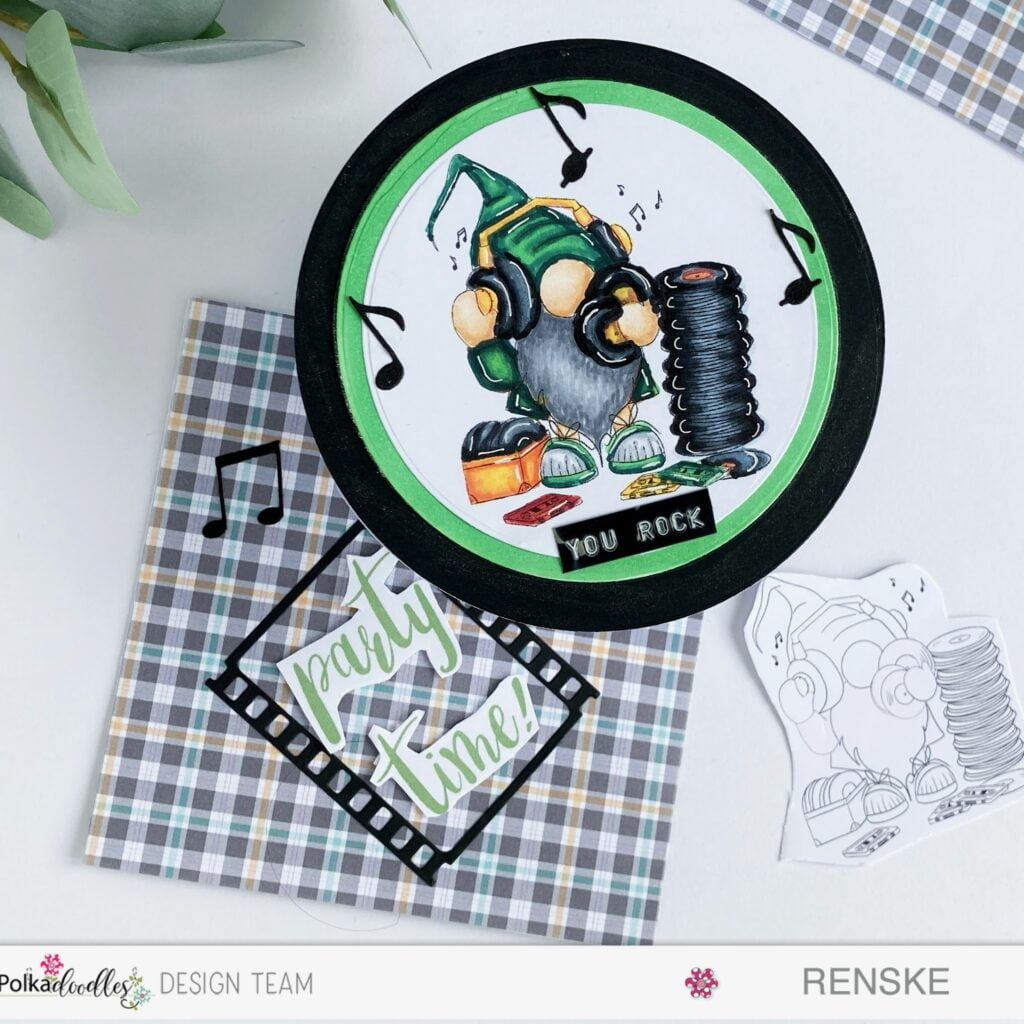
Rock On! Crafting a Music Gnome Masculine Card Tutorial
You might also enjoy this tutorial which features a round record shape. This project shows you how to create a circular base and a matching sleeve for your card.

Create a Stunning Double-Diamond Card with Polkadoodles Digital Stamps
You might also like this double-diamond card which features the Daffodil Flower Girl digital stamp. This tutorial shows you how to create a three-dimensional effect while using soft floral colours. It is a manageable way to try a unique fold that adds depth and elegance to your projects
Polkadoodles products in the spotlight
Bluebell Flower Girl digital stamp

This charming digital image from the Darling Buds collection is the centrepiece of the card. Because it is a digital download you can start your project immediately without waiting for international shipping. It is a manageable way to build your collection of floral stamps
Winnie Daisy Greetings set

This set includes 55 different sentiments that are perfect for the front or inside of your projects. Having such a variety of messages makes choosing the right words for a thinking of you card feel much more achievable. This is a practical resource that you will reach for time and again.
I would like to enter my card in the following challenges
- Crafty Gals Corner: Anything goes + spring
- Word Art Wednesday: Anything goes
- CREATIVE INSPIRATIONS: Anything goes
- Craft Rocket Challenges: Not Square
- Crafty Catz: Anything goes
- 613 Avenue Create: Anything goes + May flowers
- A Perfect Time To Craft Open Challenge: Anything goes
- Crafts Galore Encore Challenge Blog: Anything goes
A pretty card. Lovely image and soft colours.
Thank you for joining in with the Crafts Galore Encore May Challenge “Anything Goes” x
Cute image and card. Thanks for sharing over at Crafty Catz
Renske, it’s beautiful! Thanks for joining us at 613 Avenue Create. I hope we see you on the front porch again soon!
Hugs, Em
613 Avenue Create Co-Owner
A Place To Start DT
Creative Em my blog
Creative Em on YouTube my Youtube channel
Thank you so much. Glad you like it.
Very fun card, Renske! I love how you used the arch design and the colors are really nice too. Thanks so much for playing along with us at Word Art Wednesday. We have a new challenge starting today and would love to have you join us again!
Thank you so much for your lovely comment.