
Some links in this post are affiliate links. This means I may earn a small commission if you make a purchase, at no extra cost to you. I only recommend products I use and genuinely enjoy in my own cardmaking. Read more here.
A wedding is all about love, and what better way to show it than with a beautiful handmade wedding card? A card made with care adds that personal touch to someone’s big day. Imagine how special it must feel for the couple to receive a card crafted just for them, filled with thoughtful details that reflect their style and love story.
This handmade wedding card tutorial will guide you step by step in creating an elegant handmade wedding card. Embossing adds depth and texture to your design, while the digital stamp and other elements make the card unique.
By the end of this tutorial, you’ll know how to combine techniques to create a wedding card that stands out. From digital stamps to the perfect finishing touches, you’ll learn how to craft a card that’s both beautiful and meaningful. Let’s get started and create something special!
- Overview of the Card Design
- Materials and Measurements for this wedding card tutorial
- The Wedding card tutorial: Crafting Your Elegant Embossed Wedding Card
- Let's Get Creative Together
- Products used for this Wedding card tutorial
- I would like to enter my card in the following challenges:
Overview of the Card Design
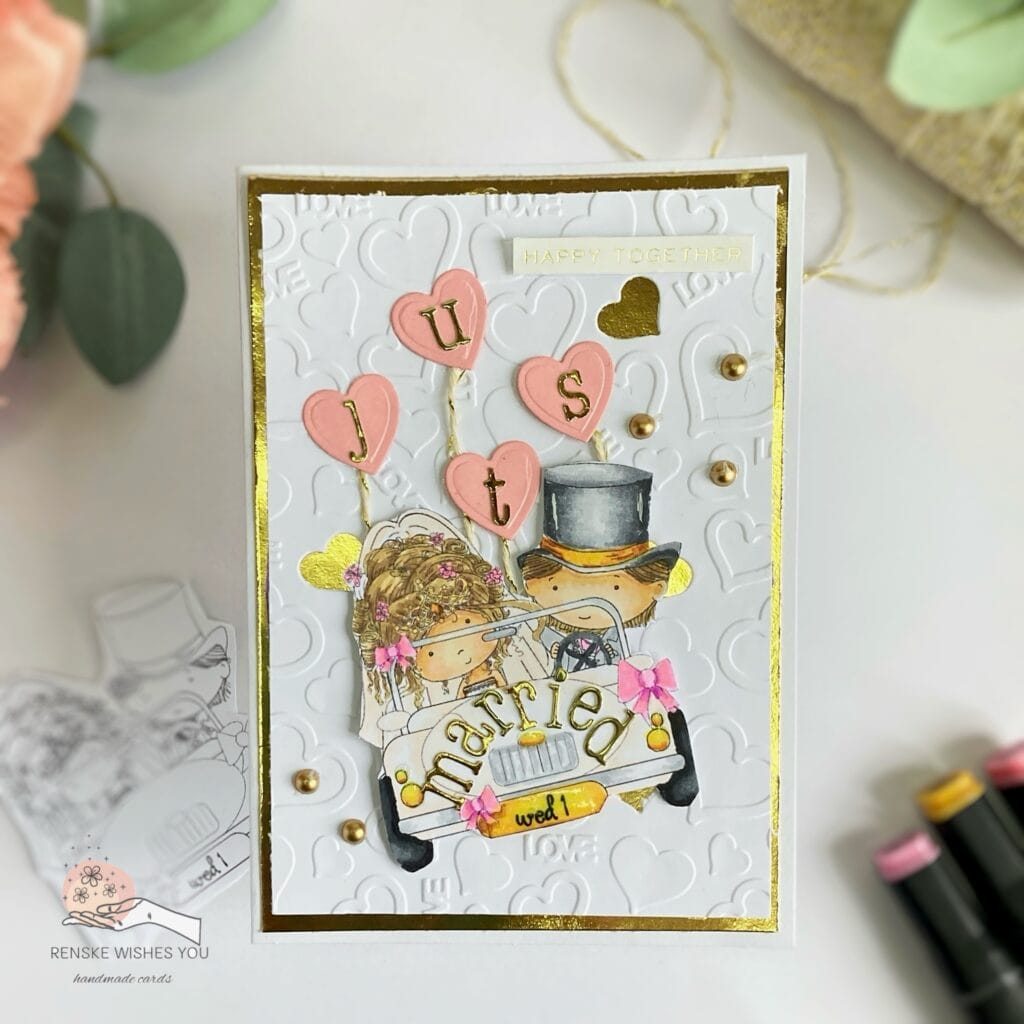
Creating a wedding card is about balancing elegance with a personal touch. I aimed for a design that’s both sophisticated and playful—perfect for a wedding, with a fun twist that reflects the couple’s style, making it the perfect card for newlyweds.
While looking through my craft stash, I found a beautiful digital stamp called Wedding Car from Polkadoodles. It felt like the perfect choice. The stamp blends elegance with a charming touch, making it ideal for a wedding card. I wanted to create a card that’s both refined and lively, using a colour palette that reflects the joy of the occasion.
For this card, I chose a soft, elegant colour scheme often associated with weddings: gold, black/grey, and blush pink. These colours work together to create an elegant wedding card atmosphere, while the subtle pops of gold add a touch of luxury. The embossed patterns tie everything together.
What do you think makes a handmade wedding card stand out? Do you prefer simple and minimal designs, or something more elaborate and intricate?
The beauty of crafting a wedding card is that you can tailor it to suit the couple’s personality while showcasing your creativity with a unique handmade wedding card design.
Materials and Measurements for this wedding card tutorial
Creating a beautiful wedding card is simple with the right materials. Here’s a breakdown of the dimensions and materials I used, along with alternatives if you don’t have the exact items.
The Measurements
- Card Base: 21 cm x 14.8 cm (folded in half for a top-folding card)
- Golden Layer: 14,3 cm x 10 cm
- Embossed Layer: 13,8 cm x 9.5 cm
These measurements are designed to achieve a clean, elegant look with layers that perfectly complement each other.
Materials I Used
Here’s a list of the materials I used for this card, along with explanations of their uses. If you don’t have the exact items, I’ve included some alternatives!
- Wedding Car Digital Craft Stamp from Polkadoodles: This serves as the focal point of the card. I printed and coloured this digital stamp for a playful yet elegant touch. Alternative: Any wedding-themed digital or rubber stamp from your collection will work.
- Golden Cardstock: This is used for the base layer, providing a rich and elegant feel for the card. Alternative: Any heavy-weight cardstock in gold or similar metallic colour can be used.
- White Cardstock: Used for the heart-embossed layer, this cardstock is sturdy enough to hold the embossing details. Alternative: Any thick white or cream cardstock will suffice.
- Hearts Embossing Folder: Adds texture to the background for a soft, romantic look, which is perfect for a wedding theme. Alternative: If you don’t have a heart embossing folder, try a floral or lace pattern instead.
- Heart Die from Aveccreative: This die cuts out the heart shape for the heart balloons. Alternative: Use any heart-shaped die or even hand-cut a heart shape for a more personal touch.
- Alcohol Markers from Decotimecrafts: I used these markers to colour the Wedding Car digital stamp, giving it depth and vibrancy. Alternative: If you don’t have alcohol markers, use coloured pencils or water-based markers.
- Alphabet Die from Craftemotions: Used to create the sentiment for the card, adding a clean, modern feel while fitting the elegant design. Alternative: You can handwrite your sentiment or use alphabet stickers.
- Sentiment Sticker from Tim Holtz: A pre-made sticker that saves time while providing a polished look. Alternative: you can stamp or handwrite your sentiment for a more personalized touch.
- Paper Glaze: Adds a glossy finish to the heart die-cut, making it pop and elevating the elegance of the wedding card design. Alternative: Use Glossy Accents or any clear glaze if you don’t have paper glaze.
- White Gel Pen: Used to add fine details and highlight areas of the design, such as the heart’s outline. Alternative: A white acrylic paint marker can also work.
- Bakers Twine: Adds a rustic touch, tying the card’s elements together for a balanced look. Alternative: Any twine, ribbon, or string can be substituted.
- Die-Cutting Machine Nellie Choice: Used for cutting out the dies and embossing. Alternative: Any die-cutting machine you have, such as the Big Shot or similar models, will work.
- Golden Pearls: These serve as the final touches on the card, adding extra elegance. Alternative: You can use any pearls, rhinestones, or embellishments from your collection.
- Nuvo Aqua Shimmer Pen: Adds a shimmering effect to the different elements. Alternative: You can use a glitter pen or fine glitter for a similar effect.
What’s your favourite material to use when creating wedding cards? Have you experimented with adding shimmer or texture to your designs? Let me know what you enjoy!
This list of materials will help you achieve the same elegant look I created, but feel free to switch things up and make the card your own.
The Wedding card tutorial: Crafting Your Elegant Embossed Wedding Card
Now that you have your materials ready, let’s begin crafting your elegant wedding card
This step-by-step tutorial will guide you through adding an embossed texture and colouring the Wedding Car digital stamp. You’ll find easy techniques and creative ideas to make your card stand out. Let’s get started!
Step 1: Creating the Card Base and Layers
We’ll start by building the foundation for our elegant wedding card. This involves creating the base and preparing the layers to frame the beautiful embossed background.
Materials Needed
- Golden Metallic Cardstock (brand unknown)
- White Cardstock (brand unknown)
- Embossing Folder (Hearts Embossing Folder, brand unknown)
- Die-Cutting Machine (Nellie Choice)
- Adhesive
Here’s how to do it:
Create the Card Base
Begin by preparing the base of the card. You can use a pre-made card base measuring 10.5 cm by 14.8 cm, or you can easily make your own. To create your base, cut a piece of cardstock to 21 cm by 14.8 cm. Score along the longer side at 10.5 cm and fold it in half to create a crisp crease. This will be the foundation for your card.
Cut the Layers
Now it’s time to cut the layers.
- Start with the white cardstock and cut it to 9.5 cm by 13.8 cm. This panel will hold the wedding couple’s image.
- Next, cut the Golden Metallic Cardstock to 10 cm by 14.3 cm to create a golden border that complements the background. This layer will frame the white background panel.
Emboss the Background
To add texture and elegance to your background, use an embossing folder (I used a heart-themed one with the word “LOVE” and hearts cut out in various places).
Place the white cardstock in the embossing folder, tape it down to prevent it from shifting, and run it through your die-cutting machine. This will create a beautiful embossed pattern with hearts and the word “LOVE,” allowing the golden cardstock to peek through the cut-out areas.
Assemble the Layers
Once your embossed background is ready, adhere it to the golden metallic cardstock. Since the golden cardstock is smooth, it may take a little longer to stick. I recommend placing something heavy on top and letting it dry to ensure it adheres properly. Once that’s set, attach the layered panel to your card base.

With the base and layers complete, you now have a solid foundation for your stunning wedding card! Ready to move on to the next steps and add even more beautiful details to your handmade wedding card?
Step 2: Printing and Colouring the Digital Stamp for Your Wedding Card
“In this step, we will bring the digital stamp to life by adding colour and personality to your design, making it the perfect focal point for your handmade wedding card. Let’s get started!
Materials Needed
- Wedding Car Digital Craft Stamp (Polkadoodles)
- DCP Paper (for alcohol markers)
- Alcohol Markers (Decotimecrafts)
- White Gel Pen
- Nuvo Aqua Shimmer Pen
- Paper Glaze
Here’s how you do it:
Printing the Digital Stamp
Start by choosing the right size for your digital stamp. For my rectangular card, I adjusted the stamp height to 7 cm, allowing the width to adjust automatically. Print your image on DCP paper, which is excellent for alcohol markers. This paper works perfectly for smooth blending and vibrant colours.
Colouring the Image
Once your stamp is printed, it’s time to colour! I used Decotimecrafts alcohol markers for this. Here are the combinations I used to bring the wedding car and couple to life:
- Skin: Pale Cream (142), Salmon Pink (25), Peachy Blush (259), Tanned Skin (260)
- Bride’s Hair: Pale Cream (142), Brown Grey (104), Walnut (100), Clay (116)
- Groom’s Hair: Clay (116), Walnut (100)
- Car and Veil: Pearl White (109), Leather (113)
- Bow Ties and Flowers: Pastel Pink (174), Pale Pink (09), Rose Pink (08), Peony Purple (282)
- Lights, Hat Ribbon, and Car Plate: Barn Red (245), Golden Yellow (222), Primary Yellow (221)
- Tires: Black (120), Cool Grey 9 (CG9), Cool Grey 7 (CG7)
- Hat: Cool Grey 7 (CG7), Cool Grey 5 (CG5), Cool Grey 3 (CG3), Colourless Blender (0)
- Car Grill and Rod: Cool Grey 4 (CG4), Cool Grey 3 (CG3), Colourless Blender (0)

Adding Highlights and Details
After coloring, it’s time to add a little extra sparkle and shine! I used a white gel pen to add highlights to the hat and number plate, giving them a bright and polished look. Next, I applied a Nuvo Aqua Shimmer Pen to add a delicate shimmer to the bow ties and flowers—because what’s a wedding card without a little glitter, right? For the headlights and number plate, I used Paper Glaze to add gloss and dimension.
Cutting Out the Image
Once the highlights have dried completely, carefully cut around the edges of your image. You now have a beautifully colored and detailed wedding car ready to be placed on your card.

This step is all about adding personality to your design with colors and special touches. It’s amazing how the right coloring can transform a simple image into something truly special!

Having trouble editing or colouring digital stamps? Download my free guide for extra tips and tricks to help you perfect your digital stamps!
Step 3: Creating the Heart Balloons and ‘Just Married’ Text
In this step, we will add a playful and romantic touch to your wedding card by incorporating heart-shaped balloons and the perfect sentiment. The heart balloons will float behind the car, and the words ‘Just Married’ will complete this special design. Let’s bring these elements together!
Materials Needed
- Heart Die
- Alphabet Die
- Pink Paper
- Gold Cardstock
- Baker’s Twine (Beige with Gold Thread)
- Double-Sided Tape
- Craft Glue
- Tweezers
Here’s how you do it:
Die-Cutting the Heart Balloons
Begin by die-cutting four heart shapes using your heart die from Aveccreative. I chose a lovely pink paper for this purpose. These hearts will serve as the balloons that float behind the car. Once cut, set them aside for the next steps.
Creating the ‘Just Married’ Text
To create the ‘Just Married’ sentiment, use an alphabet die from Craftemotions. This die cuts all the letters at once, making it easy to create your phrase. Cut the letters out of the same gold cardstock used for the background layer; this will add a cohesive touch to the design.
Assembling the Heart Balloons
Take the word ‘Just’ and carefully place each letter in the centre of one of the heart balloons. Use tweezers to hold the letters steady, applying a small amount of craft glue to the back of each letter before sticking them down. Once all the letters are in place, set them aside to dry.
Attaching the Baker’s Twine to the Balloons
Cut a small piece of baker’s twine, which has a beige base with gold thread running through it. Attach a small piece of double-sided tape to the back of each heart balloon, then press the twine firmly onto the tape. This will give the effect of the balloons floating behind the car.
Placing the ‘Married’ Text on the Car
Next, we’ll add the word ‘Married’ to the car. Again, use tweezers to carefully position each letter on the front of the car, forming a beautiful arc. Apply glue to the back of each letter and adjust their positions until the word looks just right.

These heart balloons and the ‘Just Married’ sentiment will add a playful, romantic touch to your elegant handmade wedding card.
Step 4: Assembling Your Elegant Wedding Card – Bringing It All Together
With all the elements ready, it’s time to assemble your wedding card. This step is where the design really comes together.
Materials Needed
- Foam Tape (affiliate)
- Tim Holtz Sticker (Happy Together)
- Gold Paper
- Craft Glue
- Scissors
Here’s how you do it
Placing the Heart Balloons
Begin by placing the heart balloons on your card’s background. Since the twine will go behind the car, it’s important to stick the balloons first. To ensure they stay in place, apply glue to the back of each heart and gently press them into position. Let them set for a minute, and place something heavy on top to help the glue adhere. If the twine is too long, trim it to fit the design.
Attaching the Car
Next, let’s add the car to your card. I love to add dimension, so I use foam tape to raise the car off the background. Apply foam tape to the back of the car image and position it slightly tilted for a playful, dynamic look. Make sure the twine from the heart balloons goes behind the car as you position it.
Adding a Sentiment
To fill the empty space in the top-right corner, I used a Tim Holtz ‘Happy Together’ sticker. I adhered it to a piece of paper, cut it out, and layered additional paper behind it for dimension. Once everything is cut out, glue it in place for a perfect finishing touch.
Adding the gold pearls
To complete the card, use the gold pearls to add elegance and a bit of sparkle to the design. This ties everything together and gives the card a polished look.
")
And that’s it! Your wedding card is now fully assembled and ready for gifting. The playful heart balloons, the romantic sentiment, and the personalized touches come together beautifully. Enjoy the process, and feel free to adjust any element to make it yours!
Let’s Get Creative Together
Creating this elegant wedding card was enjoyable and fulfilling. The combination of heart balloons, a playful tilted car, and elegant gold accents adds a unique touch.
I hope this tutorial inspires you to get started on your own handmade wedding card projects. Don’t hesitate to personalize this design—there are countless ways to add your unique flair.
More Related Blogposts

DIY Vintage Anniversary Card Ideas: Crafting a Romantic Anniversary Card
This is an anniversary card, but you can turn it into a wedding card.
Products used for this Wedding card tutorial
Affiliate disclosure: Some of the links to products in this blog post may be affiliate links. This means that if you purchase through these links, I may earn a small commission at no additional cost to you. I only recommend products that I use and believe are suitable for the projects I share. Thank you for your support!
Products with affiliate links
Wedding car digital stamp from Polkadoodles

Alfabeth letter die Craft-Emotions

White gel pen

nuvo Aqua Shimmer pen

Products without affiliate links
- Golden Carstock (brand unknown)
- White Cardstock (brand unknown
- Hearts embossing folder (brand unknown)
- Hearts die from Aveccreative
- Alcohol markers from Decotimecrafts
- Sentiment sticker from Tim Holtz
- Paper Glaze from Alenee’s
- Bakers twine (brand unknown)
- Golden pearls (brand unknown)
I would like to enter my card in the following challenges:
- My Time To Craft!: Use a sentiment
- We Love Stamping: Anything but square
- A Perfect Time To Craft Open Challenge: Anything goes
- Crafts Galore Encore Challenge Blog: Anything goes
- Daisy Chain Challenges: No Design Paper
- Let’s Craft and Create: Anything goes + cheers to you (use a sentiment)
Beautiful image and love all the hearts, embossed white background looks great. Thank you for joining us at the Crafts Galore Encore Challenge.
Thank you so much for your lovely comment. Glad you like it.
The card is beautiful. Thank you for participating in Let’s Craft and create
Thank you so much
Such a cutie adorable Wedding card. Thank you so much for sharing your lovely creation with us at We Love Stamping.
Hugs
Cathy
XXXX
Thanks a lot
Fabulous and sweet card!
Thank you for sharing at We Love Stamping Challenge;-))m
Thank you
A delightful wedding card, many thanks for sharing at We Love Stamping challenge.
B x