
Some links in this post are affiliate links. This means I may earn a small commission if you make a purchase, at no extra cost to you. I only recommend products I use and genuinely enjoy in my own cardmaking. Read more here.
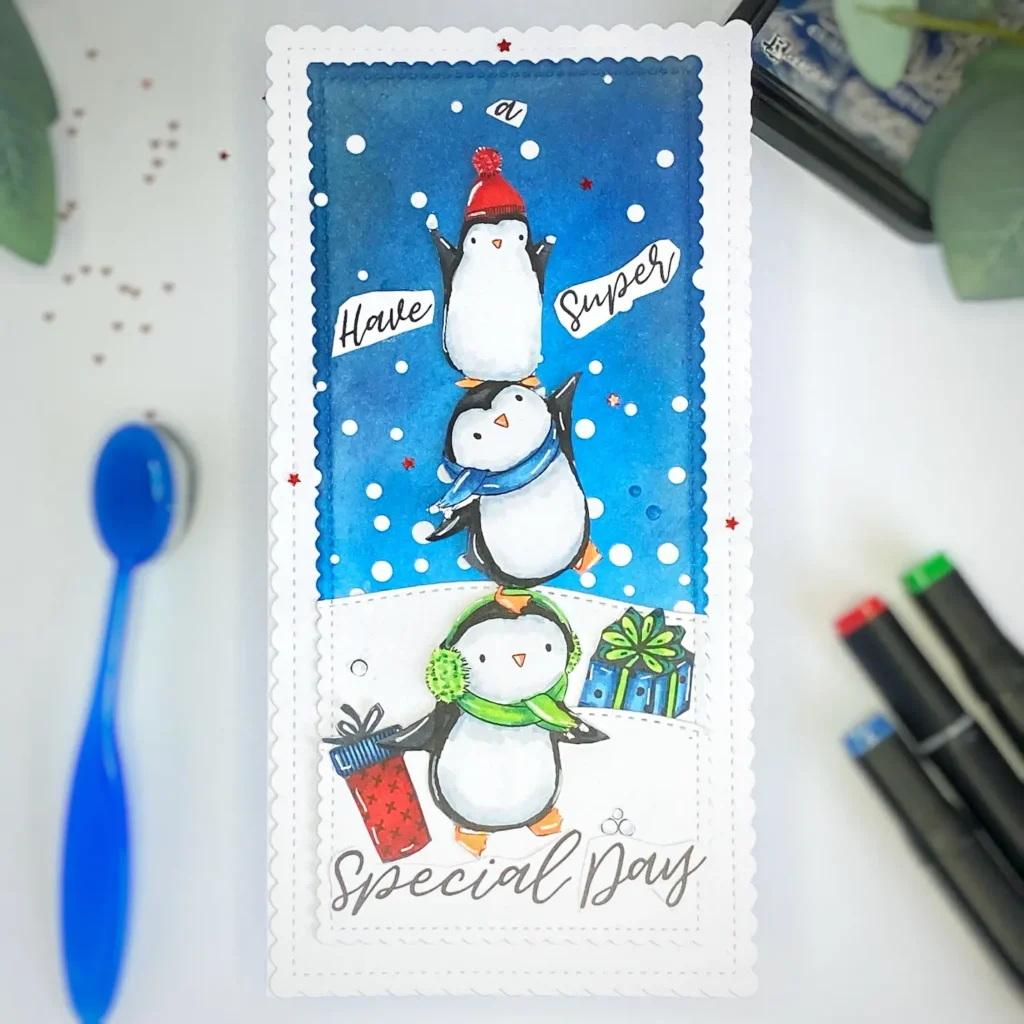
Looking for a fun winter-themed birthday card idea? I’ll show you how to make a playful penguin birthday card using the new release from All Dressed Up Stamps.
In December, All Dressed Up Stamps released three new digital stamps: (nov.2025 not available anymore)

Star of 2025

Happy 2025

Penguin fun
Happy 2025, Penguin Fun, and Star of 2025. For this project, I worked with the Penguin Fun stamp. Those stacked penguins are too playful to resist and perfect for adding a cheerful winter touch.
In this tutorial, you’ll learn how to colour with alcohol markers, create a blended ink background, and assemble a layered slimline card. I’ll also share tips on adapting these techniques for different occasions, so you can use this guide for any project.
Materials and Measurements
Before we start with the step-by-step instructions, let’s cover the basics.
Below, you’ll find the measurements I used for this slimline card, along with a list of materials. I’ve also included alternatives to help you make the most of what you have in your craft stash. And included alternatives to help you make the most of your craft stash.
Measurements
Here is a quick overview of the measurements for the slimline card:
- Card base: 21 cm by 21 cm, scored at 10.5 cm.
- First layer on the card base: Slightly smaller than the card base, using a slimline die for a perfect fit. If you don’t have a slimline die, just trim your panel to fit your desired layout.
- Background panel for the penguins: I used a smaller slimline die here, but you trim your panel to fit your desired layout.
These measurements create a balanced layout, providing enough space to showcase the adorable penguin stamp and layered elements.
Materials
Here is a list of the materials I used, along with alternatives to inspire your creativity:
- Penguin Fun digital stamp from All Dressed Up Stamps: Perfect for a festive winter scene with playful penguins. Alternatives: Any winter-themed stamp set or digital stamp with characters or animals wearing accessories.
- Distress Ink Black Soot, Chipped Sapphire, Salty Ocean: Ideal for creating a winter night effect on the background. Alternatives: you can use any blue shades from your ink collection or watercolour paints.
- Blending brush: For smooth ink blending on the background. Alternatives: A sponge or makeup brush can also do the trick if you don’t have a blending brush.
- The sentiment ‘Have a super special day’ from Polkadoodles: A cheerful message to match the playful design. Alternatives: any fun sentiment stamp or you can handwrite a sentiment or use stickers if you prefer.
- The background die from Aveccreative: Creates a snowflake pattern. If you don’t have a background die, you could use a stencil or hand-draw snowflakes.
- Hill die from Aveccreative: Used to create layered snowdrifts. If you don’t have a hill die, simply cut the hills by hand from white paper.”
- Slimline dies: For cutting the card layers. If you don’t have these, use a ruler and craft knife to achieve the desired size.
- White cardstock: The perfect base for the card. Alternatives: Any high-quality white cardstock.
- Presents clear stamp from Craftsensations: For adding gifts to the scene. Alternatives: Feel free to use other small stamps or embellishments to personalise your design.
- Alcohol markers from Decotimecrafts: For vibrant colouring of the penguins and gifts. Alternatives: Any markers or coloured pencils will work, depending on your preferred medium.
- Red star embellishments (brand unknown): Adds festive sparkle to the design. Alternatives: Rhinestones, enamel dots, or sequins.
- Foam tape: For adding dimension to the penguins and snowdrifts. If you don’t have foam tape, layering cardstock pieces can provide a similar effect.
- Memento Tuxedo Black ink: For crisp stamping of the presents. Alternatives: Any black ink suitable for your colouring medium will work.
- Acrylic block: For precise stamping. If you don’t have one, use a flat, sturdy surface like a glass or plastic sheet.
By including alternatives, you can customize this card based on your supplies and personal style preferences. Ready to get started? Let’s move on to the step-by-step tutorial!
Step-by-Step Tutorial: Craft a Playful Penguin Birthday Card
Creating this card is easier than you might think. Follow these simple steps to colour, blend, and layer your way to a cute penguin birthday card that will surely delight anyone.
Step 1: Print and Colour the Digital Stamp
When I saw the Penguin Fun digital stamp, I knew it would be perfect for a slimline card. Its design made it easy to print in a larger size.
Printing the digital stamp
Start by printing and colouring the Penguin Fun stamp. I printed it at 15 cm on DCP paper, which works well with alcohol markers and helps prevent ink bleeding for smooth blending.
Colouring the digital stamp Penguin Fun
Once printed, colour the penguins using Decotimecrafts alcohol markers to bring them to life. These are the colour combinations I used:
- Penguins: Black (120), Cool Grey 9 (CG9), Cool Grey 7 (CG7).
- White portions: Blue Grey 3 (BG3), Blue Grey 1 (BG1), Colourless Blender.
- Beaks and feet: Yellow (34), Deep Yellow (32), Orange (23).
- Red hat: Cardinal (244), English Red (249), Burgundy (247).
- Blue scarf: Baby Boy (144), Midi Sky (190), Dark Sky (191).
- Green earmuffs and scarf: Yellow Green (48), Grass Green (47), Forest Green (50).
Adding highlights
Add highlights with a white gel pen for a polished finish. Focus on the penguins’ hats, scarves, and earmuffs to make the details stand out and create a fun, wintry effect.

Cutting the penguins
Once coloured, carefully cut out the penguins, leaving out the snowflakes and snowballs. This gives you more flexibility when arranging the elements on the card.
Now that the penguins are coloured, it’s time to move on to the next step: creating the background.

Having trouble editing or colouring digital stamps? Download my free guide for extra tips and tricks to help you perfect your digital stamps!
Step 2: Create the background using Distress Inks
In this step, we’ll create a background with Distress inks.
A blended ink background adds depth to the card with smooth colour transitions that mimic natural light and shadows. Blending multiple ink colours creates a gradient effect, giving the illusion of distance, perspective, and lighting to enhance your design.
Darker shades around the edges or in certain areas can simulate shadows, while lighter tones in the centre can suggest light sources. This makes the elements on the card appear more dynamic and visually engaging. This technique helps to draw attention to focal points and enhances the overall composition of the card.
Die-cut the background panel using a slimline die.
We’ll use two slimline dies of different sizes. I used a smaller one for the background panel. I used a smaller slimline die for the background panel.
Use white paper for this panel and run the die through the die-cutting machine. Now, we have a nice panel that can serve as the background for our penguins.
Ink blending with distressed inks to create a winter night sky
To create the night sky, we will use three distress inks:
- Salty Ocean
- Chipped Saphire
- Black sooth.
Since we will be covering the bottom part with snow hills, apply the ink to about two-thirds of the top part of the panel.
Begin by applying a layer of Salty Ocean using a blending brush. After applying the first layer, work on the edges with Black Soot. Then, you go over the black layer with Chipped Sapphire to blend it into the lighter blue in the middle. This technique keeps the darkest colours at the edges, blending into a lighter blue in the centre. Continue this process until I am satisfied with the blend.
Using a Background die for snowflakes
Once you are happy with the colour of the background, enhance it using a background die. This die punches circles out of the background in various places, simulating falling snowflakes that allow you to look through the circles.
I have decided to place the bottom of the background die at the top and the busiest part at the bottom, as I believe this arrangement suits the scene best.
We’ll use partial die-cutting to avoid cutting off the edge of the panel. Since the full panel won’t fit in the machine, position the die where you want it to cut and run the glass plate up to the edge to create the desired cuts.

Our background is now ready, and we can move on to creating the snow drifts.
Step 3: Create the Snowdrifts
In this step, we will create two snow hills to add dimension to the card. This will allow a snow hill to be visible in the background and make the card more visually interesting.
Die-cutting the snowdrifts
To create the snow hills, we’ll use a hill die. No die? No problem – simply cut the hills from white cardstock.
Cut the snow hills twice.
Next, we will use the smallest slimline die that we previously used for the background panel. This is important because the edge of the background panel features both a wavy and stitched edge, and we want these details to continue onto our snow hills.
Place one of the snow hills on the die plate, ensuring that the slim die is positioned correctly on top. For the hill that will reach the bottom of the card, make sure the slim die is positioned to cut both the top wavy edge and the bottom edge. Repeat this process for the second hill, which will only need the wavy edge cut on one side.

Attaching the snow drifts to the background panel.
First, adhere the top hill directly onto the background panel. For the hill at the bottom, we will elevate it using foam tape. Attach the foam tape to the back of this bottom hill and then position it onto the background panel. Ensure that the wavy edges align perfectly with the bottom and side of the background panel.
Now that this step is complete, we can move on to the next phase of creating the base and the first layer of the card.
Step 4 Creating the card base and the first layer.
Now it’s time to create the base of the card and the first layer that will go on top.
Creating the base of the slimline card
We are making a slimline card. To create the base, you will need sturdy cardstock measuring 21 centimetres by 21 centimetres. Score the cardstock at 10.5 centimetres and fold it in half. Your slimline card base is now ready for the next step.
Creating the first layer of the card
Earlier, I mentioned that I have two slimline dies I want to use. We already used the smaller one for the background, and now we will use the larger one for the first layer. We’ll keep this first layer white, as it adds a bit more texture to the background. Use the slimline die on white paper to cut it out, and then adhere this layer to the card base.
Step 5: Create the Sentiment and Gifts
In this step, we will work on the text for the card and add gifts to give it a more playful character.
Stamping and colouring the gifts
I have a clear stamp set from Craftssensations that contains stamps of presents. I want to create a cheerful birthday card using these stamps.
First, stamp two presents with Tuxedo Black ink. Attach the stamps to an acrylic block and stamp them onto white paper.
Colouring the presents
Next, let’s colour the presents with alcohol markers. I used my alcohol markers from Decotimecrafts. Here are the colour combinations I used:
- – Bottom of the tall present: Cardinal (244), English Red (249), and Burgundy (247).
- Top of the tall present: Baby Boy (144), Midi Sky (190), Dark Sky (191).
- Bottom of the Square present: Baby Boy (144), Midi Sky (190), Dark Sky (191)
- Bow of the square present: Yellow Green (48), Grass (47), Forest Green (50).
Once, you coloured the presents you can cut them out.
Creating the sentiment
For the text, I chose the phrase “Have a super special day.” This comes from a sentiment set by Polkaadoodles.
Print the text and cut out each of the five words separately. This allows you to attach them to the card in a playful way.
Now that we have all the elements for our card, we can start putting it together.


Step 6: Assembling the card
Now that we have all the elements ready, we can proceed with assembling the card.
Attaching the penguins
The first step is to attach the penguins. Apply glue to the bottom of the base penguin to account for the height differences caused by the snow hills. Use foam tape for the other penguins and position them in the centre of the background panel.
Adding the presents
“Place the red and blue present next to the bottom penguin. Tuck the second present behind the hill on the left side.
Adding the sentiment
Now it’s time to add the sentiment. We arrange the words “Have a Super” around the top penguin, creating a playful effect. The two words “special day” are placed under the feet of the penguin, giving the impression that the penguin is standing on the word “special.”.
Adding embellishments
To enhance the playful character of the card, we include some embellishments.
Adding snowballs
The stamp set also includes a pile of snowballs as well as snowballs in the air. Cut out a few of these and position the pile to the right of the bottom penguin. Additionally, place two loose snowballs on the back snow hill on the left side.
Adding red stars
Next, it’s time to add the red stars. Place three stars on the first layer we created, arranging them in a triangle: one on top and one on each side. Also, place stars in a triangle formation around the penguins.

And just like that, the card is ready! It has turned into a super fun and playful winter birthday card.
Let’s Get Creative Together
This penguin happy birthday card is wonderfully playful and perfect for a winter birthday. When I saw the stamp, I couldn’t help but smile, and that was exactly the feeling I wanted to create for the card’s recipient. What do you think of this happy birthday penguin card? Let me know in the comments – I’d love to hear your thoughts!
Follow for more cardmaking inspiration.
If you enjoyed this tutorial, consider signing up for my blog updates. Receive new tutorials, tips, and inspiration delivered straight to your inbox. Enter your email address below to never miss a post!
More related Penguin card blogposts
Can’t get enough of penguin cards. Here I have two more tutorial of penguin cards.

Happy Crafting!
Products used for this penguin birthday card
Affiliate disclosure: Some of the links to products in this blog post may be affiliate links. This means that if you purchase through these links, I may earn a small commission at no additional cost to you. I only recommend products that I use and believe are suitable for the projects I share. Thank you for your support!
Products with affiliate links
Penguin fun Digital stamp from All Dressed Up stamps (nov 2025 not available anymore)

Ink Blending brushes Studiolightnl

Memento Tuxedo Black ink

Distress Ink Black Sooth from Ranger

Distress ink Chipped Saphire from Ranger

Distress ink Salty Ocean from Ranger

Spring Gnomes Digital Paper set

Products without affiliate links
- Background die from Aveccreative
- Hill die from Aveccreative
- Slimline dies from Aveccreative
- White Card stock
- Clear stamps presents from Craftsensations
- Alcohol markers from Decotimecrafts
- Red Star embellishments (brand unknown)
- Foam tape Boekenvoordeel
- Acrylic Block (brand unknown)
I would like to enter this card in the following challenges:
- Unicorn Challenge Blog: Birthday
- Krafty Chicks Challenge: Birthday
- Lil Patch of Crafty Friends Challenge …: Anything goes
- We Love Stamping: Anything but square
- A Perfect Time To Craft Open Challenge: Anything goes
- Daisy Chain Challenges: No design paper
- Critter Crazy CHALLENGE BLOG: Anything goes + Featured Critter
- Crafty Animals: Anything goes + must use an animal
Those penguins look like they are having such fun. Thank you for the detailed description of how you made this and thank you for sharing it with us at we love stamping xx
thank you so much
A real fun Penguin card, many thanks for sharing another with us at We Love Stamping challenge.
B x
Thanks a lot
A fun and playful card, a lovely background for the fun penguins. Great instructions too. Thank you so much for joining us in our challenge at We Love Stamping. Good Luck and I hope you will join us in our next challenge.
Faith A DT