
Hello fellow Crafters!
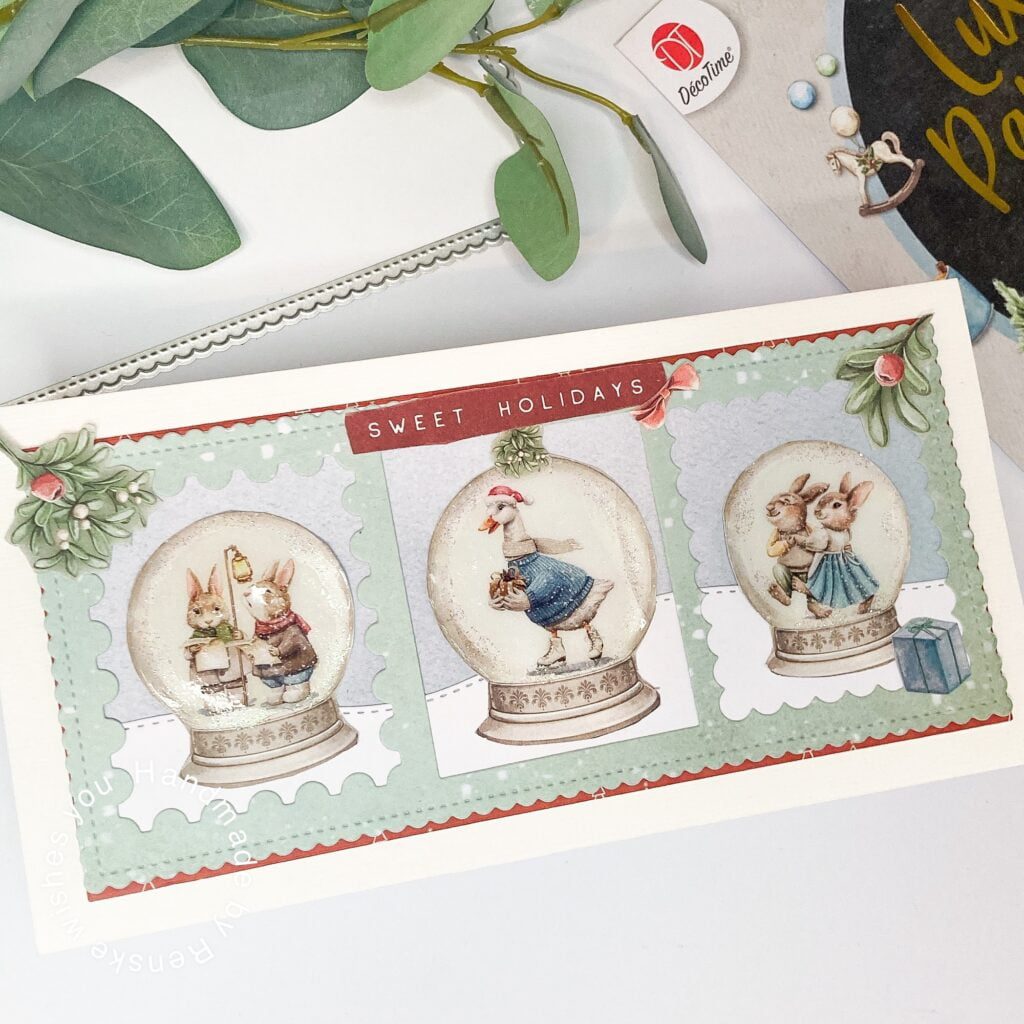
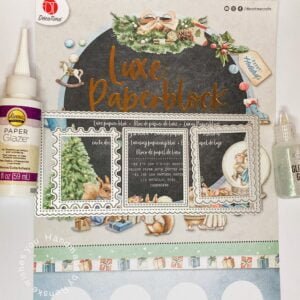
I am thrilled to present to you a DIY snow globe card. I will use the luxurious paperback by Decotimecrafts to teach you how to create a beautiful Christmas card with three charming snow globes. The Luxe Paper Block from Decotimecrafts is my secret crafting weapon that makes this project even more special. This block has transformed my card-making by integrating patterns, die-cut images, and sentiments into one cohesive package.
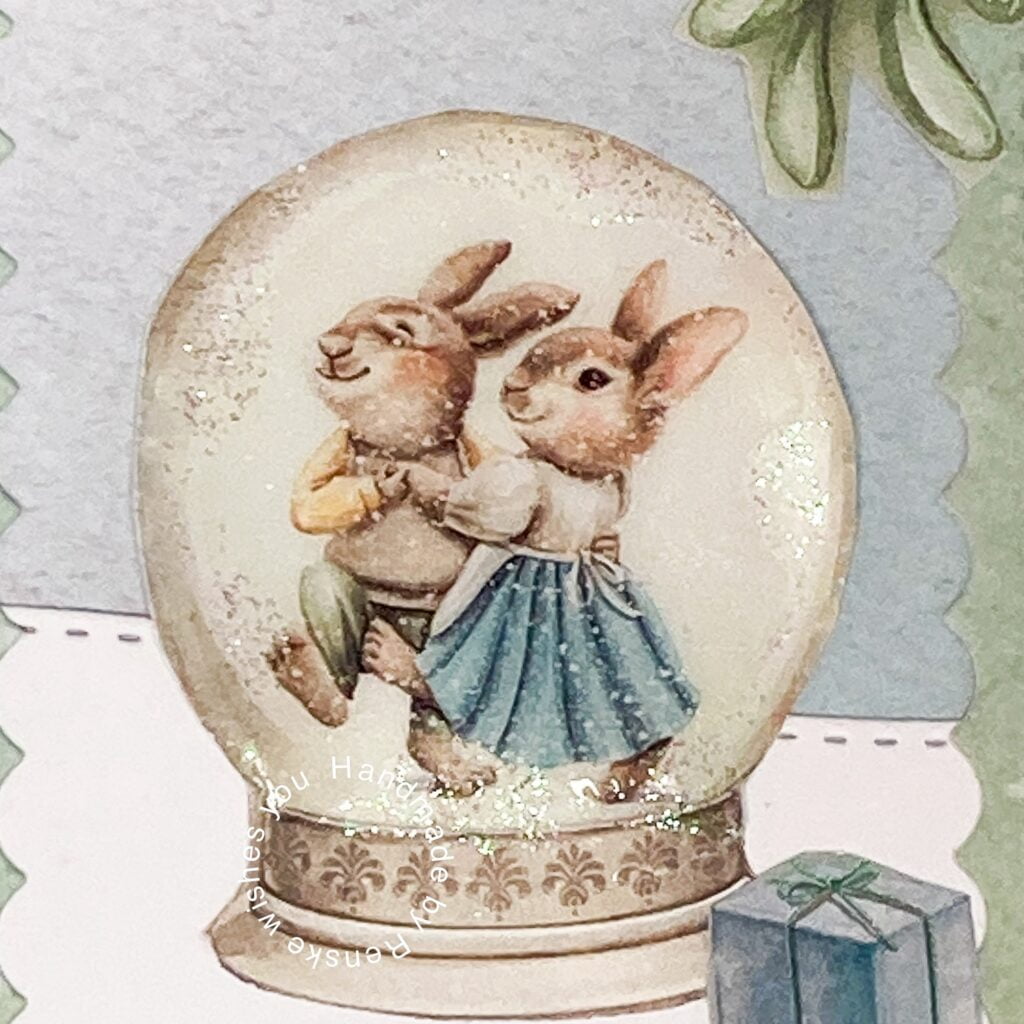
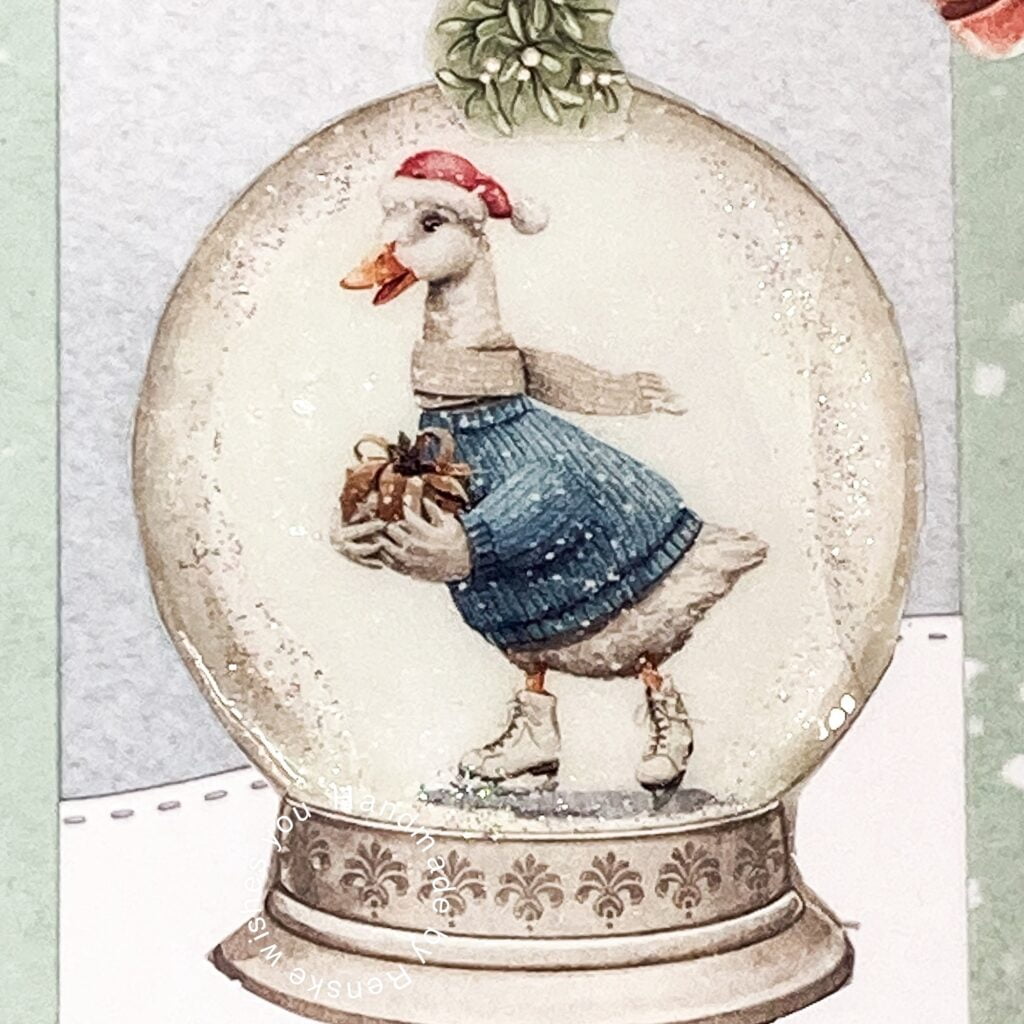
Crafting this DIY snow globe card is an absolute joy, thanks to the comprehensive materials provided within the paper pad. Inside, you’ll find three distinct snow globes, each with unique imagery – an incredibly fun and adorable touch. While we will use dies to layer our cards, the real magic lies in decorating our snow globes with paper glaze and glitter glue.
Are you curious and eager to start this creative card-making journey? Let’s get started and bring these snow globe visions to life.
Getting Started: Materials Needed
Crafting a card can be a fun and exciting journey. Before starting, it’s important to gather all the necessary materials. Here’s a comprehensive list of what you will need to create a snow globe-inspired Christmas card:
Essential Materials
- Luxe Paper Block: Choose two different patterned papers from the Luxe Paper Block to serve as the backdrop for your card. Also, select a sentiment and images that match your snow globe theme.
- Cutting Tools: Prepare cutting tools such as scissors and a paper trimmer. You may also want to consider using a die-cut machine and slimline dies for more precise shaping and creating unique layers and windows within the card.
- Decorative Elements: Although the paper block’s images serve as the main focus, you can enhance the card’s charm by adding extra elements such as bows, pearls, or other embellishments of your choice.
Specialized Supplies for Snow Globe Magic
- Paper Glaze: This specialized supply works wonders by creating a realistic glass-like effect within the snow globes. Alternatively, glossy accents can be used to achieve a similar effect.
- Glitter Glue: To add an enchanting sparkle, apply glitter glue onto the snow globes, giving them a shiny and alluring look.
Once you have gathered all these materials, you are ready to start crafting a fascinating DIY snow globe card!
Planning the design of this DIY Snow Globe Card
Planning the design of a beautiful snow globe Christmas card requires inspiration and thoughtful planning. To create this card, I utilized the Luxe Paper Block from Decotimecrafts, which played a crucial role in shaping our vision.
Finding Inspiration in the Luxe Paper Block
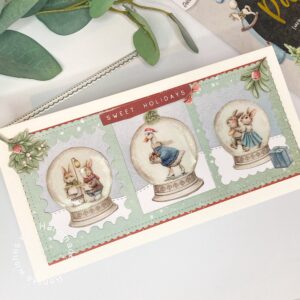
The paper block is a treasure trove of coordinated elements, and for this project, it served as our main source of inspiration. I found three snow globes in the paper block and immediately knew I wanted to feature them on the card. The advantage of this block is that it also comes with matching patterned paper, which saved me time and allowed me to stay within our desired colour scheme.
I wanted to combine the colours well with the colours used in the snow globes.
Crafting a Slimline Snow Globe Canvas
To incorporate all three snow globes, I decided to make a slimline format card, which provided enough space for the design. However, it took me a while to arrive at a good design. I had the pictures and the papers, but I struggled to find a nice layout. Eventually, I stepped away from the project for a moment and came up with the idea of adding windows to the card where I could place the snow globes. This design solution allowed me to showcase all three snow globes and create a cohesive and visually appealing card.
By utilizing the coordinated elements within the Luxe Paper Block and overcoming design challenges, I was able to bring my vision for this snow globe Christmas card to life. This project is a combination of inspiration, creativity, and strategic planning.
Step-by-Step Guide: Crafting the Snow Globe-Inspired Card
After collecting all the materials, let’s begin making the card. Follow the step-by-step guide below.
Step 1. Preparing the card base
First, we make the card base. The card has a slimline format and measures 10.5 centimetres by 21 centimetres. To make the base yourself you need a sturdy paper measuring 21 centimeters by 21 centimeters. Score at 10.5 centimetres and fold in half. Now the base of your card is ready.
Step 2. Preparing the layers of the card
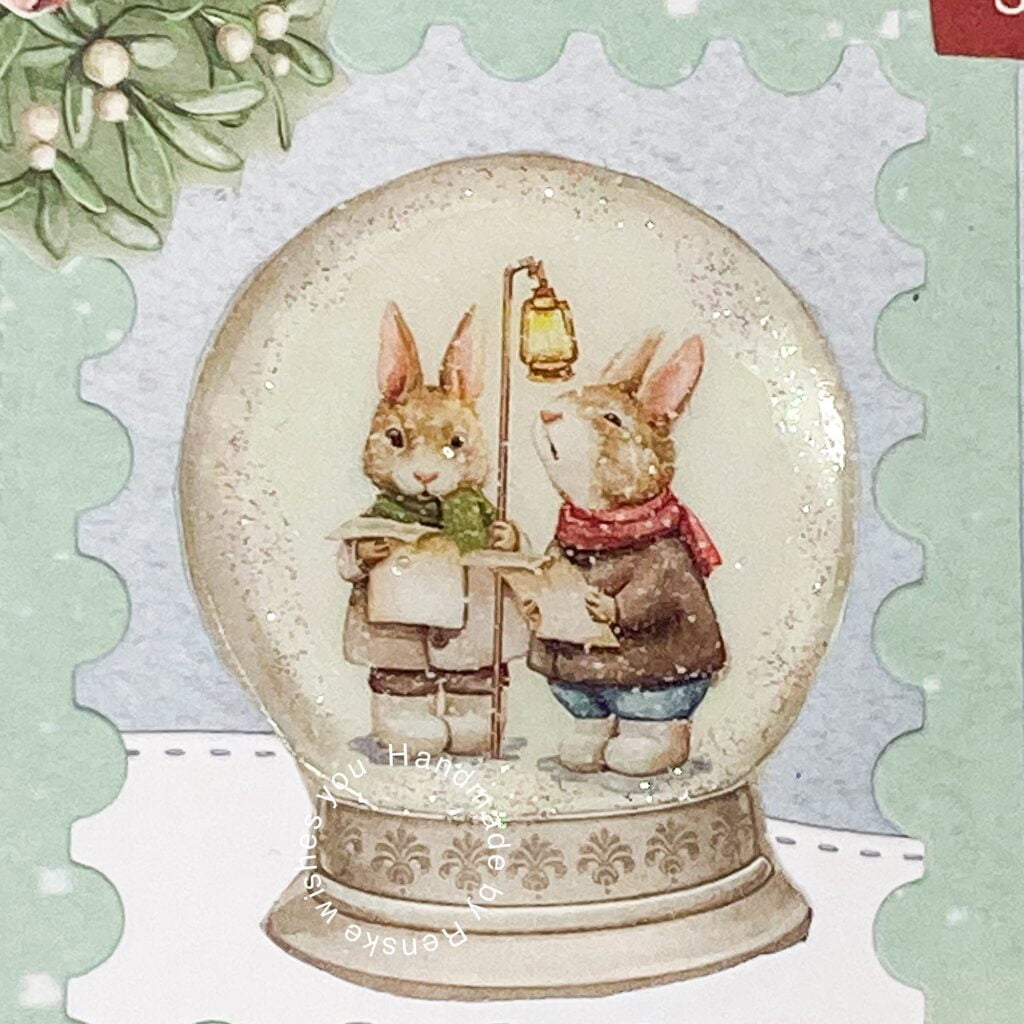
We use different layers on this card. To create these layers I used two different patterned papers from the block. One is a blue paper and the other is a green paper with snowflakes on it. I use the green one as a frame for my windows and the blue paper as a background.
- Die-cutting the green paper: I use a slimline die for this with waves along the edges. The size of this die is 19 centimetres by 8.5.
- Die-cutting the windows: I have three dies that I can use to die-cut the windows into the green paper. A die with a postage stamp look, a rectangle and a die with waves. Place these dies evenly over the green paper. Run this through your die-cutting machine and you have the windows in your green paper.
- Die-cutting the snow: I use a hill die to die-cut snow hills. I have this in a slimline format. I die-cut this from white paper.
- Placing the background and the snow to the green frame: I cut the blue paper to size so it fits behind the green frame. I stuck the snow hill on top of the blue paper. I stick all this behind the green frame.
- Placing the green frame on a red paper: Finally, I placed the green frame on a red paper. I cut this so that a small red edge is visible around the red paper.
Step 3. Enhancing the Snow Globes with Paper Glaze and Glitter Glue
In the block, you have ready-made pictures. I like it when I use these types of images to add something extra to them and when they look realistic. I used paper glaze and glitter glue to create this.
Applying Paper Glaze:
- Gently squeeze a small amount of paper glaze onto each snow globe image.
- Spread the glaze evenly over the entire surface of the image with an applicator or fine-tipped brush.
- Provide a smooth and uniform coating that mimics the appearance of glass. Allow the glaze to dry completely according to the product instructions.
Accentuating with Glitter Glue
I decided to add glitter glue to the edges of the snow globes. Squeeze the glitter glue from the tube and follow the curve of the ball. This way, you have an extra shiny accent around the characters in the sphere and it attracts even more attention.
Now that our snow globes are prepared, we can start creating the scene where we will place the globes.”
Step 4: Assembling the Card
Now that we have finished creating the elements, it is time to put the card together.
First, we need to place the frame with the background on the base card. Then, we can put the three snow globes on the snow in the windows.
To add some extra decoration, I looked for some elements from the paper block. I found a red banner with the words “Sweet Holiday” written on it, which perfectly matches the look of this card. I also found some branches, red berries, and a blue present.
I placed the “Sweet Holiday” banner above the middle snow globe. Then, I added two branches with leaves on the top corners and put a red berry on each.
Finally, I placed the blue gift in the bottom right corner.
Now, our card is fully assembled and ready to be given as a holiday greeting!
Inspire, Create, Share, and More!
Thank you for joining me on this creative journey to make a DIY snow globe card. In this article, you have seen how simple it is to use a paper pad like the one I used and how we can add that extra touch to images. This way, you can always add a personal touch to the cards you create.
More card-making inspiration
If you’re looking for more handmade card inspirations, check out these related blog posts for additional techniques, ideas, and card-making inspirations:

Bunny Christmas card; crafting card
This is a card made with the same paper block.
Christmas Shaped Snow Globe shaker card
Here’s some more snow globe Christmas card inspiration. This time in the shape of a snow globe.
I hope that with these articles I can give you even more ideas for a beautiful floral birthday card. Let me know in the comments which one inspires you the most.
Products and Tools I have used for this card
I bought all these products at Action NL. Unfortunately, there are no links for this.
- Luxe Paper block Christmas from Decotimecrafts
- Slimline die from Aveccreative
- 3 window dies from Aveccreative
- Glitter glue from Craftsensations
I would like to enter my card in the following challenges
- Fab ‘n’ Funky Challenges: Christmas
- The Sisterhood of Crafters: Christmas
- Cardz 4 Galz: Christmas
- My Time To Craft!: Holiday around the world
- Cut It Up: Celebrate
- 613 Avenue Create: Anything goes + Winter holiday
- Dragonfly Dreams: Christmas
- A Perfect Time To Craft Open Challenge: Anything goes
- Classic Design Challenge Blog: Anything goes
- The Creative Crafters: Anything goes
- Critter Crazy CHALLENGE BLOG: Anything goes + featured critter
- Crafty Animals: Anything goes + must use an animal
- Creatalicious Challenges: Anything goes + Last minute Christmas
- Crafting Happiness Challenges: Christmas
Always such wonderful tutorials. Thank you for joining our Cut it Up challenge. We hope you’ll continue to play along in 2024.
Hugs,
Larelyn (CIU owner)
Ah thank you so much for your lovely comment. I will certainly do.
An adorably cute card with those precious snowglobes!!
Thank you for joining our challenge at The Sisterhood!
Diane TSH DT
{Nellies Nest}
{The Sisterhood}
Thank you
Very cute snow globe slimline card. Thanks for sharing with us at MTTC :)
Thank you
Wat heb je dat weer ontzettend leuk gedaan!! Het zijn eigenlijk 3 kleine kaartjes in 1!
Superleuk!
Dank je wel
The joy this brings my heart to see the happy creatures and love all the details, especially the detail directions.
Thank you so much for your lovely comment