
Spring is a great time to experiment with fresh, vibrant card designs. The colours and blooming flowers always get my creativity flowing, so I thought I’d bring a bit of spring magic to this adorable shadow box card. Want to create a spring card that’ll make someone smile? You can with this shadow box card tutorial.
In this tutorial, I’m going to show you how I created a handmade spring card for Penny’s Paper-Crafty Challenge, sponsored by Last Minute Manda and Sheepski Designs. I’ve used the Spring Skunks digital stamp set, which fits the spring theme perfectly. The skunk with a watering can adds a fun touch, giving it that springtime feel.
In this tutorial, I’ll walk you through making a shadow box card. We’ll build layers for depth, and colour in the cute skunk, and put together a lovely spring scene.
Ready to get started? Let’s make something that’ll bring a smile to someone’s face!
- Spring Skunk Shadow Box Card Materials and Dimensions
- How to Make a Lawn Fawn Shadow Box Card with a Skunk Digital Stamp
- Step 1: Printing and Colouring the Skunk Digital Stamp from Last Minute Manda
- Step 2: Die-Cutting and Assembling the Shadow Box Card
- Step 3: Creating a Spring-Inspired Background
- Step 4: Bringing the Scene to Life with Die-Cuts and Colour
- Step 5: Assembling the Shadow Box
- Step 6: Adding All the Elements to the Scene
- Let's Get Creative Together
- Products used for this shadow box card tutorial
- I would like to enter my card in the following challenges
Spring Skunk Shadow Box Card Materials and Dimensions
For this spring shadow box card, I’ve chosen some versatile materials that will help bring the scene to life.
- Digital stamp: Use the “Spring Skunks” stamp from Last Minute Manda featuring a skunk with a watering can. If you don’t have this one, you can swap it for any cute spring image, like a bunny or a flower.
- Card base: Use the Lawn Fawn shadow box die with kraft cardstock. If you don’t have this die, you can still create a shadow box card – check out the section on other shadow box card ideas for inspiration.
- Background: Use Distress Inks (Mowed Lawn, Pine Needles, and Salty Ocean) for the grass and sky, and a cloud stencil from Carlijn Design. You can also use traditional ink, and watercolours, or create clouds with a sponge or DIY cloud template.
- Decorations: Grab some die-cuts from Aveccreative, Kokorosa, and Lawn Fawn – think grass, trees, birds, clouds, and flowers. No worries if you don’t have these, you can always hand-cut elements or use other tree and flower dies from your stash.
- Colouring medium: Alcohol markers from Decotimecrafts are great for bringing the skunk and other elements to life. But if you prefer, you can use coloured pencils, watercolour markers, or any medium you like.
- Other tools: You’ll need scissors, glue, double-sided tape, a white gel pen for fine details, and a text sticker. You can swap the sticker for any sentiment stamp you’ve got, or even hand-letter your message for a personal touch.
With these materials and alternatives, you’ll be able to create a dimensional, layered shadow box card that’s perfect for spring. Ready to start? Let’s go!
How to Make a Lawn Fawn Shadow Box Card with a Skunk Digital Stamp
Ready to make a shadow box card that brings spring to life? In this step-by-step shadow box card tutorial, I’ll walk you through each step, from building the card base to adding the skunk digital stamp from Last Minute Manda.
No need to stress if you don’t have all the materials I used – I’ll suggest alternatives along the way. So gather your supplies, and let’s get started on this creative project!
Step 1: Printing and Colouring the Skunk Digital Stamp from Last Minute Manda
Let’s begin with the Spring Skunks digital stamp!
Print the digital stamp.
Start by downloading and printing the stamp from Last Minute Manda. I kept the skunk image small, around 4 cm, since the shadow box is on the smaller side. I printed it on DCP paper, as it works well with alcohol markers.
Colouring the digital stamp
For colouring the skunk, I used different marker combos for the various areas:
- Dark areas: Black, Cool Grey 9, Cool Grey 8, Cool Grey 7, and Cool Grey 5
- Light areas: Pearl White (09), and Leather (113)
- Inside of ears: Flesh (139), and Blush (136)
- Tongue: Old Red (02)
- Flower & Watering Can: Yellow (34), and Lemon Yellow (35)
- Watering Can: Apple Green (160), Yellow Green (48), Grass Green (47), Forest Green (50), Deep Green (52)
Adding highlights and cutting the image
After colouring, add highlights with a white gel pen to make the image stand out. Then, carefully cut it out using scissors. The skunk is easy to cut, so make sure to cut right along the edges.

Now that the skunk’s ready, let’s move on to creating the base of our shadow box card. Ready? Let’s go.

Having trouble editing or colouring digital stamps? Download my free guide for extra tips and tricks to help you perfect your digital stamps!
Step 2: Die-Cutting and Assembling the Shadow Box Card
Let’s start by creating the base of the shadow box. I want the skunk to be surrounded by trees and flowers, so I’m using a background die to make the tree pattern. The background die isn’t quite large enough to cover the whole shadow box die, so we’ll use partial die-cutting to make it fit.
Creating the tree pattern on the kraft card stock
- Grab some craft paper and place it in landscape orientation.
- Position the background die on the paper, ensuring it is vertical so the pattern runs from top to bottom.
- Next, take the plates for your die-cutting machine. Place the paper and die on the bottom plate, then place the top plate over the die, covering only about half of it. This way, the die will cut only part of the pattern.
- Run it through the machine.
- Once that’s done, slide the die to the right, overlapping the area you’ve already cut.
- Place the top plate over the part that hasn’t been cut and run it through the machine again.

Now you have a large piece of paper with the tree pattern.
Die-cutting the base of the shadow box
Next, we’ll use the shadow box die to create the base of the card.
- Place the die on your patterned paper and cut it twice. This will give you the two pieces you need for the shadow box.
- In the die set, you will also find a die for the shadow box frame. Cut the long rectangle out of one of the shadow box bases; this will become the front of the shadow box.

Don’t assemble the box just yet, there are still some grassy hills and a background to add inside the card. Let’s prepare those before putting everything together.
Step 3: Creating a Spring-Inspired Background
Let’s bring some fresh spring vibes to your shadow box with a simple ink-blending technique. Using Distress Ink and stencils, we’ll create a sky and grass that’ll give the feel of a warm, sunny day.
- For this step, grab a piece of paper measuring 8 cm by 7 cm.
- Start by laying a cloud stencil over the paper.
- Use a blending brush to apply Distress Ink in Salty Ocean around the stencil’s edges.
- Rotate the stencil at different angles to make a varied cloud pattern that adds interest to the background.
Now that the background is done, let’s move on to making the die-cut elements.
Step 4: Bringing the Scene to Life with Die-Cuts and Colour
Now that the background’s set, let’s start creating the elements we’ll use to build the scene. Layering trees, grass, and flowers will create depth and bring the scene to life.
Die-cutting the hills, grass, and trees
- For the grassy hills, use the die from the shadow box set. These cuts help create the hills and folds needed to attach them inside the box.
- For the grass at the bottom of the box, use a grass die.
- For the tree leaves at the top, use a cloud die to shape them.
- Die-cut all these elements from white cardstock and colour them with Distress Inks in Mowed Lawn and Pine Needles for a soft gradient.
- Add some water splatters for texture. The water reacts with the Distress Ink, giving it a unique colour variation.
Making the trees and flowers
- Next, use the tree dies from the shadow box set. Die-cut the tree trunks from kraft paper and the crowns from white cardstock.
- Apply Walnut Stain Distress Ink to the tree trunks for shading, then add Mowed Lawn and Pine Needles to the crowns for depth.
- Attach the trunks to the crowns, and your trees are ready to place.
Adding the flowers and birds
- To complement the skunk with the watering can, die-cut flowers in two styles: flowers on stems and loose ones. Colour them with alcohol markers in pastel yellows and greens.
- Die-cut two birds from black cardstock to add some charm to the scene.
Step 5: Assembling the Shadow Box
Now that we have all the die-cut elements ready, it’s time to assemble the shadow box. Building the scene is the best part, it’s like bringing your design to life in 3D.
Assembling the Box Base
- Take the two base pieces you created with the shadow box die. Each piece has strips along the edges to attach them together. Apply double-sided tape to these strips.
- Flip the base pieces upside down so you can see the inside. Position the base with the window on the right and the one with the flap on the left.
- Carefully remove the release paper from the strip on the window base. Ensure the corners of the two bases meet correctly.Press down firmly on the flap to secure it.

Attaching the Hills
- Now, let’s attach the hills inside the box. Each hill has two flaps on the sides. Fold these flaps carefully using a bone folder or the edge of scissors to create a sharp crease.
- Add double-sided tape to both flaps. With the base upside down and the window on the left, position the hills beside the window, ensuring their bottoms align with the bottom of the panel.
- Once you’re satisfied with the placement, remove the tape backing and press down firmly to secure the hills.


Final Touches for the Base
- Turn the hills to the other side and peel off the tape backing. Fold the other edge inward to keep the hills in place.
- Next, remove the tape from the second strip and fold the window base inward. This step will seal the shadow box base.
Attaching the Background
- Add a grass hill to the bottom of the background panel.
- Add a bit of glue to the back of the background panel and stick it onto the back of the inside of the shadow box.

Once the base is done, we’re ready to add the image and bring everything to life!
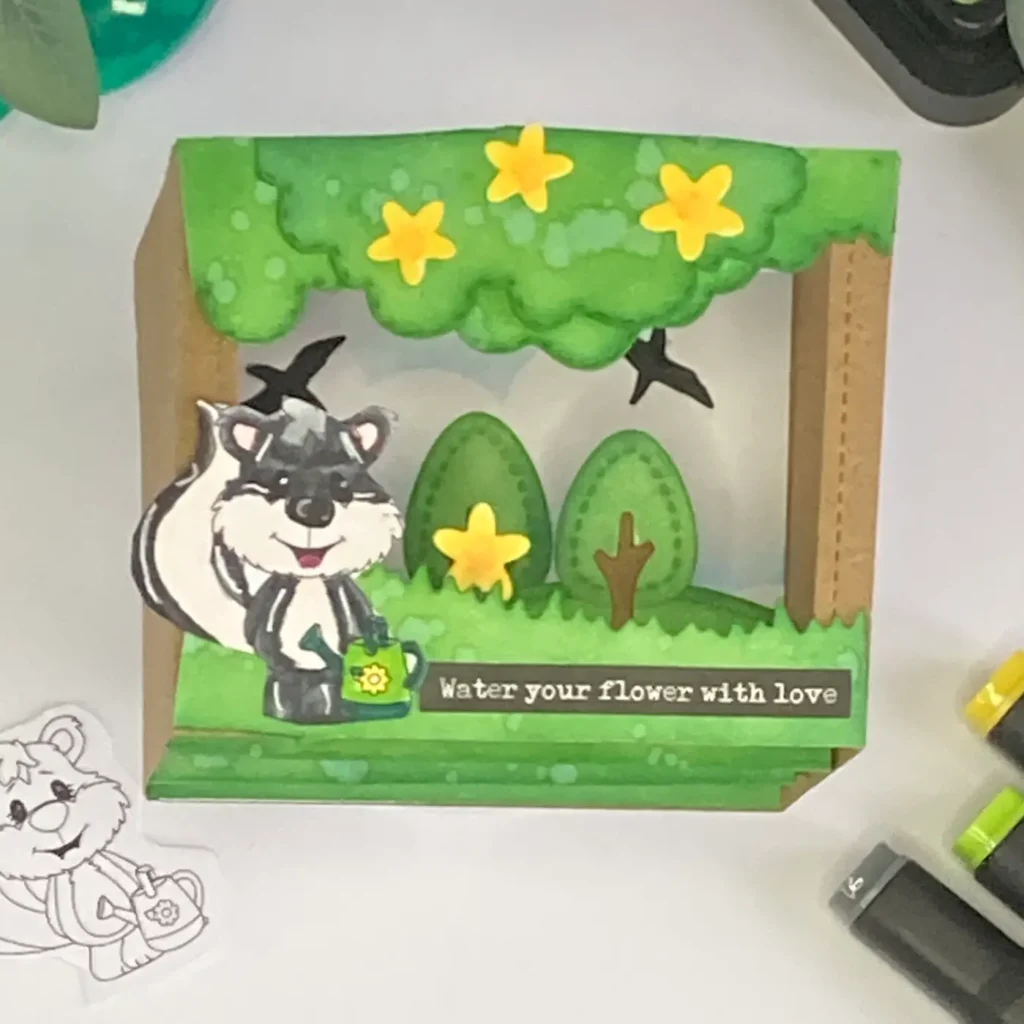
Step 6: Adding All the Elements to the Scene
Now that we have all the pieces ready, it’s time to bring everything together. This is where your scene really comes to life—you’ll see everything take shape as you add the details.
Placing the Grass and Trees
- Begin by adding the grass to the front of the box.
- Stack the tree tops to add dimension.
- Attach three small flowers to the top tree.
- Place the largest tree in the centre of the background
Placing the skunk and the sentiment
- Place the skunk in the bottom right corner of the box.
- Place the sentiment sticker, ‘Water your flower with love,’ next to the skunk.
Adding More Details
- Position the medium tree on the second hill, to the left.
- Add a tree behind the skunk on the first hill.
- Add two small flowers with stems: one on the first hill and one on the second hill. For the middle hill’s tree, attach a single flower.
- With the trees and flowers set, place the birds in the background.

Your scene is complete, now your shadow box is ready to display.
Let’s Get Creative Together
Shadowbox cards are a fun way to add depth to your designs. Once you’ve got the basics down, you can make it your own. Change the theme, swap out the images, or play with colours to create something unique.
.Join the Challenge
Now it’s your turn to get involved! Take part in Penny’s Paper-Crafty Challenge—anything goes as long as it’s made with paper. The sponsors for this challenge are Last Minute Manda and Sheepski Designs, and we can’t wait to see your creations!
More Shadowbox Card Ideas
If you loved this shadow box card, check out more ideas for shadow box cards. You’ll find plenty to inspire your next crafting adventure!

Look at me | All dressed up stamps
A shadow box card without special dies and with a spring theme.
Products used for this shadow box card tutorial
Affiliate Links: The products mentioned in this post are affiliate links. If you decide to purchase through these links, I may earn a small commission at no extra cost to you. These commissions help keep my blog running, so I truly appreciate your support!
Products with affiliate links
Distress Ink Mowed Lawn from Ranger

Distress Ink Pine Needles from Ranger

Distress Ink Salty Ocean from Ranger

Ink Blending brushes StudiolightNL

White gel pen 08

Products without affiliate links
Lawn Fawn Shadow Box

Spring Skunks digital stamp Last minute Manda

- Kraft Card stock (brand unknown).
- Grass, Flowers dies from Aveccreative
- Cloud dies from Kokorasa
- Alcohol markers from Decotimecrafts
I would like to enter my card in the following challenges
- Crafty Catz: Anything goes + use a die
- A Perfect Time To Craft Open Challenge: Anything goes
- Crafts Galore Encore Challenge Blog: Anything goes
- Creative Moments: Cute
- Daisy Chain Challenges: Layer it up
- Critter Crazy CHALLENGE BLOG: Anything goes + featured critter
- Crafty Animals: Anything goes + must use an animal
This is super cute!! And that shadow box technique really does add so much great depth and dimension! Thanks for playing with Creative Moments Challenge.
Thank you so much. It was fun to make.
A cute shadow box card with a great step by step tutorial. Thank you for joining us at Crafty Catz.
Chris
x
Thanks a lot. Glad you like the tutorial.