
How to make a slider card.
Hello everyone!
A new challenge started today on the Penny’s Crafty-Paper challenge blog. The theme, as always, is “Anything goes using paper.”
Our sponsors are:


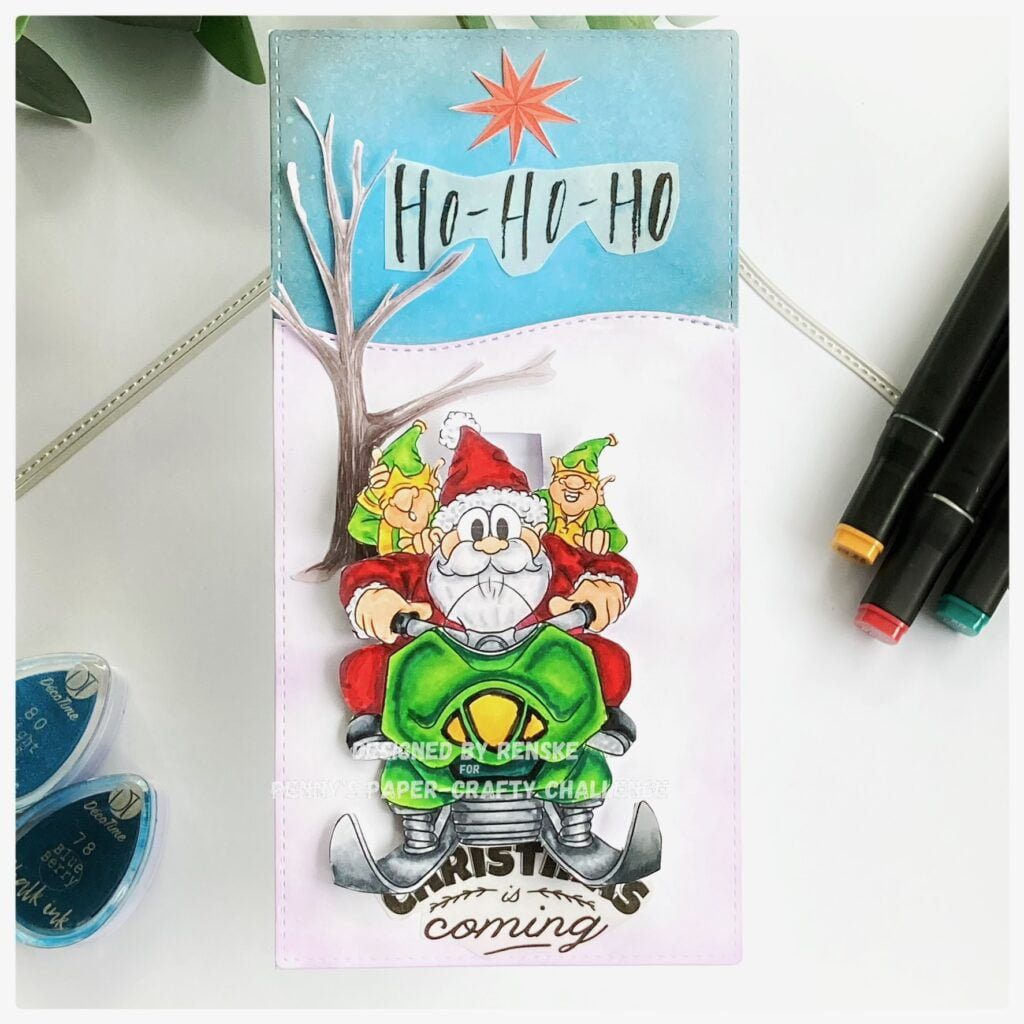
For this challenge, I used the image “Santa Skidoo” from Doctor Digi’s house of stamps.
Measurements of this Santa Skidoo slider card
- Slimline card base. You will need a piece of white card stock measuring 21 centimetres by 21 centimetres. Score at 10,5 centimetres.
- Piece of white card stock measuring 10,5 centimetres by 21 centimetres. This is for your background.
- Piece of white card stock from which to make your snow hill.
- DCP paper to print your image on.
Colouring the digital stamp Santa Skidoo
I printed my image on DCP paper and coloured it in with my Twinmarkers (alcohol markers.
- Faces: Sand (107), Peachy Blush (259), Salmon pink (25), Barely beige (29).
- Beard: Cool grey 4 (CG4), Cool grey 1 (CG1) and Colorless blender (0).
- Suit and hat: Wine Red (01), Burgundy (247) and English Red (249).
- Lights: Deep Yellow (32), Lemon Yellow (35), Pastel Lemon (39) and Canari Yellow (44).
- Snowmobile: Dark Green (51), Forest Green (50), Grass Green (47), Vivid Green (46) and Weeds Green (162).
- Ski’s: Cool Grey 8 (CG8), Cool Grey 5 (CG5), Cool Grey 4 (CG4) and Cool Grey 1 (CG1).


Having trouble editing or colouring digital stamps? Download my free guide for extra tips and tricks to help you perfect your digital stamps!
Making the Background
First, I die-cut a panel with a slimline die. I use this panel to make my sky. I don’t need to ink the whole panel, as there will be a snow panel on top of this panel.
For the sky, I use my chalk ink. I use the following colours:
- Back tulip 78.
- Noble blue 29.
- Blue Berry 78.
- Bright eyes 80.
Now it’s time to make the snow hill. I use a piece of white card stock and decide where I want the snow hill to start. I use a die, which is meant to make waves, but I use it to make my hill. On the edges of my hill, I apply some purple ink. I used the colour Pastel purple (65).
Making the slider part.
On the snow mound panel, I make my sliding part to move the snowmobile.

Based on the picture, I determine where the sliding part should be. Where I think it should not be higher or lower, I draw a line with a pencil. I made the sliding section 1.5 centimetres wide. Both edges of the sliding section are 4,5 centimetres from the edge.

Now it’s time to make the mechanism behind the digital stamp what makes it move. I die-cut 4 small circles out of white card stock. I make two mechanisms on the back of the digital stamp. I put two circles on top of each other with foam tape in between.

You stick the circles behind the digital stamp where you want the slider to stop. For me, that was at the very bottom, so that is stops exactly above the sentiment. For the top, I did the mechanism a bit further down, otherwise the picture was too far above the snow hill.

Assembling the card
I glue my background panel onto my card base. I adhere the snow hill with foam tape on top of my background panel. Pay close attention to where you stick the foam tape, so it doesn’t get in the way of your sliding mechanism.
Behind Santa a place a tree and in the sky a red star. And the card is done.

Inspire, Create, Share, and More
Thank you for joining me on this creative journey as we explore crafting with this Santa Skidoo slider card.
Join the Challenge
Are you inspired to embark on your crafting journey? I invite you to participate in the Penny’s Paper-Crafty Challenge! Share your unique creations, discover a supportive community, and let your creativity soar. Click the button below to join the challenge and be part of the crafting magic.
More Christmas or Winter Slider Card-Making Ideas


Products I used for this Santa Skidoo Slider card
Affiliate Disclosure: This post may contain affiliate links. If you purchase through these links, I may earn a small commission at no additional cost to you. This helps support and maintain our blog, allowing us to continue creating valuable content and inspiring tutorials. Thank you for your support!
- Digital stamp Santa Skidoo from Dr. Dig’s House of Stamps.
- Twin markers (alcohol markers) from Decotimecrafts.
- Sentiments, tree and star from a paper block from Decotimecrafts
- Chalk ink from Decotimecrafts.
- Wave die from Aveccreative.
I would like to participate in the following challenges:
- Crafty Gals Corner: Winter fun
- Creative Knockouts: Anything goes
- Craft Rocket Challenges: Not square
- Krafty Chicks Challenge: Christmas
- Crafty Calendar Challenge: Add a sentiment
- Lil Patch of Crafty Friends Challenge …: Anything goes
- Pearly Sparkles Challenge Blog: No design paper
- Most Magical Time of the Year!: Most Magical anything Halloween of Christmas goes
What a wonderful background for your clever slider card. Love it! Thank you for sharing at Pearly Sparkles.
Dr Digi has some of the best fun images for cards. This Santa is super fun. He reminds me of my husband’s grandpa. Great card with the image.
Thank you. Yes, dr digi stamps are really fun. I really enjoyed making this card.