
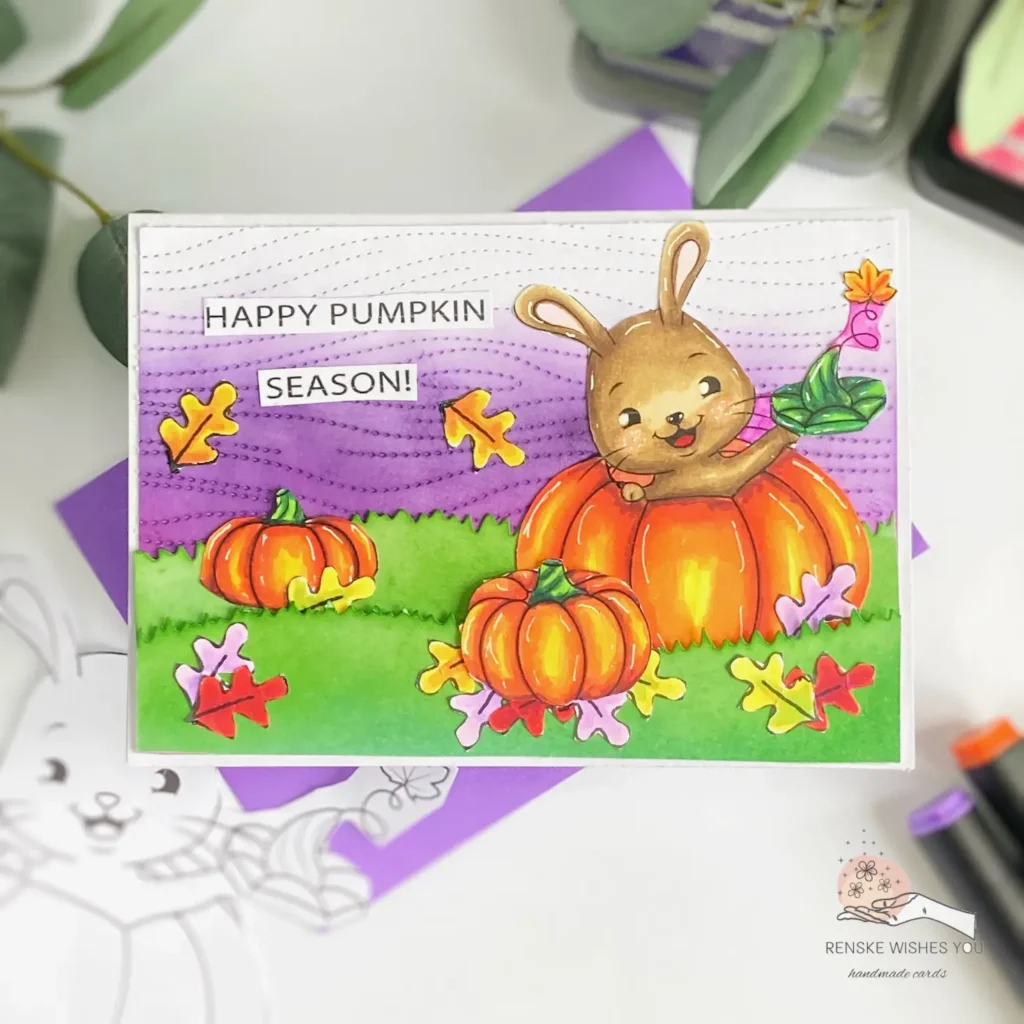
A hand-coloured purple pumpkin card adds a unique personal touch, especially when it’s crafted to reflect someone’s style. This season, I created a DIY pumpkin card for Liz, my swap partner, who loves vibrant purples and a fresh twist on autumn colours!
In this article, I’ll guide you through each step, from creating a bold purple backdrop to adding delicate pumpkin details. With simple techniques and materials, you can craft your beautiful autumn card!
Embracing Autumn’s Charm: Crafting with Seasonal Themes
Seasonal cards add warmth and personality to celebrations, and autumn is the perfect time to fill your designs with rich, cosy details. A pumpkin theme brings out the heart of fall, capturing the season’s colours and the spirit of gatherings and harvests.
Autumn-themed cards can feature anything from rustic tones to vibrant, unexpected twists like deep purples or rich oranges. The colour palette you choose plays a significant role in setting the mood of your card. While traditional fall colours like warm oranges, browns, and greens are classic, don’t hesitate to incorporate personal favourites that reflect what the season means to you.
As you create, think about these questions:
- What does autumn represent to you? How can you express that feeling in your design?
- What are your favourite colours for fall? How could they work with a pumpkin theme?
Inspiration from Other Autumn Cards
Looking at other DIY pumpkin cards can spark new ideas. From whimsical designs with bright pumpkins to elegant cards in muted autumnal hues, each card tells its story. Experimenting with your favourite colours is a simple way to add your unique touch to a seasonal greeting.
Gathering Your Materials for this DIY Pumpkin card
To create this DIY pumpkin card, gather basic crafting materials and a few tools to elevate your design. Here’s a list of everything I used to bring this autumn-inspired piece to life, along with some helpful alternatives when applicable.
Key Materials
- Digital Stamp: “Hello Pumpkin” by Isabella Cristina: Although this freebie isn’t currently available, any pumpkin-themed digital stamp will work. Look for something that embodies a cosy autumn feel and matches the theme.
- Cardstock:
- White Cardstock DCP – Ideal for a smooth background and clean colouring.
- White Card Base – Sturdy enough to hold the layers and embellishments, while making sure the final card is durable.
- Tip: For added texture, you can also use patterned or textured cardstock as your base.
- Inks for Background and Blending: I created a soft yet vibrant background using:
- Distress Ink in Picked Raspberry
- Distress Oxide in Villainous Potion
- Distress Ink in Mowed Lawn
- Distress Ink in Pine Needles
- These shades capture the essence of autumn with both traditional and unexpected colours.”If you don’t have these exact colours, try other shades that evoke the warmth of fall like rust orange or mustard yellow, or use any brand ink you like.
- Blending Brush (StudiolightNL): A good blending brush allows you to apply inks smoothly for a seamless gradient. If you don’t have one, a foam applicator or even a soft makeup brush can work.
- Clear Stamp Leaves (from the “Nuts About You” Set, Polkadoodles): Adding leaf accents brings in that extra autumn vibe. If you have other seasonal leaf stamps, those would work too!
Tools and Embellishments
- Acrylic Block & Memento Tuxedo Black Ink: Perfect for getting clean, crisp stamped images, especially when working with detailed stamps. The black ink pairs well with alcohol markers too.
- Alcohol Markers (DecoTime Crafts): I used these for adding pops of colour to the stamp. If you prefer, you could use coloured pencils or watercolours.
- Grass Die & Background Die (from Aveccreative): These dies add a dynamic layer to the card. You could cut similar shapes by hand if you don’t have these dies, or use other landscape dies you have on hand.
- Foam Tape for Dimension: Essential for adding depth to the card and making elements pop! You can substitute with double-sided tape if foam tape isn’t available.
- White Gel Pen for Highlights: Small details make all the difference. This pen adds highlights to bring your design to life. A white coloured pencil can be a handy alternative here.
- Scissors & Paper Trimmer: Sharp tools make crafting smoother and more precise, essential for clean edges.
Each tool and material here helps shape your seasonal masterpiece. If you’re new to crafting, start with a few essentials and build up over time.
Steps to Make the DIY Pumpkin Card for a Perfect Autumn Card Look
Bringing this autumn card to life is all about layering colours, textures, and details that capture the cosy, festive feel of the season. In this guide, I’ll walk you through each step, from building a vibrant background to adding those delicate pumpkin accents. Ready to craft a DIY pumpkin card that reflects your unique autumn style? Let’s dive into the process!
Step 1: Printing and Colouring the Digital Stamp
The first step in creating your DIY pumpkin card is setting up your digital stamp for printing and colouring. Since digital stamps often come as one large image, here’s a simple way to resize each element to fit your card perfectly.
Preparing Your Digital Stamp
- Open in Word: Start by inserting the digital stamp file into a Word document.
- Crop the Image: Click on each element you want to use, such as the rabbit in the pumpkin and individual pumpkins. Select “Crop” under the Picture Format tab. Adjust the black bars around the edges until they closely encircle the part of the image you want to keep.
- Resize: After cropping, right-click on the image, select Size and Position, and adjust the height. For this card, I set the rabbit’s height to around 8 cm; the width will adjust automatically. Repeat this process for any other pumpkins you’d like to include.
Once you’ve resized the images, print them on cardstock that is compatible with alcohol markers or your preferred colouring medium.
Adding Colour to the Stamps
Next, colour the images. Here are the shades I used to create an autumn vibe. Feel free to choose colours that suit your style:
- Rabbit: Pale Cream (142), Brown Grey (104), Walnut (100), Clay (116)
- Rabbit’s Ears and Blush: Blush (136), Flesh (139), Blushed Skin (257)
- Pumpkins: Lemon Yellow (35), Yellow (34), Orange (23), Vermillion (14), Old Red (02)
- Pumpkin Stems: Yellow Green (48), Grass Green (47), Forest Green (50), Dark Forest Green (168)
- Pumpkin Leaf: Lemon Yellow (35), Yellow (34), Orange (23)

Take your time to layer colours for a dimensional, hand-painted look.
Finishing Touches
To make your images pop, add white highlights with a gel pen. Apply small dots to the bunny’s blush and on the pumpkin stems to give them an extra touch of charm.
With your beautifully coloured elements, we’re ready to move on to the next important step: preparing the background and cutting out your coloured images. This will bring your card together, so let’s proceed to Step 2!
Having trouble editing or colouring digital stamps? Download my free guide for extra tips and tricks to help you perfect your digital stamps!
Step 2: Create the Background with Blending Techniques for Depth
Now that your coloured images are ready, it’s time to focus on creating the background. This step adds a new layer of depth and cohesion to your card.
Creating the Textured Background
To start, I’m using a background die to create a wooden texture effect. I’ll cut the die from white cardstock, but instead of positioning it vertically, I’ll flip it horizontally. This will create the look of windblown texture, which perfectly complements the autumn feel of the card.
Blending the Purple and Pink
Since Liz loves purple, I’ve decided to use a combination of Distress Oxide Villainous Potion and Distress Ink Picked Raspberry to give the background a soft, layered appearance.
- Start by applying Villainous Potion to the lower section of the panel, just above where the grass will be placed.
- Blend this colour lightly into the Picked Raspberry as you move upwards, gradually allowing the purple to fade into a soft pink at the top.

This gradient effect adds depth and enhances the background without overwhelming the main design.
If you look closely at this background and the background on the card that is finished, I made a mistake. I did not put the purple and pink at the top but put the bottom white part at the top. The intention was purple just above the grass, and pink above that. But oh well, it still became a nice card. Haha
Adding the Grass Elements
For the grass, I’m using a grass die to cut two strips from white cardstock. These will be coloured with Distress Ink Mowed Lawn and Pine Needles to create that rich, earthy feel.
- Begin by applying Mowed Lawn to the top of each grass strip, then work Pine Needles into the bottom and sides.
- Blend the two inks smoothly together so the colours transition naturally—this creates a seamless and realistic grass effect.
With the background set and the grass ready, it’s time to start assembling your design for the final look. Let’s move on to Step 3, where we’ll start making the autumn leaves.
Step 3: Stamp and Colour the Leaves for an Autumn Touch
Now that the background and grass are ready, it’s time to add those final autumn details that will bring your card to life. The leaves will add an extra pop of colour and depth to your design. Let’s get started with stamping and colouring them.
Stamping the Leaves
To keep that autumn vibe going, I’ve decided to use the leaf stamp from the Nuts About You clear stamp set by Polkadoodles. Begin by mounting the stamp on an acrylic block and inking it with Memento Tuxedo Black ink. This ink works beautifully with alcohol markers, ensuring clean, crisp lines.
For a lush and varied look, stamp the leaf design 11 times. Feel free to adjust the quantity depending on how many leaves you want to incorporate into your design.
Colouring the Leaves
Now comes the fun part—colouring! I used a mix of alcohol markers to achieve rich, seasonal hues. Here are the colour combinations I used:
- Combination 1: Pale Pink Light (196), Pale Lilac (147), Neon Violet (148)
- Combination 2: Cardinal (244), Wine Red (01)
- Combination 3: Lemon Yellow (35), Yellow (34), Orange (23)
- Combination 4: Yellow Green (48), Lemon Yellow (35), Pastel Lemon (39)
Feel free to experiment with your favourite colours for a personalized autumn touch!
Cutting Out the Leaves
Once you’ve coloured the leaves, carefully cut them out. These detailed leaves will add dimension and texture to your card, enhancing the 3D effect we’re aiming for.
With all your elements ready—the leaves, grass, and background—it’s time to start layering and assembling your card. Let’s move on to Step 4, where we’ll bring everything together to create a beautiful 3D effect!

Step 4: Assemble the Card and Add the Final Touches
With all the elements crafted and ready, it’s time to bring everything together and make your card truly come to life. Let’s layer the pieces and add those final details that give the design depth and personality.

Assembling the Layers
Start by adhering the first grass strip to the background, positioning it as the top layer. Then, add the second grass strip, but this time use foam tape for added dimension. This helps create a more realistic effect, making the elements stand out.
Placing the Rabbit and Pumpkins
Now, it’s time to place the focal image.
- Position the rabbit between the two grass strips, making sure it sits in a natural place within the scene.
- For the pumpkin, place it on the front grass strip, overlapping the rabbit’s pumpkin. You’ll want to add foam tape to the top of the pumpkin to compensate for the height difference, ensuring it stays securely in place.
Add the Second Pumpkin
On the left side of the card, place the second pumpkin on the rear grass strip. This one will sit flat in the background, completing the scene.

Adding the Sentiment
Take the pre-printed sentiment, which says “Happy Pumpkin Season,” and cut it into two pieces: “Happy Pumpkin” and “Season.” Position them on the left side of the background, with “Happy Pumpkin” at the top and “Season” underneath it. This simple yet bold sentiment will draw attention to your design.
Decorating with Leaves
To complete the autumn look, it’s time to add the leaves!
- Start by placing a stack of leaves under the front pumpkin on the grass strip. T
- Then, place two leaves at each end of the grass strip. Add a leaf in front of the rear pumpkin and another one in front of the rabbit’s pumpkin.
- For a bit of whimsy, place two leaves floating in the air, creating a dynamic sense of movement.
Finishing the Card
Once everything is in place, adhere the assembled piece to the card base. With all the elements layered and glued in place, you’ve created a beautiful, dimensional autumn card that’s sure to impress.
Now that the front of your card is complete, let’s move on to the inside! let’s move to Step 5, where we’ll finish the inside of your card with a creative design.

Step 5: Finish the Inside of the Card with a Personal Touch
To complete your autumn card, add a personal touch inside with space for your message A well-designed interior adds a special charm and ties the entire card together.
Adding the Purple and White Layers
Begin by cutting a piece of purple cardstock to 10 cm by 14.3 cm. Then, cut a smaller piece of white cardstock to 9.5 cm by 13.8 cm. This will create a lovely purple border around the white area where you’ll write your message.
Placing the Final Pumpkin
Next, take the last unused pumpkin and colour it in the same shades as the others to maintain consistency. After colouring, carefully cut it out and place it in the lower-left corner of the white cardstock. This subtle detail ensures that the inside of your card matches the front beautifully.
Completing the Card
With the inside finished, all that’s left to do is add a purple envelope, and your card is ready to be sent to a lucky recipient!
By incorporating these thoughtful touches to the inside, you’ve made sure the card is just as special on the inside as it is on the outside. Your autumn-themed card is now complete!
Let’s Get Creative Together
I enjoyed creating this autumn-inspired card, and I hope you did too. Combining layers, colours, and textures results in a truly unique designThere’s something incredibly satisfying about combining layers, colours, and textures to create a unique piece.
Now that you’ve finished, take a moment to appreciate the work you’ve done and consider how you might adjust it in the future with different colour schemes or embellishments.
What part of the card do you like best?
More DIY Pumpkin Card Blogposts

Pumpkin wheelbarrow card | Jan’s digital stamps
Another autumn card with pumpkins
I hope you’ve been inspired to make this DIY Pumpkin Card and create other autumn cards. Share your creations with me – I’d love to see what you make!
Products Used for this DIY Pumkin Card
Please note the links in this post are affiliate links, and I may earn a commission if you choose to purchase through them. This comes at no extra cost to you. I only share products and brands that I trust and use in my crafting projects. Your support allows me to continue sharing helpful tips and tutorials. Thank you for your support!
Products with affiliate links
Unfortunately, this digital stamp is no longer available in Isabel Cristina Shop. But you can buy other nice digital stamps. That’s why I’m sharing the link to her shop for you.
Isabel Cristina Stamps Shop. Lots of adorable digital stamps

Distress ink Picked Raspberry from Ranger

Distress Oxide villainous potion from Ranger

Distress ink Mowed Lawn from Ranger

Distress ink Pine Needles from Ranger

Blending brushes from StudiolightNL

Nuts About You Clear Stamp set from Polkadoodles

Memento Tuxedo Black ink

Twin Markers (alcohol markers) set XXL from Decotimecrafts

White Gelly Rol pen

Products without affiliate links
Here I will list al the products with links and without links. I try where I can add a link to the products.
Action Products
There are products I bought at ActionNL that you can only buy in the store. But Action does show the products on their website and you can mark them as a favorite. These are the products:
Tacky Glue

Foam Tape

Scissor

Twin Markers 4 pieces

Twin markers 60 pieces

Twin Markers 12 pieces

Products without links
- White cardstock (brand unknown)
- DCP paper from Clairfontaine
- Grass die from Aveccreative
- Background die from Aveccreative
I would like to enter my card in the following challenges:
- Krafty Chicks Challenge: Stamps
- Lil Patch of Crafty Friends Challenge …: Anything goes
- A Perfect Time To Craft Open Challenge: Anything goes
- Critter Crazy CHALLENGE BLOG: Anything goes + featured critter
- SheepSki Designs Challenges: Anything goes
- Crafty Animals: Anything goes + must use an animal