
Some links in this post are affiliate links. This means I may earn a small commission if you make a purchase, at no extra cost to you. I only recommend products I use and genuinely enjoy in my own cardmaking. Read more here.
Are you ready to add some festive cheer to your holiday crafting? This cute animal Christmas card is the perfect way to bring a unique touch to the season. It incorporates fun techniques to create a scene that will make anyone smile. I chose the “Cute Snowfriends” digital stamp and the “Theo Penguin Greetings” sentiments from Polkadoodles for a whimsical touch. These little details truly bring the card to life. They add a playful twist to classic holiday themes.
This card is part of the Polkadoodles challenge, which focuses on animal and Christmas elements. If you’re feeling inspired, seize this wonderful opportunity. Try your hand at a new project. Join in the fun of the challenge.
I’ll guide you through each step, from digital stamping and colouring to creating a textured, ink-blended background. Whether you’re looking to learn new techniques or need festive inspiration, there’s something here for everyone. Let’s get started and get crafting!
- Materials Used for this cute animal Christmas card
- Cute Animal Christmas card tutorial step by step
- Let's Get Creative Together
- Polkadoodles products in the Spotlight
- I would like to enter my card in the following challenges:
Materials Used for this cute animal Christmas card
This cute animal Christmas card with a festive flair begins by gathering a few essential supplies. Below, I have listed all the materials I used, including Polkadoodles products and alternatives for each item. This will make it easy for you to adapt based on what you already have in your crafting stash. Each tool and product adds its unique touch. They bring this holiday card to life. Elements range from the snowman’s soft colours to the textured winter sky.
Polkadoodles Products
- Cute Snow Friends Digital Stamp: This delightful snowman image adds a whimsical touch to your cute animal Christmas card. It makes the card perfect for festive fun. It’s easy to resize and ready for colouring with alcohol markers, adding personality to your card.
- Theo Penguin Greetings Sentiments Bundle: I chose the “Merry Christmas” sentiment from this set. It adds the perfect festive greeting to complete the card.
Other Supplies
- DCP Paper: This smooth cardstock is ideal for printing digital images like the Cute Snowfriends. It allows even colour application when blending alcohol markers, helping your snowman stand out with detail and depth.
- Alternative: Any smooth, printer-friendly cardstock that works well with alcohol markers can be used for blending and colouring.
- Alcohol Markers: These markers are perfect for shading and blending the animal’s details, giving a rich, smooth look.
- Alternative: Coloured pencils or water-based markers will also work, though you may need to adjust blending techniques for different effects.
- Distress Inks (Peacock Feathers, Salty Ocean, Chipped Sapphire, Black Soot): I used Distress Inks. They helped me create a smooth evening sky backdrop. I blended shades that evoke a cosy winter night. This technique adds depth and atmosphere to the card’s background.
- Alternative: Any dye or pigment inks that blend well can achieve similar results for backgrounds.
- Blending Brushes: These are essential for creating a beautiful background sky.
- Alternative: Makeup sponges can also work if blending brushes aren’t available.
- Moon and Star stencil: This is used to apply the moon and stars to the night sky background.
- Alternative: Any moon and star stencil will suffice.
- Crafting Mousse: I used this to add texture to the stars and moon. This gave an extra layer of detail to the night sky.
- Alternative: White paint or gel pens can achieve a similar effect if you prefer a different texture.
- Spatula: This is used to apply the crafting mousse to the stencil.
- Alternative: Any flat object will work to spread the crafting mousse over the stencil.
- Double-Stitched Rectangular Die & Foam Tape: These add dimension to the snowy hill scene, creating a multi-layered look that brings the card to life.
- Alternative: If you don’t have a die, use scissors and layered cardstock to create depth in the scene.
- White Gel Pen: A white gel pen is invaluable for adding final highlights and details. It makes the snowman and other elements stand out with extra dimension.
Dimension. You can create a cute animal Christmas card with these supplies and techniques. It combines playful Polkadoodles products with festive inspiration. Let’s get started!
Cute Animal Christmas card tutorial step by step
Get ready to make a cute animal Christmas card that brings a smile to anyone who receives it. This festive tutorial takes you through each step. You will create a cosy night sky and colour adorable animal characters. All of these steps are designed to bring a cheerful, wintery vibe to your card. Let’s get into the details and make your card come to life!
Step 1. Print and Colour Your Cute Snow Friends
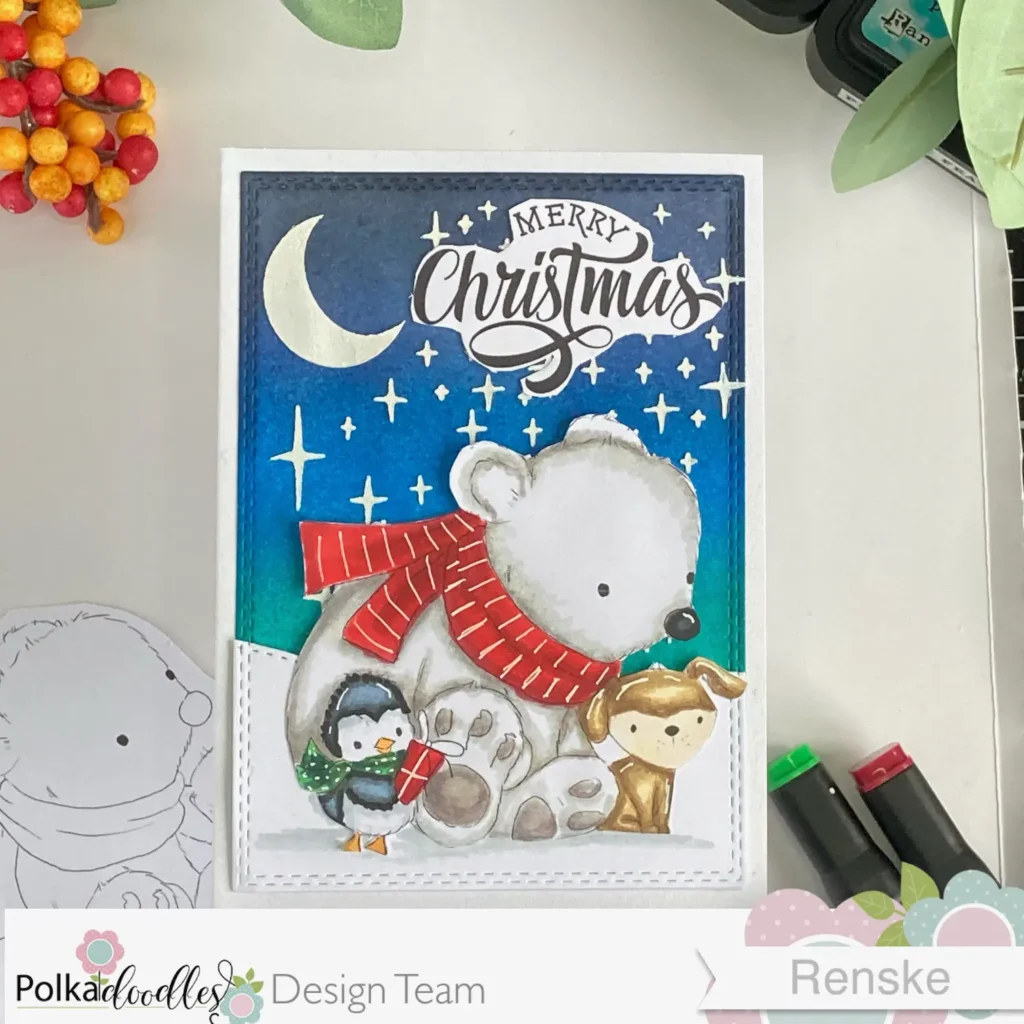
We start by preparing the digital stamp for our cute animal Christmas card. It features adorable animals that are perfect for the festive season. The “Cute Snowfriends” digital stamp from Polkadoodles will be the centrepiece of this card.
Resize and print the stamp.
Adjust the stamp to about 8 cm in height, making it the main focus of your Cute Animal Christmas Card. Once you’re happy with the size, print the image on DCP paper, which works great with alcohol markers.
Colour the characters
Now, let’s bring the characters to life with colour! Here’s how I coloured each character to capture a festive, wintery look:
- Polar Bear: To create a warm, cosy feel, I used warm greys:
- Body: Warm Grey 2, Warm Grey 4, and a touch of colourless blender for softness.
- Feet: Warm Grey 5 and Warm Grey 4 for a darker tone on the soles.
- Scarf: Festive red tones using Cardinal, English Red, and Burgundy.
- Penguin: For a soft, warm look, I chose blue greys instead of the standard black:
- Body: Black, Blue Grey 9, Blue Grey 5, and Blue Grey 3.
- White Areas: Cool Grey 3 and Cool Grey 1 to add soft shading.
- Scarf: Green shades to complement the bear’s scarf in holiday colours, using Grass Green, Forest Green, and Pine Forest.
- Gift: Red tones to match the bear’s scarf, using Cardinal, English Red, and Burgundy.
- Dog: To keep the colours soft and warm, I used browns that add a friendly touch:
- Brown Fur: Pale Cream, Brown Grey, Walnut, and Clay.
- Beige Fur: Pale Cream for a gentle contrast.
Add White Highlights
For extra detail, add highlights with a white gel pen. Here’s how I did it:
- Bear’s Scarf: White stripes add a fun touch.
- Penguin’s Scarf: Add small white dots for texture.
- Character Details: Add a few highlights on the penguin and dog to make them shine.
Cut Out the Characters
Carefully cut around each character to prepare them for the background we’ll create next.

Now that the characters are ready, it’s time to create a magical winter night background.
Step 2: Creating the Wintry Night Background
This step is all about creating a winter wonderland backdrop for your Cute Animal Christmas Card. We will create a beautiful background with snow, stars, and a glowing moon. It captures the essence of winter at the North or South Pole.
Die-cut the Rectangle Panel
Start by die-cutting a rectangle from white cardstock. I recommend using a die with a double-stitched edge for an added touch. Feel free to use any rectangle die you have. This will serve as our background base.
Blend Distress Ink for the Night Sky
On this panel, we will create a glowing sky effect using distress inks in the following shades:
- Peacock Feathers: Begin at the bottom, where it will peek out from behind the snow hill.
- Salty Ocean: Apply above the Peacock Feathers, creating a smooth transition.
- Chipped Sapphire: Layer above Salty Ocean for added depth.
- Black Soot: Finish at the top, giving it that night sky feel.
Apply layers for a smooth, blended look. Remember to leave some space at the bottom for the snow hill we’ll add next.
What ink colours would you choose for the night sky? Would you go for a darker sky with deep blue tones or a lighter, softer evening shade?
Add Stars and Moon with Crafting Mousse
I used a stencil featuring a moon and stars pattern along with crafting mousse for extra texture. If crafting mousse isn’t available, you can use white ink instead.
Secure the stencil over the background and, using a spatula, spread the mousse evenly. Once finished, carefully remove the stencil and set it aside to dry.
Die-Cut the Snow Hill
While the mousse dries, let’s create the snow hill.
- Die-cut a hill from white cardstock. I used a hill die with a stitched top edge.
- To match the double-stitched edge of the rectangle panel, position the rectangle die over the snow hill’s bottom edge. Align the sides, then die-cut. This ensures the hill has a consistent border.
Attach the Snow Hill
Once the hill is ready, adhere it to the bottom of the night sky with foam tape for dimension.
With this background complete, we are ready to add a festive message to our card!
Step 3: Adding the Festive Greeting
For the greeting on your cute animal Christmas card, I’ve chosen “Merry Christmas” from the Theo Penguin Greetings Sentiments Bundle. For this card, I’m keeping it simple and classic with “Merry Christmas.”
In the bundle, you’ll find pre-designed pages that you can print, featuring all the phrases in various sizes. They are also available individually, allowing you to adjust the size to suit your card. I previously printed the entire set, and fortunately, the size works perfectly for this project.t.
- Cut and Shape the Sentiment: Carefully cut around the shape of the words to add dimension.
- Position it on the background: Place the sentiment near the moon, centered among the stars.

What message would you use? Would you go for a personalized message or another classic festive greeting like ‘Season’s Greetings’?
With the festive greeting in place, the card starts to come together. Next up, we’ll position our coloured image for the final touch!
Step 4: Positioning Your Characters on the Card
The final step is adding your coloured cute animal Christmas card characters to the scene. Position them carefully on the snow mound to create a layered, fun look. Using foam tape will give these adorable animals lift, making them stand out against the background.
Attach the animals
Place foam tape on the top part of the image and glue the bottom portion directly to the snow. This method will give the impression that the animals are nestled into the snowbank, creating a cosy, layered effect.
Add shadows for realism.
To achieve a grounded and realistic look, I will add a subtle shadow beneath the image. I will use alcohol markers in Cool Grey 3 and Cool Grey 1. I will then blend the colors with a colourless blender.
What other characters would you add for a fun twist? Perhaps a snowman or a reindeer? Or would you prefer to use this scene with different animals?

With the shadow in place, the card is ready to be sent. It is a festive scene sure to bring cheer to its recipient.
Let’s Get Creative Together
Now that you’ve made this cute animal Christmas card, you want to put your spin on it. Experiment with different colours or add extra elements to make it truly unique. The beauty of card-making is that you can continually explore and unleash your creativity!
Join the Challenge
Join in the Polkadoodles challenge and showcase what you’ve created! Click the button below to join and share your masterpiece.
More Christmas project ideas with animals
I’d love to see how your version of this Cute Animal Christmas Card turns out! Share your creations on social media and tag me. Let’s inspire each other!
Polkadoodles products in the Spotlight
Please note the links in this post are affiliate links. I may earn a commission if you choose to purchase through them. This comes at no extra cost to you. I only share products and brands that I trust and use in my crafting projects. Your support allows me to continue sharing helpful tips and tutorials. Thank you for your support!
Cute Snow Friends Digital Stamps

Theo Penguin – GREETINGS/SENTIMENTS BUNDLE

I would like to enter my card in the following challenges:
- 4-Season Swap Challenge Blog: Sterrennacht
- Make My Monday Challenge Blog: Wild animals
- Unicorn Challenge Blog: Christmas and/or Winter
- CREATIVE INSPIRATIONS: Christmas animals
- Craft Rocket Challenges: Christmas and/or Winter
- Krafty Chicks Challenge: Stamps
- My Time To Craft!: Stencils
- Lil Patch of Crafty Friends Challenge …: Anything goes
- We Love Stamping: Christmas
- A Perfect Time To Craft Open Challenge: Anything goes
- Daisy Chain Challenges: Christmas and/or Winter
- Critter Crazy CHALLENGE BLOG: Anything goes + featured critter
- Crafty Animals: Anything goes + Must use an animal
- Peace On Earth Christmas: Anything goes
Wat een mooie sterrennacht op je kaart. Bedankt voor je bijdrage aan onze challenge bij 4-SCB.
Groetjes Nelly (DT 4-SCB)
Very Sweet card! Thanks for sharing with us at Make My Monday!
thank you
What a cute Christmas card. Love those little animal characters. Thanks for the full description of how you made it and for sharing it with us at we love stamping xx
Thank you so much for your lovely comment
Super toffe kaart. Helemaal leuk. Leuk dat je meedoet met onze challenge bij Make My Monday challenge
Great card, love it. Thanks for joining us at Make My Monday challenge
Creatieve Groetjes Claudia
<aMijn FB pagina: Claudia’s Kaartjes and more
<aBlog:Claudia’s Kaartjes
Challenge blogs:
<aGirlz Creative Christmas
<aGirlz makes Guyz Cards
<aGirlz creative crafts
<aCreative sketchy girls
<aGirlz Rebel Challenge
<aGirlz Creative Fun Art of Scrap
Dank je wel
Super cute! Thank you for taking part at We Love Stamping.
thank you
Fantastic fun festive card. Thank you for joining us at We Love Stamping.
thank you so much
A real fun and colourful Christmas card, many thanks for sharing at We Love Stamping challenge.
B x
thank you so much
OMG what a fabulously fun creation! Thanks so much for joining in the fun at our Peace On Earth challenge! Good Luck and we hope you’ll come back often.
Darlene
DAR’S CRAFTY CREATIONS
Peace On Earth Co-Owner
Thank you so much for your lovely comment