December birthdays hold a unique charm, combining the beauty of the winter season with the joy of celebration. Adding a handmade touch, like a winter-themed DIY gift bag, makes your gift feel even more thoughtful and special. It’s a great way to make someone’s day extra special.
I am a member of the Design Team from Polkadoodles. I aim to inspire creativity with handmade ideas. This DIY gift bag highlights the versatility of their Frozen Birthday Digital Stamp. It’s a delightful way to incorporate a wintry theme into your crafting.
In this post, I will share everything you need to create your gift bag. You’ll find a list of materials, an easy step-by-step tutorial, and suggestions for personalizing your design. If you’re crafting for a loved one or joining the Polkadoodles challenge, this guide will help you.
- Materials You'll Need for the DIY Gift Bag
- How to Make Your Winter-Themed DIY Gift Bag
- Let's Get Creative Together
- Polkadoodles products in the spotlight
- I would like to enter my card in the next challenges:
Materials You’ll Need for the DIY Gift Bag
Before crafting your winter-themed DIY gift bag, here’s a comprehensive list of everything you’ll need. I’ve included links to Polkadoodles products. You will also find suggestions for alternative materials, allowing you to adapt the project to your supplies.
Polkadoodles Products
- Frozen Birthday Digital Stamp – The focal point of the design, adding a whimsical winter charm to your project.
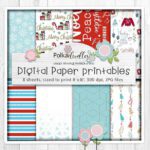
- Theo Penguin Paper Bundle 1 – A collection of winter-inspired patterned papers to create the bag’s base.
- Birthday Sentiments & Greetings – Perfect for customizing your bag with heartfelt birthday wishes.
Using Polkadoodles products will help tie your design together beautifully, but feel free to add your personal touch.
Other Supplies
- Alcohol markers – These are perfect for colouring the digital stamp. Alternatives include coloured pencils, watercolour paints, or gel pens for a more textured appearance.
- Snowflake embellishments – These add a festive and wintry touch. If you don’t have snowflakes, consider using sequins, small die cuts, or hand-drawing snowflakes with a white gel pen.
- Foam tape – This adds depth to your project by lifting key elements, like the sentiment or stamp. You can also use double-sided adhesive squares or stacked layers of cardstock for a similar effect.
- Adhesive pearls – These add elegance and texture. You can substitute them with rhinestones, enamel dots, or small punched paper circles.
- Paper adhesive – Essential for assembling the gift bag. Strong glue, double-sided tape, or a glue gun will give the necessary durability.
Feel free to adapt this list based on what you have at home or your preferred supplies. No matter how you personalize it, this gift bag will make any winter birthday even more special.
How to Make Your Winter-Themed DIY Gift Bag
Creating a personalized gift bag adds a thoughtful touch to any celebration. This winter-themed version is perfect for December birthdays. Below is a simple step-by-step tutorial to guide you in crafting your DIY gift bag. Use various crafting techniques with the charm of Polkadoodles products. This approach will help you create a unique keepsake. It’s just as special as the gift inside.
Step 1: Crafting the Gift Bag Base
Start with the base of your gift bag. This is a practical first step. It will help you find the size of your decorative elements, like the digital stamp. For this project, I chose a light blue patterned paper from the Theo Penguin Paper Bundle 1. The delicate white ice flowers on this paper are stunning. They perfectly capture the winter theme I wanted for this December birthday gift bag.
Preparing the Base
- Choose and Print Your Paper: Open your selected design in Word or similar software and print it on sturdy paper. The soft winter hues of this pattern make it an excellent choice for the theme.
- Cut to Size: Trim your paper to 9 1/2″ x 7″.
- Score and Fold: Use the following measurements to score your paper:
- Long side: 3″, 4 1/2″, 7 1/2″, and 9″.
- Short side: 1 1/2″ and 5 1/2″.
- Once scored, fold along the lines to form your bag.
Trim and assemble the gift bag
- Cut away the outer two sections on the top side.
- On the bottom, trim along the score lines to create flaps. Remove a small triangle between the flaps to make sure clean folds.


- Round the edges of the flap that will form the front closure.
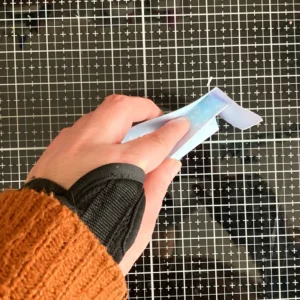
- Apply glue to the thin side flap and attach it to the opposite side, ensuring everything aligns perfectly.
- Fold the bottom flaps inward, applying glue as needed to secure them.

Final Touches
To achieve the classic gift bag shape, press the sides inward at the top, forming a milk-carton-like crease. Fold the front flap over to finish your bag base.
Tips and Troubleshooting
- Neat Cuts and Folds: Use a paper trimmer and bone folder for clean edges and crisp folds.
- Choose Sturdy Materials: Opt for thicker paper or lightweight cardstock to make sure the bag holds its shape.
- Alternative Tools: If you don’t have a bone folder, the back of a spoon works well for smoothing folds. Alternatively, use the sharp side of scissors.
Now that the gift bag base is ready, it’s time to focus on the centrepiece of this project—the digital stamp.
Step 2: Printing and Colouring the Digital Stamp Frozen Birthday
Now that the gift bag base is ready, it’s time to focus on the centrepiece of this project—the digital stamp. I used the Frozen Birthday Digital Stamp from Polkadoodles, which perfectly complements the December birthdays theme.
Printing
- Set the Size: To fit the proportions of the gift bag, I resized the stamp to a height of 5.5 cm (approximately 2 ¼ inches). This adjustment ensures the image enhances the design without overpowering it.
- Use the Right Paper: Print the digital stamp on DCP paper. Its smooth surface works well with alcohol markers, preventing bleeding and ensuring vibrant colours.
Colouring
For this project, I used alcohol markers to bring the stamp to life. Here’s the colour palette I chose:
- Skin: Tanned Skin, Peachy Blush, Salmon Pink, Pale Cream
- Hair: Pale Cream, Brown Grey, Walnut, Clay
- Crowns and Boots: Pastel Lemon, Lemon Yellow, Golden Yellow, Barn Red
- Girl’s Coat and Snowman’s Scarf: Dark Denim Blue, Light Denim Blue
- Girl’s Scarf and Gloves: Blue Grey 3, Blue Grey 1
- The icing on the Cake: Frosty Blue
- Snowman: Blue Grey 3, Blue Grey 1
Add Highlights
I wanted to create dimension and a polished finish. Use a white gel pen for highlights on the hair, clothing, and snowman.
Cut Out the Image
Once coloured, carefully cut out the stamp with scissors.
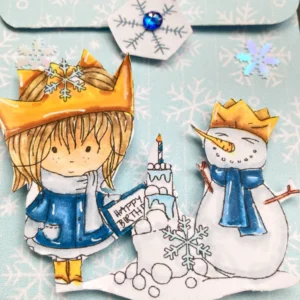
The stamp is beautifully coloured and cut. It’s ready to take its place as the star of the gift bag design.

Having trouble editing or colouring digital stamps? Download my free guide for extra tips and tricks to help you perfect your digital stamps!
Step 3: Adding the Closure
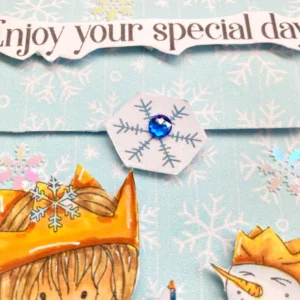
The flap closure serves both a practical and decorative purpose, enhancing the winter theme of the gift bag. In this step, I used a snowflake element from the Theo Penguin Paper Bundle 1 to secure the flap. This element also complements the overall design.
Creating the Decorative Flap
- Choose the Pattern: I selected a snowflake design from a different paper in the bundle. This created a contrast against the bag’s base.
- Prepare the Closure: Carefully cut out the snowflake, ensuring you have clean edges.
- Attach foam tape: Add foam tape to the lower half of the back of the snowflake. The foam tape adds dimension and provides space to tuck the flap behind it.
- Position and Secure: Place the snowflake on the front of the bag, aligning it with the flap. Press down firmly to make sure the adhesive sticks.
Now, the flap can easily be tucked behind the snowflake, keeping the bag securely closed while adding a stylish touch.
Optional Variations
If you’d like to try different closure options, here are some ideas:
- Use an image: You can use an image to hold the back flap closed.
- Decorative Clips: Consider using themed paper clips or mini clothespins for a quick and reusable option.
The snowflake closure brings purpose and flair to the DIY gift bag, making it a standout feature of the design.
Step 4: Placing the Sentiment and Final Embellishments
This step brings everything together by incorporating a personalized sentiment and decorative accents that emphasize the December birthday theme.
Adding the Sentiment
Choose and Prepare the Sentiment
For this project, I selected the phrase “Enjoy your special day” from the Birthday Sentiments & Greetings set by Polkadoodles. This is a perfect sentiment for December birthdays. Before printing, I adjusted the size to fit the bag’s flap, setting the width of the sentiment to 7.3 cm to perfectly complement the flap’s dimensions. Print the sentiment on quality paper and carefully cut it out with scissors for neat edges.
Attach the Sentiment
Apply foam tape to the back of the sentiment to create a raised effect. Position it slightly above the centre of the flap, ensuring it is level and secure.
Final Touches
- Digital Stamp Placement: The coloured digital stamp adds a focal point to the bag. Apply foam tape to its back for added dimension. Position the stamp towards the lower half of the bag, leaving room for embellishments.
- Embellishing the Design: Attach snowflake embellishments to enhance the wintry feel. I placed one above the sentiment, one over the girl’s crown, and another above the snowman’s crown. Add adhesive pearls for a soft, festive finish.
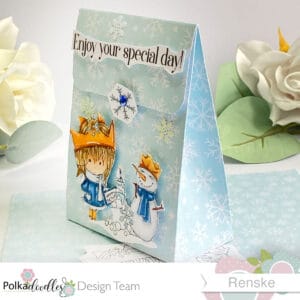
The sentiment and final details are in place. The gift bag is finished. It is truly special for a winter birthday celebration.
Let’s Get Creative Together
Creating a personalized winter-themed gift bag for December birthdays adds a thoughtful touch. Imagine the joy on someone’s face. They will appreciate the effort you’ve put into crafting something unique for their special day. Have you created a DIY gift bag before? I’d love to hear your tips or see your creations—feel free to share them in the comments below. Now it’s your turn to bring this idea to life with your own creative flair.
Join the challenge and share your creation.
Feeling inspired? This project was created as part of the Polkadoodles “Anything Goes” challenge. Why not join in and share your creations? Use Polkadoodles products and let your creativity shine!
More paper craft gift ideas
Let’s keep crafting together and sharing inspiration!
Polkadoodles products in the spotlight
Affiliate Links: The products mentioned in this post are affiliate links. If you decide to purchase through these links, I may earn a small commission at no extra cost to you. These commissions help keep my blog running, so I truly appreciate your support!
Frozen Birthday – Winnie Winter Celebrations

Theo Penguin Digital Paper Bundle 1
Birthday sentiments and Greetings

I would like to enter my card in the next challenges:
- Unicorn Challenge Blog: Christmas and/or Winter
- Seize the Birthday: Focal one
- Craft Rocket Challenges: Christmas and/or Winter
- Dragonfly Dreams: Winter Birthday
- A Perfect Time To Craft Open Challenge: Anything goes
- Crafts Galore Encore Challenge Blog: Anything goes
- Creative Moments: Winter
- The Cutie Pie Challenge Blog: Special occasions


