
Hello, crafting friends!
Today, we have a special creative project in store to celebrate Nikky’s birthday. Nikky is the force behind Polkadoodles. For this project, we’ll be making a slider card in Nikky’s favourite colours – pink and orange. But that’s not all!
To join the celebration, Polkadoodles Challenge Blog has a new challenge that starts today with the theme “Anything Goes”. Everyone is invited to participate and showcase their creativity for a chance to win fantastic prizes.
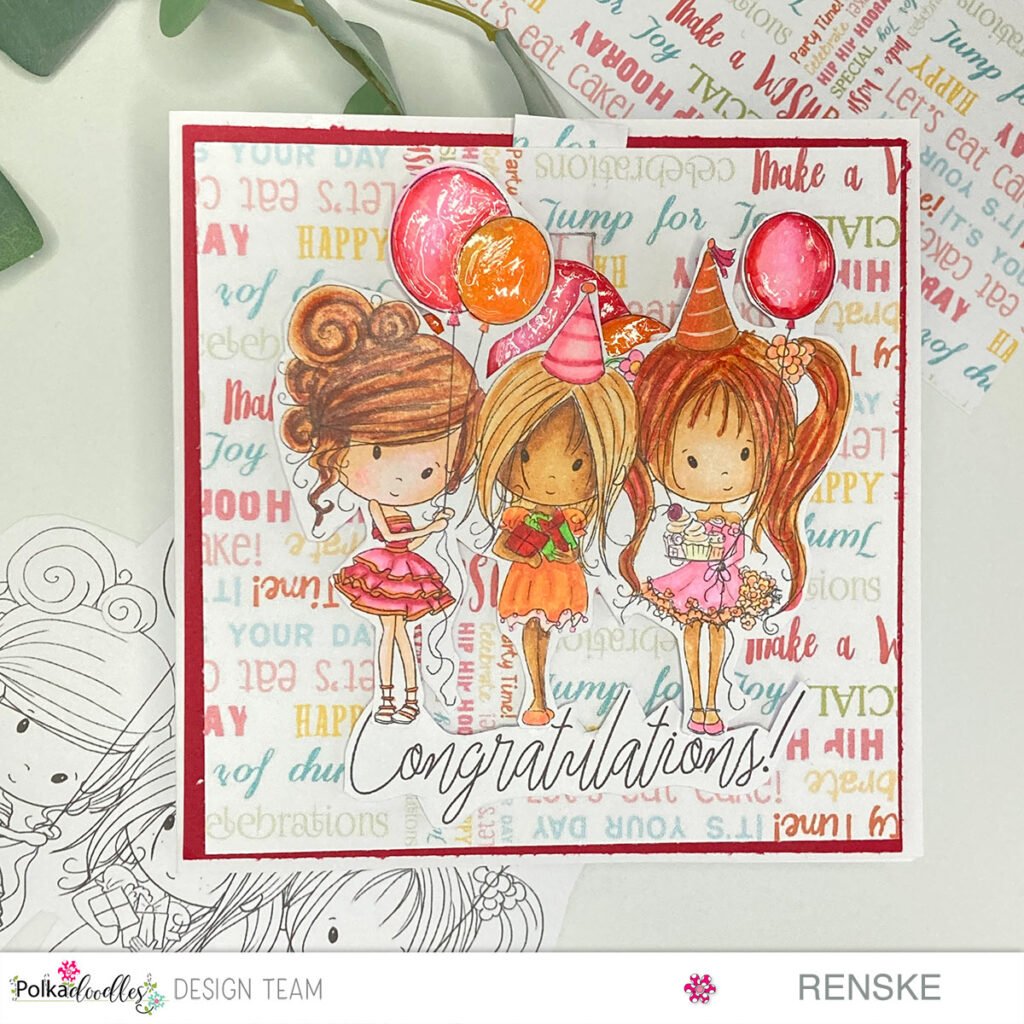
In this tutorial, we’ll be using the ‘From All of Us’ digital stamp and ‘Winnie Celebrations’ papers from Polkadoodles. We are going to make a handmade birthday slider card. So, grab your crafting materials and let’s create a personalized birthday card that’s as special as the occasion it celebrates! Join us in celebrating Nikky’s birthday, and let’s have fun crafting together!
Materials Used
For creating this vibrant birthday slider card, I mainly used Polkadoodles products, which gave the project a unique charm. These are the main materials that brought this celebration to life:
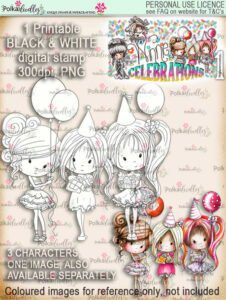
- “From All of Us” Digital Stamp by Polkadoodles: This digital stamp, the heart of our creation, contains three cheerful figures, each radiating the spirit of celebration. The design perfectly captures the essence of the occasion.
- Winnie Celebrations” Papers by Polkadoodles: These papers form the backdrop for our card and not only serve as a background but also add to the festive atmosphere. The vibrant colours and beautiful patterns of this Polkadoodles set enhance the overall festive feel. For this card, I chose the patterned paper with all kinds of festive texts on it.
- Winnie Daisy Greetings, Quotes, and Sentiments: I used this set to add text to the card. For this card, I chose the text “Celebrations”.
- Alcohol Markers: For the colouring process, alcohol markers became our artists’ tools, bringing the digital stamp to life with vibrant hues. The blending capabilities of these markers allowed us to create depth and dimension.
- Foam Tape: To ensure that our sliding mechanism works, we need foam tape.
- Piece of pink paper: To get a coloured border around the pattern paper, I use pink paper measuring 12.5 centimetres by 12.5 centimetres.
- Paper Glaze: To add some shine.
These materials, combined thoughtfully, contributed to the creation of a handmade birthday slider card that not only meets the challenge criteria but also encapsulates the joyous spirit of the occasion.
Crafting Magic: A Step-by-Step Guide to Your Vibrant Handmade Birthday Slider Card
In this section, we will begin creating our birthday slider card. This step-by-step tutorial will guide you through the process of colouring, assembling, and bringing to life the charming characters from the “From All of Us” digital stamp from Polkadoodles.
Each step has been crafted carefully to help you personalize your creation, ensuring a personal touch that makes your card truly unique.
Let’s get started on this crafting adventure and watch your card come to life!
Step 1. Prepare Your Crafting Haven
Start by creating a sturdy foundation for your vibrant birthday slider card. Follow these simple steps:
Creating the Card Base
Cut a piece of cardstock to a size of 26 centimetres by 13 centimetres. Score the long side at 13 centimetres and fold it in half. This will serve as the base of your card, providing stability for the entire project.
Choosing the perfect patterned paper
Pick out the perfect patterned paper from Polkadoodles, decorated with an abundance of birthday wishes in vibrant hues. The paper resonates with the festive mood, with pink, red, orange, yellow, green, and blue tones.
Cut the pattern paper to size
Carefully cut out the chosen patterned paper to a square size of 12 x 12 cm. This will be the main layer of your card and will provide the backdrop for the vibrant scenes to come.
Enhance with a pinkish-red border
Increase the visual appeal of your card by covering it with 12 x 12 cm rose red paper. This border not only enhances the colours of the patterned paper but also adds a touch of sophistication to your creation.
Now that the card base is ready and the rest of the paper has been custom-made, we can bring the card to life.
Step 2. Print and Color the Digital Stamp “From all of Us”.
Now it’s time to bring our festive trio to life with the “From All of Us” digital stamp from Polkadoodles and give each character vibrant shades. Follow these steps:
Printing the Digital Stamp
Print the digital stamp ‘From All of Us’ several times. This allows us to isolate individual elements, allowing for more detailed and personalized colouring. You will colour the entire stamp, but we will use the balloons from the other stamps separately to make a bunch of balloons.
Colouring the digital stamp with alcohol markers
I chose to colour the picture with my alcohol markers. I used the following colour combinations for this.
- Skin Tones: Achieve a diverse yet harmonious look by employing distinct skin tones for each girl:
- Girl 1: Pearl White, Salmon Pink, Blush, and Pale Pink
- Girl 2: Peachy Blush, Sand, and Burnt Sienna
- Girl 3: Barely Beige, Salmon Pink, Peachy Blush, Tanned Skin
- Hair Colors: Infuse personality into each character with a unique hair colour palette:
- Girl 1: Burnt Sienna, Chocolate, Hazelwood, Orange, Yellow
- Girl 2: Caramel, Sand, Leather, Buttercup Yellow.
- Girl 3: Red Barnish, Caramel, Sand, Cardinal, Cherry Red, Red Coral
- Dress Colors: Elevate the festive charm by choosing distinct dress colours for each girl:
- Girl 1: Rose Red, Rose Pink, and Pale Pink
- Girl 2: Orange, 226, 34, Pale Pink, and Pearl White
- Girl 3: Roze Pink, Pale Pink and Pastel Pink,
- Balloons:
- Pink Balloon: Rose Red, Rose Pink, and Pastel Pink
- Orange Balloon: Orange Ochre, Amber, Orange
With your printed digital stamps and a palette of lively colours, you’re now ready to infuse character and joy into the heart of your birthday slider card. Let the colouring adventure commence!

Step 3. Crafting the Balloon Bouquet
As I mentioned earlier, you will need to print the digital stamp multiple times. This step will come in handy now. We will cut out the balloons from the digital stamps and use them to create a bunch of balloons.
Isolating and Cutting
Carefully cut out each balloon from the printed digital stamps. This will allow us to arrange them freely and create the illusion of a floating bouquet.
Colouring the Balloons
Let’s bring the balloons to life by adding vibrant colours. Here are the colour combinations I used for our balloons:
- Red balloons: Cardinal, English Red, and Burgundy
- Orange Balloons: Orange Ochre, Amber, Orange
- Pink balloons: Rose Red, Rose Pink, and Pastel Pink
- Green Balloons: Apple Green, Weeds Green, Grass Green
- Blue Balloons: Light Sky, Midi Sky and Dark sky
- Yellow Balloons: Lemon Yellow, Pastel Lemon Yellow, Pastel Yellow
Assembling the Balloon Cascade
Once coloured, arrange the balloons in a cascading pattern.
Adding shine to the balloons
To give the balloons some extra shine and make them look more festive, you can use glossy highlights.
By infusing your balloon bouquet with vibrant colours and clever arrangements, you will not only add decoration but also create a festive story that unfolds with every turn of the slider. Get ready to see your birthday slider card come to life!

Step 4. Crafting the Interactive Slider Mechanism
In this step, we will create the sliding mechanism that will allow the balloons to come out from behind the girls.
- Choosing the perfect spot: Determine the ideal location for your sliding mechanism by measuring it. For this digital stamp, the best spot is in the centre of the card.
- Creating the Slider Slot: Carefully measure and cut a strip from the patterned paper where the sliding mechanism will be located. I made the slot 1.5 centimetres wide.
- Creating the paper strip: To attach the balloons to the slider, you will need a strip of paper. I made this strip about 2 cm wide from the same patterned paper. Make sure that the top part of the strip is above the pattern paper so that you can still grab it to raise the balloons.
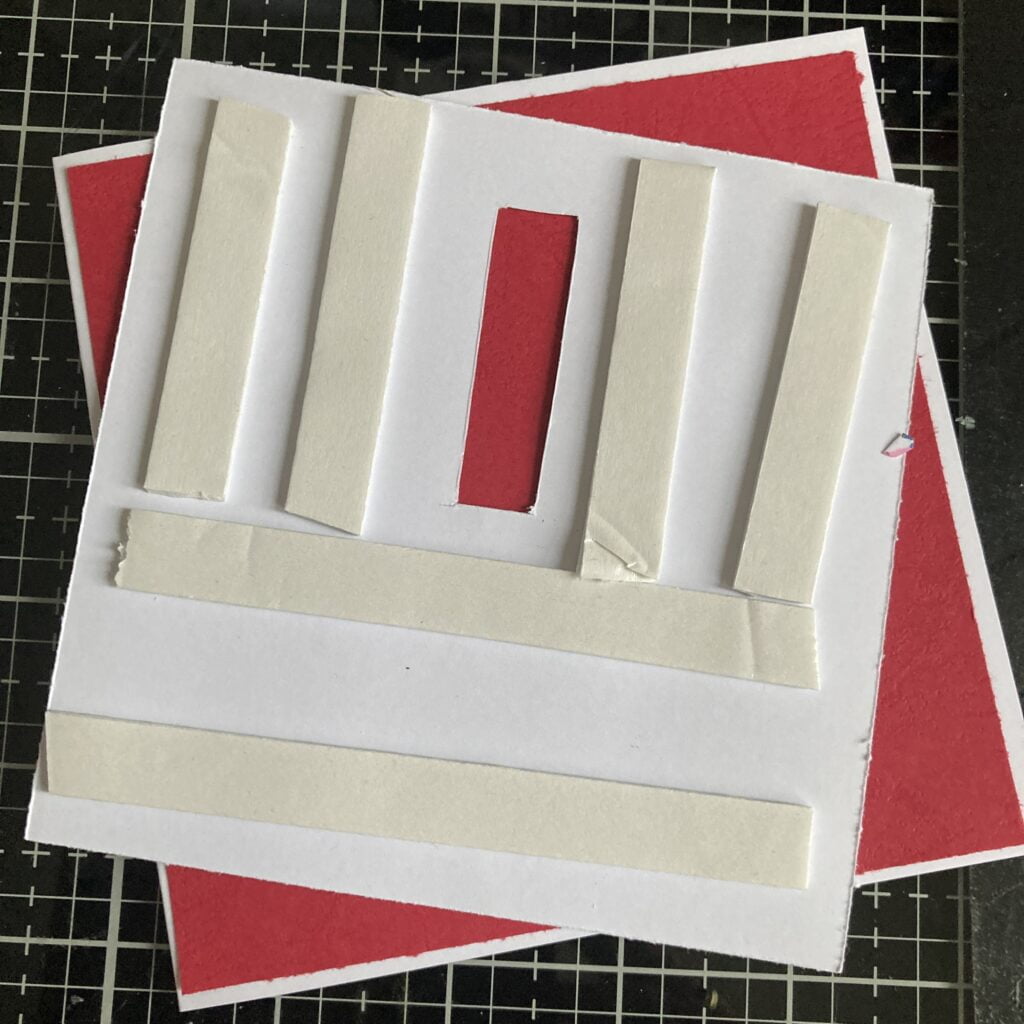
- Assembling the Slider: Attach foam tape to the back of the pattern. Place the foam tape where it does not get in the way of the slider. Position the strip in place using foam tape, ensuring it allows free movement for the slider. Attach the balloons to the strip using additional foam tape, creating a dynamic effect as they rise behind the joyful girls. Place the pattern paper on the pink paper.
- Attaching the balloons: Now that the sliding mechanism is ready, the balloons can be attached to it. Place foam tape at the bottom of the sliding slot, and place the balloons so that they fall behind the girls when you place them.
With the interactive slider mechanism in place, your birthday card will be a visual and dynamic feast. Get ready to surprise and delight with this engaging crafting technique!


Step 5. Adding the Digital Stamp and Congratulations Sentiment
In this final step, we will add the finishing touches to the birthday card and complete the scene.
- Positioning the Digital Stamp: Carefully choose where to place the brightly coloured girls. Make sure that most of the balloons are hidden behind them.
- Attach the girls with foam tape: To ensure that the balloons rise freely, secure the girls with foam tape. Make sure that the foam tape does not get in the way of the balloons.
- Adding the congratulations sentiment: Print the text “Congratulations” from the Winnie Daisy Greetings set and place it strategically on the card. Make sure the girls’ feet rest on the sentiment area. Use foam tape to attach it, adding depth to your creation.
With the digital stamp and sentiment in place, your birthday slider card will become a captivating celebration story. The carefully placed elements come together to convey joy, movement, and heartfelt congratulations.

Inspire, Create, Share, and More!
Thank you for joining me in creating this handmade birthday slider card. I hope you enjoyed the process and found inspiration in the magic of Polkadoodles products.
If you have any questions, need clarification, or just want to share your thoughts, please comment below. I will answer this as soon as possible.
Join the Polkadoodles Challenge
Remember, the beautiful handmade birthday slider card was created to inspire you to participate in the Polkadoodles’ “Anything goes” challenge. I am excited to see your creative journey unfold! This is your chance to showcase your skills, so get your craft supplies ready and let your imagination soar. Show us the amazing projects you come up with! I strongly encourage you to join in this thrilling challenge, create your art, and share your work with our lively community. Your talent deserves recognition, and who knows? You might be our next winner!
More Birthday card ideas
In this section, I have two more examples of birthday cards that I made with Polkadoodles products.

Another interactive card with Polkadoodles products

Polkadoodles Products in the Spotlight
Digital stamp “From All Of Us

Winnie Celebrations Digital Paper Set 1

I would like to enter my card in the following challenges:
- Make My Monday Challenge Blog: Happy Birthday
- Unicorn Challenge Blog: Birthday
- The Paper Funday Challenges: Anything goes + Let’s celebrate
- Through The Purple Haze Challenges: Anything goes
- Alphabet Challenge Blog: U is for Under Something. The balloons are under the girls
- Lil Patch of Crafty Friends Challenge …: Anything goes
- A Perfect Time To Craft Open Challenge: Anything goes
- Classic Design Challenge Blog: Anything goes
- Crafts Galore Encore Challenge Blog: Anything goes
- The Creative Crafters: Anything goes
- Crafting Happiness Challenges: Celebration of any kind
Love it – what a great, fun design,
Thanks for joining us at The Paper Funday Challenge.
Helen x
DT
Lol, looks like these gals are having a super fun birthday party! Great coloring for the ladies, and love that background paper, too! Thanks so much for playing at Make My Monday!
Thank you so much for your lovely comment ❤️