
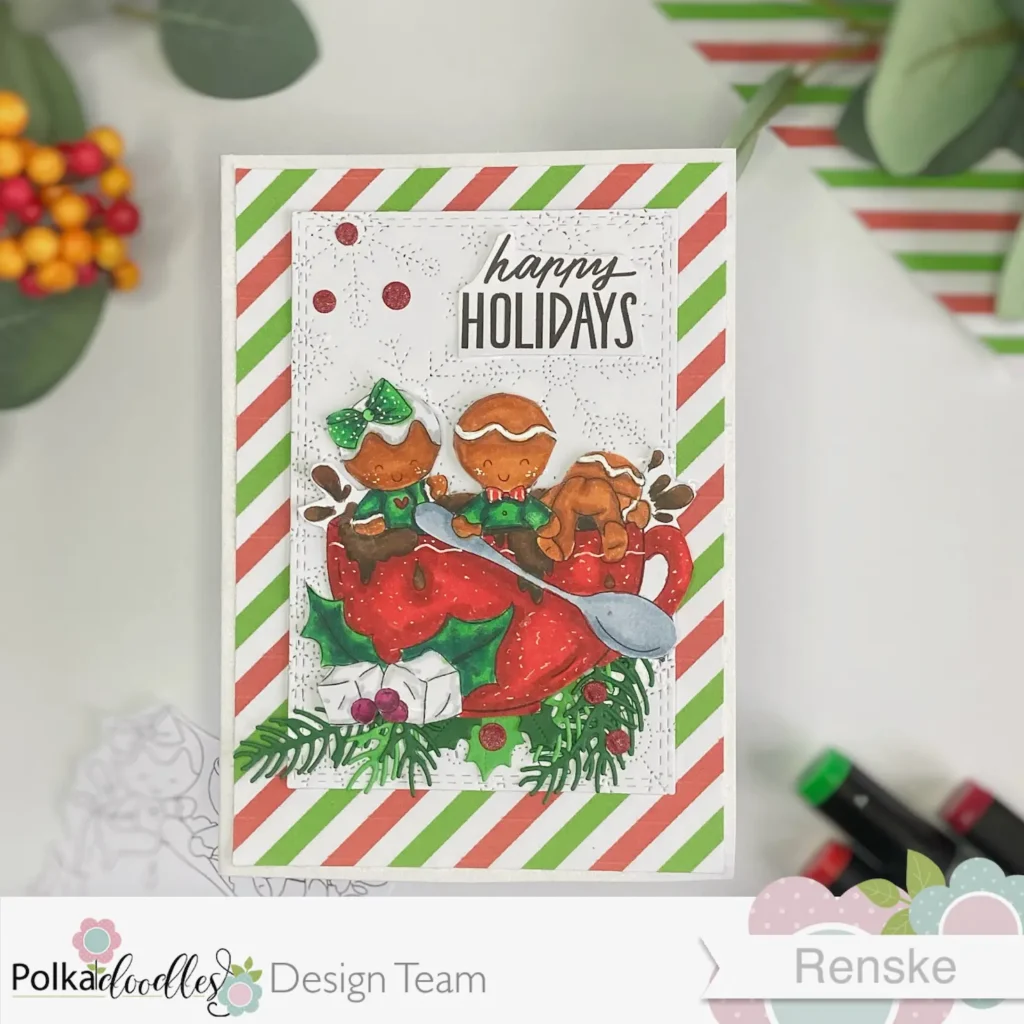
Do you love the cosy combination of gingerbread and hot chocolate? If so, this digital stamp is perfect for your Christmas cards! I can’t resist a cup of hot cocoa. I must confess—I’ve never had a gingerbread cookie. They’re not a thing in the Netherlands.
That’s why I had so much fun working with the Hot Chocolate – Gingerbread Holly digital stamp. The gingerbread cookies in the cup of cocoa look like they’re having the best time. They bring a smile to my face. I’ll show you how to transform this playful image into a charming handmade gingerbread Christmas card. We will use festive elements and Polkadoodles products.
You’ll learn simple techniques to create layers, add texture, and bring your design to life with vibrant colours. By the end, you’ll have a cheerful Christmas card ready to spread holiday magic. Let’s get started!
- Everything You Need for Gingerbread Christmas Magic
- Create a Fun Gingerbread Christmas Card step-by-step.
- Step 1: Prepare Your Digital Stamp Hot Chocolate – Gingerbread holly.
- Troubleshooting Tips for a Smooth Crafting Experience
- Let's Get Creative Together
- Polkadoodles products in the spotlight
- I would like to enter my card in the next challenges
Everything You Need for Gingerbread Christmas Magic
Let’s get everything ready for your festive gingerbread card! Here’s a breakdown of the materials you’ll need. These items will bring this project to life. Pay special attention to the fantastic Polkadoodles products that will make your card extra special.
Polkadoodles Must-Haves for Festive Card Making
(Affiliate links provided for easy shopping)
- Hot Chocolate – Gingerbread Holly Digital Stamp: This is the star of your card! It features a fun and playful design that combines hot chocolate and gingerbread. The combination captures the Christmas spirit with a delightful scene.
- Theo Penguin Paper Bundle 2: This digital paper bundle includes the striped digital paper I used for the card base. This has a lovely festive feel. This is the perfect backdrop for your stamped images.
- Theo Penguin – GREETINGS/SENTIMENTS BUNDLE: A versatile set with fun Christmas and winter wishes. It includes various sentiments, ensuring there’s something for everyone.


Essential Supplies to Finish Your Gingerbread Christmas Card
(Here’s what you’ll need, with some suggestions for alternatives)
- Alcohol Markers: These are ideal for adding vibrant colour to your digital stamp. I recommend alcohol markers for their rich pigmentation. They have a smooth finish. But, you can use watercolour or coloured pencils if you prefer those mediums.
- DCP Paper (for printing): This type of paper ensures crisp print quality for your digital stamp. If you don’t have DCP paper, any smooth cardstock will work. You have to make sure it’s compatible with your printer.
- Cardstock (21 x 14.8 cm): This will serve as your card base. You can also use pre-made card bases or cut your own from sturdy cardstock for a custom size.
- Patterned Paper: I used this for the festive background, but feel free to get creative! You can also design your patterned paper using stamps or stencils for a personal touch.
- Rectangle and Background Dies: These add lovely texture and dimension to your background. If you don’t have embossing dies, you can use any texture folder or create your own with stamps.
- Die-cutting machine: You’ll need this to cut out branches, holly, and berries. Both manual and electronic die-cutting machines will work.
- Adhesives: Foam tape can add dimension to your design, but glue also works well for layering elements. Double-sided tape is another simple choice that works great.
- White Gel Pen: This pen adds highlights and little details to your design, making it pop. If you don’t have a white gel pen, substitute it with a white paint pen or a fine-tipped white marker.
Now that you have gathered your materials, you are ready to bring this festive gingerbread Christmas card to life. In the next section, I will guide you through the process. We will go step by step. This way, you can create a card that is as fun to make as it is to give.
Create a Fun Gingerbread Christmas Card step-by-step.
Now that we have everything ready, let’s start crafting! In this step-by-step tutorial, I will guide you through making your gingerbread Christmas card.
You will learn how to use the Hot Chocolate – Gingerbread Holly Digital Stamp. You will also discover other Polkadoodles products. These tools will bring your card to life with vibrant colours and festive charm. Along the way, I will share tips and techniques to make your card-making process as enjoyable and creative as possible. Are you ready to get started? Let’s dive in!
Step 1: Prepare Your Digital Stamp Hot Chocolate – Gingerbread holly.
Let’s start by printing and colouring the Hot Chocolate – Gingerbread Holly Digital Stamp! First, print the stamp on DCP paper for the sharpest and most vibrant results. Once it’s printed, we’ll bring the gingerbread and hot chocolate design to life using alcohol markers.
Here’s how I coloured the stamp:
- Gingerbread: I used a combination of Sand, Rose Beige, and Burnt Sienna for that warm, baked look.
- Mug: For the hot chocolate mug, I used Cardinal, English Red, and Burgundy to create a rich, festive red.
- Holly Leaves: I used Grass Green, Forest Green, and Dark Green to achieve a vibrant green for the holly leaves.
- Berries: For the berries, I picked Old Red and Wine Red, giving them a deep, warm finish.
- Bow and Shirts: To keep the green theme, I used Grass Green, Forest Green, and Dark Green for the bow. I also used these shades for the shirts.
- Hot Chocolate: I used Clay and Chocolate to achieve a smooth, warm finish.
Once everything is coloured, it’s time for the finishing touches! Grab your white gel pen and add highlights to the mug, creating small white dots.
To make the gingerbread even more playful, I added extra white to their cheeks and other details. The gel pen adds shine and dimension, giving your design that festive flair.

Now that your colouring is finished, it’s time to move on to the next step!

Having trouble editing or colouring digital stamps? Download my free guide for extra tips and tricks to help you perfect your digital stamps!
Step 2: Make the Card Base
Let’s set up the foundation for your gingerbread Christmas card!
Prepare the Card Base
Start with a pre-made card base measuring 10.5 x 14.8 cm, or create your own. If you want to make your card base, cut a piece of cardstock to 21 x 14.8 cm. Score the cardstock at 10.5 cm along the longer edge and fold it in half to form your card base.
Prepare the Patterned Paper
For the background, print a design from the Theo Penguin Paper Bundle 2. I used the striped paper featuring red, white, and green stripes for a festive touch. To print, insert the paper into a Word document. It will automatically resize to 16 x 16 cm. This size is perfect for this card. Once it’s ready, print it out!
Trim and Adhere the Patterned Paper
After printing, trim the paper to 10 x 14.3 cm. Adhere the trimmed paper to the front of your card base, and your card background will be finished!
With the card base and patterned paper in place, we are all set to move on to the next step. Let’s keep going!
Step 3. Create a Textured Ice-Flower Background
Now, let’s add some texture and dimension to our card background!
Die-cut the Rectangle with a Stitched Border
I start by using a smaller rectangle die with a stitched border to create a neat and polished background layer. I cut this out of white cardstock for a crisp, clean look.
Add Texture with an Ice-Flower Background Die
Next, I introduce a fun background die that features an ice-flower pattern for a festive touch. Even though the paper is smaller than the die, don’t worry, it works perfectly. Just make sure that the die-cut rectangle is centered on the background die, then run it through your die-cutting machine. This process will create a beautiful textured pattern on your background.
With this textured background ready, we’re one step closer to assembling the full card!
Step 4: Add Die-Cut Elements to Frame Your Gingerbread Scene
Now it’s time to create the beautiful die-cut elements that will frame your gingerbread and hot chocolate design!
Die-Cut the Branches and Holly Leaves
To start, I die-cut branches in dark green and light green to help frame the gingerbread stamp. I used branches of various sizes to add depth and dimension. Additionally, I cut out a set of three holly leaves for that festive touch.
Add the Berries
Next, I die-cut several small berries from red cardstock. These pops of red will make the holly leaves stand out and add extra Christmas charm to the design.
These die-cut elements will be important when assembling the card. Keep them handy as we move on to the next step. With these pieces ready, we’re one step closer to putting everything together!
Step 5: Assemble Your Card and Add the Finishing Touches
Now it’s time to bring everything together and add the final touches to your gingerbread Christmas card!
Layer and Adhere the Die-Cut Elements and Digital Stamp
Start by adhering the die-cut branches to the left and right sides of your rectangular background. Then, place the three holly leaves near the centre, just beneath the gingerbread and hot chocolate design. Use foam tape to attach the Hot Chocolate – Gingerbread Holly Digital Stamp on top of the branches. This will add dimension.
Add the Sentiment
Next, I added the “Happy Holidays” sentiment to the top-right corner of the card. It complements the festive theme perfectly. In the top-left corner, I placed three red berries for a pop of colour. I also added a few more berries along the branches for extra detail.
Assemble the Card Base
Once all the elements are in place, it’s time to attach the entire piece to the card base. I used foam tape to give the card some extra lift and dimension.

Once everything is adhered to, your card is ready to be shared with loved ones!
Troubleshooting Tips for a Smooth Crafting Experience
While creating your gingerbread Christmas card, you may encounter some common challenges. Don’t worry—I’m here to help with a few tips to keep your crafting experience smooth and enjoyable.
- Ink Smudging or Blurring When Colouring
- Problem: Colors are smudging or not staying crisp, especially around detailed areas
- Solution: Use the right type of paper for alcohol markers. Opt for DCP (Digital Colour Printing) paper. This choice helps prevent ink from bleeding. Allow each layer to dry completely before applying another. This helps avoid blending unwanted colours and ensures crisp details.
- Uneven Prints or Faded Images
- Problem: Your printed digital stamp looks blurry or faint.
- Solution: Make sure you’re using high-quality paper and adjust your printer settings to the highest print quality. If your printer offers it, choose the ‘Photo’ or ‘Best Quality’ setting for the sharpest print results.If the print remains faint, try adjusting your printer’s resolution to the highest setting. This often makes a big difference in print quality
- Die-Cutting Problems
- Problem: The die doesn’t cut through all layers of cardstock, or the paper gets stuck in the die.
- Solution: Check that the pressure settings on your die-cutting machine are correct. If needed, adjust them for the best results. For thicker cardstock or intricate designs, run the die through your machine twice to get a clean cut. If the paper gets stuck, carefully use a paper piercer to release any trapped pieces. Always use a shim or cutting plate as needed.
Final Tip: Patience is Key!
If something goes wrong, don’t rush. Take your time to fix it. Crafting is about enjoying the process. Every mistake is just another learning experience. It will make your next project even better. Remember, crafting is all about enjoying the process. Mistakes are part of the journey and will only make your next project better.
Let’s Get Creative Together
I hope you had fun creating your gingerbread Christmas card! It’s always exciting to bring a festive Christmas card design to life, and I can’t wait to see your creations. Don’t forget, this is just one way to use the Hot Chocolate – Gingerbread Holly Digital Stamp. There are many other possibilities for your designs.
I’d love to hear how you add your special touch to holiday cards. What’s your favourite way to personalize your festive designs? Share your ideas in the comments below—I can’t wait to read them!
Join the Challenge
Ready for a challenge? Polkadoodles has a monthly challenge, and I’d love for you to join in!
Head over to the Polkadoodles website and take part in the current challenge. It’s a wonderful way to showcase your creativity and even win some fabulous prizes! Click the button below to join the fun.
More Related Blogposts
Looking for more Christmas card inspiration? Check out these related blog posts for extra festive fun and creative ideas.
Happy Crafting!
Polkadoodles products in the spotlight
I’ve shared all the materials I used to create this Gingerbread Christmas card below, including affiliate links. If you choose to buy through these links, I earn a small commission at no extra cost. Thank you for supporting my work and creativity!
Hot Chocolate – Gingerbread Holly Digital stamp
Theo Penguin Paper Bundle 2
Theo Penguin Sentiment Bundle
I would like to enter my card in the next challenges
- 4-Season Swap Challenge Blog: Sweet Christmas
- A Place To Start: Anything goes + Happy Holidays
- Try it on Tuesday: Traditional Christmas
- Crafty Gals Corner: Anything goes + use 3 layers
- The Sisterhood of Crafters: Anything goes
- Krafty Chicks Challenge: Stamps
- Crafty Catz: Anything goes
- 613 Avenue Create: Anything goes + any winter holiday
- Dragonfly Dreams: Christmas
- A Perfect Time To Craft Open Challenge: Anything goes
- Pearly Sparkles Challenge Blog: Christmas
- Peace On Earth Christmas: Mood Board
Beautiful card! Thanks for joining us at A Place To Start!
Thank you so much.
A wonderful and sweet card! bringing X-mas cheer! Thanks for participating in our 4 seasons challenge, best Danielle
Thank you so much
Wonderful card, a realy Sweet Christmas!
Thanks for joining our challenge on the 4 Season blog.
grtz Colien
Thank you so much
The image is adorable! I like your presentation!
Happy Holidays! Thanks for your awesome submission to A Place to Start and for your support. We look forward to seeing more fabulous creations in 2025!
Hugz,
Chana Malkah, Owner, A Place to Start
Co-Owner, 613 Avenue Create
Thanks
thanks for sharing at Crafty Catz and Merry Christmas & Happy New Year
Merry Christmas and a Happy new year to you too. Thank you for your lovely comment.
A lovely card, the image is so cute.
Thanks for sharing with us at Try it on Tuesday.
Avril
Thank you so much.
A fabulous and fun card!
We’re always thrilled to see each entry arrive in our mailbox at 613 Avenue Create.
We do hope you’ll return!
Wishing you the very best luck with your entry.
Warm Wishes, Jackie,
DT member at 613 xx
Thank you for your lovely comment.
What a beautiful card! The stamp is adorable! Thank you so much for entering our challenge at Try it on Tuesday. Looking forward to see you again next challenge.
Regards,
Mia
Designer for Try it on Tuesday
craftartista.blogspot.com {My Blog}
Thank you so much Mia.
Love the festive cup of cocoa with the yummy gingerbread cookies! Sweet. Thank you for joining our challenge @ 613 Avenue Create. Tee DT
Thanks a lot for your lovely comment.
Thanks so much for joining in the fun at our Sisterhood of Crafters challenge! Good Luck and we hope you’ll come back often.
Darlene
DAR’S CRAFTY CREATIONS
Sisterhood of Crafters Owner
Thank you
Oh so pretty! Beautifully done! Thanks so much for joining in the fun at our Peace On Earth challenge! Good Luck and we hope you’ll come back often.
Darlene
DAR’S CRAFTY CREATIONS
Peace On Earth Co-Owner
Thank you so much