
Are you ready to make your DIY Christmas cards stand out this year? Adding a festive wreath around a heartfelt scene is a simple way to create a unique card. The Christmas Hugs stamp is the perfect choice for designing a card that is both personal and full of holiday spirit. In this tutorial, I’ll guide you through combining this adorable stamp with a wreath design. By the end, you’ll have a beautiful DIY Christmas card wreath that is sure to bring joy to anyone who receives it.
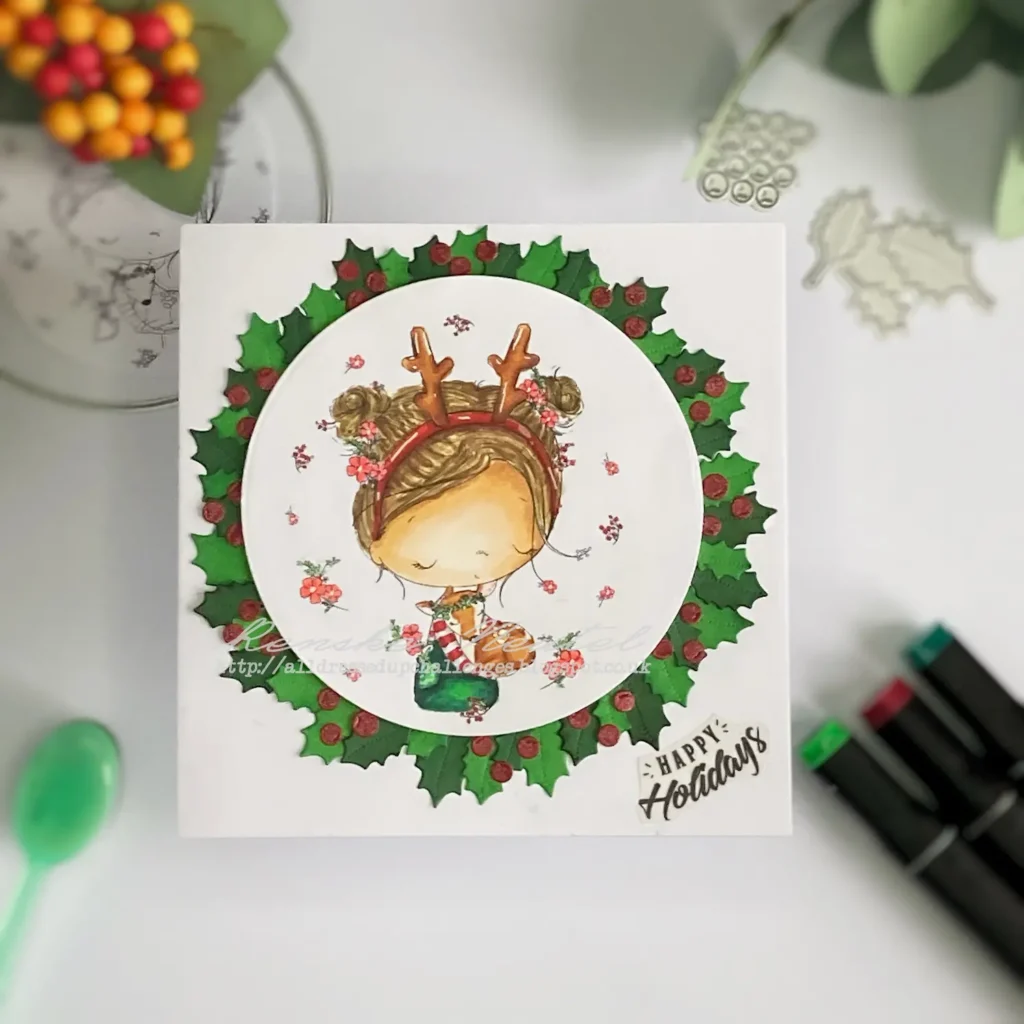
I’ve truly enjoyed working with the Christmas Hugs digital stamp from All Dressed Up Stamps. This image evokes the warmth and joy of the holiday season, and it’s been a pleasure bringing this design to life. The little girl hugging the deer, surrounded by festive flowers and berries, really captures the spirit of Christmas, don’t you think? It reminds me of all the cosy moments spent with loved ones during the holidays.
As a member of the All Dressed Up Stamps design team, I’m excited to share this project with you, especially since this month’s challenge theme is Christmas. Whether you’re new to card-making or an experienced crafter, this tutorial will show you how to craft a wreath design around the Christmas Hugs stamp. Plus, you’ll pick up some new techniques to elevate your holiday cards.
Let’s get started and make this Christmas even more special with a heartfelt, handmade card!
- Materials Needed for Your DIY Christmas Card Wreath
- Step-by-Step Tutorial: How to Create Your DIY Christmas Card Wreath
- Let’s Get Creative Together
- Products used
- Products without affiliate links
- I would like to enter my card in the following challenges:
Materials Needed for Your DIY Christmas Card Wreath
Before we begin crafting your beautiful DIY Christmas card wreath, let’s review the essential materials you’ll need. This list covers key supplies for creating your card design, focusing on the Christmas Hugs digital stamp, which is the centrepiece of your festive wreath. You will also find alternative ideas if you want to experiment with different techniques or materials.
I’ve included suggestions for alternatives so you can still create a beautiful and unique Christmas card using supplies you may already have at home. Let’s get started!
Main Supplies
| Material/ Tool | Where to use for | Alternative |
|---|---|---|
| Christmas Hugs Digital Stamp from All Dressed Up Stamps | This adorable stamp features a girl hugging a deer, surrounded by flowers and berries. It’s perfect for the warm, festive feeling of your DIY Christmas card wreath. | As an alternative you can use any Christmas stamp of image you like. |
| Alcohol Markers | Alcohol markers were used to colour the Christmas Hugs stamp. Alcohol markers are excellent for achieving smooth blending and vibrant colours. | You can use any brand alcohol markers you like, or go for a different colouring medium. |
| Circle Die for the Main Image | A circle die was used to cut out the coloured image to fit into the centre of the wreath. | If you don’t have a circle die, you can use a manual punch or simply cut out the image by hand with scissors for a more rustic touch. |
| Holly and Berry Dies | These dies were used to cut out the holly leaves and berries that form the wreath surrounding the image. | If you don’t have this specific die set, you can use any set you like. Or maybe you stamps with holly leaves and berries. |
| “Happy Holiday” Sentiment on Vellum | The sentiment adds a festive touch to the card. Vellum is a lovely material to use for sentiments as it’s subtle but still visible. | For a different look, you can stamp your sentiment directly onto the card or use a sticker sentiment from your collection. |
| White Card Base (13 cm x 13 cm): | A simple white card base provides a clean, neutral backdrop for the design. | You can adjust the size of the base to suit your preference, such as a standard A6 size (10.5 cm x 14.8 cm) for a more traditional look. |
| Green Card Stock and Red Card Stock | These colours were used to craft the wreath’s leaves and berries. | You can use any green or red shades you have, or experiment with different types of patterned card stock to add more visual interest to the wreath. |
| Foam Tape for Dimension: | Foam tape helps to give the stamped image dimension and makes it pop against the wreath. | Alternatively, you can use foam dots or double-sided foam squares. |
| White Gelly Roll Pen for Highlights: | This was used to add small highlights to the image, such as on the girl’s dress and deer’s antlers. | If you don’t have a gel pen, you could use a white pencil or chalk for softer highlights. |
Optional Supplies
| Material or Tool | Where to use it for | Alternatives |
|---|---|---|
| Distress Ink (Black Soot, Pine Needles) for Shading the Holly Leaves | Shading the leaves with Distress Ink adds depth and dimension. | You can also try other ink pads brands for the same shading look. |
| Bone Folder for Scoring Card Base: | A bone folder helps to create crisp folds in your card base. | You can use any scoring tool or even a ruler and blunt edge to achieve a neat crease. |
Suggestions for Variations
- Alternative Dies for the Wreath:: If you want to try a different wreath shape, you could use a square die or even a star-shaped die. You could also make a wreath using punched-out circles or hand-cut leaves for a more DIY approach.
- Using Different Colouring Mediums: Instead of alcohol markers, you could opt for watercolour paints or coloured pencils for a softer, more delicate look. Watercolours are great for a more painterly finish, while pencils give a textured, subtle effect.
Now that you have all the materials needed to create your DIY Christmas card wreath, it’s time to start the fun part—putting everything together! Let’s move on to the step-by-step tutorial.
Step-by-Step Tutorial: How to Create Your DIY Christmas Card Wreath
In this guide, I will walk you through the process of bringing your Christmas Hugs digital stamp to life with a festive wreath design. From printing and colouring the stamp to assembling the card, these simple yet effective steps will help you create a beautiful holiday card.
Step 1: Printing and Colouring the Christmas Hugs Digital Stamp
To begin creating your card, we first need to print and colour the Christmas Hugs digital stamp. Let’s break this step into smaller tasks for simplicity.
Printing the Image
Before colouring, the digital stamp needs to be printed. Since we will be cutting the image into a circle, it’s essential to ensure the image fits within the selected die. Paste the image into a Word document and adjust the height to 9 cm, allowing the width to adjust automatically. This ensures that the image fits nicely inside the circle die.
For the printout, I recommend using DCP paper, which works well with alcohol markers. If you plan to use a different colouring medium, be sure to select a paper that is best suited for it.
Colouring the Image
Now it’s time to bring the image to life with alcohol makers. I used the following combinations.:
- Skin: Tanned Skin (260), Peachy Blush (259), Salmon Pink (25), Pale Cream (142)
- Hair: Pale Cream (142), Brown Grey (104), Walnut (100), Clay (116)
- Deer: Sand (107), Rose Beige (97), Burnt Sienna (95)
- Headband: Cardinal (2414), English Red (249), Burgundy (247)
- Deer Antlers: Sand (107), Burnt Sienna (97, 95), Natural Oak (91)
- Shirt (red stripes): Cardinal (244), English Red (249), Burgundy (247)
- Shirt (white stripes): Cool Grey 3, Cool Grey 1
- Dress: Grass Green (47), Forest Green (50), Dark Green (51)
- Flowers: Coral Pink (16)
- Leaves: Grass Green
- Berries: Cardinal (244)
Adding Highlights
After completing the colouring, I add some highlights to the image using a white gel pen. Focus on the headband and deer antlers to add dimension and bring the image to life.
Die-Cutting the Image
To finish this first step, use a circle die to cut out the coloured image. Align the die around the image and run it through a die-cutting machine. Now, you have a beautifully coloured and die-cut stamp that is ready to be used on your card!
")
Once the image is prepared, we’re ready to move on to the next step: preparing the card base. Let’s get started with that next!

Having trouble editing or colouring digital stamps? Download my free guide for extra tips and tricks to help you perfect your digital stamps!
Step 2: Preparing the Card Base
Before we can start assembling the wreath, we need to prepare the card base. This step is essential as it sets the foundation for everything else. Let’s get that card base ready for all the lovely elements we’ll be adding!
Creating the Card Base
To begin, cut a piece of white cardstock to 13 cm x 13 cm. Next, score the card at the 13 cm mark to ensure a clean fold. Use a bone folder to press down along the fold, ensuring it’s crisp and neat. This will give you a sturdy and well-aligned base for your card.
Ensuring a Perfect Fold
Once the card is scored, fold it carefully and use the bone folder to create a sharp crease. This will help the card sit flat and look more professional when displayed.
Now that you have a perfectly prepared card base, it’s time to move on to creating the holly and berry wreath that will be the star of the design!
Step 3: Creating the Holly and Berry Wreath
Now that the image is printed and coloured, it’s time to create the wreath using holly leaves and berries. This is where the festive charm of your card really starts to take shape! Let’s break this down into manageable tasks.
Die-cutting the Holly Leaves and Berries
To begin, we’ll need some holly leaves and berries. Using holly dies in three different sizes, die-cut the leaves from both light green and dark green cardstock. For each set, I like to use three leaves: the largest one in light green and the two smaller ones in dark green. This creates a balanced look.
Next, die-cut the berries from red cardstock. This will give the wreath a vibrant pop of colour.
Adding Shading to the Leaves
While this step is optional, I like to add some shading to my holly leaves for extra depth. Using Distress Inks, I apply Black Soot to the edges of the dark green leaves to create a shadow effect. For the lighter green leaves, I use Pine Needles to enhance the colour and add dimension. I apply the ink with a blending brush to achieve a soft, even look.
Assembling the Wreath
Now it’s time to assemble the wreath! Start by positioning the die-cut holly leaves in a circular shape on your card base. Use the circle die-cut with the coloured image as a guide to make sure the wreath fits perfectly around it.

Before glueing everything down, apply foam tape to the back of the circle die-cut to lift it slightly. This will make it easier to use as a guide for the wreath, ensuring everything stays in place as you work.
Once you’re happy with the arrangement of the holly leaves, glue them down one by one, making sure the arrangement remains even and symmetrical.
Attaching the Berries
With the holly leaves in place, it’s time to add the berries. Position them in various spots around the wreath, then glue them down securely.
Step 4: Attaching the Coloured Image
In this step, you’ll attach the coloured Christmas Hugs image to the wreath. This will centre the image on the card and enhance the festive feel.
Positioning and Attaching the Image
Place the coloured image in the centre of the wreath and secure it with foam tape to create depth and dimension. This ensures the image pops while the wreath adds a beautiful background.
Now that the image is in place, let’s move on to adding the sentiment for that festive message.
Step 5: Attaching the Sentiment
Now that the front of the card is almost complete, it’s time to add the finishing touch: the sentiment. The “Happy Holiday” phrase adds a personal message to your card and ties everything together.
Preparing the Sentiment
For this, I used a vellum sentiment from Decotimecrafts’ luxury paper block. These vellum sentiments are perfect for adding a subtle, elegant touch to your cards. Cut around the sentiment using a pair of scissors, making sure to leave a small border around the text.
Attaching the Sentiment
To attach the sentiment without the adhesive showing through, apply the glue only behind the black letters. This ensures that the adhesive remains hidden and does not detract from the transparency of the vellum.
Position the sentiment in the bottom-right corner of the card and press it down firmly to ensure it sticks securely.
With the sentiment in place, the front of your card is now finished! Let’s move on to decorating the inside of the card.
")
Step 6: Decorating the Inside of the Card
To keep the inside of the card simple yet elegant, we will use layers of green and white cardstock to continue the theme from the front.
Layering the Cardstock
Start by cutting a piece of green cardstock to 12.5 cm x 12.5 cm and adhere it to the inside of the card. Next, cut a piece of white cardstock to 12 cm x 12 cm and layer it on top of the green. This creates a clean and subtle contrast that ties in with the card’s colour scheme.
Adding the Holly Details
To carry the theme of the card to the inside, place a small cluster of holly leaves and berries in the bottom-left corner. This little touch brings the design from the front of the card seamlessly into the interior.
With the inside of the card now complete, your card is ready to go! Now it’s to time to sent Christmas hugs to your loved ones.
Let’s Get Creative Together
Making handmade Christmas cards is a wonderful way to spread holiday cheer. The Christmas Hugs stamp adds a heartfelt touch to any card. I hope this card inspires you to get crafty and bring some holiday cheer into your creations. I’d love to see your versions, so don’t hesitate to share your cards with me! Tag me on Instagram or Facebook.
Join the All Dressed Up Stamps Challenge
Looking for more inspiration? Join the All Dressed Up Stamps Challenge! This month’s theme is Christmas, making it the perfect opportunity to showcase your creativity. Use any of their beautiful digital stamps, including Christmas Hugs, to enter. Visit the All Dressed Up Stamps Facebook Group for all the details and to submit your entry. Let’s celebrate the season together!
More Related Blogposts
Looking for similar projects? Here are some other tutorials you might enjoy:
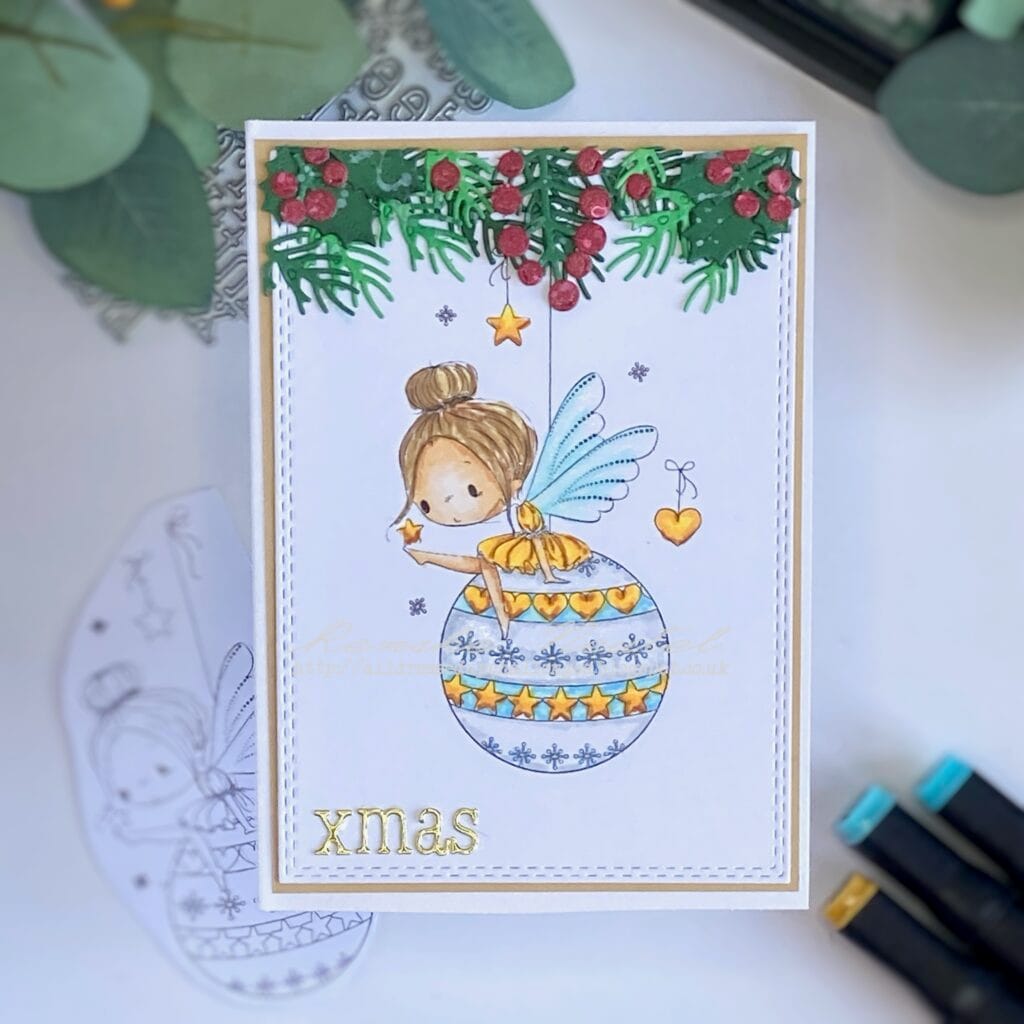
Create A Fairy Christmas Card With Festive Bauble
Another Christmas card with a digital stamp from All Dressed Up Stamps
Products used
Please note the links in this post are affiliate links, and I may earn a commission if you choose to purchase through them. This comes at no extra cost to you. I only share products and brands that I trust and use in my crafting projects. Your support allows me to continue sharing helpful tips and tutorials. Thank you for your support!
Christmas Hugs digital stamp from All Dressed Up Stamps

Twin markers XXL set 300 pieces from Decotimecrafts

White Gelly Roll pen 08

Bella Bear Gift Fuzzy Pufs

Spring Gnomes Digital Paper set

Products without affiliate links
Here I will list al the products with links and without links. I try where I can add a link to the products.
Action Products
There are products I bought at ActionNL that you can only buy in the store. But Action does show the products on their website and you can mark them as a favorite. These are the products:
Scissor

Foam Tape

Tacky Glue

Twin Markers 4 pieces from Decotimecrafts

Twin Markers 60 pieces from Decotimecrafts

Twin markers 12 pieces from Decotimecrafts

Products without links
- Circle die from Card & Deco
- Holly and Berrie dies from Aveccreative
- Green card stock (brand unknown).
- Red card stock (brand unknown).
I would like to enter my card in the following challenges:
- Unicorn Challenge Blog: Christmas and/or Winter
- Passion for Markers: Dies and/or Punches
- Crafty Gals Corner: Anything goes + must use 3 layers
- Cardz 4 Galz: Texture
- Craft Rocket Challenges: Christmas and/or Winter
- Krafty Chicks Challenge: Christmas
- We Love Stamping: Christmas
- A Perfect Time To Craft Open Challenge: Anything goes