
Some links in this post are affiliate links. This means I may earn a small commission if you make a purchase, at no extra cost to you. I only recommend products I use and genuinely enjoy in my own cardmaking. Read more here.
Fun fold card
Hello everyone..
First, I want to wish you all a happy, wonderful, healthy and creative 2023. Thank you for all your support in 2022, and I hope you will join me on our creative journey in 2023. To start this new year I made a bunny baby card.
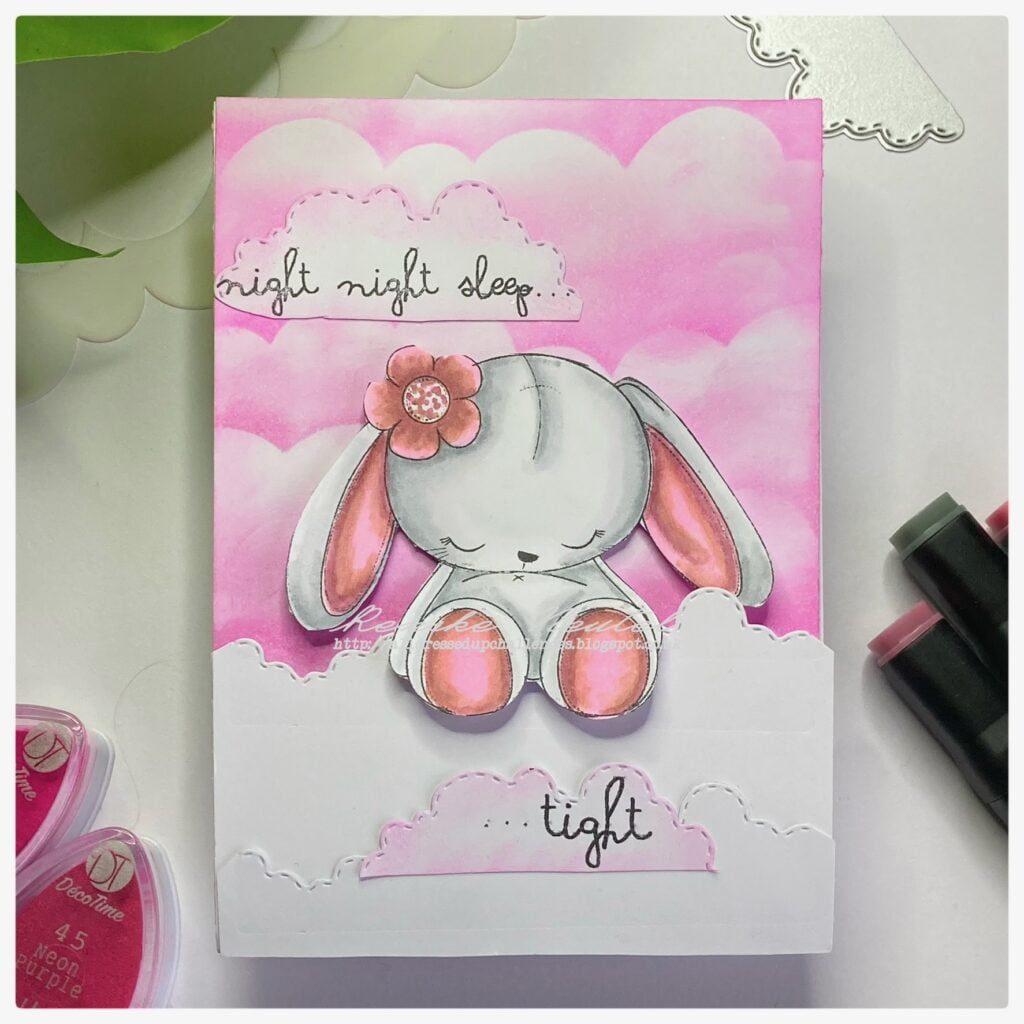
A new challenge has started in the Facebook group from All Dressed Up digital stamps. This time the theme is “cute”. I used this cute “bunny”. To make this card I used a YouTube tutorial from Jennifer McGuire ink. You open the card with the clouds below the bunny.
So, let’s get into it.

Measurements from this Fun Fold Bunny baby card
As I mentioned above, I used a video tutorial from Jennifer Mcguirink. You can find the video here. I used slightly different dimensions as Jennifer, so I will mention that below.
- You need two card bases with a top fold. So, I used two pieces of card stock measuring 10,5 centimeters by 30 centimeters. You score at the long side at 15 centimeters.
- A piece of card stock measuring 10,5 centimeters by 25 centimeters to make your background on.
- For the inside of the card a piece of pink card stock measuring 10 centimeters by 14,5 centimeters.
- And for the inside a piece of white card stock measuring 9,5 centimeters by 14 centimeters.
Digital stamp Night Night little one from All Dressed Up Stamps

I printed the image on 200-grams DCP paper. Then I colored my image with my alcohol markers.

- Bunny’s body: Cool Grey 4 (CG4), Cool Grey 1 (CG1), Colorless Blender (0).
- Bunny’s ears, blower and feet: Old Rose (201), Old Pink (202) and Pastel Pink (17).


Having trouble editing or colouring digital stamps? Download my free guide for extra tips and tricks to help you perfect your digital stamps!
Cloudy background
I wanted to make the bunny sit in the clouds. The card is for the birth of a girl, so I made the clouds pink. I used my cloud stencil for that and used my chalk ink. The colors I used are Neon pink and Neon purple.
At the bottom of the background I stamped the word “Gefeliciteerd”. This is Dutch for Congratulations.

Creating the cloud border
Like the video I made a border of clouds. You need one of the base cards you created. I have a cloud border die in my stash, so I used that. I used the tip from Jennifer to die-cut the border first out of vellum. You can place this on your card to find out were you want the border to go.
You don’t need a border die to do this, you can make your own clouds, by cutting them yourself. I also die-cut another border clouds, to give the clouds some dimension on the front.
Placing the sentiments
The sentiment comes with the image. I decided to cut them lose from the image. I printed it out and decided to die-cut them into a cloud. I applied some of the pink ink to match it with the card.
Inside of the card
On the inside of the card, I applied my pink and white card stock. I stamped the rest of my sentiment.
The text is: “met de geboorte van jullie dochter” what means in English “With the birth of your daughter”.

Assembling the card.
Now all the elements are finished for the card. First, I glue the background on my base card. Then you get your part where you die-cut the border on. You put this with the fold down and glue this on the inside of the card. Check Jennifer’s video to see how she does this.
When you close the card you can fold the clouds over the top of the card.
Now its time to glue the bunny down. I die-cut some little circles out of white card stock. I glued them together and put them behind my bunny to give him the dimension you need to put the clouds under him.
I glue my sentiments down, and the card is finished.

Hope you like it. Let me know in the comments.
Happy Crafting!
I’m listing the products I used below. I will link them when I can. Click on the link to go directly to the product. Where available I use compensated affiliate links which means if you make a purchase, I receive a small commission at no extra cost to you. Thank you so much for your support.
Products I used:
- Digital stamp “Night Night Little One” from All Dressed Up Stamps.
- Cloud stencil from CarlijnDesign.
- Chalk ink from Decotimecrafts.
- Alcohol markers from Decotimecrafts.
- Clear stamps from CarlijnDesign.
- Cloud border die from Kokorosa.
- Cloud dies from Kokorosa.
I would like to participate in the following challenges:
- Crafting Happiness Challenges: Celebrations
- Make My Monday Challenge Blog: Something new
- A Place To Start: Anything goes
- Lil Patch of Crafty Friends Challenge …: Anything goes
- A Perfect Time To Craft Open Challenge: Anything goes
- Classic Design Challenge Blog: Anything goes
- Crafts Galore Encore Challenge Blog: Anything goes
- Pearly Sparkles Challenge Blog: No design paper
- Critter Crazy CHALLENGE BLOG: Anything goes + featured critter
- Crafter’s Cafe: Anything goes
- Crafty Animals: Anything goes + must use a animal
- My time to craft challenge blog: Welcome to the world little one.
Your card is si, so cute! I love your digi choice and coloring!
Thank you for joining us at the Crafts Galore Encore Challenge.
~ DT Dagmara
Sweet!!! Thanks so much for participating in our CRAFTING HAPPINESS challenge!!! I appreciate that you play along and I enjoy visiting your blog!! Have a happy crafty day!!
Deanne at A Little Bit O’ Paper
Lovely card. Thank you for joining the challenge at My Time to Craft and Critter Crazy. Hope to see you again.
I love you’re card, thanks for sharing it with us at the Pearley Sparkles Challenge Blog.
Hugs Ilonka DT
Super cute card!
What a lovely card! I love the pink clouds. Thank you for joining us at A Place to Start. :)
Sara Lihz Staroska
Thank you
What a super cute work! Like this sweet image and this awesome colouration. WOW!!!!
Thanks for playing along with our Challenge at Critter Crazy and good luck!
Hugs and please come back soon!
Doris
Kleido’s BastelStüble
*Owner* Do-Al(l) Kreatives
*Owner*Critter Crazy Challenges
*DT* Sweet Sketch Wednesday 2
Thank you so much for lovely comment ❤️
What a smashing project!
We always love to see all the entries at Classic.
Thank you for sharing in our challenge at Classic Design Challenge
We really appreciate you joining in.
Jackie DT
Very cute, thanks for joining us at The Crafter’s Cafe’s Anything Goes challenge.
This is so darling!! Precious!! The overall design is genius!!! The lucky parents will probably frame this card so that they have it displayed in the baby’s room!!! Thanks for linking to MTTC’s Welcome to the World baby! theme. –Becca/DT
Thank you so much for your lovely comment ❤️
I have a smile on my lips :) Thank You for joyning us at Lil Patch and Crafty Friends challenge. DT Ella.
Wat een super schattige kaart! Helemaal passend bij een pasgeboren meisje!
Die wolkjes zijn altijd leuk.
An absolutely adorable image and card,beautiful image and gorgeous shades of pink in the background,thank you for joining in at MMM
Oh, goodness, this card is so sweet! I just love the image you used and the fun fold is great, too! I will have to check it out – thanks for sharing the link. I’d also love it if you would share this at Creative Creases challenge for fun fold cards. Thank you for playing with us at the Alphabet Challenge and hope you can join in again soon.
Debbie
Secrets To Stamping
Join my Creative Creases Challenge for fun folds!