
Hello everyone!
Welcome to my creative corner! I’m thrilled to guide you in crafting a unique Christmas birthday card. We’ll use a captivating double Z-fold design. Let’s blend the joy of birthdays with the enchantment of Christmas in a single handmade card!
Recently, I took on an exciting challenge as part of the Polkadoodles design team. I needed to create a birthday on Christmas day card without relying on traditional colours. To meet this challenge, I explored creative ideas. I aimed to design a card that embodies the magic of Christmas. The card also captures the joy of birthdays with an unconventional palette.
This journey becomes even more exciting with today’s event. It marks the launch of the new challenge on the Polkadoodles Challenge Blog. The theme is “Anything Goes,” inviting all crafters to join without product restrictions. As a design team, we often get unique themes to continually showcase diverse products, encouraging creativity beyond any boundaries.
Join me on this crafting adventure. I will reveal the secrets behind the double Z-fold technique. I will infuse the scene with lively elements from Polkadoodles digital stamps. Finally, I sprinkle in a touch of crafting magic to make this card an extraordinary creation.
Crafting a Winter Birthday Celebration: Design and Preparation
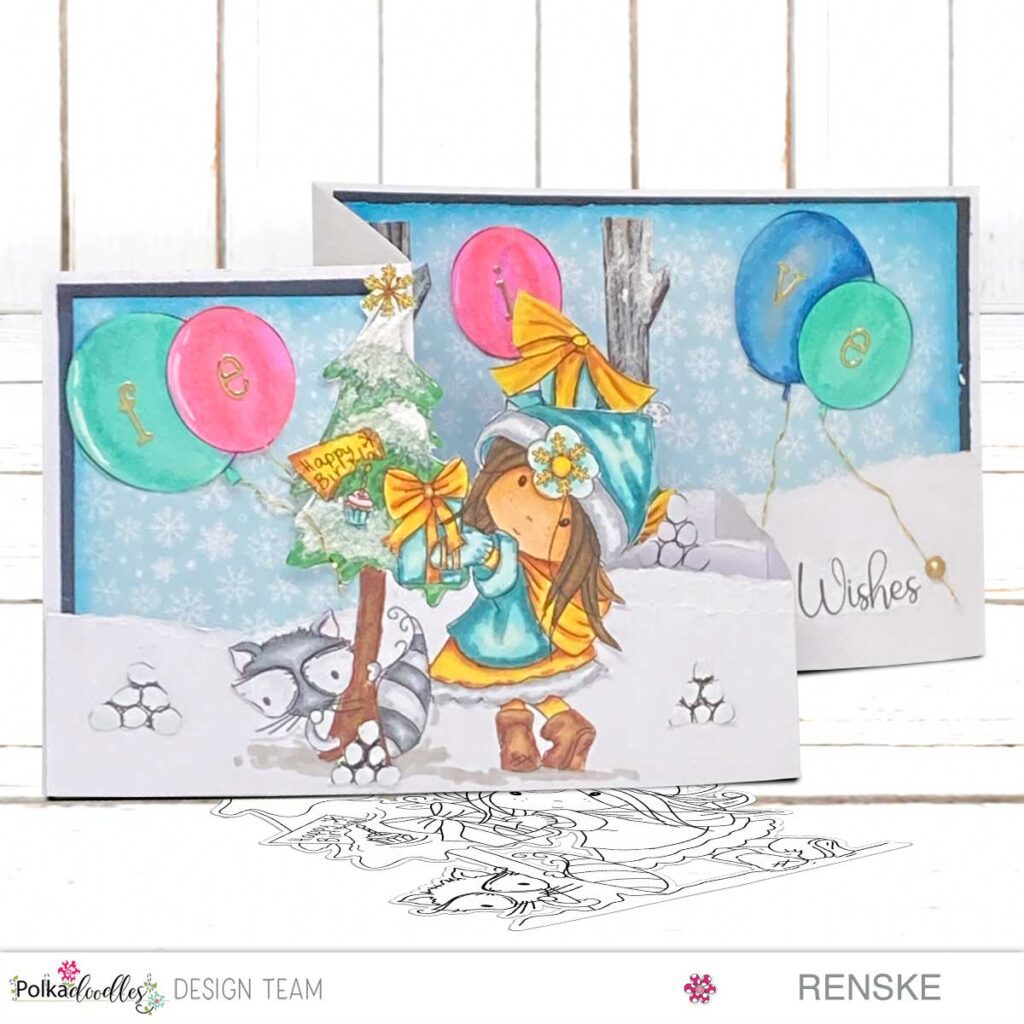
Sometimes people’s birthday is on Christmas. I don’t think it’s the best day to have a birthday. So all the more fun to make a special personalized homemade card. It has to stand out from all the Christmas cards that are coming in. It has to be a special card for a special person.
The choice of digital stamps and materials becomes integral to crafting a card that encapsulates the essence of both celebrations. It’s essential to curate elements that seamlessly blend the festivity of Christmas with the personal touch of a birthday celebration.
Choosing the digital stamps
For this particular project, we focused on selecting the right digital stamps from Polkadoodles. These stamps echoed the festive cheer of Christmas while also integrating elements of a birthday celebration. The Birthday Tree digital stamp stood out with a whimsical depiction of a celebratory tree. It was adorned with a birthday cupcake and conveyed a subtle yet meaningful birthday message. Elements from the From All of Us and Christmas Shopping sets were meticulously chosen to complement the overall festive theme.
Choosing the colour palette
Designing the card involved a deliberate consideration of the colour palette. Teal blues, frosty shades, and radiant golden tones were used. This created a balanced blend. It bridged the wintry ambience with the warmth of the celebratory season. The Theo Penguin Paper Bundle 1 provided the perfect wintry backdrop. It set the stage for an amalgamation of birthday and Christmas elements.
The ultimate aim was to craft a card that embraces the cosiness of a winter birthday celebration. It also embraces the vibrant spirit of Christmas.
Step-by-Step Tutorial: Crafting a Christmas birthday card with a double Z-fold.
Join me on a creative journey to design a captivating birthday Christmas card with an eye-catching double Z-fold design. In this detailed tutorial, I will guide you through every step of the process. I will reveal the magic behind creating a picturesque winter scene. This will be together with the festive atmosphere of a birthday party.
Step 1. Materials and measurements used.
First, we collect the materials we need.
- A4 white or coloured paper
- Paper measurements:
- 1 piece measuring 14.3 cm white card stock
- 2 pieces measuring 6.8 x 10 cm of white card stock
- 1 piece measuring 9.5 x 13.8 cm of patterned paper
- 2 pieces measuring 9.5 x 6.3 cm of patterned paper
- Deco snow for creating snow texture
- Baker’s twine (beige with golden string)
- Alphabet die-cuts for the word “festive”
- Digital stamps:
- Birthday Tree
- From All of Us (for balloons)
- Christmas Shopping (for gifts)
- Alcohol markers in various colours for colouring or any colouring medium you like.
- Greeting sentiment “Wishes” from the Christmas Greetings set
These materials played a key role in making this Christmas Birthday card.

Step 2. Making the Card Base
First, we have to make a sturdy card base.
- Prepare the A4 Paper: Start with an A4-sized sheet of white or coloured paper. Cut the A4 sheet in half along the short side, resulting in a piece measuring 10.5 centimetres in width.
- Scoring: On the longer side, make score lines at 14.8 centimetres and 7.4 centimetres. These score lines will serve as folding guides for the card base.
- Layering: Gather the pieces for layering on the base:
- 1 piece of white or coloured paper measuring 14.3 centimetres.
- 2 pieces of white paper measuring 6.8 by 10 centimeters.
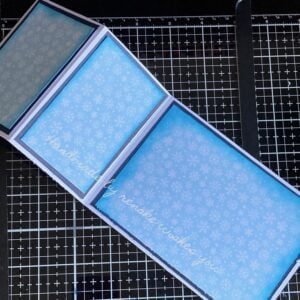
- 1 piece of patterned paper measuring 9.5 centimetres by 13.8 centimetres.
- 2 pieces of patterned paper measuring 9.5 centimetres by 6.3 centimetres.
- Preparing the Layers: If desired, distress the edges of the patterned paper with blue ink for a more textured appearance.
- Assembling the Layers: Adhere the layers together as follows:
- Layer the 14.3-centimetre paper first, followed by the two 6.8 by 10-centimetre papers.
- Apply the 9.5 by 13.8-centimeter patterned paper on top of the layered pieces.
- For the smaller patterned paper pieces (9.5 by 6.3 centimetres), adhere them to the panels as desired.
- Attaching to the Base: Once the layers are set, attach the assembled layers to the prepared card base. This will create a beautiful foundation for the card design.
This sturdy base sets the stage for further embellishments and decorations. It creates a visually appealing and festive canvas for the Christmas birthday card.

Step 3. Creating Snow Banks
It’s time to create the snow hills. We have a large snow hill in front of the card base. It is also a z-folded piece in the opposite direction. This results in a double fold.
- Preparing the Snow Strip: Cut out a strip of A4 paper, measuring about 5-6 cm wide. Score it at 14.8 cm and 7.4 cm. Distress the top edge to give it a textured, snowy hill appearance.
- Forming the Central Structure: Attach this prepared strip to the card base. Position it to create a box-like structure at the card’s centre fold. The long piece of the snow hill comes to the short piece of the card base. The short piece of the snow hill comes to the end of the long piece of the card base. I hope it makes sense.
- Layered Snowbanks: Cut and affix two strips (each 8.5 cm) onto the central box structure, creating layered snowbanks. Distress the upper edges of these strips to keep consistency with the snowy effect.
By meticulously creating these snowbanks, the card’s wintry landscape takes shape, contributing to the overall festive ambience.
The base of the card is finished, so now we can focus on creating the elements for the card.
Step 4. Printing and Coloring the Digital Stamps
In this section, we discuss printing the digital stamps or parts there of and the colouring process.
Printing Specific Sections
Utilizing Microsoft Word, selectively print the desired portions of the digital stamps. To isolate specific elements:
- Insert the entire stamp image into a Word document.
- Access the ‘Picture’ menu by clicking on the image.
- Choose ‘Crop’ from the options. Adjust the cropping lines to isolate the desired portions of the image. For example, you can isolate the balloons from the ‘From All of Us’ stamp. You can also isolate gifts from the ‘Christmas Shopping’ stamp.
- Crop the image, retaining only the required elements to be used in the card design. This method allows flexibility in utilizing diverse parts of digital stamps for creative compositions.
Colouring with Alcohol Markers
Get the suggested alcohol marker colour combinations for each segment to infuse vibrant hues into the elements:
- Gold Elements: Rose Beige, Golden Yellow, Lemon Yellow, and Pastel Lemon
- Blue Elements: Teal Blue, Frost Blue, Cool Shadow
- Skin Tones: Tanned Skin, Peachy Blush, Salmon Pink, Barely Beige
- Hair: Dark Wood, Chocolate, Clay, Walnut
- Trees: Dark Green Forest, Pine Forest, Green Smoothie
- Tree Stems: Yellow Ochre, Burnt Sienna, Natural Oak
- Raccoon: CG7, CG5, CG4, CG1
- Shoes: Yellow Ochre, Burnt Sienna, Natural Oak
- Balloons: Mint Green (Cool Mint, Mint Macaron, Jade Green), Pink (Pastel Pink, Pale Pink, Rose Pink), Blue (Light Sky, Baby Boy, Midi Sky)
- Holly: Weeds Green, Grass Green, Forest Green
- Berries: Wine Red
- Tree Stumps: WG8, WG9, WG4, WG2

This meticulous process of printing and colouring the digital stamps allows for precision in selecting elements. It enables the use of vibrant colours. This enhances the overall visual appeal of the card’s design.
Step 5. Adding Snow Texture to different elements.
Create a winter landscape by embellishing selected elements with decorative snow for a snow effect.
Carefully apply Deco snow to the branches and trunks with a fine brush or spatula. This adds depth and texture, mimicking the look of snow accumulation on the foliage and bark. Focus on the higher points of the branches. Apply it to the upper surfaces of the tree trunks to simulate a natural snowfall effect.
The application of decorative snow enhances the wintery aesthetic. It adds a beautiful texture that accentuates the seasonal charm of the card’s design.
Step 6. Attaching Balloons and Gifts
To attach the balloons and presents to our card, we need to follow these steps:
- Die-cut the letters: We want to spell out the word “festive” on the balloons. So, using an alphabet die, we cut out the letters from gold paper.
- Place the letters on the balloons: We have the letters. Now, we can attach them one by one to the balloons.
- Placing golden threats: To give the balloons a more festive look, I added gold threads to them. I used a baker’s twine rope that had beige rope and gold strings. I removed the gold strings from the rope and used them at the bottom of the balloons. This made the balloons look even more ready for the celebration.
- Add the balloons to the panels: On the first panel, we place two balloons with the letters “Fe”. On the second panel, we place the balloons with the letters “St”. On the last panel, we place three balloons with the letters “i” and “ve”.
- Adhere the presents: We place the presents in the box with snow hills and put them on the second hill.
- Adhering the sentiment wishes: The word “wishes” completes the sentence. We place it at the end of the front snow hill.
By arranging the balloons to spell out the word”FESTIVE “. It finishes with the word wishes. By placing the gifts in a visually appealing way, we can create a celebratory vibe. This adds to the card’s overall design.
Step 7. The Final Touches
We first need to attach the digital stamp in a central place. We can also add the tree trunks in the background to enhance the winter atmosphere. To further show the winter theme, we can draw snowballs. Stack them on top of each other. Cut them out and attach them to different places on the card. Finally, we can place three golden pearls around the word “wishes”. Once we finish these steps, the card will be ready.

Personal Touch for a Special Occasion
Crafting a card for someone whose birthday intertwines with the festive spirit of Christmas presents a unique opportunity. It’s more than just merging a birthday with Christmas. It involves making a card that speaks to the individual. The card should celebrate their special day amid the grandeur of the holiday season.
When creating this Christmas birthday card, I aimed not just for a blend of the two occasions. I also wanted to create a personal connection. I chose colors beyond the traditional reds and greens of Christmas. This choice added an individual touch. It made the card stand out. Teal blues and frosty tones gave a wintry feel. Vibrant golden hues added the warmth of a birthday celebration.
The essence of crafting such a card is to guarantee it’s more than just a generic greeting. It’s about infusing it with personal elements that show the recipient’s taste and the uniqueness of the occasion. The card becomes a symbol of thoughtfulness and care when it deviates from the typical colours and designs. This makes it a truly special gift for someone celebrating a Christmas birthday.
Each stroke of colour was carefully selected. Every embellishment was chosen with care. The overall design symbolizes not just the holiday but also the joyous celebration of a birthday on this special day.
Inspire, Create, Share, and More!
Thank you for joining me on this creative journey as we crafted this amazing Christmas Birthday card together. I hope you have enjoyed the process and feel inspired to create your double Z-folded card with Polkadoodles products.
I’d love to hear from you if you have any questions, need clarifications, or simply want to share your thoughts. Crafting is not just a hobby; it’s a wonderful community, and I’m here to support you in your creative endeavours.
Join the Challenge
Remember, this card was designed to inspire you for the Polkadoodles’ ‘Anything goes’ challenge. I am genuinely excited to see your creations! This is your moment to shine. Get your crafty gears in motion. Let us see what amazing projects you come up with. I encourage you to join in the new challenge. Craft, create, and share your projects. The crafty community is waiting to celebrate your talent, and who knows, you might just win a prize.”
More Christmas birthday card ideas
Polkadoodles Products in the Spotlight
Affiliate disclosure: Some of the links in this post are affiliate links. This means I may earn a small commission when you make purchases through these links. This doesn’t affect your purchase price, but it helps support my work in sharing valuable content. I truly appreciate your support!”
The creation of this festive Christmas birthday card was successful. This was due to the wonderful range of Polkadoodles digital stamps and papers. Here are the key Polkadoodles products used:
Winnie Winter Birthday Tree

Christmas Shopping Digital Stamp

From All Of Us Digital Stamp

Theo Penguin Paper Bundle

Christmas Greetings, quotes and sentiments

Clear Stamp Set Nuts About You

These diverse products contributed to the vibrant and festive elements used in creating this unique Christmas birthday card. Click on the links to discover these amazing Polkadoodles products and start your delightful creations!
I would like to enter my card in the following challenges
- Make My Monday Challenge Blog: Oh Christmas Tree, Oh Forest Tree
- A Place To Start: Anything goes + optional New
- Simon Says Stamp blog Monday: Winter blues
- Passion for Markers: Add a sentiment
- The Paper Shelter: Celebrations
- Simon Says Stamp blog Wednesday: Anything goes
- The Paper Funday Challenges: Birthday or anniversary
- Lil Patch of Crafty Friends Challenge …: Anything goes
- 613 Avenue Create: Anything goes + Winter Holiday
- A Perfect Time To Craft Open Challenge: Anything goes
- Classic Design Challenge Blog: Anything goes
Fabulous tutorial and a really lovely card,
Hugz Tinz
Thank you ❤️
Such a great design. I love the torn edges. Thanks for sharing this with us at The Paper Shelter!
Linda
Thank you
I love how you have combined Christmas with Birthday here! Great fold too.
Thank-you for joining us at The Paper Shelter for our CELEBRATIONS CHALLENGE and good luck with your entry.
DT Nicola (Amethyst Lily Designs )
Thank you so much ❤️
This is an adorable fold and festive scene! Thanks for playing along at the Paper Funday Challenge and we look forward to seeing more from you soon. Also, please make certain to enter in our 5th Birthday Party challenge too!
Donna xx
The Paper Funday Challenges
Inspiration Station Challenge
Beautiful Blossoms Challenge
Thank you
So cute, Renske! Thanks for joining us at 613 Avenue Create. I hope we see you on the front porch again soon!
Hugs, Em
613 Avenue Create DT
Creative Em my blog
Creative Em on YouTube my Youtube channel
Thank you
Such a beautiful card, thanks for sharing it with us at the Sheepski Designs Challenges.
Ilonka DT
Making a a birthday card for a Christmas day birthday is tough. You’ve done a sterling job. I love the colours you chose. Thanks for playing along in our MEGA CHRISTMAS CHALLENGE at Passion for Markers! Good luck!
Linda
Thank you so much for your lovely comment