Moo! Hello crafty friends.
Welcome to another exciting tutorial on my blog! Today, we’re going to make a cow greeting card with a farm theme.
But before we begin, I’d like to let you know that a new challenge has started on Penny’s Paper-Crafty Challenge Blog. As always, the theme is “Anything goes using paper”.
But before we get started, let’s take a moment to thank our generous sponsors for this challenge: Streamside Studios and Color of Love. Their support allows us to provide you with endless inspiration and creativity.
For today’s tutorial, we’ll be using the Strawberry Cows digital stamp set from Streamside Studios. Let’s get started making this cow greeting card in the shape of a barn.
Gathering Materials and Tools for the Perfect Cow Greeting Card
Let’s gather our supplies to create a beautiful cow greeting card! Below is a list of materials and tools required for this project. We’ll be using the “Strawberry Cows” digital stamp set from Streamside Studios:
Materials needed
- Square card base: We’ll start with a sturdy square card base as the foundation for our barn-shaped card.
- Grass die cut: his die will add a charming touch of grass to the bottom of our barn, creating a scenic farmyard scene.
- Alcohol markers: These are essential for colouring our digital stamps and adding vibrant hues to our cow and barn.
- White gel pen: Perfect for adding highlights and details to our coloured images, bringing them to life with a pop of brightness.
- Foam tape: This will create a dimension on the card.
- Glue or double-sided tape: Used to attach all the elements to the card.
Tools Needed
- Scissors: to cut the different elements of the card.
- Craft knife:o cut the door so we can open it.
- Die-cutting machine: To die-cut the piece of grass.
From the “Strawberry Cows” digital stamp set, we’ll be using
- Digital stamp of a cow greeting: his adorable image will be the focal point of our card, welcoming recipients with a
- Digital stamp of a barn: The barn-shaped digital stamp will serve as the main feature of our card, providing a unique shape and theme.
- Digital stamp of a cow sitting: This cow will sit in the hay.
- Flowers: We will place the flowers in the grass.
- Sentiment: We will use the text “Moo! means hello in cow” on the inside of the card.
- Digital stamps of a cow greeting: This is the stamp of a cow looking over its shoulder and greeting with its paw.
Now that all the materials are ready, let’s start crafting!
Crafting Magic: Step-by-Step Tutorial to Creating Your Cow Greeting Card in the shape of a barn.
Let’s get started with creating a cow greeting card in the shape of a barn! In this step-by-step tutorial, we will guide you through the entire process, from shaping the card base to adding the final embellishments. Let’s unleash your creativity and embark on this creative journey together.
Step 1: Printing and Resizing the Digital Stamp
The first step is to print and resize the digital stamps from the Streamside Studios “Strawberry Cows” set. This set offers two printing options: a full-page sheet with all the elements and individual stamps that can be customized according to your liking.
To print the full-page sheet, select the option in the kit and print it on DCP paper. This option provides an overview of all available elements in the set and makes it easy to print all stamps in one go.
For specific elements like the shed, printing the individual stamp separately gives you more flexibility in resizing. To resize the stamp, you can use Microsoft Word. Copy and paste the stamp into a Word document, right-click the image, select “Size and Position,” and then adjust it to the desired size.
Once you’ve printed and resized the digital stamp(s), you’re all set to proceed to the next step of shaping the card base. Let’s continue our creative journey!
Step 2: Creating the Barn-Shaped Card Base
Let’s now shape our card base into a charming barn silhouette to add a touch of whimsy to our cow greeting card.
Start by preparing your card base, whether it’s a premade square card or one you’ve crafted yourself. In my case, I used a ready-made square card base measuring 13 by 13 centimetres.
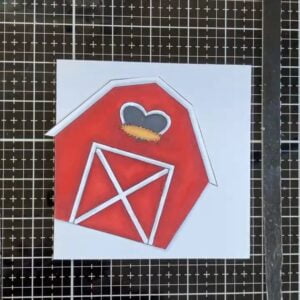
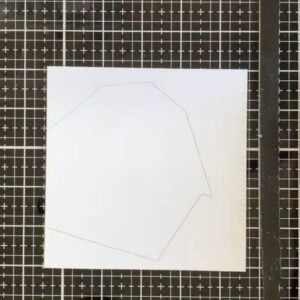
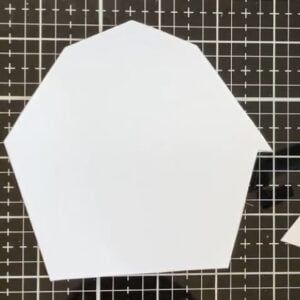
Next, we need to create the barn shape. Using the digital stamp of the barn as a guide, place it on the card base with the fold line of the card on the left side. The bottom edge of the barn should align with the fold line, giving us the perfect barn-shaped card.
Trace around the barn with a pencil to create an outline on the card base. Before you start cutting, make sure the card is closed, so you immediately cut the front and back into the right shape. Then, carefully cut along the traced lines using scissors or a craft knife. Be sure to follow the outline precisely to achieve the desired barn shape.
With the barn-shaped card base complete, we’re ready for the next step of adding the delightful cow and other elements to our card. Let’s continue our creative journey!
Step 3: Colouring the Digital Stamps
Let’s add some color to our digital stamps to bring our cow greeting card to life! This step will allow us to infuse personality and charm into our design.
Begin by selecting your preferred alcohol markers in shades that complement your desired colour scheme. Here are the colour combinations used for different elements of the card:
- Barn: Cardinal (244), English Red (249), Burgundy (247), Cool Grey 1 (CG1)
- Cows (Black Patches): Cool Grey 9 (CG9), Cool Grey 8 (CG8), Cool Grey 7 (CG7), Cool Grey 4 (CG4)
- Flowers (Leaves): Frost Blue (182), Cool Shadow (178)
- Flowers (Inside): Orange (23), Yellow (34), Lemon Yellow (35)
- Hay: Tanned Skin (260), Golden Yellow (222), Light Cantaloupe (275)
- Barn Heart (Inside): Black (120), Cool Grey 9 (CG9), Cool Grey 8 (CG8)
After colouring, use a white gel pen to add highlights and details to areas such as the barn, cow’s eyes, and the spots. These highlights will enhance the realism and dimension of your coloured images, making them truly pop!
Once all the digital stamps are beautifully coloured and highlighted, your card will start to take shape, ready to charm anyone who receives it! Let’s move on to the next step and continue our creative journey.

Step 4: Assembling the Card
Now that we have coloured our digital stamps, it is time to put together our cow greeting card and bring all the elements together. This step adds depth and dimension to our card, making it stand out.
Adding Dimension to the Door and Cow
Let us first focus on creating depth in our design by adding dimension to the door and cow.
Start by using a T-ruler and carefully cut along the line between the two doors with your craft knife, just below the door frame. This creates a hinged effect, making it appear as if a door is slightly open.
To enhance this effect, use a craft knife to create a fold line where the door should open. Apply glue only to the door that remains closed, and leave the other door slightly open.

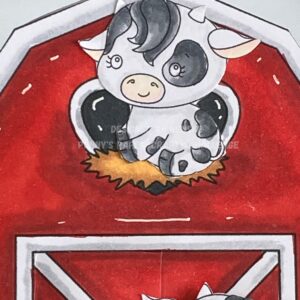
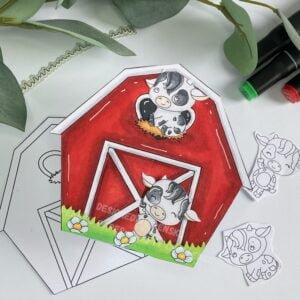
Now we can attach the shed to our card base. Use foam tape to leave the door slightly open. Also, use foam tape to attach the digital stamp of the cow to the card. Apply foam tape behind the cow’s head to give it a raised look, and use glue on the bottom of the body to secure the cow to the card. This positioning creates the illusion of the cow looking out from the corner of the door, adding a playful touch to our design.
Decorating the Bottom of the Barn with Grass and Flowers
Now let us turn our attention to the bottom of the barn, where we will add some decorative elements to enhance the barnyard scene.
To make the grass, use a grass die to die-cut the grass from white paper. Colour the grass with alcohol markers in shades of green, such as Weed Green and Grass Green. Once coloured, attach the grass strip to the underside of the barn with foam tape, creating a realistic lawn.
Then take the digital flower stamps with coloured flowers and place them on the lawn. Use glue to secure the flowers in place, adding pops of color and visual interest to the scene.
Now that the door and cow are dimensionally placed and the barn is decorated with grass and flowers, our card is starting to come to life! Let us move on to the final step of creating the inside of the card.
Step 5: Designing the Inside of the Card
As we near the completion of our cow greeting card, let us focus on adding the finishing touches to the inside of the card. This step ensures that the recipient gets a nice surprise when they open the card.
Adding the Greeting and Additional Cow
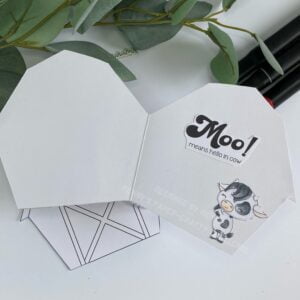
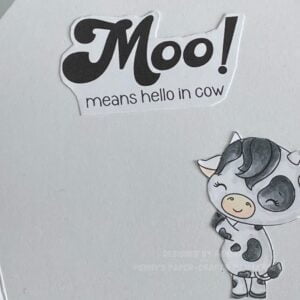
Start by selecting the sentiment “Moo! means hello in cow” from the “Strawberry Cows” digital stamp set. We have already printed this out with the entire page. Cut it out and place it on the inside of the card.
Next, let’s bring in another delightful cow to greet the recipient. Choose the digital stamp of the cow looking over its shoulder and extending its paw in greeting. We have also already printed out and coloured this stamp. You can now cut it out and place it on the inside of the card.
With the greeting and additional cow in place, our card’s interior is now as charming as its exterior!
Inspire, Create, Share, and More
Let’s take a moment to celebrate the creative journey we have completed together in creating this delightful cow greeting card. As we complete our tutorial, there are still many opportunities to explore and expand your creativity. Below, you will find ways to continue your creative journey, from joining the crafting community to discovering more card-making inspiration.
Join the Challenge
Feeling inspired? Why not join the Penny’s Paper-Crafty Challenge Blog and showcase your creations? Click the button below to participate in the latest challenge! The theme is “Anything goes using paper”.
More Shaped Card Inspiration
Are you looking for more inspiration for shaped cards? Check out these other articles featuring unique card designs.
Products used for this cow greeting card
Disclaimer: This article may contain affiliate links, which means that I may earn a commission if you make a purchase through these links. This is at no additional cost to you and helps to support my blog. I only recommend products or services that I personally use and believe will add value to my readers
Streamside digital set in the spotlight (no affiliate)

Strawberry Cows digital stamps
Products used with affiliate links

White Gelly Rol Pen 08
Products used without affiliate links
- Grass die from Aveccreative
- Alcohol markers from Decotimecrafts
- Sticky glue from ActionNL
- Foam tape (brand unknown).
I would like to enter my card in the following challenges:
- Try it on Tuesday: Spring
- Passion for Markers: Shaped cards
- CREATIVE INSPIRATIONS: Anything goes
- Krafty Chicks Challenge; Stamps
- Crafty Catz: Anything goes
- Lil Patch of Crafty Friends Challenge …: Anything goes
- A Perfect Time To Craft Open Challenge: Anything goes
- Crafts Galore Encore Challenge Blog: Anything goes
- Daisy Chain Challenges: Animals
- Critter Crazy CHALLENGE BLOG: Anything goes + featured critter
- Crafty Animals: Anything goes + must use an animal


Fab card. Thanks for sharing it with us at the critter crazy challenge Janet DT
Thank you
Great card and a fabulous tutorial too.
Thanks for joining us at the Creative Inspirations Challenge.
Helen x
DT
Thank you, great to hear you like the tutorial too
What a wonderful and fun shaped card Renske. The cow images are super cute and you’ve coloured them perfectly. I really like the added details of the grass and flowers. Thanks for sharing with us at Passion for Markers this week for Kitty’s ‘shaped cards’ challenge. Hugs, Denise x
Denise, thank you so much for your kind words! I’m delighted to hear that you enjoyed the fun barn shape and adorable cow images. Have a great day
Wonderful card. Love the design. Will have to give it a try. I have all sorts of farm animals. Love your card. Thanks for sharing over at Crafty Catz
Thank you for your lovely comment! I’m thrilled to hear that you love the design of the card. It would be fantastic to see your version with your collection of farm animals. So glad you enjoyed the card. Have a great day.
This is just fabulous! I love your unique card shape – perfect for our theme and your cows are too cute! Thanks for sharing at PFM
Natx
“Thank you so much for your kind words! I’m thrilled to hear that you loved the unique card shape and found the cows adorable. It was such a joy to create this card, and I’m delighted to share it with fellow crafters like you. Your feedback means a lot to me, and I’m grateful for your support. Looking forward to sharing more creations with you in the future.
I love those little cows and the shape of the barn. Thanks for joining Passion for Markers. Elaine
Elaine, thank you so much for your lovely comment! Those little cows stole my heart too, and I’m glad you enjoyed the unique barn shape. Your kind words truly made my day! 🐄💖”