
Some links in this post are affiliate links. This means I may earn a small commission if you make a purchase, at no extra cost to you. I only recommend products I use and genuinely enjoy in my own cardmaking. Read more here.
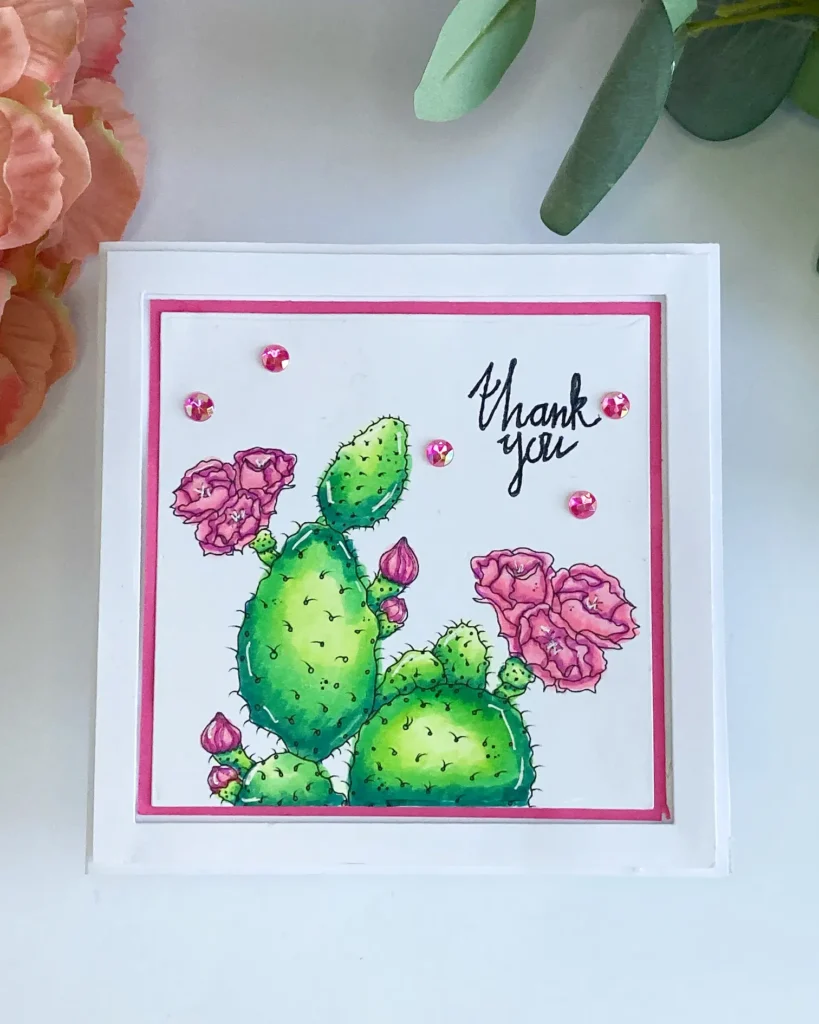
Combine a vibrant cactus design, a heartfelt thank you message, and a dash of creativity, and you get a beautiful cactus thank you card!
When I first received the Pretty Cactus digital stamp from Alex Syberia Designs for Penny’s Paper-Crafty Challenge, I wasn’t sure how to transform this modern, quirky image. However, after some experimentation, I was thrilled with the result. Stepping outside your comfort zone with materials that challenge you can spark your creativity.
This month, two fantastic sponsors, Alex Syberia Designs and Doctor Digi House of Stamps, made this project possible. Check out their logos below and explore their incredible collections.
In this post, I’ll guide you through creating a cactus thank you card. We’ll use simple techniques anyone can master. From colouring the digital stamp to adding layers for dimension, I’ll show you how to combine these elements. Together, they’ll create a one-of-a-kind card that will impress.
Let’s gather our materials and get started!
Materials Used to Create the Cactus Thank You Card
Creating this vibrant cactus thank you card was simple and rewarding, thanks to the right materials. Here’s a breakdown of the tools I used, along with alternatives to suit your crafting needs.
Key Materials
- Pretty Cactus Digital Stamp by Alex Syberia Designs: This digital stamp served as the focal point of the card, with its quirky, modern cactus design that adds personality and vibrancy. If you don’t have this specific stamp, you can use any cactus-themed digital stamp or even a flower stamp for a similar effect.
- Alcohol Markers from Decotimecrafts: I used these markers to bring the cactus to life with vibrant colours. They blend beautifully and provide a smooth finish. If you don’t have these, you can use any colouring medium, such as coloured pencils, watercolours, or other markers.
- Thank You, Stamp: This stamp was used for the sentiment and is essential to the thank you card. If you don’t have this exact stamp, feel free to replace it with any “Thank You” sentiment stamp or even a handwritten message.
- White Gel Pen: I used this to add fine details and highlights to the cactus. A gel pen adds a pop of colour and extra dimension to the design. Any white gel pen will work.
- Square Dies from Scrapfever: used these dies to cut out the card base and layers. They create clean, precise edges and are versatile. If you don’t have square dies, you can use any die shape or even simple scissors for a more custom, freehand look.
- Pearls (Brand Unknown): I added pearls to the card for a touch of elegance and dimension. These embellishments are easy to find. If you don’t have pearls, you can substitute them with sequins, rhinestones, or even small enamel dots.
- White Paper and Pink Paper: Both these papers were used for the background and layering. These basic crafting supplies are essential for creating a clean and vibrant card. You can use any colour or pattern that fits your design, as craft stores offer a wide range of paper options.
- Memento Tuxedo Black Ink: This ink was used to stamp the Thank You sentiment and outline the digital image. It provides crisp, clear impressions, but you can substitute it with any dye ink you prefer.
- Foam Tape Strips: These were used to add dimension to the layers of the card, helping to lift elements for a 3D effect. If you don’t have foam tape, you can use double-sided adhesive pads or stack pieces of cardboard for a similar effect.
Alternative Materials
If you don’t have some of these materials on hand, here are a few alternatives you can use:
- Instead of the Pretty Cactus digital stamp, look for any cactus-themed stamps or die-cuts that fit your card design.
- You can easily swap Decotimecrafts alcohol markers with Copic or Spectrum Noir markers if those are more accessible to you.
- If you don’t have the Thank You stamp, you can try using a handwritten sentiment or a printed message for a personal touch.
By using these materials and following the steps, you’ll create a cactus thank you card that’s uniquely yours. Whether you have access to the exact brands or not, these materials will help you achieve a fun, creative result that is sure to impress.
Step-by-Step Tutorial for a Simple Handmade Cactus Greeting Card
Ready to make your own cactus thank you card? This step-by-step guide shows you how to turn the Pretty Cactus digital stamp into a vibrant, heartfelt greeting card. With these simple techniques, your card will come to life
Let’s start with the first step
Step 1: Printing and Coloring the Digital Stamp Pretty Cactus
Start by printing and colouring the Pretty Cactus digital stamp for your cactus thank you card. Follow these steps for the best results.
Materials Needed
- Pretty Cactus Digital Stamp (from Alex Syberia Designs)
- Word Document (for resizing)
- Printer
- DCP Paper (ideal for alcohol markers)
- Alcohol Markers from Decotimecrafts
- White Gel Pen
Printing the Digital Stamp
- Open a Word document and insert the Pretty Cactus image.
- Resize the image to 9.5 cm wide to fit within the square die.
- Print the image on DCP paper, which is ideal for alcohol markers because it enhances blending and vibrancy.
Colouring the Cactus
Start colouring the cactus using the following marker colours:
- Cactus: Green Bice (163), Yellow Green (48), Grass Green (47), Forest Green (50)
- Flowers: Medium Pink (137), Pastel Pink (17), Pale Pink (09), Rose Pink (08), Magenta Deep (292)
Blend the colours smoothly with alcohol markers to add depth and shading.
Adding Highlights
Once the colouring is complete, use a white gel pen to add highlights. This will give your cactus a bit more dimension and make it stand out on the card.

Now that your digital stamp is printed and coloured, you’re ready to move on to the next step!

Having trouble editing or colouring digital stamps? Download my free guide for extra tips and tricks to help you perfect your digital stamps!
Step 2: Stamping the Text
With the cactus coloured, it’s time to add the thank you sentiment. The space above the flowers is perfect for stamping.
Materials Needed
- “Thank You” Rubber Stamp
- Tuxedo Black Ink (Memento)
- Scrap Paper (for test stamping)
- Black Fineline
Test the Stamp
Before stamping on the image, test your stamp on scrap paper to check the ink coverage.
Since this is a new stamp for me, I want to make sure the ink coverage is even and crisp. Test stamping also helps to ensure that the sentiment will fit nicely above the cactus flowers.
Stamping the Sentiment
When the test stamp looks good, carefully stamp the thank you sentiment above the flowers.
Tuxedo Black Ink creates a bold, clean look. If needed, outline the text with a black fine liner for a sharper finish.

With the sentiment stamped and outlined, your image is ready for the next step!
Step 3: Die-Cutting the Image and Create the Pink Border
In this step, you’ll add layers to give the card more dimension. Square dies keep the design simple while adding depth.
Materials Needed
- Square Dies (various sizes)
- Pink Paper
- Tape (to hold dies in place)
- Die-Cutting Machine
Die-Cut the Image
- Start with the smallest square die to cut out the cactus image.
- Position the die on the image so that the cactus is centred, and on the bottom, for a symmetrical cut. I tape the die in place to prevent it from shifting as it goes through the machine.
- Run it through the die-cutting machine. Your cactus image is now ready!
Create the Pink Border
- Next, create the pink border using the middle-sized square die to cut a square from pink paper.
- Adhere the cactus image to the pink square to create a contrasting border. This adds colour and dimension.

Your image is framed and ready to be added to the card!
Step 4: Creating the Card Frame
With the image die-cut and framed in pink, it’s time to create the card frame. This adds structure while keeping the design simple.
Materials
- White Paper (12.5 cm x 12.5 cm)
- Square Dies (larger size)
- Tape (to secure die)
- Die-Cutting Machine
Cut the White Card Base
Cut a 12.5 cm x 12.5 cm square from white paper. This forms the frame base.
Position and Die-Cut the Frame
- Take the largest square die and place it on the white paper. This cuts out the middle, leaving a frame.
- Centre the die to ensure even borders. Once positioned, tape it in place
- Run it through the die-cutting machine to cut the frame


Your clean white frame is now ready to pair with the cactus image!
Step 5: Assembling the Card
With the frame and image ready, it’s time to assemble the card. This step pulls everything together for a polished finish.
Materials Needed
- Card Base (13 cm x 13 cm)
- Foam Tape Strips
- Adhesive (for attaching pieces)
- Pearls (for embellishing)
- Glue
Prepare the Card Base
Begin with a 13 cm x 13 cm card base as the foundation of your design. To make one, cut a 26 cm x 13 cm piece of card stock, score at 13 cm, and fold.
Attach the Frame to the Card Base
- Apply foam tape strips to the back of the white frame, placing them along all four sides for dimension.
- Peel off the backing paper and add a thin layer of glue on top. This allows slight adjustments before securing the frame
- Center the frame on the card base and press down firmly once positioned
Position the Cactus with a Pink Border
- Apply glue to the back of the pink-bordered cactus image.
- Centre it within the frame and press down to secure it.
Add the Embellishments
Add pearl embellishments around the cactus for a finishing touch. I placed three near the ‘thank you’ sentiment and two in the top corner for balance.

Your card is now ready to send, a simple, handmade cactus greeting card for any occasion

Let’s Get Creative Together
Now that your handmade cactus greeting card is finished, try different colours or swap the ‘thank you’ sentiment for another to suit any occasion Enjoy the process and explore creative ideas at your own pace. Crafting offers endless possibilities, make it your own
Join the Challenge
Have fun showing off your creations! If you’re inspired by this project, don’t forget to join the Penny’s Paper-Crafty Challenge for a chance to win exciting prizes. Click the button below to get started.
More Related Blogposts with Alex Syberia Designs
Create a Stunning 3D Handmade Floral Birthday Card with Alex Syberia Designs
Another card with a digital stamp from Alex Syberia Desings
Products used
Affiliate Links: The products mentioned in this post are affiliate links. If you decide to purchase through these links, I may earn a small commission at no extra cost to you. These commissions help keep my blog running, so I truly appreciate your support!
Products used with affiliate Links
White gel pen

memento Tuxedo Black ink

Products without affiliate links
Pretty Cactus Digital stamp Alex Syberia Desings

- Alcohol markers from Decotimecrafts
- Thank you stamp (brand unknown)
- Square dies from Scrapfever
- White and Pink card stock (brand unknown).
- Foam tape strips from Boekenvoordeel
I would like to enter my card in the following challenges
- Fab ‘n’ Funky Challenges: Include a stamped image (digital or real stamp)
- Simon Says Stamp blog Wednesday: Anything goes
- Krafty Chicks Challenge: Anything goes
- Daisy Chain Challenges: No design paper
Very nice card, thanks for sharing!
thank you
This beautiful card is a perfect fit for our ‘stamped image ‘ challenge at Fab’n’ Funky, thank you so much for joining in.
It also fits the challenge at Sweet Stampin’ which is ‘ thank you cards’ you still have time to link it if you wish.
Chris
x
Thanks a lot