

Some links in this post are affiliate links. This means I may earn a small commission if you make a purchase, at no extra cost to you. I only recommend products I use and genuinely enjoy in my own cardmaking. Read more here.
Hey everyone!
The Polkadoodles Challenge blog has started another new challenge today. I wanted to share my creation with you in an Autumn Gnome Card Tutorial. I was inspired by autumn, which gave me inspiration to work with this gnome and squirrel.
In this tutorial, I will guide you through the creation process of the card using the “Autumn Wheelbarrow Halloween Gnome” digital stamp and the “Nuts About You” clear stamp set by Polkadoodles.
We will start by creating a serene forest background and then bring the gnome and squirrel to life with alcohol markers.
I will give you step-by-step instructions for adding magical details, whimsical sentiments, and final embellishments to make your card stand out.
Additionally, I have listed all the Polkadoodles products used in this project at the end of the article, complete with links, so that you can easily find what you need to recreate the magic at home.
Are you ready to get creative together? Let’s dive into the world of Polkadoodles and embark on this crafting adventure.
Materials Needed for this Autumn Gnome Card tutorial
Let’s gather all the materials we need before creating our wonderful card. Here is a list of the things we will need:
- Stamps: We will use the “Autumn Wheelbarrow Halloween Gnome” digital stamp and the beautiful ‘Nuts about you’ clear stamp set from Polkadoodles to create our charming gnome and his squirrel friend.
- Ink: Choose your favourite ink to make the background. You can use any ink you like. I used my chalk inks.
- Colour mediums: You can use alcohol markers, pencils, watercolours, or any medium you prefer.
- Tools: Basic crafting tools like scissors, glue, a die-cutting machine (optional), and stencils (optional) are needed to make this card.
- Paper: We will need paper to print the digital stamp on and stamp the images on. We will also need paper for the card base, the background panel, and the grass layers.
Now that we have all the materials gathered, let’s start creating our card. In the following sections, we will create a magical forest background, meet our gnome, and squirrel friends, add colours and accents, and finally, assemble all the elements to create a beautiful autumn card. Let’s get started!
Setting the Scene
Creating an engaging background is the first step in making our autumn card. I guide you step-by-step through the process and give handy tips for when you don’t have the right supplies.
Step 1: Preparing Your Materials
To begin, make sure you have the following materials ready:
- White cardstock for your card base.
- Stencil with tree patterns (If you don’t have a stencil, no problem! You can also achieve a similar effect by drawing trees freehand or using a tree stamp with masking techniques).
Step 2: The Art of the Sky and Trees
To begin, attach a white paper to your crafting surface.
TIP: A helpful tip to do this is by taking a small piece of tape, folding it in half under the card, and sticking it to your workstation.
Now, use a stencil that has covered the trees and an open sky. This will help you create the sky while keeping the trees white. Use an ink tool to apply blue ink over the stencil. I used four different shades of blue for this. The stencil will keep the white colour and create the tree shapes against the blue sky.
Tip: If you don’t have a tree stencil, don’t worry. You can either draw the tree shapes by hand or use a tree stamp. When using a stamp, remember to mask the trees. This way, you can ink your sky without colouring the trees.
Step 3: Remove the Stencil
Remove the stencil with care to reveal your beautiful forest of trees against the blue sky.
With your background complete, you’ve set the stage for the upcoming magic. Our autumn gnome and his squirrel friend will soon come to life in this enchanting forest backdrop. Let’s continue crafting our autumn wonderland!”
Colouring Your Characters and Creating Grass Elements
Now it’s time to bring our beloved gnome, squirrel and accompanying autumn elements to life. Now that our enchanting forest background is here, it’s time to start the colouring process. In this section, I will guide you through the process step-by-step and provide you with colour combinations and tips to make it easy and fun.
Step 1: Printing and Stamping
- Start by printing the ‘Autumn Wheelbarrow Halloween Gnome’ digital stamp on DCP paper. Carefully cut out the image to give you the freedom to determine its placement on your card later.
- For the squirrel, leaves, and acorns from the clear stamp set, use black ink that’s alcohol-marker friendly to stamp them onto DCP paper. This ensures that your ink won’t smudge when you start colouring.
Step 2: Colouring Your Gnome and Squirrel
For our gnome and squirrel, I used the following colour combinations:
Gnome:
- Skin: Peachy Blush, Salmon Pink, Barely Beige
- Hat: Cool Grey 5, Cool Grey 4, Cool Grey 1
- Beard: Cool Grey 5, Cool Grey 4, Cool Grey 1
- Wheelbarrow: Deep Olive Green, Dark Olive Green, Olive Green
Squirrel:
- Fur: Natural Oak, Burnt Sienna, Sand, Leather
Step 3: Colouring the Leaves and Acorns
For the leaves and acorns, I used these colours:
- Leaves: Dark Olive, Olive Green, Mustard, Dark Yellow
- Acorns: Deep Olive Green, Dark Green, Olive Green
Step 4: Cutting Out Your Characters
After colouring, cut out your gnome, squirrel, leaves, acorns, and the two grass layers. This step allows you to arrange them exactly where you envision them on your card for the perfect composition.
With your coloured characters in hand, you’re ready to create the enchanting grass elements. In the upcoming section, I’ll guide you through creating the grass layers that will add depth and texture to your scene. Stay tuned!”
Creating Grass Elements
Now that we have the enchanted forest background and coloured characters ready, the next step is to create the grass elements that will add depth and texture to our scene.
Step 1: Crafting the Grass Layers
To create the grassy foreground, we need two layers of grass. Start by cutting the grass shapes from white cardstock, either by using dies or by cutting them manually.
Step 2: Adding Colour to the Grass Layers
To make the grass layers look more realistic, we can use different shades of green ink. I used my chalk inks, but you can use any ink you like.
Step 3: Placing the Grass Elements
After adding colour to the grass layers, we can position them on the card, one in front of the other, to create a sense of depth and perspective in our scene. We use adhesive to secure them in place.
With the grass elements in place, we are almost done. In the next section, we’ll add magical details to our scene, including white metallic paint splatters and highlighting for that extra touch of whimsy.
Adding Enchanting Details
Now that we have our enchanting forest backdrop, coloured characters, and vibrant grass layers, it’s time to add those final changes that will make our autumn card truly stand out.
Step 1: Adding White Metallic Paint Splatters
To create a sense of whimsy and a touch of magic, use white metallic paint. Simply add some water with your metallic paint. Get paint on your brush and tap against your brush. This will create splatters scattered across your card. This adds a beautiful, ethereal quality to your scene.
Step 2: Highlighting the Details
To make our characters and elements pop, consider using a white gel pen to add highlights. Pay attention to areas like the gnome’s hat, the squirrel’s fur, and any other areas where a touch of highlight will bring out the details.
With these final enchanting details in place, our autumn card is nearing completion. In the next section, we’ll explore the art of assembling all the elements to craft a truly magical card.
Assembling Your Magical Autumn Card
Now that we’ve brought our forest scene to life and added those enchanting details, it’s time to put everything together.
Step 1: Preparing Your Base
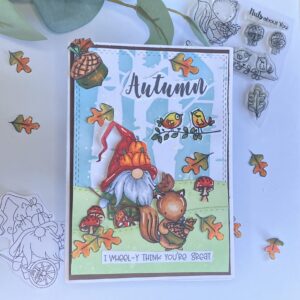
Begin with a basic card, either a ready-made one or make your own. If you prefer to make your own, take a 21 x 14.8 cm paper and score it at 10.5 cm. Apply a layer of brown paper (14.3 cm by 10 cm) on the base card, and then attach the created background panel on top of it.
Step 2: Arranging the Characters and Elements
Arrange the coloured gnome, squirrel, leaves, and acorns on the card. Play around with different placements until you’re satisfied with the composition.
Step 3: Adding Sentiments
Place the sentiments ‘Autumn’ and ‘I wheel-y think you’re great’ on your card to add a touch of warmth and charm.
Step 4: Final Details
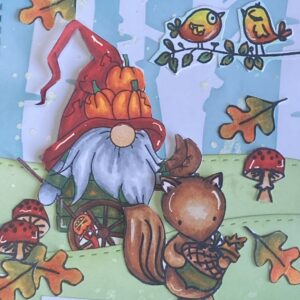
Enhance the scene by placing a large acorn in the top left corner, the branch with two birds and three leaves on the right, and mushrooms and extra leaves around the gnome and squirrel.
With all the elements in place, the magical autumn card is complete! You have created a whimsical masterpiece that captures the spirit of the season.
Join the Challenge and Stay Inspired
Now that we have finished our card, I would like to invite you to join the challenge too.
Join the Autumn Challenge
Are you feeling inspired by the breathtaking autumn scenery? Why not put your crafting skills to the test and participate in our latest challenge on the Polkadoodles Challenge Blog? This is the perfect opportunity to display your talent, connect with fellow crafters and win fantastic prizes!
More autumn card ideas

Happy crafting!
Affiliate Disclosure: This blog post contains affiliate links. When you purchase through these links, I may earn a commission at no extra cost to you. These commissions help support the creation of free, valuable content for you. I appreciate your support as it allows me to continue sharing crafting inspiration and tutorials.
Products Polkadoodles Used:
Autumn Wheelbarrow Halloween gnome.

Nuts about you clear stamp set

Trick and treat Sentiment Set

I would like to enter my card in the following challenges
- Make My Monday Challenge Blog: Autumn colours
- A Place To Start: Anything goes
- Cardz 4 Guyz: Autumn Colours
- Try it on Tuesday: Autumn
- Unicorn Challenge Blog: Autumn and/or Halloween
- CREATIVE INSPIRATIONS: Autumn or Halloween
- Craft Rocket Challenges: Autumn
- Lil Patch of Crafty Friends Challenge …: Anything goes
- Stamping Sensations: Autumn Colours
- 613 Avenue Create: Autumn Colours
- Dragonfly Dreams: Autumn
- A Perfect Time To Craft Open Challenge: Anything goes
- Daisy Chain Challenges: Autumn and/or Halloween
Love the little aquirrel! And a real Autumn card in such great clean design! Thank you for joining us at Stamping Sensations!
Thank you
This is super sweet and in such gorgeous colours! Thanks for joining us at Stamping Sensations this month.
Pinky
Thank you
This is a great card with so many fun details! Thanks for sharing with us at A Place to Start!
Hugz,
Chana Malkah, Owner
Thank you so much ❤️
Lovely desinged and card. Thank you for joining us at 613 Avenue Create this month. Hope to see you back here again soon. Judy DT https://avenue613.blogspot.com/
Thank you
Lovely designed card. Thank you for joining us at 613 Avenue Create this month. Hope to see you back here again soon. Judy DT https://avenue613.blogspot.com/
Beautiful card, love this gnome! Thanks for joining us at A Place To Start!
Thank you
What a fabulous card! I love how this autumnal scene came together, the gnome and squirrel are so sweet with all those leaves 😊. Thanks so much for joining in the fun at Try it on Tuesday! Hugs, Jo x
Thank you
Beautiful colours Renske, love the papers and your stunning background xx
Thank you ❤️
You have created a delightful Fall scene, Renske. Thank you for joining us at C4G this round and participating in my suggested theme. Cheers, Jolanda – DT
Adorable!! Thanks for playing along with our “Shades of Brown” challenge over at Cardz 4 Guyz!! You nailed the masculine element with your cute little guy & showed a great variety of “shades of brown” in your creation. -Deb Horst, DT #C4G332
What a fun Fall scene, Renske! Love that barrow gnome, and all those cool LEAVES! What a great color blend for them! Thanks so much for playing at Make My Monday!
Lovely autumn card and such a cute gnome! Thanks for sharing with us at TIOT
Such fun in the lovely Autumnal colours, many thanks for sharing at Stamping Sensations October challenge.
B x
What a cute little scene! Love the sentiment. Thanks for sharing with us at Dragonfly Dreams :)
You sure created a wonderful Autumn card with this one. Great colouring of all your images and a lovely layout. thanks for joining us at MMM, Johanna DT
Super cute gnome and wonderful coloring of all your images on this card.