Have you ever wondered how to create a card that captures the beauty of a blooming garden with just a few strokes of watercolour? Imagine the delight of holding a piece of art crafted by yourself – a vibrant display of colours and intricate designs, all coming together in a stunning watercolour flower card. Whether you are an experienced card maker or just beginning your journey into paper crafting, this project ignites your creativity and brings you and the recipient joy.
One of the greatest joys of crafting is rediscovering the supplies you already have and finding new ways to use them. This month, I am excited to join the Monthly Discovery Hop on Instagram, where a group of enthusiastic paper crafters come together to share their creations and inspire one another. The theme for this month is “rainbow,” and the technique is “watercolour” – a perfect combination to create something truly unique and beautiful. The goal of this hop is to encourage us to revisit tools and materials that we may not have used in a while, or perhaps have never used at all. For me, I haven’t used aqua markers for a long time. This is perfect to take it out of the closet again for this card.
In this tutorial, we’ll explore how to make a gorgeous watercolour flower card. This project is not only a wonderful way to experiment with colours and techniques, but it’s also an opportunity to create something personal and heartfelt. Whether making this card for a special occasion or to brighten someone’s day, the process is rewarding and enjoyable. So, gather your supplies and dive into the world of watercolour flower cards, where each stroke and splash of colour brings a touch of magic to your paper canvas.
- Materials Needed to Create a Beautiful Watercolor Flower Card
- Step 1: Die-cutting the Background
- Step 2: Creating the Rainbow Watercolour Background
- Step 3: Stamping the Floral Design
- Step 4: Adding White Acrylic Paint Splatters
- Step 5: Adding the Sentiment
- Step 6: Assembling the Card
- Follow for More Card Making Inspiration
- More Watercolour Card Inspiration
- Products without affiliate links
Materials Needed to Create a Beautiful Watercolor Flower Card
To create a beautiful watercolour flower card, you’ll need the following materials, most of which you likely already have in your crafting supplies. Here’s a quick overview of what you’ll need and why each item is essential for this project. We’ll also provide alternatives in case you don’t have the exact materials on hand.
- Aqua markers in rainbow colours: These will be used to create a vibrant watercolour background. If you don’t have aqua markers, use watercolour paints, brush pens, or water-soluble markers. Alternatively, you can use distress oxide inks as these inks react with water.
- Water: This will blend the colours on the glass mat and create the watercolour effect.
- Flower clear stamp: You’ll need this to add the floral design to the background. If you don’t have a flower clear stamp, you can use any floral-themed stamp you have on hand.
- Watercolour paper: This will be used for the die-cut background. It’s essential to ensure the paper can withstand water without warping. If you don’t have watercolour paper, you can use thick cardstock or mixed media paper, but the watercolour paper is the best choice.
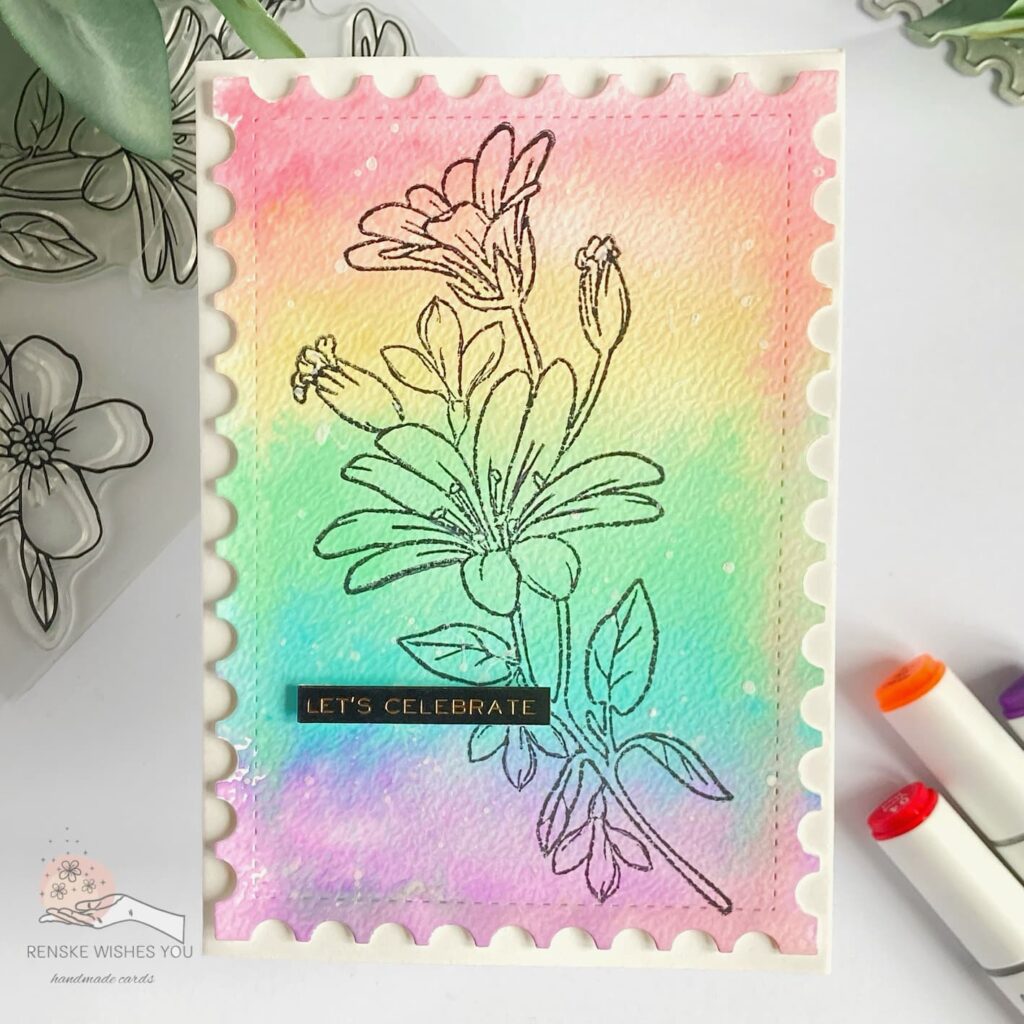
- Postage stamp dies: This will create an interesting die-cut background shape. If you don’t have a postage stamp die, you can use any decorative die you like or cut a rectangle if you don’t have a die-cutting machine.
- Beige cardstock for the card base: This will form the base of your card. You can use any sturdy cardstock in a complementary colour if you don’t have beige cardstock.
- Glass mat: This will be used as a non-porous surface for blending and picking up colours. If you don’t have a glass mat, use a plastic or ceramic plate, a non-stick craft mat, or a large acrylic block.
- Sentiment sticker book (“Let’s Celebrate”): This will add a pre-made sentiment to your card. If you don’t have this specific sticker book, you can use any sentiment you like.
- White acrylic paint: You’ll need this for adding white splatters to enhance the background. If you don’t have white acrylic paint, use white gouache, white ink, or a white gel pen for finer splatters.
- Foam tape: This will be used to elevate the sentiment and background panel, adding dimension to the card. If you don’t have foam tape, you can add multiple layers of cardstock on the back of the sentiment to create the same effect.
- Black fine liner: This will enhance the stamped lines if they are not crisp enough. If you don’t have a black fine liner, you can use any fine-tipped black pen or marker.
By gathering these materials, you’ll be well-equipped to create a stunning watercolour flower card. Don’t worry if you don’t have the exact supplies—use what you have and get creative with alternatives. Crafting is flexible, and the joy lies in making something uniquely yours.
Step-by-Step Instructions for creating the Watercolour flower card
Creating a watercolour flower card is a delightful and rewarding process. Each step is designed to guide you through the creation of a stunning card that showcases your artistic skills and creativity. Let’s dive into the steps and explore how to bring this vibrant watercolour flower card to life.
Step 1: Die-cutting the Background
To start, choose a sturdy watercolour paper and a postage stamp die.
- Prepare Your Watercolour Paper: Choose a piece of thick watercolour paper that can withstand multiple layers of water and ink.
- Set Up Your Die-cutting Machine: Place the postage stamp die on the watercolour paper. Since watercolour paper is thick, you may need to run it through the die-cutting machine a few times to ensure a clean cut.
- Die-cut the Background: Place the paper and die between cutting plates and feed them through the machine. If the die doesn’t cut through the paper on the first pass, carefully rotate the paper and run it through the machine again. Repeat this process until the die has been cut through the paper.
- Remove the Die-cut Paper: Carefully remove the cut-out paper from the die without tearing the edges. Now you have a postage stamp-shaped watercolour paper, ready for the next steps.
Taking your time with this initial step will allow you to create a sturdy and visually appealing base for your card that can withstand the watercolour techniques we’ll be using next.

Step 2: Creating the Rainbow Watercolour Background
To create a vibrant rainbow background on our die-cut watercolour paper, follow these steps:
- Set Up Your Workspace: Place a glass mat on your work surface to easily blend and lift colours. A glass mat is recommended for its simplicity to clean. If you don’t have a glass mat, you can use something else if it is smooth. You can even use a piece of sturdy plastic or, for example, acetate.
- Apply the Aqua Markers: Color the white squares of the glass mat with aqua markers starting from the top with red, followed by orange, yellow, green, blue, and finally purple at the bottom to create a rainbow effect.
- Activate the Colors with Water: Lightly spray water over the coloured areas on the glass mat to blend the colours, creating a seamless transition between each hue.
- Ink Smooshing Technique: Gently press your die-cut watercolour paper into the wet, coloured area on the glass mat. This ink-smooshing technique transfers vibrant, blended colours onto the paper. Be careful to avoid excessive colour bleeding.
- Reveal Your Background: Lift the paper from the glass mat to reveal the beautifully blended rainbow background. If any areas are too light, you can repeat the process to add more colour.
- Dry the Background: Allow the watercolour background to dry completely before moving on. Let it air dry or use a heat tool to speed up the process.
By using aqua markers and the ink smooshing technique, you’ve created a stunning, one-of-a-kind rainbow background for your card. This colourful base is the perfect backdrop for your stamped floral design in the next steps.

The coloured colours with my aqua markers on my glass mat.

I was spraying the colours with water.

The sprayed colours with water

Ink Smooshing the background panel in the watercolours.

The finished ink-smooshed background
Step 3: Stamping the Floral Design
After your rainbow watercolour background is dried, it’s time to add a beautiful floral design to the card.
- Prepare Your Stamping Tool: Using a stamping tool is essential for stamping on textured watercolour paper. This tool allows you to repeatedly stamp in the same spot, ensuring a crisp and clear image.
- Position Your Stamp: Place the floral stamp on the stamping tool. Position the stamp over your rainbow background where you want the floral design to appear. Close the lid of the stamping tool to pick up the stamp.
- Ink the Stamp: Open the stamping tool and apply Memento Black Tuxedo ink to the floral stamp. Make sure the stamp is evenly covered with ink for the best impression.
- Stamp the Image: Close the stamping tool and press firmly to transfer the image onto the watercolour paper. Due to the texture of the watercolour paper, you may need to repeat this step several times to get a clear, sharp image. Reapply ink to the stamp and press down until you are satisfied with the result.
- Enhance the Image: If the stamped image isn’t as crisp as you’d like, you can enhance it using a black fine liner. Carefully trace over the lines of the floral design to sharpen the details and make the image stand out more against the colourful background.
Following these steps will help ensure that your floral design is clear and striking, adding a beautiful focal point to your watercolour flower card. This combination of the vibrant rainbow background and the delicate floral image creates a captivating and unique handmade card.

Step 4: Adding White Acrylic Paint Splatters
To add more interest and texture to your card, we will incorporate white acrylic paint splatters across the background, including the stamped floral design.
- Prepare Your Acrylic Paint: Put a small amount of white acrylic paint on a palette or a similar surface. Add a few drops of water to the paint and mix well to achieve a slightly thinned consistency. This will help create finer splatters.
- Set Up Your Work Area: Lay down a scrap paper or an old cloth to protect your workspace from paint splatters. Place your watercolour background panel in the centre of your workspace.
- Apply the Paint Splatters: Dip a small brush or an old toothbrush into the thinned white acrylic paint. Hold the brush above your card and gently tap it to create splatters. You can also use your finger to flick the bristles, aiming for an even distribution of splatters across the card. Be sure to cover both the background and the stamped floral image.
- Control the Splatter Size: For finer splatters, use a brush with smaller bristles or thin the paint a bit more. For larger splatters, use a brush with thicker bristles or add less water to the paint. Experiment on a scrap piece of paper if needed to achieve the desired effect.
- Let It Dry: Allow the paint splatters to dry completely before moving on to the next step. This ensures that you don’t smudge the paint while handling the card.
By adding these white acrylic paint splatters, you introduce a fun and dynamic element to your card, enhancing its visual appeal and adding a layer of depth to your design. The contrast between the white splatters and the colourful background makes the floral design even more eye-catching.
Step 5: Adding the Sentiment
Now it’s time to add to your watercolour flower card the sentiment. By adding a well-placed and elevated sentiment, you give your card a polished and professional finish.
- Choose Your Sentiment: For this card, I chose the “Let’s Celebrate” sticker from the Tim Holtz sticker book. The cheerful phrase complements the vibrant rainbow colours and floral design.
- Prepare the Sentiment: Place the sticker onto a piece of white cardstock. This not only provides a sturdy base for the sticker but also makes it easier to give the sentiment dimension.
- Cut Out the Sentiment: Carefully cut around the sticker. This helps the sentiment stand out against the colourful background.
- Elevate with Foam Tape: To add dimension to your card, apply foam tape to the back of the cut-out sentiment. Foam tape adds a 3D effect, making the sentiment pop from the background.
- Position the Sentiment: Decide where to place the sentiment on your card. For this design, I positioned it slightly towards the left side, overlapping the flower stem. This creates a balanced look and draws the eye towards the focal points of the card.
- Adhere the Sentiment: Peel off the backing from the foam tape and carefully adhere the sentiment to the card. Press down gently to secure it in place.
By following these steps, you’ve added a thoughtful and eye-catching sentiment to your card. The raised sentiment not only adds visual interest but also enhances the overall design, making your handmade watercolour flower card truly special and ready to celebrate any joyful occasion.

Step 6: Assembling the Card
The final step is to assemble all the elements and complete your beautiful watercolour flower card.
- Create the Card Base:
- Cut a piece of beige cardstock to 21 centimetres by 14.8 centimetres. This will be your card base.
- Score the 21-centimetre side at 10.5 centimetres. Use a bone folder to create a sharp fold and then fold the cardstock in half. This gives you a standard card size of 10.5 by 14.8 centimetres.
- Attach the Watercolour Panel:
- Turn your completed watercolour background panel over and apply thin foam tape to the back. This adds a slight elevation, giving your card dimension and interest.
- Center the panel on the front of your card base and press down gently to secure it in place.
- Final Touches:
- Ensure that everything is firmly attached and that the card base is sturdy. Make any final adjustments to the placement of elements if necessary.
By following these steps, you’ve successfully assembled your card. The combination of the watercolour background, floral stamp, white paint splatters, and elevated sentiment come together to create a unique and stunning handmade card, perfect for celebrating any occasion.

Let’s Get Creative Together
In this tutorial, you learned different techniques. We created a rainbow watercolour background using aqua markers and stamped a flower. It was a delightful and rewarding process.
Follow for More Card Making Inspiration
Handmade card-making is not just about the final product; it’s about the joy of creativity and the satisfaction of crafting something unique and heartfelt. Each card is a piece of art that reflects your personality and effort. Follow my blog for more inspiration, tips, and tutorials to fuel your passion for card-making.
More Watercolour Card Inspiration
If you enjoyed creating this watercolour flower card, check out these related blog posts for more ideas and techniques:
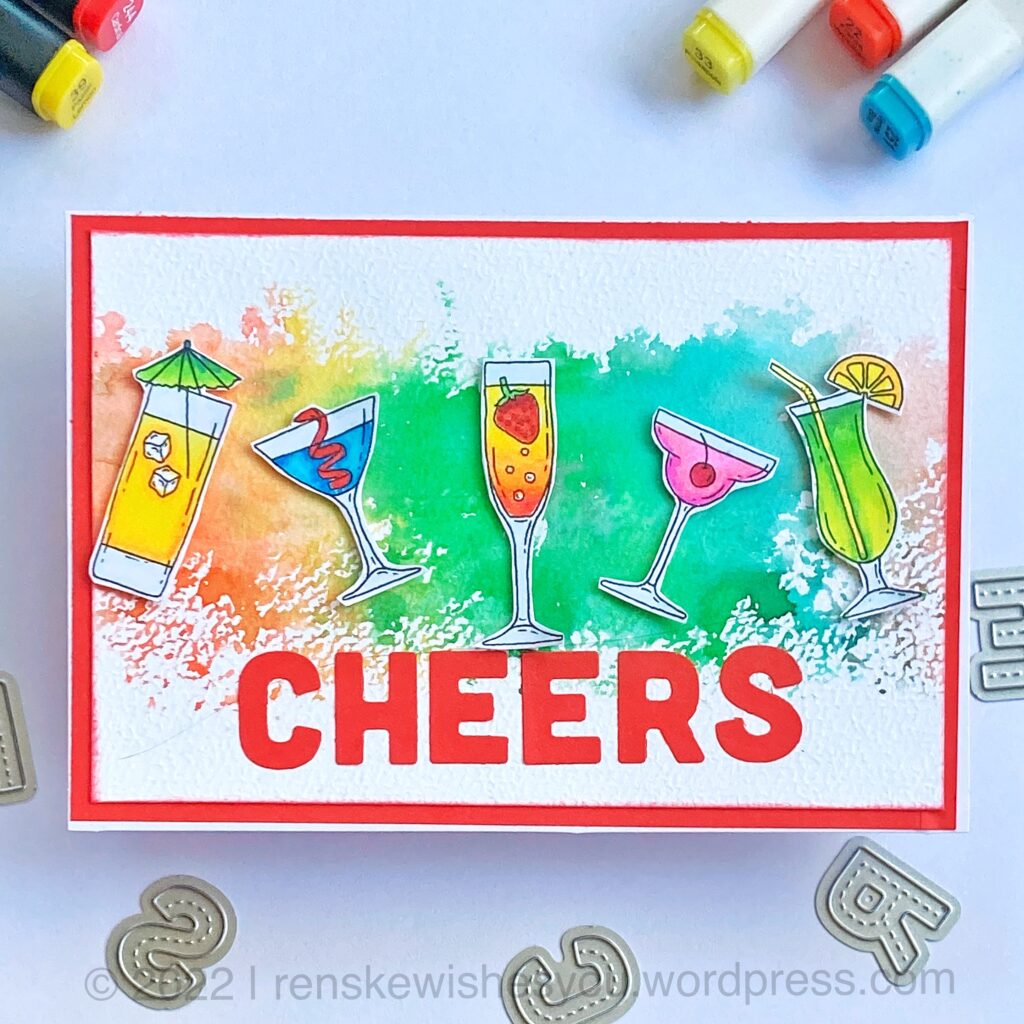
Cocktail card | Using ink smooshing technique
For this card, I used a piece of plastic for this this technique.

How to craft a quick and easy handmade sympathy card?
For this card, I applied different distress inks on a clear stamp and sprayed it with water.
Join the crafting community and let’s continue to inspire and support each other in our creative journeys. Happy crafting!
Products used for this Watercolour flower card
Affiliate Disclosure: Some of the links in this article are affiliate links. This means that, at no additional cost to you, I may earn a commission if you click through and make a purchase. By using these links, you are supporting me and my blog, and I genuinely appreciate your support. Rest assured that I only recommend products that I have personally used and trust, and the income generated helps me maintain and improve the quality of content provided. Thank you for your support!
Products with affiliate links
Alinacutle Floral Stamps Clear Stamps

Tim Holtz Glass Media Mat

Tim Holtz Metallic Sticker Book

Die-cutting Machine PressBoss Pro

Artemio paper cutter

Memento Tuxedo Black ink

Products without affiliate links
- Aquamarkers from Decotimecrafts
- Aquarel paper
- Postage die from Avecreative
- White craft paper from Joy Crafts!
- White acrylic paint
- Foam tape (brand unknown).
- Black fine liner (brand unknown).
I would like to enter my card in the following challenges:
- Through The Purple Haze Challenges: Anything goes
- Craft Rocket Challenges: No design Paper
- Krafty Chicks Challenge: All Occasions
- Allsorts challenge blog: Bloom, bees or butterflies
- We Love Stamping: Fabulous flowers
Thank you for sharing your card with us during June at We Love Stamping Challenge. I must admit I had forgotten about this technique so will have a play later today Karen We Love Stamping Design Team
Hi Karen, Thank you for your lovely comment. I am glad I reminded you of this technique. Curious to know how you used the technique.
Crafty Hugs, Renske