
Are you ready to create a vintage-inspired butterfly greeting card?
I’ll guide you through stamping, colouring, distressing, and die-cutting techniques, in this tutorial.
I designed this card with soft pastel tones and delicate vintage details, making it a thoughtful project for someone special
Along the way, you’ll learn how to combine these elements for a beautiful, nostalgic design. Let’s start crafting something unique and meaningful.
- Understanding the Allure of Vintage Style in Card Making
- Essential Materials for Your Vintage Butterfly Card
- Step-by-Step Guide: Crafting Your Vintage Butterfly Card
- Let's Get Creative Together
- Products used for this butterfly greeting card
- Twin markers from Decotimecrafts pieces 12 pieces
- Twinmarkers from Decotimecrafts 60 pieces
- Twinmarkers from Decotimecrafts 4 pieces
- Distress ink Walnut Stain from Ranger
- Distress ink Vintage Photo from Ranger
- Distress ink Tumbled Glass from Ranger
- Distress ink Weathered wood from Ranger
- Memento Tuxedo black ink
- White gelly roll pen 08
- Products without affiliate links
- I would like to enter my card in the following challenges:
Understanding the Allure of Vintage Style in Card Making
Vintage style captures the charm and beauty of the past, with its soft, muted colours, intricate patterns, and aged finishes. These elements combine to give your butterfly greeting card a nostalgic, timeless appeal.
Soft pastel tones are essential in vintage designs, bringing a calm and elegant touch to your project. Think about aged paper, distressed edges, and antique embellishments – these are the hallmarks of a classic vintage card.
Adding personal touches, like the feel of a worn postcard or the look of an old book with faded pages, can turn your card into a treasured keepsake. By blending vintage techniques with your style, you’ll create something truly unique.
Essential Materials for Your Vintage Butterfly Card
Here’s what you’ll need to create your vintage butterfly greeting card. If you don’t have the exact items, I’ve suggested some alternatives to achieve a similar look.
| Material/Tool | Description | Alternatives |
|---|---|---|
| Rubber butterfly stamp | Adds the main butterfly element | Any butterfly stamp or butterfly die-cut. |
| Alcohol markers | Colours the butterfly for a vibrant look | Coloured pencils, watercolour paints, any colouring medium you like. |
| White gel pen | Highlights details on the butterfly and flowers | White acrylic paint with a fine brush |
| Flower clear stamp | Adds floral accents to complement the butterfly | Any floral stamp or hand-drawn flower designs |
| Clock die | Creates a vintage clock embellishment | Use a clock-themed sticker or hand-drawn clock |
| Leave dies | Adds leaf details for texture and dimension | Hand-cut leaves from cardstock or patterned paper or maybe you have stickers. |
| Sample of wallpaper | Gives a textured background | Vintage-patterned scrapbook paper or fabric scraps |
| Raster die | Adds a textured grid-like pattern to the card | Use a stencil or embossing folder with similar texture |
| Sentiment stamp | Stamps a thoughtful sentiment for the card | Use a stencil or embossing folder with a similar texture |
| Wooden background patterned paper | Creates a rustic, vintage wood grain background | Patterned paper with wood grain or hand-drawn wood |
| Distress Ink (Walnut Stain) | Distressed edges for a worn, vintage look | Any brown ink or watered-down brown acrylic paint |
| Distress Ink (Vintage Photo) | Adds vintage, sepia-toned detail to the card | Light brown or tan ink |
| Memento Tuxedo Black Ink | Ink for stamping crisp outlines | Any black stamping ink |
| Distress Ink (Antique Linen) | Creates a soft, aged effect | Light beige or yellow-toned ink |
| Distress Ink (Tumbled Glass) | Adds a soft blue tint to areas of the card | Light blue watercolour or ink |
| Distress Ink (Weathered Wood) | Creates a muted grey-blue vintage feel | Grey or blue-grey ink |
| Clear text stamp | Adds subtle handwritten text to the background | Handwriting with a fine pen or a vintage script stencil |
| Foam tape | Adds dimension to elements on the card | Use adhesive dots or layers of cardstock |
| Sticky glue | Secures all the elements in place | Double-sided tape or a glue stick |
| White cardstock | Forms the base of the card | Any sturdy cardstock in a light colour |
| Distressing tool | Create distressed edges for a worn, vintage look | Scissors or sandpaper to roughen edges |
With these materials and a few creative adjustments, you can craft a vintage-inspired butterfly card. If you’re missing any of these items, check local craft shops or online stores like Decotimecrafts, Aveccreative, or Craftsensations for great options.
Step-by-Step Guide: Crafting Your Vintage Butterfly Card
Let me walk you through the steps to create your vintage-inspired butterfly greeting card. I will provide tips and techniques to help you bring each part of your card to life.
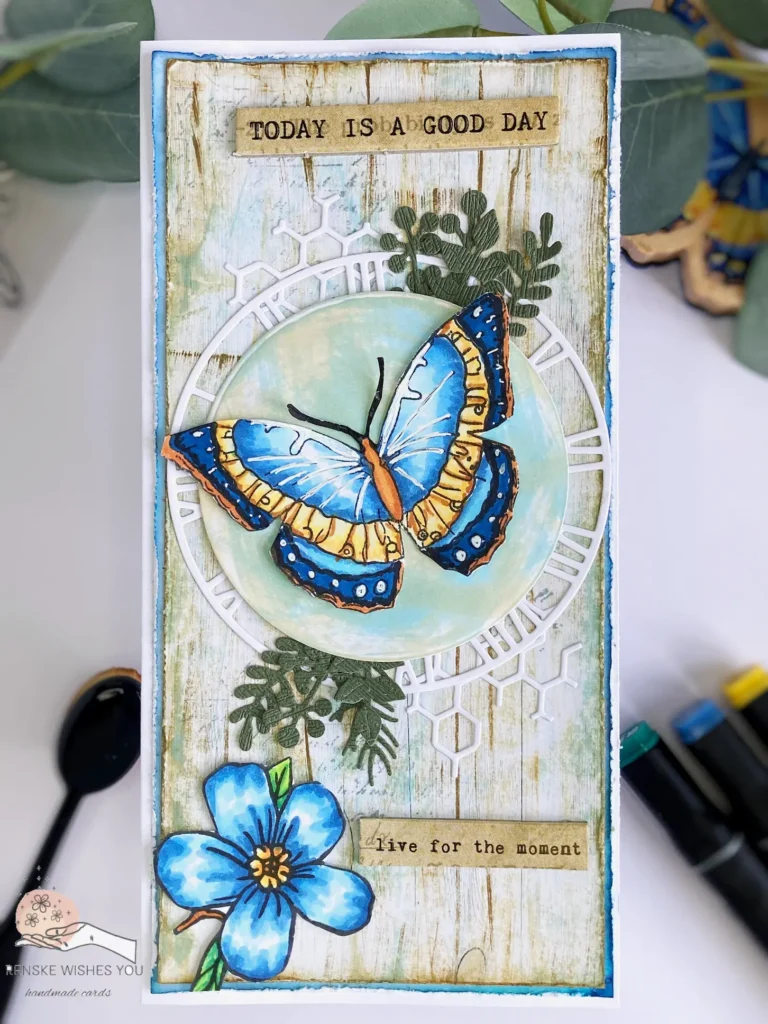
Step 1: Stamping and Vibrant Colouring of Your Butterfly
We’ll begin by adding the focal point of the card, the butterfly. This involves stamping and colouring to bring it to life with vibrant tones.
Stamping the Butterfly
SStart by stamping your butterfly image. I used a rubber butterfly stamp from Decotimecrafts and stamped it with Memento Tuxedo Black Ink on white cardstock. Rubber stamps can be tricky—ensure your stamp is well-inked and apply even pressure for a clean result.
Colouring the Butterfly
After stamping the butterfly, it’s time to colour. I used alcohol markers and blended the following colours:
- Body and outer wings: Sand (107) and Rose Beige (97).
- Inner wings: Midi Sky (190), Phthalo (183), and Frost Blue (182).
- Yellow accents: Pale Yellow (38), Lemon Yellow (35), Golden Yellow (222), Barn Red (245).
- Outer blue edges: Dark Indigo (188) and Dark Sky (191).
After colouring, I used a white gel pen to highlight the small circles on the wings and traced over some of the black lines for extra definition.
Finally, cut out your butterfly.

Now that you’ve created the butterfly, let’s move on to the next step by stamping and colouring the flower.
Step 2: Beautifully Stamp and Colour Your Floral Accent
With the butterfly complete, it’s time to add a beautiful flower to complement it. This will balance out the design and create a cohesive look.
Stamping the Flower
I used a clear flower stamp from Alina Cuttle. Place the stamp on an acrylic block and stamp it with the same black ink on white cardstock.
Colouring the Flower
Then, colour it with alcohol markers as follows:
- Flower petals: Midi Sky (190), Phthalo Blue (183), Frost Blue (182).
- Flower centre: Pale Yellow (38), Lemon Yellow (35), Golden Yellow (222), Barn Red (245).
- Leaves: Yellow Green (48), Grass Green (47), and Forest Green (50).
After colouring, I used a white gel pen to highlight the small circles on the wings and traced over some of the black lines for extra definition. Finally, cut out your butterfly. Now that you’ve created the butterfly, let’s move on to the next step by stamping and colouring the flower.

Step 3: Create a Stunning Card Base and Vintage Background
Now that the butterfly and flower are ready, let’s create the base and background layers. These will provide the perfect foundation for our decorative elements.
Creating the Card Base
For the card base, I chose a slimline format. I cut a piece of white cardstock to 21cm by 21cm, scored it at 10.5cm, and folded it in half for a neat finish.
Creating the Vintage Wood Background
For the background, I aimed to create a vintage wood effect. I used a wooden background paper from Craftsensations. Here’s how I achieved the look:
- Cut the background paper to 9.5cm by 20cm.
- Distress it using Distress Inks: Antique Linen, Walnut Stain, Vintage Photo, and Tumbled Glass.
- Instead of using a blending brush, swipe the ink pads directly over the surface to create a streaky, vintage effect.
Layering the Background
For added depth, layer blue cardstock behind the wood background:
- Cut a piece of white cardstock to 20.5cm by 10cm.
- Ink the edges with Chipped Sapphire and Tumbled Glass.
- Distress the edges of both layers with a distress tool or the blade of a pair of scissors.
- Glue both layers onto the card base.

Now that the card’s base and background are ready, we can move on to the next step, where we’ll punch out different elements to add texture and dimension.
Step 4: Die-cutting for Added Texture and Visual Interest
With the base and background in place, we’ll use die-cut elements to add texture and depth to the card. These additional details will make your card stand out.
Die-Cutting Elements
Here are the elements I die-cut for this card:
- Hexagon grid dies from Aveccreative: cut from white cardstock and placed diagonally across the card.
- The clock dies from Aveccreative: cut from white cardstock and layered over the hexagon grid.
- The leaf dies from Aveccreative: cut from a wallpaper sample. You can find free wallpaper samples at DIY stores, perfect for die-cutting and adding unique textures.
Creating a Distressed Circle
- Die-cut a white circle.
- Distress it with Antique Linen and Tumbled Glass inks by swiping the ink pads directly over the paper for a vintage look.
Now that we have all the die-cut elements complete, we can start putting the card together. Let’s move on to the assembly phase to see how these pieces fit together.
Step 5: Assemble Your Card for a Stunning Finish
Now that all the pieces are ready, we can bring everything together. It’s time to assemble the card and see the final design come to life.
Layering the Elements
- Glue the hexagon grid diagonally across the card base.
- Place the die-cut clock on top of the grid.
- Adhere the distressed circle, and raise it with foam tape for added dimension.
Attaching the Butterfly and Flower
- Attach the butterfly to the circle using glue for the body and foam tape under the wings to give it a lifelike lift.
- Add the die-cut leaves on the top right and bottom left corners of the circle, beneath the butterfly.
- In the bottom left corner, place the flower, raised with foam tape. Trim any leaves or petals that extend beyond the card’s edge.
Adding the Sentiments
Finally, I added two sentiments to complete the card:
- “Today is a good day” at the top of the card.
- “Live for the moment” on the right of the flower.
")
Now you have a beautifully layered, vintage-inspired butterfly card, perfect for sending to someone special!
Let’s Get Creative Together
This charming butterfly greeting card combines vintage style with a personal touch, perfect for anyone who appreciates a nostalgic feel.
From selecting colours that reflect the beauty of transformation to layering die-cuts and adding intricate details, this project invites you to explore your creativity while crafting something special.
More Related Blogposts

Products used for this butterfly greeting card
Affiliate Disclosure: This post contains affiliate links. If you click through and make a purchase, I may earn a small commission at no extra cost to you. I only recommend products that I genuinely use and love. Your support helps me keep creating free content..
Twin markers from Decotimecrafts pieces 12 pieces

Twinmarkers from Decotimecrafts 60 pieces

Twinmarkers from Decotimecrafts 4 pieces

Distress ink Walnut Stain from Ranger

Distress ink Vintage Photo from Ranger

Distress ink Tumbled Glass from Ranger

Distress ink Weathered wood from Ranger

Memento Tuxedo black ink

White gelly roll pen 08

Products without affiliate links
- Wooden butterfly stamp from Decotimecrafts
- Clock die from Aveccreative
- Leave dies from Aveccreative
- Sample Wallpaper to die-cut from. Check stores in the neighbourhood to find wallpaper samples.
- Hexagon grid dies from Aveccreative
- Flower clear stamp from Alinea Cuddle
- Sentiment stamp (brand unknown)
- Wooden Patterned Paper from Craftsensations.
I would like to enter my card in the following challenges:
- Lil Patch of Crafty Friends Challenge …: Anything goes
- A Perfect Time To Craft Open Challenge; Anything goes
- Critter Crazy CHALLENGE BLOG: Anything goes + featured critter
- Crafty Animals: Anything goes + must use an animal