
Hey everyone!
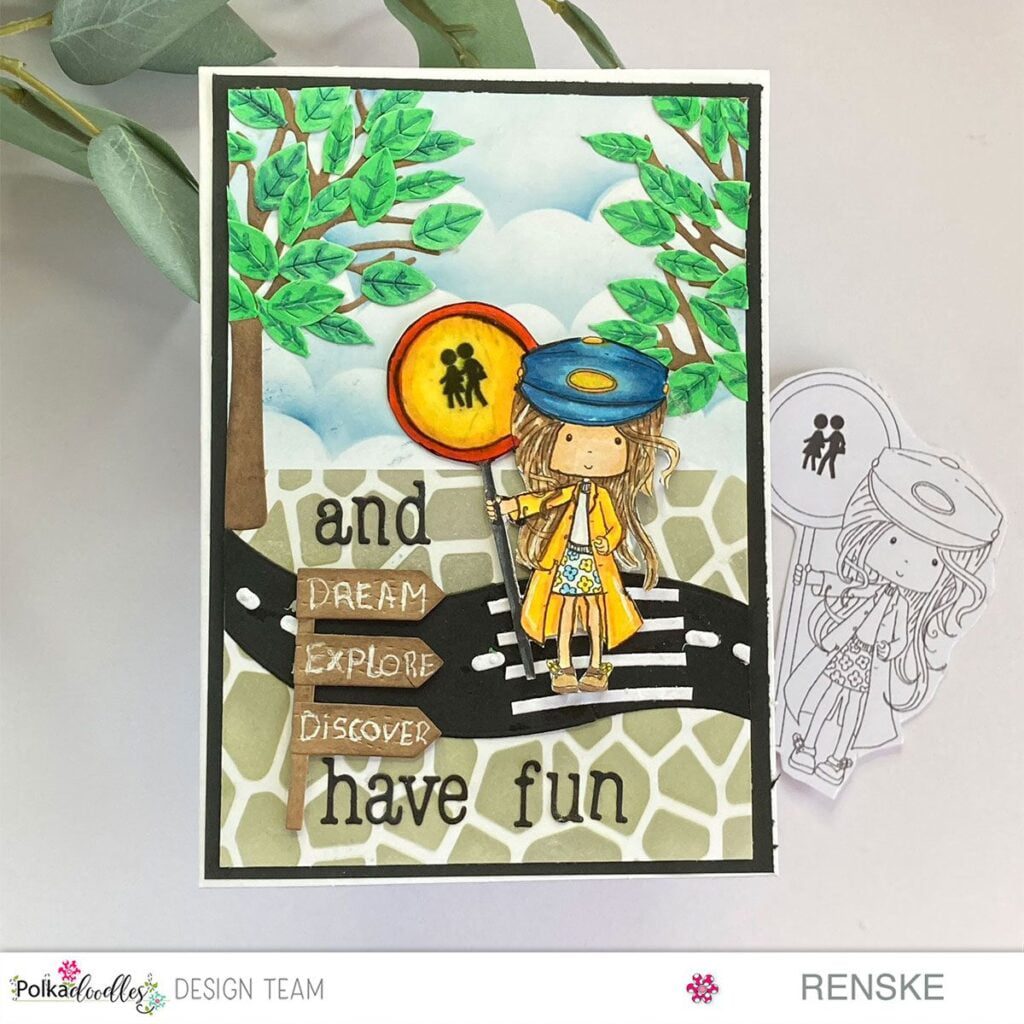
It’s time to dive into my latest creative adventure! Today, I am happy to share the creative process behind my vibrant back-to-school card with the charming digital stamp “Lollipop Lady School Crossing Patrol/Security Guard” from Polkadoodles. This is my design team inspiration card for the new challenge on the Polkadoodles challenge blog. Go to the section and join the challenge for more details.
Let’s start discovering how this card came to life!
Materials used
To create a stunning back-to-school card, you will need various materials and tools. This guide provides a detailed breakdown of everything you’ll need, including specific items from the Polkadoodles collection.
Polkadoodles materials
For this card, I started working with the digital stamp Lollipop Lady School Crossing Patrol. This stamp is perfect for a back to school card.
Other materials used
- White cardstock
- Stencil for the pah and the clouds
- Dies for the trees, leaves and signpost
- White gel pen
- Paper Glaze
- Alcohol markers
- Chalk ink
- Alphabet die
Step-by-step tutorial for this back-to-school card
his step-by-step guide will show you how to create a charming handmade back-to-school card from start to finish. I will cover every aspect of the card-making process, providing detailed instructions to help you achieve a polished final product.
By following this tutorial, you will gain the skills to craft a fun and visually appealing card that is perfect for the back-to-school season. Let’s get started and make something special!
Step 1: Crafting the background for the back-to-school card
First, I got to work on the background of this card. I used a combination of stencils to create this background.
Using a stencil, I have used before on a card to create a path, I again created a path to go on both sides of the road. This time I used two colors of ink on top of each other to create this color. I used grey ink and on top of that a light-yellow ink.
At the top of my background, I want to add clouds again. To prevent the ink for the clouds from getting onto the path, I have masked the path with masking tape. Do check before using this to make sure it doesn’t tear your paper.
Tip if the tape tears your paper: Run it over your trousers or shirt a few times to get the worst of the sticky stuff off. With blue ink, I applied the clouds to my background. You can do this also on your hand.
Step 2: Bringing the digital stamp a life with my alcohol markers
With the background created, it’s time to digitally stamp Lollipop Lady Once the scene was set, it was time to bring our charming “Lollipop Lady” to life. I was keen to use bold and fresh colours. With us in the Netherlands, you have to wear an orange or yellow vest over your jacket. Starting with her vibrant yellow jacket that exudes cheerfulness. So, I decided to give her a nice bright yellow colour for the jacket. The white shirt adds just a bit of freshness, and I always really like the colour combination with blue.
I used the following color combinations:
- Skin: Barely Beige, Salmon Pink, and Peachy Blush.
- Hair: Leather, Brown Grey, Walnut, and Clay.
- Coat and the middle of the traffic sign: Pastel Lemon, Lemon Yellow, and Deep Yellow.
- Shirt: Cool Grey 1.
- The red border on traffic signs: Cardinal, English Red, and Burgundy.
- Post of traffic sign: Black, Cool Grey 9 and Cool Grey 7.
- Hat: Dark Sky, Midi Sky, and Baby Boy.
- Skirt: Blue flowers – Baby blue, and yellow flowers-Lemon Yellow
- Shoes: Sand


Having trouble editing or colouring digital stamps? Download my free guide for extra tips and tricks to help you perfect your digital stamps!
Step 3: Die-cut elements: Crafting dimensions and depth
To complete the scene, I used different die-cuts to make the digital stamp stand out more.
The tree and leaves
I die-cut a tree out of brown paper. I worked the trunk and branches a bit with brown ink to create shadows. When schools start again at our place, the trees are still full of leaves. So I wanted to create leaves on the trees. Fortunately, I still had some leaves lying around from a previous project that I could use.
Tip in between die-cut small parts in copious quantities. I try to die-cut out lots of leaves right away so, I can use them on other projects. While you’re at it, just die-cut a lot right away.
The leaves were die-cut of white paper and coloured with alcohol markers. I used the colours Weeds Green, Grass Green and Forest Green for this.
The street
I have a die-cut that you can make a street with. I laid this out twice on black paper. I turned the shape both in opposite directions and this way you get a shape that you can lay against each other.
I die-cut the white lines on the street from white paper. But to avoid having to work with glue, I stuck double-sided tape on the back of the paper. This is where I die-cut the shapes and now I have a nice adhesive edge on the back of the white lines. I made the pedestrian crossing with a die cut meant for a birdhouse. This way you can creatively use your materials.
Finally, I die-cut the signpost. On the edges of the signpost, I applied some brown ink to give it a bit of shadow. I glue the signs to the pole.
Now we have the die-cutting elements ready it’s time to make the sentiment for this card.
Step 4: Adding the sentiment
Let’s talk about sentiment now. For the beginning of my sentiment, I used the signpost. On the signposts, I wrote the words Dream, Explore, and Discover with a white gel pen.
I liked to finish the sentence with the words “and have fun”. So, I decided to use the alphabet letters that I had already punched out of black paper before. I placed the wood and above the signpost and the words have fun below the signpost.
Step 5: Final Flourishes and Subtle Highlights: Sealing the Magic
Now it’s time for the final details. I added some highlights with my white gel pen to the “Lollipop Lady”. I decide to add some highlights to her hair, and her coat.
In addition, I decided to add some Paper glaze to the middle of the road sign.
These two additions give the card a little something extra.
Let’s Get Creative Together
We have gone through the steps to create a beautiful back-to-school card.
Now that you have seen how to make this lovely back-to-school card, it’s your turn to get creative! I encourage you to explore your crafting supplies and bring your unique vision to life.
Join the Challenge
Before I close, I would like to invite you to join our challenge on the Polkadoodles Challenge blog. For you, the theme is always “Anything goes”. Of course, we would love to see you use something from Polkadoodles, but that is not mandatory.
More Back-to-school card inspiration
Do you need more back-to-school inspiration? A couple of days ago I made another back-to-school card.
Happy Crafting!
Affiliate Disclosure: Please note that some of the links in this post are affiliate links. This means I may earn a small commission if you click on them and make a purchase. Rest assured, these are products or services that I personally use and genuinely recommend. Your support through these links helps me continue sharing creative inspiration. Thank you for your understanding and support!
Polkadoodles Product in the spotlight

Digital stamp Lollipop Lady School Crossing Patrol
I would like to enter my card in the following challenges
- A Place To Start: Anything goes + leaves and trees
- Try Stampin’ On Tuesday: Back to school
- My Time To Craft!: Stenciling
- Cut It Up: Create a scene
- Lil Patch of Crafty Friends Challenge …: Anything goes
- A Perfect Time To Craft Open Challenge: Anything goes
- Classic Design Challenge Blog: Anything goes
What a gorgeous card!! Love the sweet little girl image you used and the pretty background!!
Thanks for joining us at Cut it Up challenge!
Have a great day.
Gerda
Thank you so much ❤️
So, so sweet. Thanks for joining our Cut it Up Create a Scene challenge.
Hugs,
Larelyn (CIU owner)
Thank you ❤️
Cute card with so many details! Thanks for sharing with us at MTTC :)
Thank you ❤️
Gorgeous card love the sweet image and beautifully colored!!!!
Thanks for stopping by A Place To Start !
Hugz, Bettascrap DT
Thank you so much ❤️