
Some links in this post are affiliate links. This means I may earn a small commission if you make a purchase, at no extra cost to you. I only recommend products I use and genuinely enjoy in my own cardmaking. Read more here.
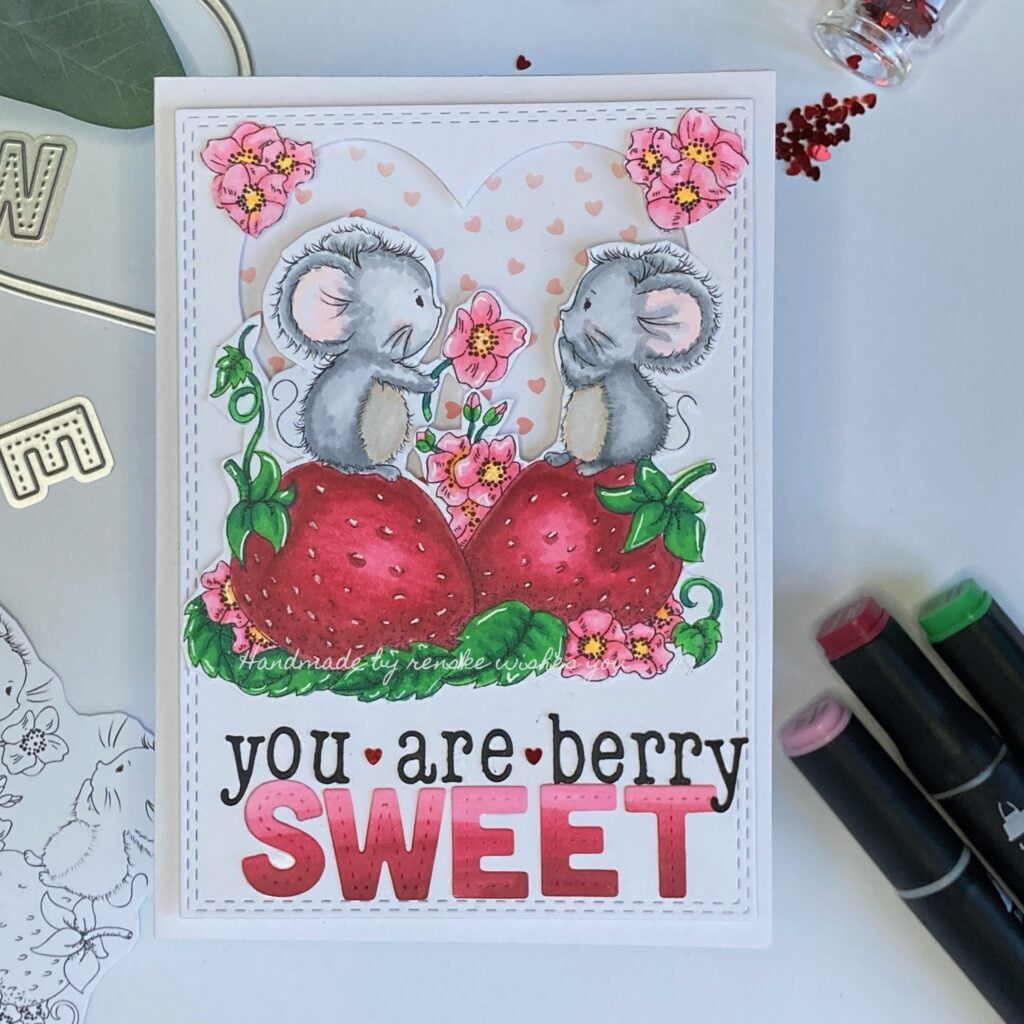
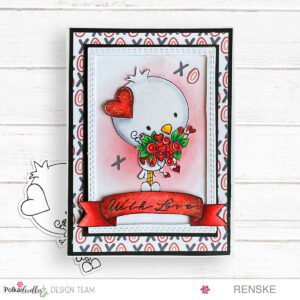
Valentine’s Day is a great occasion to express love and affection through personal messages. In this step-by-step guide, we will explore the process of making a heartfelt Valentine’s Day card adorned with cute mice on fresh strawberries. This unique card design aims to capture the essence of love and sweetness in a handmade creation.
Join me on a creative journey as we explore the process of combining digital stamps and imaginative techniques to bring these charming characters to life on paper. Each step reveals the secrets behind the colouring, detailing, and composition of this personalized Valentine’s Day card, making it an ideal gift for your loved ones.
Whether you are an experienced card maker or just starting this tutorial provides a step-by-step guide that will hopefully inspire you to createyour card. Let’s get started!
Materials for Your Valentine’s Day Card:
Materials
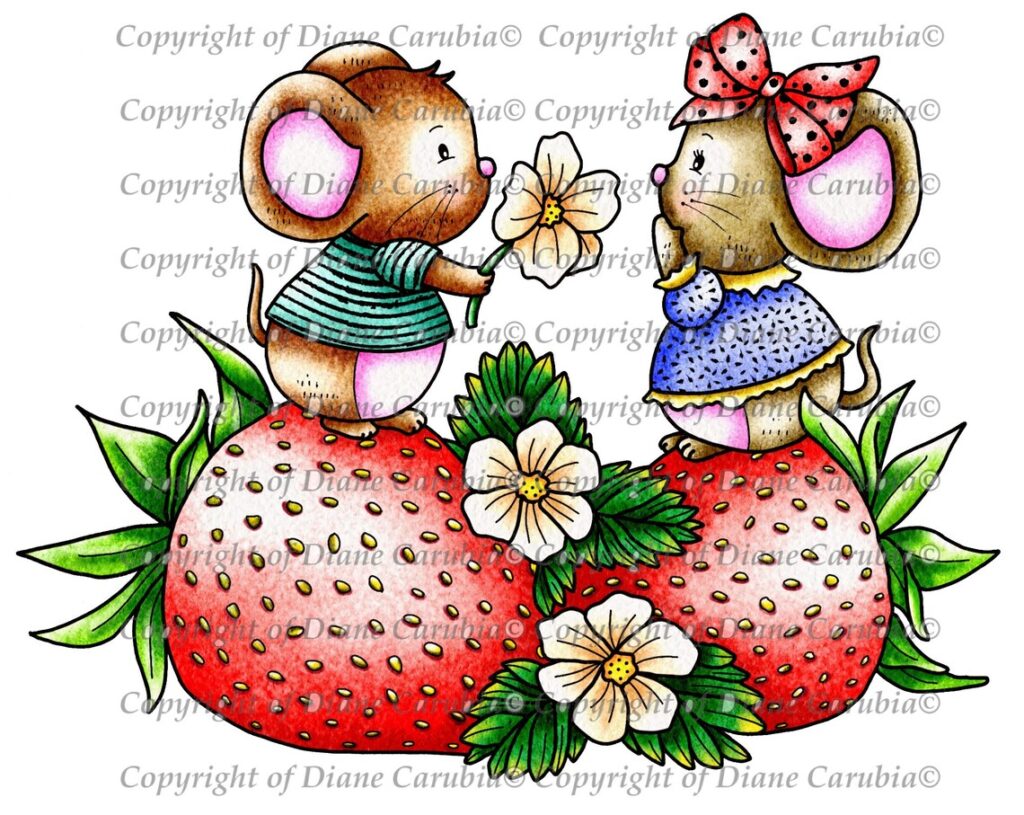
- Digital Stamp: “Strawberry Mice” from Dis Digi Stamps.
- White Cardstock for the card base: 14.8cm x 21cm.
- White cardstock for the die-cut stitched panel.
- DCP paper for printing the digital stamp.
- Ink pad for background inking.
- Heart and rectangle dies for die-cutting.
- Stencil for heart designs on the background.
- Alphabet letter die for black letters (or alternative letter mediums).
- Letter dies for larger letters.
- Markers or other colouring mediums.
- White gel pen for highlights.
- Adhesives: Foam tape, glue.
Tools
- Die-Cutting Machine
- Scissors
- Paper-Cutter
- Blending Tools: Blending brush
- Stamping Platform (optional for precise stamping)
Now that you have all the required materials and tools, let’s get started with making our Handmade Valentine’s card!
Your Attractive Step-by-Step Tutorial: Crafting a Cute Handmade Valentine’s Card
In this section, we will go through a step-by-step tutorial on creating a cute handmade Valentine’s card. I will guide you through the entire creative process, starting from creating the card base to colouring the digital stamp and assembling all the elements. Let’s embark on this creative journey together and make a personalized Valentine’s Day card that exudes love and sweetness!
Step 1: Creating the Card Base
To create a Valentine’s card, the first step is to make a card base using sturdy paper. Follow these steps:
- Cutting the Cardstock: Take a piece of white cardstock that measures 10,5 by 21 centimetres. Score the cardstock at 10.5 centimetres, then fold it along the scored line to create a neat and sturdy card base.
- Precision Cutting: Use a paper cutter or scissors to ensure accurate measurements. A clean and precise cut ensures a well-crafted base for your Valentine’s card.
- Card Folding: Fold the scored cardstock along the line, creating a seamless fold. Press firmly along the crease to ensure a crisp and professional-looking card base.
By creating a solid foundation with a properly folded card base, you set the stage for adding the delightful elements that will bring your Valentine’s card to life.
Step 2: Coloring the Digital Stamp Strawberry Mice
To bring the digital stamp to life, I print it on DCP paper as it’s ideal for colouring with alcohol markers. I used the following colour combinations:
- The Mice: Cool Grey 1, Cool Grey 4, and Cool Grey 5
- The bellies of the mice: Tawny (106), and Hazelnut (108), and I went over them with Cool Grey 1 to give them a greyish tone.
- Inside of the ears: Blush (136), Pale Pink (17).
- Leaves: Weeds Green (162), Grass Green (47), and Forest Green (50).
- Flowers: Medium Pink (136), Pastel Pink (17), Pale Pink (09), and Rose Pink (08).
- Strawberries: Rose Pink (08), Cherry Pink (05), English Red (249), and Burgundy (247).
When colouring, start with the light colours first and leave the strawberries for last. This helps prevent picking up some of the red color with a lighter marker and spreading it in unwanted places.

Step 3: Adding Details and Highlights
In this step, we will improve our digital stamp by adding more details and highlights using a white gel pen.
- Strawberry Seeds: To add seeds to the strawberries, use the fine tip of the white gel pen. Follow the existing lines of the digital stamp and create small, elongated dots scattered across the red surface to realistically simulate the appearance of strawberry seeds.
- Leaves and Flowers: To enhance the visual appeal of leaves and flowers, add subtle highlights. Apply small strokes or dots to the edges or raised areas of the leaves and petals to accentuate texture and depth.
Using a white gel pen is an excellent way to add depth and small details to your artwork.
Step 4: Creating the Rectangle Panel with Die-Cut Heart and Background
To create an attractive background for your Valentine’s Day card, you can make a rectangular panel with a heart-shaped window. Follow these steps:
- Die-cutting the rectangular panel: Take a piece of white cardstock and use a rectangular die to cut out the panel. Place the die on the paper and run it through your die-cutting machine to achieve the desired rectangular shape. If you don’t have a die available, you can of course also cut a rectangle yourself in the desired size.
- To make the heart-shaped window: Place a heart-shaped die on the rectangular panel where you want the window and run it through the die-cutting machine. If you don’t have a die, you can use a craft knife to cut out the heart shape carefully.
- Stencilling the Background: Now, we will create a background on the front of our card base. To do this, attach the card base with masking tape. As the rectangle panel is a bit smaller than the card base, I use masking tape to avoid any ink outside the panel. Look through the heart and decide where you want to apply the ink. Use a blending tool to apply ink and create a soft background effect.
By following these steps, you can get a beautiful rectangular panel with a heart-shaped window, which serves as an elegant backdrop for the Valentine’s Day card.
Step 5: Adding Sentiment and Details
Let’s add sentiment to our Valentine’s Day card. We want to create the phrase “You Are Berry Sweet”. To make the word “Sweet” stand out, we will use larger letters and a gradient colour effect.
Here’s how to do it:
- Create the Phrase: Use alphabet letter dies or stickers to form the phrase “You Are Berry”. Cut the letters from black paper to achieve a bold contrast against the card’s background.
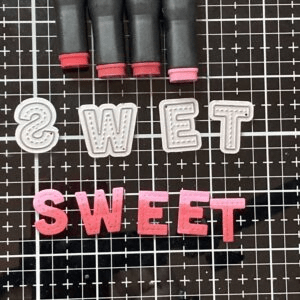
- Gradient Colouring: Colour a strip of white paper with gradient shades. Start with Burgundy at the bottom, followed by English Red, Cherry Pink, and finally Rose Pink at the top. Make sure the colour transitions smoothly.
- Die-Cut the Gradient Letters: Once the strip is coloured, place the letter dies on the strip aligned with the colour gradient. Run them through the die-cutting machine to obtain the gradient-colored letters.
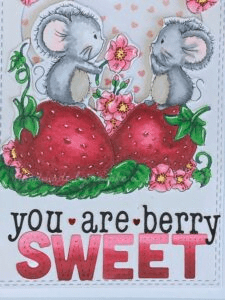
- Placement on the Card: Position the larger gradient-colored letters (“Sweet”) at the bottom of the rectangle panel, aligned just above the second stitched line. Place the smaller black letters (“You Are Berry”) directly above the larger ones, forming the complete phrase.
By following these steps, you can create an appealing focal point for your Valentine’s Day card. The gradient-colored letters and precise placement make the phrase “You Are Berry Sweet” stand out and convey your heartfelt message.
Step 6: Assembling the Card
Let’s assemble all the elements, position the digital stamp, incorporate additional cut-out flowers and enhance the visual appeal of the Valentine’s Day card using the following steps:
- Placing the Rectangle Panel: Use foam tape to affix the rectangle panel with the heart-shaped window onto the card base.
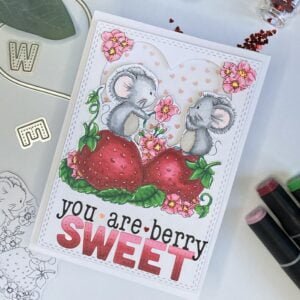
- Positioning the Digital Stamp: Carefully place the coloured and cut-out digital stamp onto the rectangle panel. Ensure that it’s strategically positioned, slightly overlapping the heart window, allowing space for the heart-shaped background to peek through.
- Incorporating Additional Cut-out Flowers: Take the extra cut-out flowers created during the colouring process, and position them on the top edges of the heart-shaped window. Arrange them in clusters of three, adhering them with glue for added dimension.
- Enhancing Visual Appeal: Assess the overall layout and add any final touches. Use the white gel pen to add subtle highlights or details to the assembled elements, enhancing the visual appeal and creating a cohesive look.
By following these steps, you’ll complete the assembly of your Valentine’s Day card, showcasing the adorable digital stamp, cut-out flowers, and an aesthetically pleasing arrangement.
Inspire, Create, Share, and More!
Thank you for joining me in creating this cute Valentine’s card. I hope you enjoyed the process and found inspiration in the magic of this cute strawberry mice card.
If you have any questions, need clarification, or just want to share your thoughts, I’m here to listen and help. Crafting is more than a hobby; it’s a vibrant community, and I’m here to support you in your creative endeavours. Let’s continue to spread the joy of crafting and explore the endless possibilities together!
More valentines day card ideas


Products and tools used with Affiliate links
Some of the links included in this article are affiliate links. This means that if you click on the link and make a purchase, I may receive a commission at no additional cost to you. Please note that I only recommend products or services that I personally use and find valuable for crafting purposes. Your support through these affiliate links helps me continue creating content and sharing crafting ideas. Thank you for your support!
Strawberry Mice from Dis Digi Stamps
Memento dew drop Lady Bug

Alfabeth Lettre die CraftEmotions
Blending brushes from Studiolight
I would like to enter my card in the following challenges.
- The paper fun challenge: Anything goes + let’s celebrate
- The Krafty Chicks Challenge: Stamps
- A perfect time to craft Open Challenge: Anything goes
- Classic Design challenge: Anything goes
- Crafts Galore Encore Challenge: Anything goes
- Daisy Chain Challenge: Anything goes
- Let’s Craft and Create: Anything goes + a penny for your thoughts
- Critter Crazy Challenge: Anything goes with a featured critter
- Sheepski designs: Anything goes
- Crafty Animals: Anything goes
- Cut it Up: Anything goes
- Lil Patch of Crafty Friends Challenge: Anything goes
Lovely card. Thanks for sharing it with us at the Critter Crazy Challenge Janet DT
Thanks
Supercute card, loving the image, makes me miss summer so much – and strawberries also, LOL. Thank you for joining us at the Crafts Galore Encore Challenge #119.
Thank you. Yes let the summer come quickly. Haha,
Those mice are so cute, and I love how you colored those strawberries! That heart window in the background is the perfect addition to the card-very nice! Thanks for joining us at the Paper Funday Challenge!
Thank you so much of your lovely comment ❤️
Your card and tutorial are wonderful! And those strawberries look good enough to eat. I’m so glad you entered your sweet card in our latest challenge at Let’s Craft and Create. Cheryl W, DT
Hi Cheryl, thank you so much for your lovely comment
Such a cute design – love the bold sentiment.
Thanks for joining us at the Krafty Chicks Challenge.
Helen x
Guest Chick
Hello Helen, thank you so much ❤️
And this is very sweet. Thank you for joining our Cut it Up “Anything Goes” challenge.
Hugs,
Larelyn (CIU owner)
Thank you
De muisjes zijn ook heel sweet!! Vind het kleurverloop van de letters ook erg leuk gedaan!
Echt een ‘lovely’ kaartje!!❤️
Dank je wel ❤️