
Creating an envelope flap card adds a creative twist to your card-making projects using envelope flap card techniques. As a dedicated member of the Polkadoodles design team, I’m excited to show you how to make your version using Polkadoodles’ beautiful digital stamps and patterned papers. This tutorial offers clear steps and creative tips to help you personalise your design.
This tutorial provides clear steps and creative tips for personalising your envelope flap card design. You’ll learn how to choose the perfect materials, master folding techniques, and add the finishing touches that make your card stand out.
Join me in crafting a card that will impress and make the most of your Polkadoodles collection.
Materials Needed
Ready to make the perfect envelope flap card? Here’s a list of all the Polkadoodles products and essential crafting supplies you’ll need:
Polkadoodles Products
- Mail Letter Post Cute Helga Hippo Digital Stamp: This adorable character makes the perfect focal point. Find it here (affiliate link).
- Pretty Printable Papers 1 – Helga Hippo: Perfect for creating coordinated layers and backgrounds. Find them here (affiliate link).
- Paper Heaven 1 – Horace & Boo: Provides a variety of complementary patterns. Find it here (affiliate link).
- Winnie and Daisy Sentiment Set: Provides a sweet finishing touch for any card. Find it here (affiliate link).
- Just a Little Note Sentiment: A sweet finishing touch for any card. Find it here (affiliate link).
- BBQ Gnome Men: Adds playful elements. Find it here (affiliate link).
Other Materials and Alternatives
- Alcohol Markers: Ideal for colouring and shading, and great for adding depth to your envelope flap card. If you don’t have alcohol markers, use watercolour or regular coloured pencils instead.
- Envelope Die: Creates cute envelopes on the front and inside.
- Pearls: Add a touch of elegance. Sequins or small rhinestones can be great alternatives.
- Foam Tape: Adds dimension. Regular double-sided tape or even small pieces of cardboard can work in a pinch.
- Glue: Use good-quality craft glue for best results, but a glue stick or double-sided tape handles lighter elements.
- Paper Trimmer: Works well for straight cuts, but scissors and a ruler also do the job.
- Background Die: Adds texture. You can achieve through embossing folders or patterned paper, a similar look.
- Die-Cutting Machine: Cuts dies, but hand-cutting or using pre-cut shapes works as an alternative.
- Card Base: Use any heavyweight cardstock.
- Antique Linen Distress Ink and Blending Brush: Create a vintage feel.. If you don’t have these, try tea-dyeing your paper or use any light brown ink.
Why These Materials?
Polkadoodles products help you create a coordinated and stylish design, while the additional materials offer room for creativity and flexibility. Whether you’re using exactly what I’ve listed or substituting with what you have at home, these options make it easy to craft a card that reflects your unique style.
Crafting an Envelope Flap Card a Step-by-Step Guide to a Delightful Design
Let’s start by creating an impressive envelope flap card, showcasing new techniques and adding personal touches This step-by-step guide walks you through each stage, from preparing your materials to adding those final personal touches. With a bit of creativity and some lovely Polkadoodles products, you’ll soon have a card that feels just as unique as the person you’re crafting it for. Ready to begin? Let’s get crafting!
Step 1: Bring Your Digital Stamp to Life
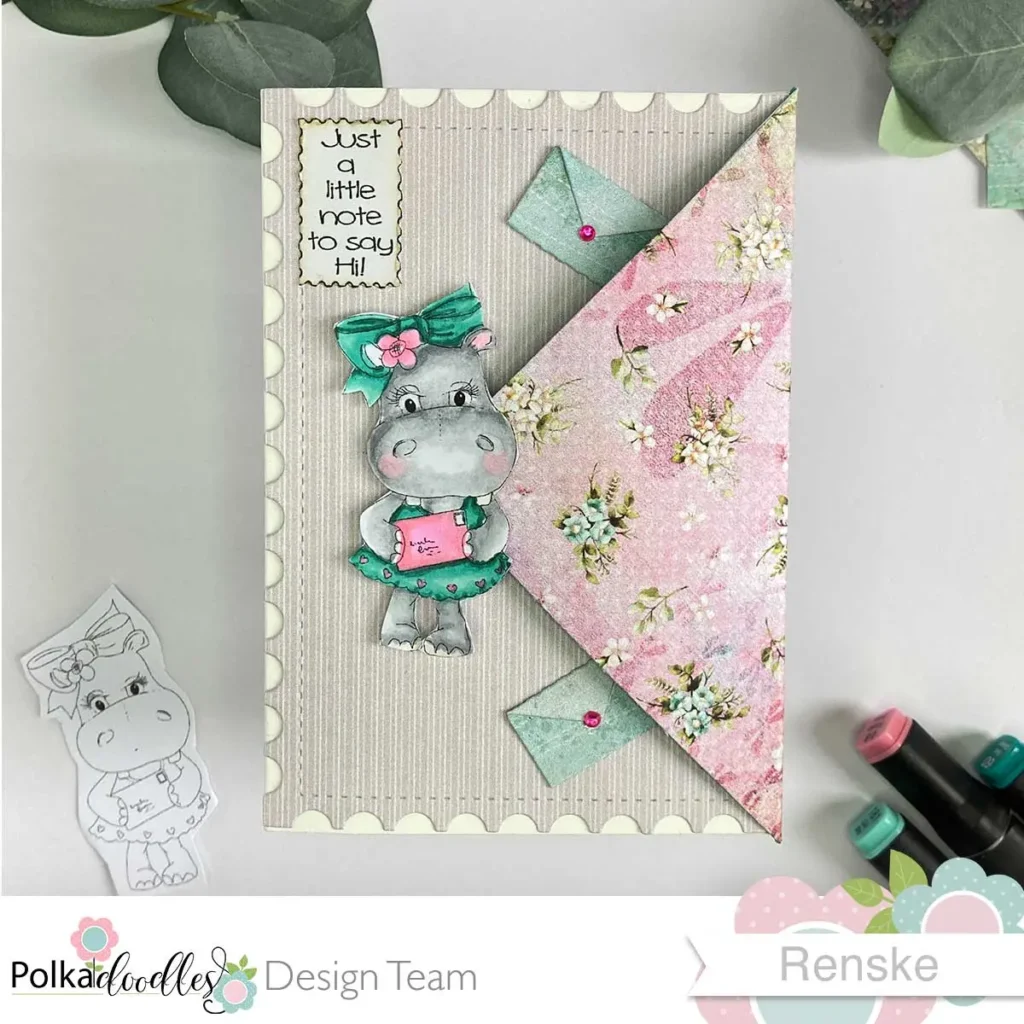
First, print your digital stamp at 7 centimetres tall on DCP paper. This type of paper is ideal for colouring with alcohol markers as it prevents bleeding and maintains vibrant colours.
The Helga Hippo stamp matches the cheerful and playful theme of this card, providing a delightful focal point and keeping the flap neatly closed.
Next, it’s time to colour. Here’s a simple guide for the colour combinations I used:
- Hippo: Cool Grey 5, Cool Grey 4, Cool Grey 3, and Cool Grey 1
- Dress and Bow: Teal Green, Turquoise Green Light, Mint Macaron, Cool Mint
- Cheeks: Medium Pink and Blush
- Envelope and Flower: Rose Pink, Pale Pink, and Pastel Pink
- Nails: Pale Cream
After colouring your image, cut it out with scissors. Trimming closely, without leaving a white border, will help the image blend seamlessly into your card design.
Enjoy this creative step—let your imagination guide you and make your digital stamp shine.

Having trouble editing or colouring digital stamps? Download my free guide for extra tips and tricks to help you perfect your digital stamps!
Step 2: Crafting the Envelope Flap Card Base
To start, create the foundation for your card, ensuring a solid base and a neatly fitting flap
- Cut the Card Base: Trim your base to 10 cm by 14.3 cm. This size is ideal for this design.
- Prepare the Pattern Paper: Cut a square of patterned paper to 10.3 cm by 10.3 cm. Use papers from the Pretty Printable Papers 1 – Helga Hippo and Paper Heaven 1 set by Polkadoodles, for a coordinated look. Print your pattern paper slightly larger than the final size to avoid losing edges when cutting. Trim it down to the exact size for a clean finish.
- Assemble and Score: Adhere the two pieces of pattern paper together so that the flap features a pattern on both the front and inside. Score the square piece of pattern paper diagonally from corner to corner and attach it to the back of the card base in a diamond shape.


Completing this step will provide a sturdy base and a stylish flap for your card. Now you’re ready to move on to the next part of creating your unique envelope flap card.
Step 3: Adding Pattern Paper to the front of the card
Let’s add some texture and detail to the front of the card.
- Choose the Pattern Paper: I selected a light beige patterned paper with white stripes from the BBQ Gnome Men set. The beige with white stripes complements the postal theme, adding a soft, rustic touch to the card.
- Create the Post Stamp Die-Cut: Cut the patterned paper with a die that mimics a large postage stamp. This shape adds a playful and thematic touch to your card. Once you make the die cut, adhere it securely to the front of your card base with glue.
Adding this element will enhance your card’s postal theme and give it a distinctive look. Now, your envelope flap card is ready for the finishing touches!

Step 4: Adding Sentiments
Now, it’s time to add some thoughtful sentiments to your card.
Attach the Front Sentiment
For the front of the card, I chose the “Just a Little Note” sentiment, styled like a postage stamp with the phrase “Just a little note to say hi.”
- Print this sentiment 3 cm high and 1.8 cm wide on sturdy white paper.
- After printing, use Distress Ink in Antique Linen to add a vintage touch to the edges. Adhere the sentiment to the front of the card.
Add the Inside Sentiment
Inside, I added the ‘HI!’ sentiment from the Winnie Sentiment sets for a personal touch.. I love mixing different sets like this to create unique combinations.
- Print this sentiment and trim it into a neat rectangle.
- Use the same Antique Linen Distress Ink to lightly ink the edges, then place it in the centre of the card’s interior.

Combining different sentiment sets from Polkadoodles allowed me to create a unique message that perfectly fits the card’s fun, light-hearted style. These added sentiments bring a warm, personal touch to your design, making your envelope flap card even more special!
Step 5: Final Touches and Assembly
To finish your card design, add some final touches that fit the postal theme.
Create Decorative Elements
Create decorative elements with postal-themed dies to enhance the texture and look of your card.
- Cut two envelopes from the same patterned paper used on the back of the flap and another from the patterned paper on the front.
- Fold each piece to create three small envelopes.
For a fun detail, add a pink adhesive pearl to the mint-green envelopes and a mint-green pearl to the pink envelope.
Assemble the Card
Now that all the elements are ready, it’s time to assemble everything.
- Start by attaching the coloured image of the hippo using foam tape. Place the foam tape only on the left side of the image to avoid interfering with the flap closure. Position the image so the flap tucks neatly behind the hippo, creating a balanced look.
- Then, adhere the two mint-coloured envelopes so they peek out from under the flap when it’s closed. Next, glue the postage stamp sentiment, “Just a little note to say HI!” in the top left corner.
- Finally, place the pink envelope in the bottom left corner.
Get creative with your embellishments! Add touches that reflect your style to make the card truly unique.

Your card is complete with all the little details that make it extra special!
Let’s Get Creative Together
I hope you’ve enjoyed crafting your envelope flap card with Polkadoodles products. We’ve walked through each step, from bringing your digital stamp to life and creating the fun fold card base to adding playful details and finishing with charming sentiments.
This card project not only highlights the beauty of Polkadoodles products but also shows how a few creative elements can transform a simple design into something special.
Now it’s your turn to get creative! I encourage you to try making your envelope flap card. Let your imagination run wild and use the products and techniques we’ve explored today to create a card that’s uniquely yours. There’s something incredibly satisfying about crafting something with your own hands and seeing it come to life.
Join the Challenge
Ready to showcase your creativity? Join the Polkadoodles challenge! It’s a fantastic opportunity to showcase your handmade cards and connect with fellow crafters. Whether you’re using Polkadoodles products or your own favourite supplies, all creations are welcome. Click the button below to participate in the challenge and share your wonderful designs with the crafting community.
More Card Making Inspiration
Looking for more inspiration? Explore these related blog posts for additional tips and tutorials.
Polkadoodles products in the spotlight
Affiliate Disclosure: This post contains affiliate links, which means I may earn a small commission at no extra cost if you purchase through these links. I only recommend products and services that I use and trust. Your support helps me continue to provide free tutorials and creative inspiration. Thank you for supporting my blog and helping me to keep sharing my passion for card making!
Mail letter post cute Helga HippoPufs

Pretty Papers 1 – Helga Hippo

Paper Heaven 1 – Horace and Boo

Winnie and Daisy Sentiment set

Just a little not to say Hi digital stamp

Gnome BBQ Men digital paper set

I would like to enter my card in the following challenges
- A Place To Start: Anything goes
- The Paper Shelter: Punches and or dies (I used digital stamps and dies)
- Simon Says Stamp Blog Wednesday: Four Legged friends
- Crafty Catz: Anything goes
- Lil Patch of Crafty Friends Challenge ...: Anything goes
- Sir Stampalot challenge: Anything goes + animal magic
- Daisy Chain Challenges: More then one fold
- Pearly Sparkles Challenge Blog: Pink, pearls and or sparkle
- Critter Crazy CHALLENGE BLOG: Anything goes + featuring animal
- Crafty Animals: Anything goes + must use an animal
I cannot tell you how much I love this card style! Thanks for the great step-by-step! I am going to give this a try today! My mojo is gone and I think this little project may just reignite it!
Thanks for sharing your wonderful project and tutorial with us at A Place to Start
Ah thank you so much for your lovely comment. I hope it will help you get your mojo back. I love to see your project and to hear or it worked out.
So sweet!Thanks for joining us at A Place To Start!
Thank you
This is wonderful Renske! I love the little postage stamp and adorable mini envelopes. You’ve chosen such beautiful colours too. Thanks for sharing this with us at The Paper Shelter!
Linda
Thanks a lot of your lovely comment
Beautiful card. Thank you for joining at Stamping Sensations.
Thanks
A sweet and pretty card, cute image, lovely design and papers. Thank you for joining in at Stamping Sensations.
Chris
x
Thanks a lot