
Have you ever wondered how to turn a simple digital stamp into a stunning handmade floral card that will impress everyone? Welcome to my friendly corner of the crafting world, where your creativity knows no bounds! Today, we are creating a handmade floral card, and I am thrilled to guide you through this delightful journey.
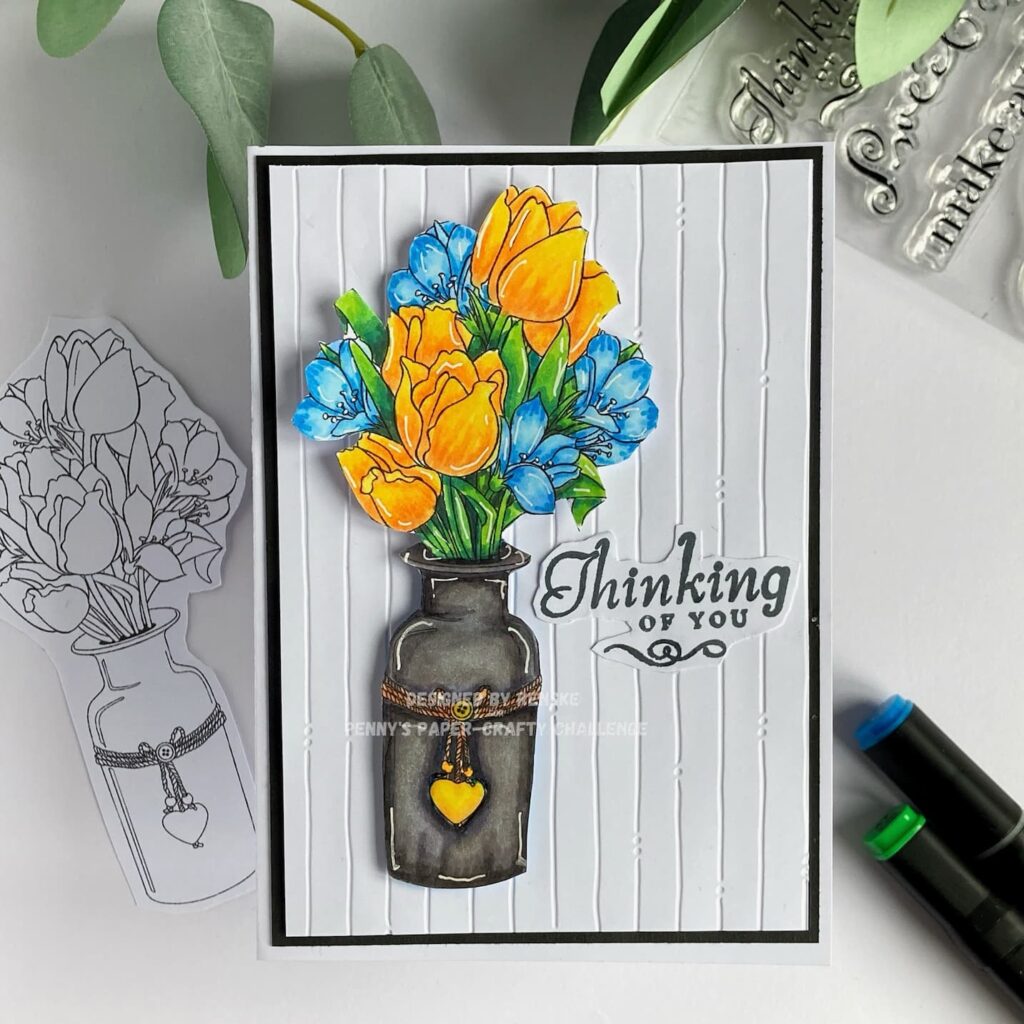
I made this card for the new challenge on Penny’s Paper-Crafty Challenge blog that started today. For this challenge, we have sponsors to highlight. The sponsors are All Dressed Up Stamps and Jan’s Digi Stamps. In this ultimate tutorial, we will transform the beautiful digital stamp “Spring Flowers” from Jan’s Digi Stamps into a vibrant and elegant card perfect for any occasion.
With step-by-step instructions, expert tips, and a sprinkle of inspiration, you will discover the joy of crafting a card that is uniquely yours. So, gather your supplies, and let us embark on this creative adventure together. By the end of this tutorial, you will have a masterpiece that showcases your talent and brings a smile to anyone who receives it.
Are you excited to get started? Don’t forget to sign up for updates below and join Penny’s Challenge to share your creations!
- Materials Needed
- Crafting Your handmade floral card with this Step-by-Step Guide
- Let’s Get Creative Together
- Products used for this handmade floral card.
- I would like to enter my card in the following challenges:
Materials Needed
Before we begin with the step-by-step process, let’s gather all the materials you’ll need for this project. Having everything ready will make your crafting experience smooth and enjoyable. Here’s a list of the essentials for creating your beautiful handmade floral card:
- Digital Stamp: Spring Flowers from Jan’s Digi Stamps (or any floral digital stamp of your choice).
- Colouring tools: Alcohol marker or any colouring medium you prefer.
- White gel pen: For adding highlights and extra details to your coloured image. You can also use a fine-tipped white marker or paint pen.
- Background Tools: Embossing folder, textured cardstock, or embossed paper. I used for this particular card an embossing folder.
- Die-Cutting Machine (optional): Essential for using the embossing folder and adding intricate details to your card
- White cardstock: For the card base and the embossed background. You can use any colour that suits your design preference.
- Black cardstock: For the contrasting border. You can use any colour that suits your design preference.
- Paper Trimmer: To cut your cardstock to the precise measurements needed for the card layers. You can use also a ruler and a craft knife.
- Sticky Glue: A reliable adhesive for assembling your card. You can also use double-sided tape or any adhesive you like.
- Foam Tape: To give your card elements some dimension and make them pop. Alternatively, you can use foam squares or adhesive dots. You can also use scrap paper behind the element you want to pop.
With these materials in hand, you’re all set to start creating your handmade floral card. Let’s move on to the step-by-step tutorial and bring your vision to life!
Crafting Your handmade floral card with this Step-by-Step Guide
Creating a beautiful handmade floral card is a rewarding and enjoyable process. With my step-by-step guide, you’ll learn how to transform a simple digital stamp into a stunning piece of art. This tutorial will walk you through each step, from colouring to assembling the final card, ensuring a fun and creative experience. Let’s get started and watch your floral masterpiece come to life!
Step 1 Preparing and colouring the Digital Stamp
To begin creating your handmade floral card, the first step is to prepare and colour your digital stamp. This process will set the foundation for your card’s design and bring your floral arrangement to life.
1. Printing the digital stamp
Start by printing the “Spring Flowers” digital stamp from Jan’s Digi Stamps on DCP paper. This paper is ideal for alcohol markers because it prevents ink bleeding and ensures smooth, vibrant colouring.
2. Colouring technique using alcohol markers
Use the following colour combinations for each element of the stamp:
- Leaves: Apple Green (160), Weeds Green (162), Grass Green (47), Forest Green (50), and Dark Forest Green (168).
- Blue Flowers: Mint Blue (143), Baby Boy (144), Sky Blue (76), and Indian Blue (64).
- Yellow Flowers: Pastel Lemon (39), Lemon Yellow (35), Yellow (34), and Dark Yellow (31)
- Vase: Warm Grey 8, Warm Grey 7, Warm Grey 5, and Warm Grey 2
- Yellow Heart: Pastel Lemon (39), Lemon Yellow (35), Yellow (34)
- Rope: Sand (107), Rose Beige (97)
Focus on creating smooth gradients and blending the shades to achieve a realistic look. Layer the colours and build up depth and dimension.
3. Highlighting with a white gel pen
After colouring, use a white gel pen to add highlights to the flowers, leaves, and vase. Pay attention to where the light would naturally hit these elements to enhance the details and give the image a polished look.
4. Adding Paper Glaze for Extra Shine
Apply paper glaze to the heart medallion for an extra touch of shine and a glossy finish. Allow the glaze to dry completely before moving on to the next step
5. Cutting Out the Image
Once everything is dry, carefully cut out the vase with a sharp scissor. This will make it easier to position and adhere to your card later.
By following these steps, you’ll have a beautifully coloured digital stamp ready to be the focal point of your handmade floral card. Next, we’ll move on to creating the textured background.

Step 2. Creating the Background
To create an elegant and textured background for your handmade floral card, follow these steps:
- Cut a piece of white cardstock to the dimensions of 9.5 cm by 13.8 cm.
- Choose an embossing folder with a subtle pattern, such as vertical stripes with small circles interspersed along the lines.
- Place the white cardstock inside the embossing folder and run it through a die-cutting and embossing machine according to the manufacturer’s instructions.
- Carefully remove the embossed cardstock from the folder.
By following these steps, you’ll have a beautifully embossed background that sets the stage for your floral vase. Next, we’ll add the sentiment and assemble the card.
Step 3: Adding the Sentiment
The sentiment is a crucial part of your card as it conveys your message and adds a personal touch. In this step, we will be creating and adding the “Thinking of You” sentiment to the card.
Stamping the “Thinking of You” Sentiment
Begin by choosing a clear stamp with the “Thinking of You” sentiment. This phrase is versatile and works well for various occasions.
- Stamp the Sentiment: Use black ink to stamp the “Thinking of You” sentiment onto a piece of white paper. Ensure that you press firmly and evenly to get a clear impression.
- Cut Out the Sentiment: Carefully cut around the stamped sentiment, following its contours. This will give a neat and polished look, making it stand out on the card.
By following these steps, you will have a beautifully stamped and cut-out sentiment ready to be added to your card. Next, we will assemble all the elements to complete your handmade floral card.
Step 4: Assembling the Card
Now that we have all the elements ready, it’s time to assemble the card. This step will bring your beautiful handmade floral card to life, giving it a professional and polished look.
1. Attaching the Embossed Background to Black Cardstock
- Prepare the Base Card: tart with a card base measuring 10.5 centimetres by 14.8 centimetres. You can use a ready-made card base or create your own by scoring a piece of white cardstock measuring 21 centimetres by 14.8 centimetres at the 10.5-centimetre mark and folding it in half.
- Cut the Black Cardstock: Cut a piece of black cardstock to 10 centimetres by 14.3 centimetres. This will create a sleek and elegant border around your embossed background.
- Attach the Background: Place the embossed white paper (9.5 centimetres by 13.8 centimetres) onto the black cardstock, ensuring it is centred and aligned perfectly. Secure it with sticky glue or double-sided tape for a firm hold.
2. Placing the Colored Floral Image on the Background
- Add Foam Tape to the Floral Image: Take your beautifully coloured floral image and apply foam tape to the back. This will give it a raised effect, adding dimension to your card.
- Position the Floral Image: Carefully place the floral image slightly to the left on the embossed background. Ensure it is straight and press down gently to secure it.
3. Adding the Sentiment to the Card
- Attach the Sentiment: Position the “Thinking of you” sentiment to the right of the floral image, ensuring it balances well with the overall design. Use sticky glue or foam tape to adhere to it, depending on the desired height and dimension.
If you follow these steps this will help you create a beautifully assembled handmade floral card, ready to impress and delight.
Your card is now ready to make a recipient happy.

Let’s Get Creative Together
We’ve covered the entire process of creating a beautiful handmade floral card, from preparing your digital stamp to assembling the final product. Now it’s your turn to test your crafting skills and bring your unique creations to life. Embrace the joy of handmade card making and let your creativity shine!
Join the Penny’s Paper-Crafty Challenge
Are you ready to showcase your handmade greeting card? Join Penny’s Challenge and share your beautiful creations with a community of passionate crafters. The theme, as always, is “Anything goes using Paper.” It’s a fantastic opportunity to get inspired, receive feedback, and maybe even win exciting prizes!
More Handmade Cards Inspiration
Looking for more ideas and techniques to perfect your handmade floral cards? Check out these related blog posts to find even more inspiration and guidance:
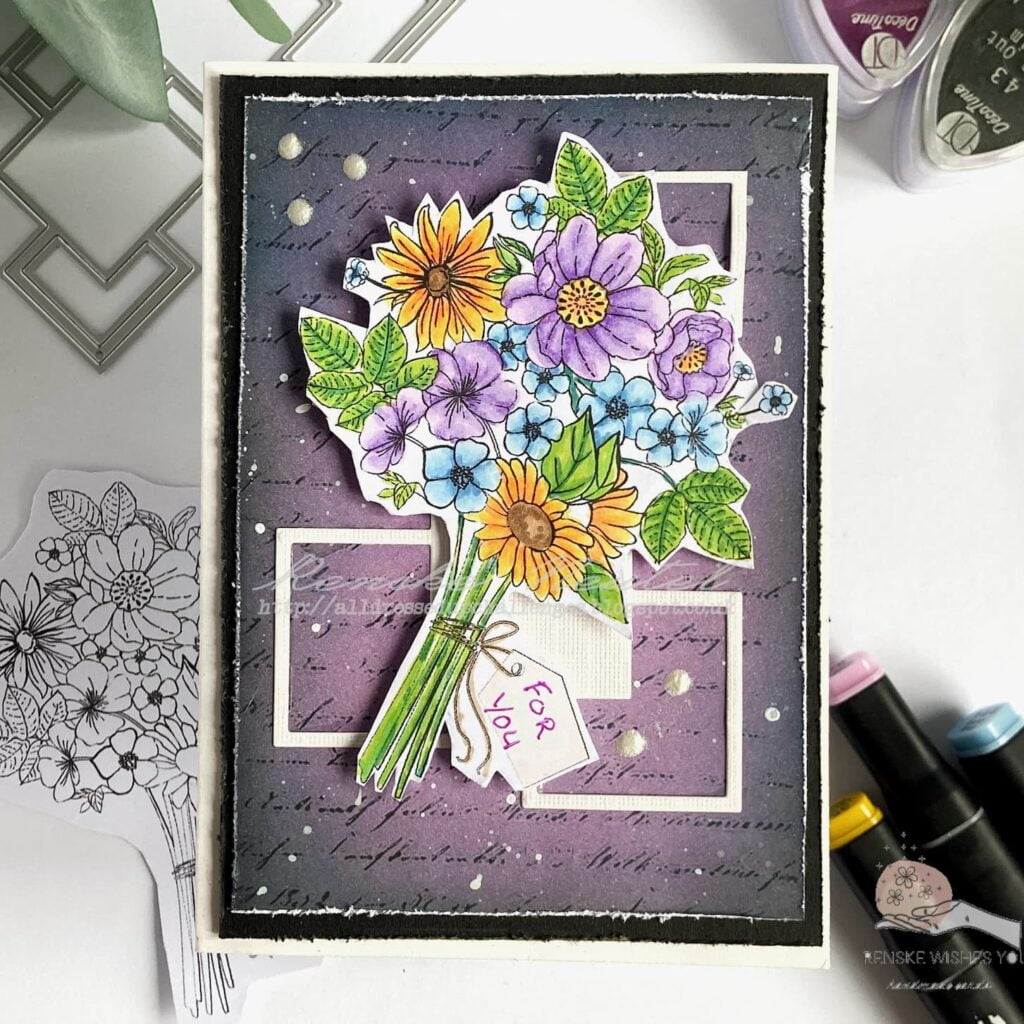
Handmade Flower card with a gorgeous freebie from Papercraft Magazine
This card will give you even more inspiration if you use a picture of flowers in a vase. I also made an embossed background here, but this time with a stencil.

Crafting Love: Creating a cute handmade Valentine’s Day card with Adorable Fairy Mice
This card gives you some extra inspiration on how to make another card with the same embossing folder.
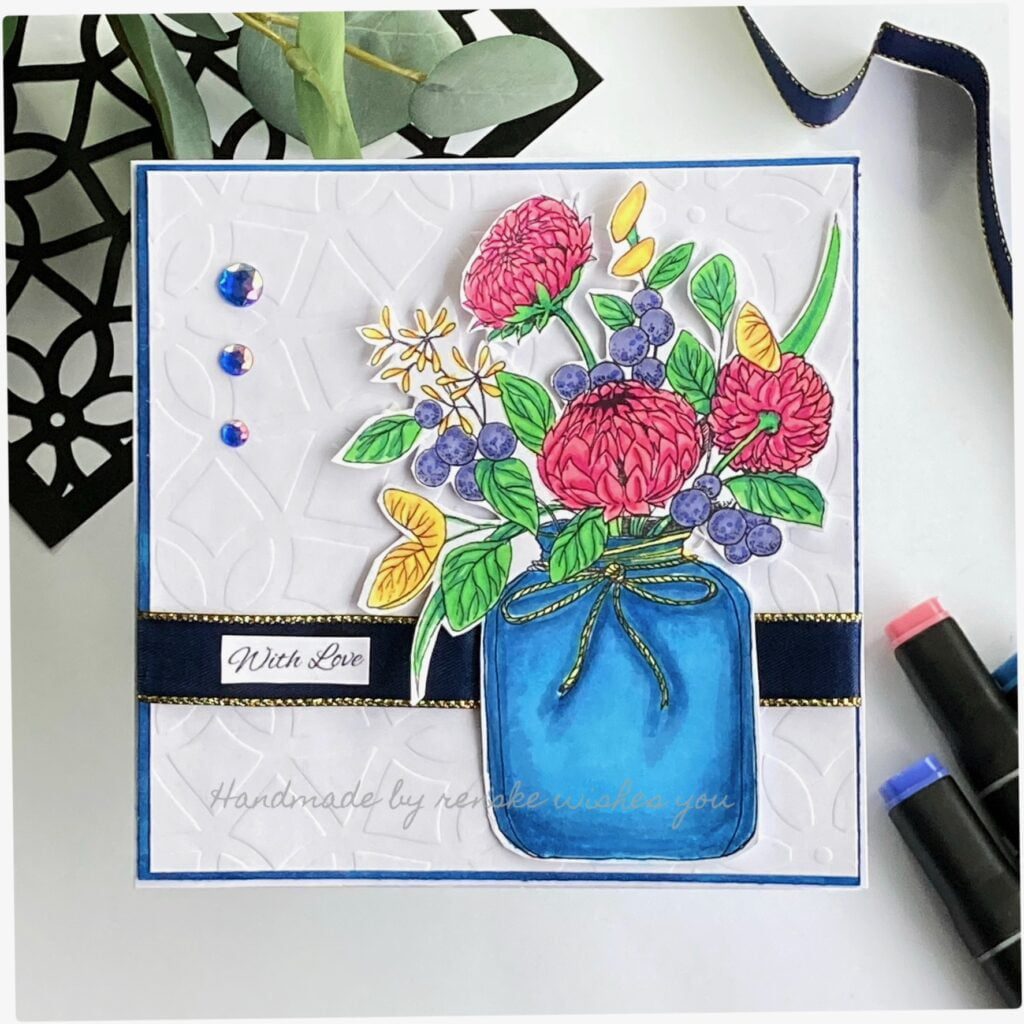
Create a Stunning Flower Bouquet Card with All Dressed Up Stamps
Another floral card, but this time with an intense background, made of patterned paper and ink.
By exploring these resources, you’ll continue to expand your skills and find new ways to express your creativity through handmade cards. Happy crafting!
Products used for this handmade floral card.
Affiliate Disclosure: This post contains affiliate links, which means I may earn a small commission at no extra cost if you purchase through these links. I only recommend products and services that I use and trust. Your support helps me continue to provide free tutorials and creative inspiration. Thank you for supporting my blog and helping me to keep sharing my passion for card making!
Products used with affiliate links
Spring Flowers and Coffee Digital Stamp Set

White Gelly Roll 08 Pen

Products without affiliate links
- Twin Markers (alcohol markers) from Decotimecrafts
- Embossing folder (brand unknown).
- White card stock
- Black card stock
- Sticky Glue from ActionNL
- Foam tape (brand unknown.
I would like to enter my card in the following challenges:
- Unicorn Challenge Blog: Not Square
- Krafty Chicks Challenge: All occasions
- My Time To Craft!: Summer Florals
- Allsorts challenge blog: Way to Grow or anything goes
- A Perfect Time To Craft Open Challenge: Anything goes
- Carlin’s Kaartenparadijs: Anything goes
- SheepSki Designs Challenges: Anything goes
A lovely vase of beautiful flowers. Thank you for joining in the Allsorts Challenge again this week.
Liz xx
Thank you
A gorgeous card. I love the texture on that white background that you’ve created with the embossing folder and the contrast that it has with those colourful flowers. The colouring is fantastic. Thanks for joining us at My Time To Craft. Hugs, María.
Thank you so much for your lovely comment
A colourful summery vase of flowers, many thanks for sharing at this weeks Allsorts challenge.
B x
Thank you