
How to color this digital stamp.
Hello everyone!
Another new challenge started on the Penny’s Paper-Crafty challenge blog.
Our sponsors are:
and:

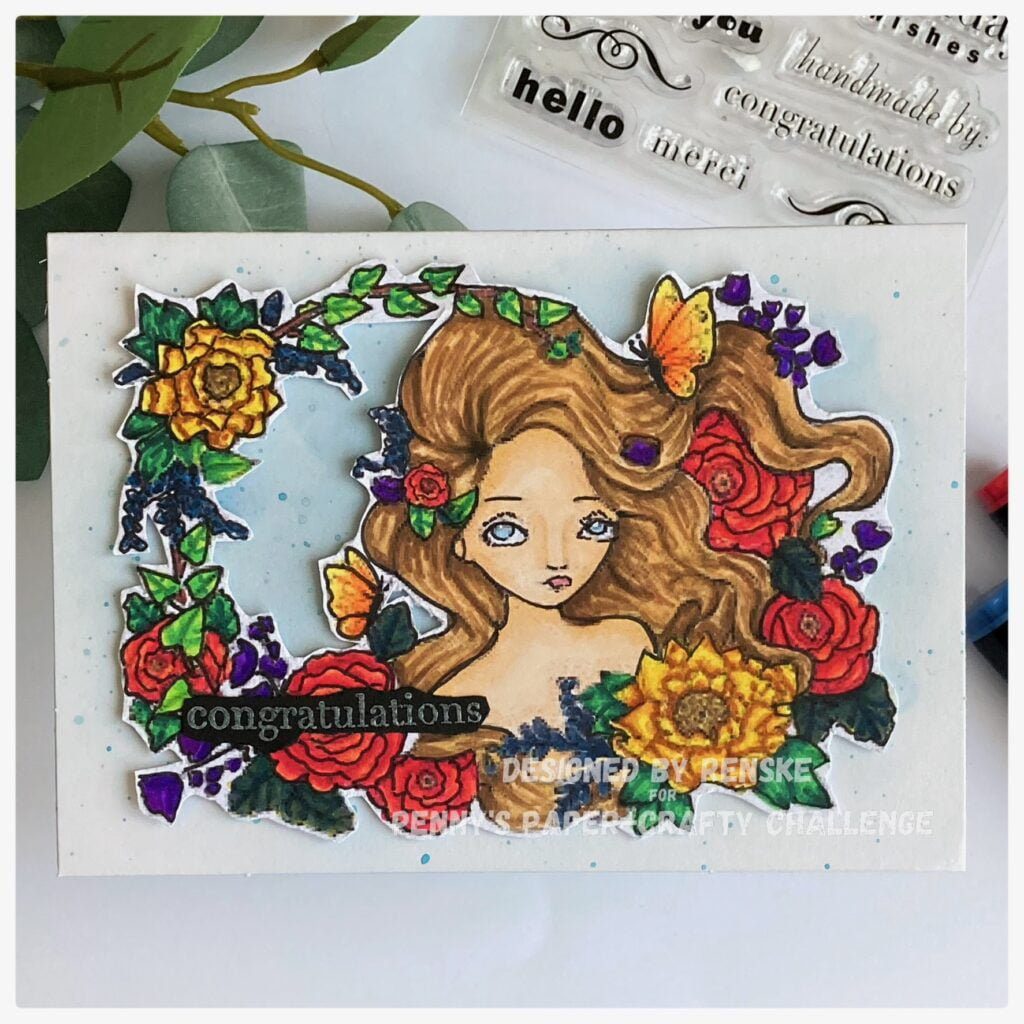
I got to work with a digital stamp Twilight Garden. I used the digital stamp as a card-filling stamp, so for this card, I did a lot of coloring. I used my Twin markers for that.
Let’s get into it.
Measurements and products you need.
- The base of the card is measuring 10,5 centimeters by 15 centimeters.
- Digital stamp. I made the size of this digital stamp around 10 centimeters by 14 centimeters.
- DCP paper to print the image on.
- Blue ink for the background.
- Metallic paint
- Alcohol markers.
- Foam tape.
- Glue.
- Black cardstock.
- White ink.
- Clear stamp sentiment.
- Clear embossing.
- Heat gun.
* When possible I will link the products below.
Coloring the digital stamp Twilight Garden
I print my digital stamp on DCP paper and colored it with my alcohol markers.
- Skin: Barely Beige (29), Salmon Pink (25) and Peachy Blush (257).
- Hair: Caramel (253), Brown Grey (104), Clay (116) and Chocolate (118).
- Yellow Flowers: Canarian Yellow (45), Primary Yellow (221), Sand (107) and Red Barn (245).
- Roses: Rose Red (03), Cherry Pink (05), Warm Coral (208) and Bright Apricot (214).
- Purple flowers: Violet Dark (274), Violet (281) and Deep Violet (81).
- Blue Leaves: Light Denim Blue (193), Dark Sky (191) and Dark Denim Blue (195).
- Light green leaves: Yellow Green (48), Grass Green (47) and Forest Green (50).
- Dark Green leaves: Grass Green (47), Forest Green (50) and Dark Green (51).
- Butterflies: Primary Yellow (221), Deep Yellow (32), Amber (266) and Tiger lily (221).

After finishing coloring I fussy cut the image.
Creating the Background.
I want the image to be in the center of the card. I decided to keep the rest of the card simple. On my base card, I applied blue ink and splattered some metallic paint on top.
Sentiment.
I heat embossed my sentiment on black card stock. First, I stamped the word congratulations with white ink on my black card stock. I added my clear embossing powder on top of that and heat set that. I cut around the word and stick this on top of my image.
Now it’s time to put the image on my base card. I want to get some of dimension, so I decide to put foam tape behind the image and stick that on top of my base card.
The card is finished. I hope you like it.

Check out the Penny’s Paper-Crafty challenge blog to see what the other Design Team Members have made. I hope you participate too and see your creations there.
Happy crafting!
More card-making ideas
Products used
Affiliate Disclosure: Please note that some of the links provided in this blog post are affiliate links. This means that, at no additional cost to you, I may earn a small commission if you make a purchase through these links. I only recommend products that I personally use and trust. Your support helps me continue to provide free content and inspiration. Thank you for your support!
For your convenience, here are the products used in crafting our Fly High Birthday Card
Products with affiliate links

Twightlight Garden Digital Stamps Ching-Chou Kuiks

Memento Dew Drop Nautical Blue
Versacraft White ink
Products used without affiliate links
- Twinmarkers (Alcohol markers) Decotimecrafts.
- Clear Stamp from from Inkadinkado.
- Clear embossing powder from Zing.
I would like to enter my card in following challenges:
- Crafty Gals Corner: Flowers for Mom
- Here is a place to start: Anything goes
- Lil Patch of Crafty Friends Challenge: Anything goes
- Krafty Chicks Challenge: Stamp act.
- A Perfect Time To Craft: Anything goes
- Classic Design Challenge Blog: Anything goes
- Crafts Galore Encore Challenge: Anything goes
- Daisy Chain Challenge: No design paper
- Crafting Happines Challenge: Anything goes
Beautiful image and lovely coloring, thank you for the tutorial. Thank you for joining us at the Crafts Galore Encore #112 Challenge.
Thank you
You have given this image a fabulous presentation! Thanks for hanging out at A Place to Start !
Hugz,
Chana Malkah, Owner
Redora Lee Designs , My Blog
A Place to Start , Challenge Blog
613 Avenue Create , Owner
Thank you ❤️
Fabulous coloring on this wonderful image.
Thank you so much
Your card is so pretty, love the colors, thanks for playing our challenge at Krafty Chicks Challenge this week. Happy Crafting.
Leanne DT Member/KCC
Thank you so much for your lovely comment
Wow a fabulous job with the colouring, a great idea to use a simple background to highlight it. Thanks for joining us at A Place To Start. Hugs, María.
Thank you 😘