Some links in this post are affiliate links. This means I may earn a small commission if you make a purchase, at no extra cost to you. I only recommend products I use and genuinely enjoy in my own cardmaking. Read more here.
Want to make a card that surprises someone when they open it? A tunnel card adds depth to your design and brings your scene to life.
In this tunnel card tutorial, I’ll guide you through each step to make a cheerful 3D ladybug card using digital stamps from Polkadoodles. This style creates a layered scene within the card, perfect for adding extra dimension.
You’ll learn how to:
- Create the base of a handmade tunnel card
- Blend Distress Inks for soft backgrounds
- Colour your digital stamps with alcohol markers
- Assemble a 3D scene using simple shapes and layers
It’s easier than it looks. I’ll share tips along the way to help you keep it simple—no fancy tools needed.
Want to try a cardmaking technique with a big impact? Here’s how to start.
What’s a Tunnel Card and Why Make One?
If you haven’t seen a tunnel card before, it’s like a miniature stage built with layers. This card style creates a 3D effect with depth and layers that make your design stand out. Unlike flat cards, tunnel cards invite you to peek inside a small world created with various layers and elements.
The first tunnel card I made was a ladybug scene. That project sparked my interest in this card shape. I enjoyed trying something new—it opened up lots of creative possibilities.
Tunnel cards work well for kids’ birthdays, spring scenes, or any playful design. They add dimension without being too complicated—a strong choice when you want your card to stand out.
Materials and Tools for Your Handmade Tunnel Card
Before you start, gather your materials and tools. It’ll make the process smoother and help you build your ladybug tunnel card with Polkadoodles digital stamps.
Polkadoodles Products
For this tunnel card, I used Polkadoodles products. These set the tone for the ladybug scene and shape the overall look. These materials form the foundation for the look and feel of the card and help bring the ladybug theme to life. Here’s what I used and how I applied them:
- Toadstool Lily Ladybug Ladybird Cute digital stamp — The main image of the card with a ladybug that ties the scene together.
Polkadoodles also offers a range of Distress Inks in their store.
- Distress Ink Pine Needles — Used to colour the grass and green accents.
- Distress Ink Mowed Lawn — Another shade of green, perfect for adding extra layers and accents in the background.
- Distress Ink Chipped Sapphire — A deep blue tone ideal for shadows and adding depth to the sky.
- Distress Ink Stormy Sky — This lighter blue ink helps create a smooth blended background for the sky.
With these Polkadoodles products, you can beautifully colour and shape both the background and the main image of your handmade tunnel card.
Other Supplies
I also used a few extras to make the process easier. Feel free to use what works best for you.
- Grass die, Flower die, Leaves die, Butterfly die — These add extra dimension and detail to your 3D scene card. If you don’t have these dies, consider using stickers, punches, or hand-cut shapes instead.
- Alcohol markers — Great for colouring the digital stamp. You can also use coloured pencils or water-based markers.
- White gel pen — Perfect for adding small details and highlights to the stamped image. A fine white acrylic paint pen is a good alternative.
- Pearl Glue 3D — Great for adding small pearls and 3D accents. You can use pearls or sequins as an alternative.
- Circle dies — Used for cutting the different tunnel layers. If you don’t have dies, you can use templates and a sharp craft knife to cut manually.
Once you’ve gathered your supplies, you’re ready to start. Don’t worry if you’re missing something—just use what you have in your stash.
Enjoy the process of bringing your ladybug scene to life. Next, I’ll guide you step by step to build your 3D card.
Design Planning – Choose a Focal Image and Scene Layout
Before you start cutting and colouring, plan your scene card first. It’s like setting up a mini stage—each layer adds depth to your design.
For this card, I selected the Polkadoodles ladybug digital stamp as the focal point. She’s bright and cheerful, making her perfect for a fun spring theme. When building your tunnel card, aim to create three main layers: the foreground, middle ground, and background.
Visualizing this will help keep your scene balanced and dynamic. You can sketch a quick plan or use shapes to map out where each element goes. It’ll make cutting and assembling easier and help your card come together smoothly.
A well-planned scene card tells a story and draws the viewer into your mini world.
Step-by-Step Tunnel Card Tutorial – Make Your Own Ladybug Scene
Let’s start the tunnel card tutorial you’ve been waiting for. I’ll guide you through each step to create your 3D ladybug scene. You’ll learn how to cut the layers, assemble the card, and add the final details.
Whether it’s your first tunnel card or not, these steps will help you build a layered scene with depth. Let’s get started and bring this cheerful ladybug project to life!
Step 1 – Cut and Score the Tunnel Card Base
Start by building the base of your tunnel card. You’ll create a 13 x 13 cm card with layered circle windows for the tunnel effect.
Materials Needed for Step 1
- 4 white square cardstock pieces, each 13 x 13 centimetres
- 3 circle dies in descending sizes
- Distress Ink Chipped Sapphire
- Distress Ink Pine Needles
- Distress Ink Mowed Lawn
- Distress Ink Stormy Sky
Cut the Circle Windows
Start by cutting out circles from the first three layers of your cardstock.
- Place the largest circle die on the first panel, the slightly smaller one on the second, and the smallest on the third.
- Mark the centre of each panel to help you align the dies.
- Secure the dies with tape to prevent slipping, then run each panel through your die-cutting machine one by one.
Now you have three panels with circular windows and one solid back panel.
Add Ink Blending
Blend colour onto the panels to bring your scene to life. Blend Pine Needles and Mowed Lawn along the bottom for a grassy base with soft shadows.
Above the grass, blend Chipped Sapphire into Stormy Sky for the sky.
Only blend the areas that will stay visible once the card is layered. Add ink to the centre of the back panel—this area will show through the smallest window.
Assemble the Layers
Stack the panels with foam tape to build the dimensional tunnel effect. Add a bit of glue on the foam tape—this lets you adjust the layers slightly for better alignment. This allows for slight movement, enabling you to position the layers perfectly straight.

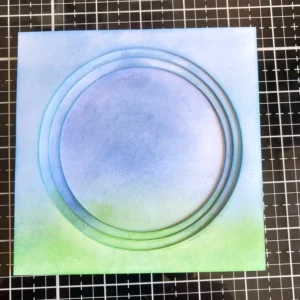
Now your base is ready for the ladybug scene.
Step 2 – Colour the Toadstool Ladybug Digital Stamp
I used the Toadstool Lily Ladybug (Ladybird) digital stamp from Polkadoodles for this step. This ladybug series features images that fit perfectly into a scene. Because I was making a tunnel card, the stamp size was an important factor.
Materials Needed for This Step
- Toadstool Lily Ladybug Ladybird Cute digital stamp
- Alcohol markers
- White gel pen
Print and Prepare Your Stamp
Print the digital stamp to fit within the smallest circle of your tunnel card. I printed mine at about 8 cm high on DCP paper, which works well with alcohol markers and stops bleeding.
Colour with Alcohol Markers
I used the following colour combinations for shading and depth:
- Skin: Tanned Skin, Peachy Blush, Salmon Pink, Pale Cream
- Hair: Lemon Yellow, Yellow Ochre, Golden Yellow, Barn Red
- Red parts on ladybug and toadstool: Wine Red, Burgundy, English Red, Cardinal
- White spots on toadstool: Cool Grey 3, Colourless Blender
- Black spots and bow: Black, Cool Grey 9, 8, 7, 5
- Leaves: Yellow Green, Grass Green, Forest Green
- Flower: Barn Red, Yellow Ochre, Golden Yellow, Lemon Yellow
Add highlights with a white gel pen. Use white dots on the dress to separate red areas and add detail.

With your stamped image ready, move on to building the card base.
Step 3 – Make the Grass, Leaves, Flowers and Butterfly
In this step, make the extra elements that bring your tunnel card to life. These small details transform your coloured image into a complete scene and add depth to the design. Use various dies, inks and markers to shape and colour each piece.
Materials Needed for This Step
- Grass die
- Leaf dies (2 styles)
- Flower dies
- Butterfly die (body and wings)
- Alcohol markers
- Distress Ink: Pine Needles and Mowed Lawn
- Blending brushes
- Pearl glue
- White cardstock
Making the Grass
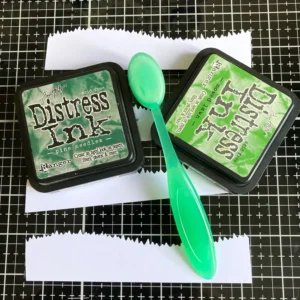
Die-cut several grass strips from white cardstock using a curved-edge grass die.
Cut:
- One full strip, 13 cm wide, for the card front
- One extra strip, cut in half, to tuck behind the third tunnel ring
Blend Distress Ink over each strip to add texture and contrast. Use Mowed Lawn in the centre and Pine Needles on the edges. This two-tone effect makes the grass look livelier and fits naturally into your scene card.
Inking the Leaves
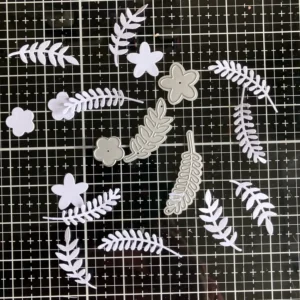
Cut two different leaf shapes from white cardstock using leaf dies. Press each leaf face down onto the ink pad and apply gentle pressure with your fingers to create a textured base. This gives a speckled texture that mimics natural shading.
Blend Mowed Lawn over each leaf with a large blending brush. Apply Pine Needles in the centre with a smaller brush for contrast. These details make the leaves stand out without overpowering the main scene.
Crafting the Flowers
Add three flowers to brighten the front layer — two large and one small. Die-cut them from white cardstock, then add a gold dot in the centre of each with pearl glue. Let dry completely.
Shade petals with Cool Grey 4, Cool Grey 3 and a Colourless Blender for soft contrast.
Assembling the Butterfly
Die-cut the butterfly body and wings from white cardstock using a butterfly die set. Colour with alcohol markers in these combinations:
- Body: Cool Grey 5, Cool Grey 7, Black
- Wings: Pastel Lemon, Golden Yellow, Yellow Ochre, Barn Red
Glue the wings to the body to finish the butterfly. This adds the right touch of movement to the scene card.
With all elements ready, assemble your tunnel card to bring the design together.
Step 4 – Assembling the Tunnel Card Scene
Bring your tunnel card scene to life. With all layers inked, the image coloured and elements prepared, the final assembly brings everything together. This is the most satisfying part of the tunnel card tutorial.
Build the background first
Attach the grass first.
- Attach the full 13 cm grass strip to the bottom front of the card.
- Place the two smaller grass pieces on the third panel. Make sure the hills flow naturally across the layers.
Behind where the hills meet, glue your coloured Toadstool Lily Ladybug image to the back panel. Use flat adhesive here—no foam tape is needed. This adds depth without increasing bulk.
Layer the leaves
Add leaves along the curved edges of the tunnel layers.
- On the left side, cluster three sets of leaves along the curve.
- On the right side, add two sets.
Tuck a few more leaves behind the tunnel card openings for extra dimension. This frames the ladybug and enhances the 3D effect.

Add the finishing touches
- Glue the butterfly in the top right corner to draw the eye upward.
- Place two flowers in the grass and one in the top left corner to balance the design.
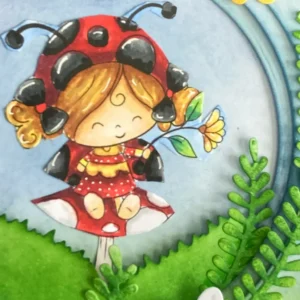
When all elements are in place, attach the finished tunnel scene to a sturdy 13 x 13 cm card base. This provides a clean edge and supports the inside dimensions.

Your card is complete—layered, dimensional and ready to send. If you followed this tutorial step by step, you’ve created your first full-scene card.
Let’s Get Creative Together
When I started building this tunnel card, I didn’t expect how much fun it would be to see all those layers come together. Each part—from ink blending to scene building—adds its own charm. The best part is you can adapt this idea to any theme or image you like.
Maybe you already have a stamp in mind or want to swap flowers and leaves for stars and clouds. That’s the beauty of a scene card—you can create your own little world inside.
Here’s my challenge to you—try making your own tunnel card using the steps in this tutorial. Use what you have, adjust it to fit your style and make it yours. If you do, I would love to see it.
Join the Polkadoodles Challenge show
This card was made as part of the Polkadoodles challenge design team. Every two weeks, a new “Anything Goes” challenge goes live.
- You don’t have to use Polkadoodles products to enter.
- There are prizes to win.
- Your card might be featured.
Want to participate? Click the button below.
More 3D scene cards
Looking for more card-making ideas? Check out one of these:
Polkadoodles products in the spotlight
Toadstool Ladybug digital stamp
Distress ink Mowed Lawn


