
Hello everyone!
It’s time for another exciting card-making journey. I’m excited to share this step-by-step theatre fold card tutorial with you.
But first, let me tell you about the fantastic challenge on Penny’s Paper-Crafty challenge blog, sponsored by none other than DR. Digi House of Stamps and Pattie’s Creations.


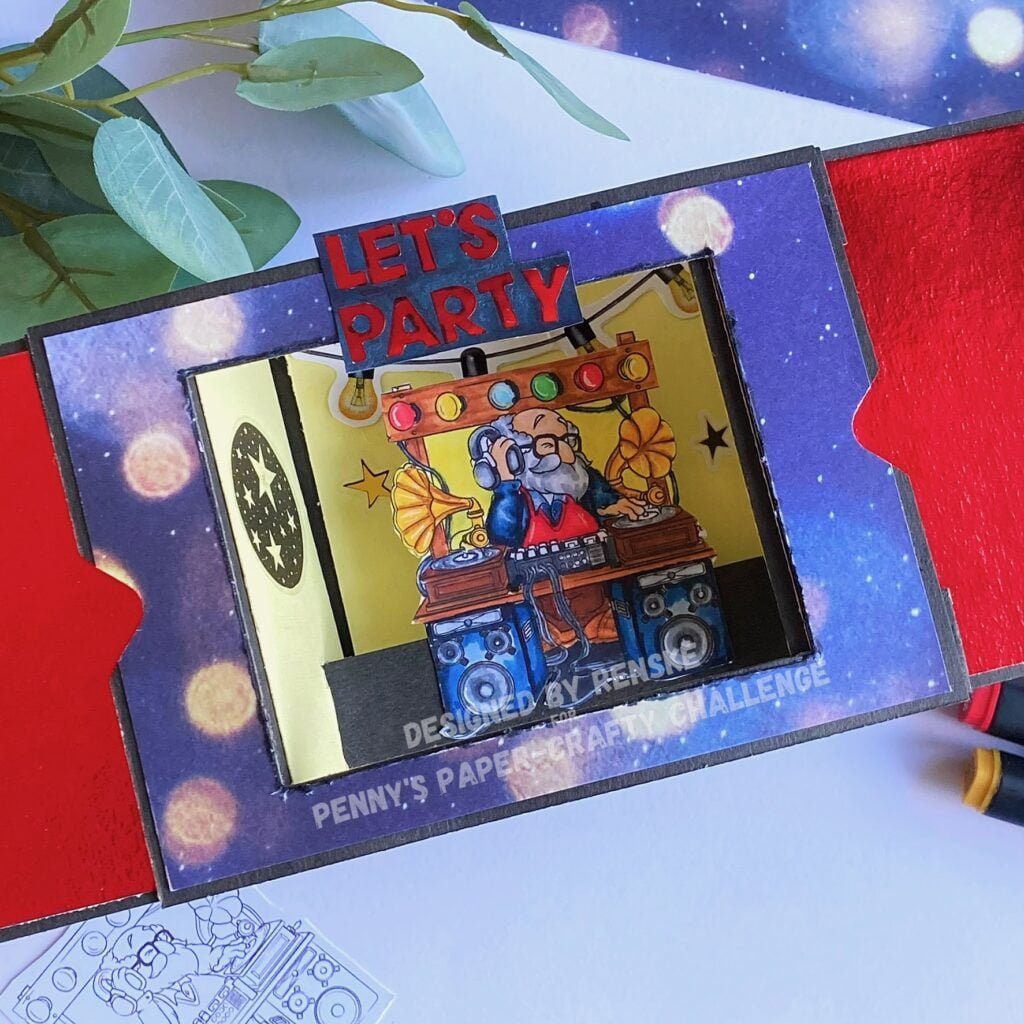
I had the privilege of working with the fun digital stamp, DJ-DAD-Rock, from Dr. Digi’s House of Stamps. This stamp is custom-made for a theatre folding card. So, let’s dive into the world of card crafting and create something truly spectacular.
Materials You’ll Need and Card Dimensions
Before we get started, let’s gather our materials:
- Two pieces of black paper measuring 14.8 cm x 10.5 cm
- Two pieces of black paper measuring 14.8 cm x 10.3 cm, scored at 2.5 cm and 7.4 cm
- Two pieces of black paper measuring 14.5 cm x 2.5 cm, scored at 2 cm on both sides
- One black strip measuring 3 cm x 11.5 cm
- One yellow paper measuring 9.2 cm x 10 cm (back panel inside).
- Two yellow paper pieces measuring 4.4 cm x 9.8 cm.
- Two pieces of red glossy paper measuring 6.8 cm x 9.8 cm.
- Digital stamp DJ-DAD-Rock from Dr. Digi’s House of Stamps.
- Stickers to decorate the card.
- One piece of designer paper measuring 10 centimetres by 14.3 centimetres.
- Glue
- Paper-trimmer
Getting Started: Coloring the Star of the Show
We start by colouring in our digital stamp, DJ-DAD-Rock. For this project, I used my trusty Twin markers (alcohol markers). Here are the colour combinations I used for different elements of the scene:
- Skin: Peachy blush (259), Salmon Pink (25), Barely Beige (29)
- Beard and Mustache: Cool Grey 5 (CG5), Cool Grey 4 (CG4), and Cool Grey 1 (CG1)
- Blouse and Speakers: Dark Indigo (188), Dark Sky (191), Midi Sky (190), and Light Sky (189)
- Sweater: Scarlet (13), Vermillion (14), and Geranium (15)
- Wooden Table: Sand (107), Rose Beige (97), and Barn Red (245)
- Turntable Wood: Natural Oak (95), Burnt Sienna (95), and Red Barn (245)
- Turntable Horn: Red Barn (245), Golden Yellow (222), Lemon Yellow (35), and Pastel Lemon (39)
- Red Lamp: Scarlet (13), Vermillion (14), and Geranium (15)
- Yellow Lamp: Lemon Yellow (35), Pastel Lemon (39), and Canary Yellow (45)
- Green Lamp: Matcha Tea (165), Weeds Green (162), and Spectrum Green (172)
- Record, Speakers, and Cables: Cool Grey 9 (CG9), Cool Grey 8 (CG8), Cool Grey 7 (CG7), Cool Grey 5 (CG5), Cool Grey 4 (CG4), and Cool Grey 1 (CG10)
Now that our DJ-DAD-Rock is coloured in, we can incorporate it into our theatre fold card.

Step-by-step Theatre fold card tutorial
Welcome to the heart of our creative journey! In this section, I will show you how to make this theatre folding card yourself in easy steps. Grab your materials and let’s get started.
Step 1: Creating the Front Panel – Framing the Stage
In this first step, we start by creating the front panel of our theatre folding map. In the panel, we also make a window, which forms the tonal stage for the surprise it contains.
- Take one of your black paper pieces measuring 14.8 centimetres by 10.5 centimetres. This will be the front panel of your card.
- To create a window in the panel, use a paper trimmer or a ruler and a craft knife. I used the paper trimmer. The sides of the panel to the window will be 2.5 centimetres and the top and bottom will be 1.5 centimetres to the window
- Place your black paper on your paper trimmer. On the right side, you also have dimensions. Put the black paper on the right side at 2.5 centimetres. But you shouldn’t start cutting until your trimmer blade is at 1.5 centimetres. Use your ruler slider on your paper trimmer for that. And set your cutter blade to 1.5 centimetres. Then start cutting to 9 centimetres, leaving 1.5 centimetres at the bottom as well. You do this on both sides.
- But now you also need to cut out the rectangle at the bottom and top. So now you place the shorter side at the top of the paper cutter. And put it on the right side at 1.5 centimetres, and bring the paper cutter to 2.5 centimetres, and you cut to 12.3 centimetres. You do the same on the other side, and if all goes well, the rectangle falls out and you have a window through your black paper.
- You should now have a rectangular window in the middle of your black panel. This window will be the frame of the theatre scene inside.
With the front panel ready, we’ve laid the foundation for our theatre fold card. Let’s move on to Step 2, where we’ll prepare the supporting strips that will guide our theatre fold mechanism.
Step 2: The Supporting Cast – “Prepping the Strips”
In this step, we prepare the supporting strips that play a crucial role in guiding the mechanism of our theatre folding map. These strips help bring the scene to life.
- Take your two black strips measuring 2,5 centimetres by 14,5 centimetres.
- Score the strips at 2 centimetres on each side.
- Fold on those score lines. The taps are now on the back of the strips.
- Take your front panel.
- We are going to attach these strips to the back of the front panel. Place them on the sides of the front panel.
- Put some glue on the taps of the strips.
- Place them on the back of the front panel en glue them down.
With these supporting strips in place, our theatre fold card is getting closer to completion. In Step 3, we’ll set the stage by adding decorative paper to our front panel.

Step 3: Setting the Stage – “Decorative Paper Placement”
In this step, we are going to decorate our front panel with decorative paper.
- Start with the prepared front panel, whose backing strips are now attached to the back.
- Cut a piece of decorative paper measuring 10 centimetres by 14.3 centimetres. This paper will go on our front panel with the window in it.
- Make a rectangular window on this decorative paper. This window should be perfectly aligned with the window on the front panel. To do this, you can use the front panel as a template and trace the window onto the decorative paper before cutting it out.
- Once you have cut out or trimmed the window, apply glue to the back of the decorative paper except for the window.
- Carefully align the window on the decorative paper with the window on the front panel. Press down firmly to glue the paper to the front panel.
- You now have a beautifully decorated front panel with a window that perfectly frames the theatre scene inside.
This decorative placement of the paper adds a touch of elegance and sets the scene for the inside of the theatre folding card. In step 4, we enhance the design by adding decorative notches to the sides of the panel.
Step 4: Curtain Call – “Creating Functional Decorative Notches”
In this step, we add a detail to our theatre folding card while ensuring functionality. We make decorative notches on the sides of the front panel. These notches serve as handles to pull the curtains aside, revealing the surprise hidden inside.
- Take your decorated front panel with the window.
- Use a decorative punch to make notches on the sides of both the left and right sides of the panel.
- Make sure the notches on both sides are symmetrical and evenly spaced.
- These decorative notches not only make the card more beautiful but also serve a practical purpose. They allow you to grab the “curtains” and pull them aside, revealing the hidden surprise inside the theatre fold card.
Once this step is completed, our card not only looks charming but also works seamlessly. In step 5, we make the doors that hide the surprise and make slots for the sliding mechanism.
Step 5: Crafting the Doors and Slots – “Welcoming the Drama”
In this step, we’ll create the doors that will hide the surprise inside our theatre fold card, craft slots to accommodate the sliding mechanism, and adorn the panels with decorative paper. These doors will set the stage for the grand reveal.
- Take the two pieces of black paper, each measuring 14.8 centimetres by 10.3 centimetres. These are the panels that will serve as doors.
- Score both panels at 2.5 centimetres and 7.4 centimetres. These lines will serve as fold lines for the doors.
- Now it is time to line this panel with paper. On the large area on the panel, line both panels with the shiny red paper. On the small part of this panel, stick the strips of yellow paper.
- Now it is time to make the slots in these panels. From the fold line, measure 1.5 centimetres to the right and make a small pencil mark. This mark is 1.5 centimetres from the fold line.
- Measure from the bottom edge 1 centimetre up and make another mark. This mark is 1 centimetre from the bottom edge.
- Now cut a slot vertically upwards of 2 centimetres.
- These slots serve as rails for the sliding mechanism so that it can move smoothly when the doors are opened and closed.
- Take your black background panel measuring 14.8 centimetres by 10,5 centimetres.
- Apply adhesive to the 2.5-centimeter section on the back of each door panel. Attach these sections to the background panel of your card, ensuring they are evenly aligned on both sides
With the doors securely attached to the back panel, our theatre fold card is coming together beautifully, with decorative paper enhancing the design. In Step 6, we’ll add the sliding mechanism and complete the card’s assembly.
Step 6: Creating the Sliding Mechanism – “Unveiling the Surprise
In this step, we make the sliding mechanism on which we attach our hidden surprise.
- Take a black strip of paper measuring 3 centimetres by 11.5 centimetres. This strip will serve as a sliding mechanism.
- Place the long side of the strip on your paper trimmer. Place the end at 1 centimetre.
- Set your cutting blade at 0.5 centimetres and make a cut upwards to remove the top half-centimetre. Repeat this process for the other end of the strip.
- Now place the short end of the strip at the top of your paper trimmer, with the end at 0.5 centimetres.
- Cut between the marks of 1 centimetre and 10.5 centimetres and also remove the top half centimetre of this end. Repeat for the other side.
- You now have a strip with a T-shape at one end and both ends trimmed to 0.5 centimetres wide.
- Bend the ends of the strip inwards so that the strip fits through the slot.
- Slide the strip through the slots we made earlier in the doors, making sure to fold the tabs back out. Now the mechanism is in place.
- Now you can attach the digital stamp in the middle of the mechanism.
- Now we can slide the doors we made through the sliders on the back of the front panel. The parts with the shiny red paper slide out through those guides.
The sliding mechanism adds an element of excitement to our theatre fold card, allowing you to unveil the concealed scene within. In Step 7, we’ll bring our card to life with colourful and creative embellishments, making it ready for a spectacular showstopper!

Step 7: Bringing Your Card to Life with Embellishments – “The Showstopper’s Finale”.
In this step, we’ll add the final touches and embellishments to our theatre fold card, making it a showstopper that’s ready for the spotlight.
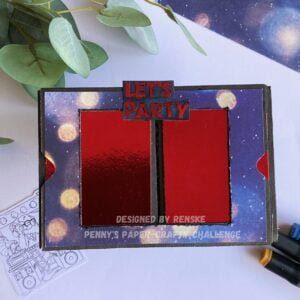
- On the top of the front panel, near the window, add the sentiment “Let’s Party.” You can create the sentiment by using letter stickers on white paper, and if desired, colour the surrounding white paper with a coordinating marker for a seamless look.
- Behind the DJ-Dad-Rock character, add a strip adorned with lightbulbs and golden stars. This strip will enhance the card’s festive atmosphere.
- On the yellow paper on the sides of the box, apply a round, black embellishment containing stars.
- On the right side panel, place scattered golden stars for an extra touch of glamour.
- If you’d like to add a bit of sparkle, consider using glitter to accentuate the lamps, speakers, and the horn of the record player.
With these creative embellishments, our theatre fold card becomes a true showstopper, ready to delight the lucky recipient.

Conclusion – “The Spectacular Finale”
In this final part, we conclude our theatre folding card tutorial.
As you present this card to the lucky recipient, imagine the joy and amazement they will experience as they slide open the doors to reveal the hidden scene within. It’s a card that is sure to steal the show and leave a lasting impression.
But our creative journey doesn’t end here. I’d like to invite you to participate in the latest challenge on Penny’s Paper-Crafty Challenge Blog, sponsored by DR. Digi House of Stamps.
To enter the challenge, visit the Penny’s Paper Crafty Challenge blog, and follow the submission guidelines. It’s a fantastic opportunity to showcase your card-making skills, receive feedback and connect with fellow crafters.
I hope you enjoyed this adventure and found the inspiration to make a card like this too.
Be sure to let me know if you are also planning to make such a nice theatre fold card.
Affiliate products used
Affiliate Disclosure: This post contains affiliate links, which means I may earn a commission if you click through and make a purchase. There’s no extra cost to you, and the earnings help support this website. Rest assured, I only recommend products or services I personally use and believe will add value to our readers. Thank you for your support!
DJ-ROCK-DAD digital stamp from Doctor Digi House of Stamps

White gelly roll pen

Products without affiliate links
- Design paper block Time for a Fabulous Christmas together from Craftsensations.
- Black card stock brand unknown.
- Yellow card stock brand unknown.
- Shiny red paper brand unknown.
- Letter stickers from Aveccreative.
- Stickers from Decotimecrafts.
- Twin markers (alcohol markers) from Decotimecrafts.
I would like to enter my card in the following challenges:
- 4-Season Swap Challenge Blog: Muziek
- A Perfect Time To Craft Open Challenge: Anything goes
- Classic Design Challenge Blog: Anything goes
- The Creative Crafters: Anything goes
- Crafting Happiness Challenges: Anything goes
Wat een fantastische kaart!
Het lijkt wel een klein theater, ontzettend leuk!
Dank je wel. Zo leuk om te maken deze kaart. En hij past ook nog in een envelop.