
Hello everyone!
It is very hot here in the Netherlands. So, I am in a summery mood. And of course, a summery card suits that. I had this die-cutting set in my stash for a while. It is time to create a summer die-cutting scene card with it.
Let’s get into it.
Card recipe for the Summer die-cutting scene card:
- white card stock to make your background and to die-cut from.
- white card stock to die-cut the pieces on the card.
- Color medium. I used alcohol markers, but you can use anything you want, also colored card stock.
- Clear stamp for the sentiment.
- White card stock to make the base of the card. This is a slimline card so you will need a piece of card stock measuring 21 centimeters by 21 centimeters. Score at 10,5 centimeters.
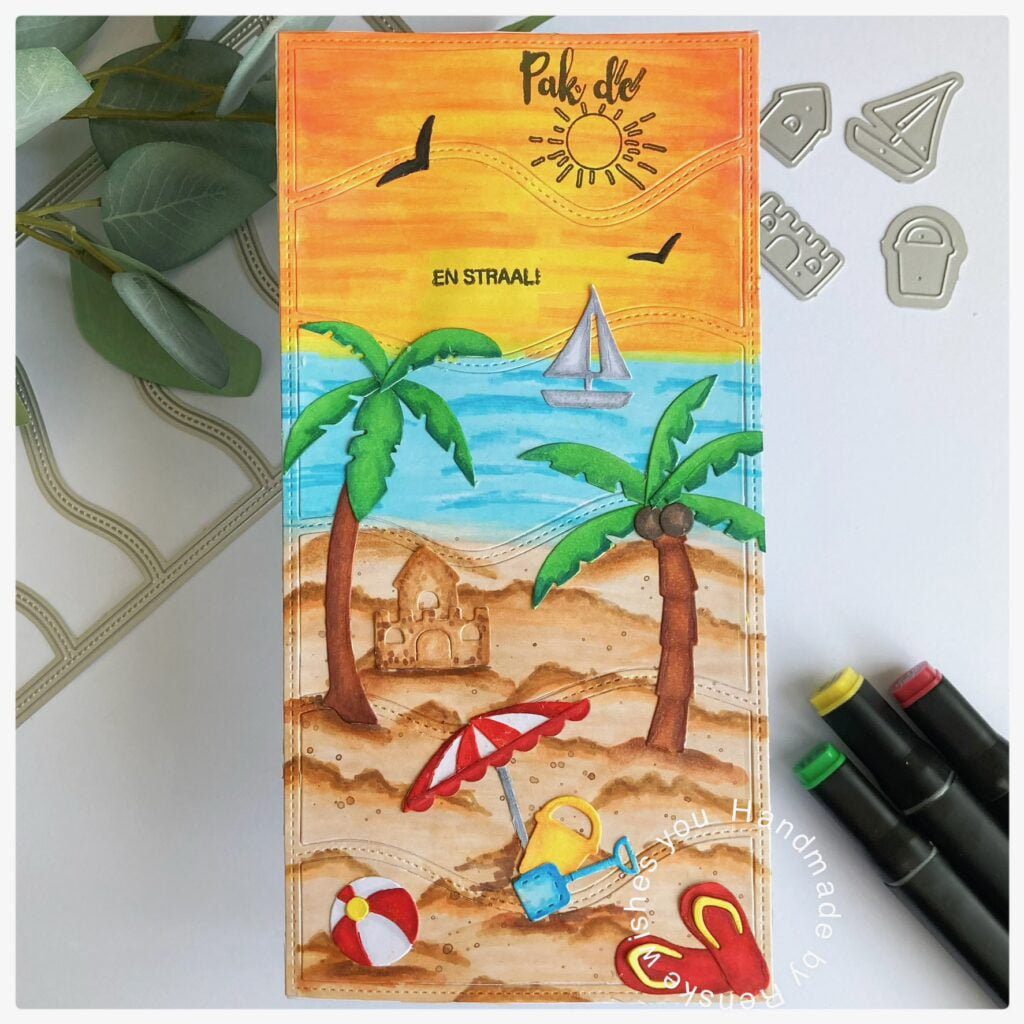
Background for the summary slimline card
For this card, I wanted to create a beach scene. So I decided to color the background with my alcohol markers. At the bottom of the card I want to have the beach, in the middle the see and on top the beautiful sunset sky. I color this first, before I die-cut the scene with the dies.
I used the following colors from my Twinmarkers:
- Beach and sand castle: Clay (116), Warm Caramel (256), Sand (107) and Caramel (253).
- Water: Frost Blue, Cerulean Blue L. and Cerulean Blue.
- Air: Bright Apricot (214), Orange (23), Canarian Yellow (45) and Pastel Lemon (39).

I die-cut the background with a slimline die.
Coloring the little dies.
I decided to color the small die-cuts also with my alcohol markers. But you can use any medium you like. You can also die-cut them out of colored card stock or color them with your inks. I decided to color them with my alcohol markers so, I die-cut them out of white paper. After that I color them with my twinmarkers.

This are the color combinations I used:
- Palm tree trunk: Natural Oak (91), Burnt Sienna (95) and Rose Beige (97).
- Leaves: Weeds Green (162), Grass Green (47) and Forest Green (50).
- Ball, flip-flops and parasol: Cardinal (244), English Red (249) and Burgundy (247).
- Bucket: Canarian Yellow (45), Deep Yellow (32) and Dark Yellow (31).
- Scoop: Frost Blue, Cerulean Blue l and Cerulean Blue
- Sailboat: Cool Grey 5 (CG5), Cool Grey 4 (CG4) and Cool Grey 1 (CG1).
- Birds: Black (120).
- Sandcastle: Clay (116), Warm Caramel (256), Sand (107) and Caramel (253).


Sentiment
In the background, I stamp my sentiment. In Dutch, it means “Grab the sun and shine”. Stamp before sticking the background on the base card if you are using a stamping tool. It’s easier that way, I found out.
Assembling the card.
Now its time to assemble the card. Stick the background on your base card. Now you can stick all the die-cuts onto your background. I decided not to use foam tape this time, but to stick everything flat on the card.

The card is finished. I hope you like it! Let me know in the comments.
Happy crafting!
I would like to enter my card in the following challenges:
- 4-Season Swap Challenge Blog: Mood board.
- Dream Valley Challenges: Summer colors
- Make My Monday Challenge Blog: Summer fun
- The Paper Funday Challenges: Anything goes + no squares allowed
- Craft Rocket Challenges: Use dies
- Crafty Calendar Challenge: Summer time
- Lil Patch of Crafty Friends Challenge …: Anything goes
- 613 Avenue Create: Anything goes + the good old summertime
- A Perfect Time To Craft Open Challenge: Anything goes
- Classic Design Challenge Blog: Anything goes
- Daisy Chain Challenges: No design paper
Products used:
- Dies from Aveccreative
- Twinmarkers from Decotimecrafts.
- Sentiment clear stamps from Craftemotions.
Fabulous summer scene. Apologies for being late commenting and thanks for joining in the challenge at 613 Avenue Create.
Hugs, Sandy DT member.
You have create a stunning scene. Well done. Thank you for joining us at 613 Avenue Create this month. Judy DT https://avenue613.blogspot.com/
Thank you
Wonderul card, great summervibe!
Thanks for joining our Moodboard-challenge on the 4 Season blog.
grtz Colien
Thank you
Wow, what a fabulous summer scene. Thanks for joining us at Make My Monday. Love Dawn x
Thank you so much
Great Beach scene and I love all the interest you’ve added to this card. Thanks for sharing with us at The Paper Funday Challenge and we hope you’ll share again soon!
Donna xx
Inspiration Station Challenge
Paper Funday Challenge
Beautiful Blossoms Challenge
Thank you
Great card. Love all the details in your summer scene. Thanks for joining us at Make My Monday.
Wow, Renske, this is lovely! What perfect little beachy dies, and I loved seeing your construction of the card! Your coloring is fabulous! Thanks so much for playing at Make My Monday!
Thank you so much for your lovely comment ❤️