Some links in this post are affiliate links. This means I may earn a small commission if you make a purchase, at no extra cost to you. I only recommend products I use and genuinely enjoy in my own cardmaking. Read more here.
Imagine a beautiful summer day by the pool: the sun is shining, the water is sparkling, and a gentle breeze is swaying the palm trees. These moments inspire us to infuse the essence of summer into our creative projects. In this tutorial, we’ll be bringing a touch of that summertime magic to life with a gorgeous summer themed card featuring a refreshing swimming pool background.
In this step-by-step guide, you’ll learn how to create a slimline card from scratch, including layered backgrounds and playful die-cut elements.
Whether you’re an experienced crafter or new to card-making, this tutorial will give you all the tips and techniques you need to create a beautiful summer-themed card. So gather your materials and let’s embark on this creative journey together!
- Materials used for this summer themed card
- Step-by-step tutorial
- Let’s Get Creative Together
- Products used for this Summer Themed card
- Products without affiliate links
- I would like to enter my card in the following challenges
Materials used for this summer themed card
For making a summer-themed card with a swimming pool background, you’ll need the following materials:
- Stencil: Use for the swimming pool tile background. Any stencil with a similar pattern can work.
- Distress Ink in Tumbled Glass and Salty Ocean: For creating the pool background. Alternatives include any light and dark blue inks.
- Blending Brush: To apply the inks smoothly. You can also use any blending tool you have on hand.
- Slimline Dies Set: sed to cut the kraft background and layered panels. If you don’t have slimline dies, you can cut the layers manually.
- Smooth White Cardstock: or the inked background and layers. Any white cardstock that can handle ink blending will do.
- Beach Dies Set: Includes the palm tree, cocktail glass, bikini, parasol, sunglasses, and slippers. Similar die sets, stickers or hand-cut shapes can be used as alternatives.
- Relax Sentiment from a Die-cut Paper Block: For the sentiment. You can use any sentiment die-cut or stamp.
- Green Cardstock: For the palm tree leaves. Any green paper or cardstock works.
- Yellow Cardstock: For the cocktail and parasol. Any yellow paper or cardstock can be used.
- Pattern Paper: For the slippers. Any patterned paper you like will work.
- Blue Cardstock: For the sunglasses and slippers. Any blue paper or cardstock works.
- Red and White Digital Pattern Paper: For the bikini. Any patterned paper with a summery feel can be used.
- Kraft Cardstock: For the palm tree trunk and coconuts. Any brown cardstock will work.
- Distress Ink in Walnut Stain: Add shading to the palm tree trunk, coconuts, and kraft layers. Any brown ink can be used.
- Distress Ink in Mustard Seed: For adding shadows to the parasol, cocktail, and slippers. Any yellow ink works.
- Distress Ink in Pine Needles: To shade the palm tree leaves. Any dark green ink can be used.
- White Gel Pen: To add highlights. Any white pen or marker will work.
- Foam Tape: To add dimension to the background panel and certain elements.
- Sticky Glue: For adhering elements. Any strong craft glue will work.
- Paper Trimmer: For cutting paper to size. Scissors or a craft knife can be used as alternatives.
- Bone Folder: For scoring and folding the card base. The edge of a ruler or another flat tool can be used.
- Die Cutting Machine: For cutting the dies. If you don’t have one, you can hand-cut the shapes, though it will be more time-consuming.
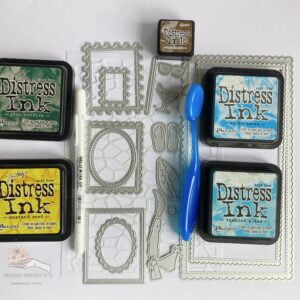
Having all these materials ready will make the crafting process smoother and more enjoyable. Let’s move on to the step-by-step tutorial to bring your summer themed card to life!
Step-by-step tutorial
In this step-by-step tutorial, you’ll learn how to create a beautiful summer themed card with a refreshing swimming pool background. We’ll cover everything from making the card base to crafting the intricate swimming pool background using stencils and inks. Finally, we’ll assemble the card with various die-cut elements, bringing the summer scene to life. Whether you’re a beginner or an experienced crafter, these detailed instructions will guide you through the process, ensuring a fun and creative experience. Let’s get started!
Step 1: Creating the Card Base and Layers
In this step, we will work on the card base and the initial layers.
Creating the Base
To start, we need to create the base of our slimline card. A slimline card typically measures 10.5 cm x 21 cm, and we’ll make the card in a landscape format.
- Begin with a piece of white paper measuring 21 cm x 21 cm.
- Score the paper at 10.5 cm and fold it in half to form the card base.
- Use a bone folder to ensure a sharp, clean crease.
Creating the Layers
Next, we’ll create the layers that add depth and interest to our card.
- Use the larger die from your slimline set to cut a layer from kraft paper. This will be the first layer on your card base.
- To give the kraft paper a richer, more textured look, distress it with Walnut Stain Ink.
- Use the smaller die from your slimline set to cut a background layer from white paper. This layer will be the canvas for your swimming pool background.
Feel free to experiment with different colours or textures for your layers. You might try using patterned paper or various shades of ink to see what effects you can create.
Step 2: Creating the Pool Background
Let’s start by creating the background for the card to give the effect of a swimming pool. Follow these steps to achieve the swimming pool effect using a stencil.
Stencil Application
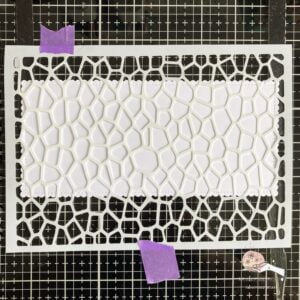
- Lace the white background panel on your work surface and secure it with tape to prevent it from moving.
- Position the stencil over the panel and tape it down as well.
- Use a blending brush to apply the Distress Ink in Tumbled Glass over the entire panel. This lighter blue will be the base colour.
- Next, apply Distress Ink in Salty Ocean in various spots to add depth and create a shadow effect. Apply the ink more heavily in some areas to mimic the look of light and shadow on pool tiles.
- After removing the stencil, use your blending brush to go over the entire panel once more. This helps to blend any harsh lines and ensures that the ink between the “tiles” isn’t stark white.
You can also experiment with different stencil patterns or colour combinations for a unique look, such as using a stencil with wave patterns or greenish-blue ink to give a different aquatic feel.
With the background ready, you can move on to the next step.
Step 3: Die-Cutting the Middle Layers
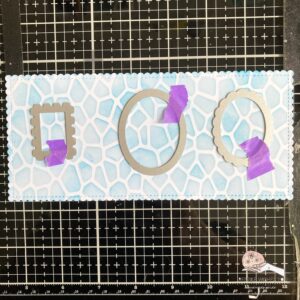
In this step, we will use the dies from the slimline die set to create the middle layers. These layers will add dimension and interest to your card. Start by selecting the smaller dies from your slimline set. Create three distinct layers from white paper, each with unique shapes and edge styles.
First, die-cut one layer using the postage stamp die. Then, die-cut another layer using the rectangle die with a stitched edge. Finally, die-cut the third layer using the rectangle die with a wavy edge.
Next, use smaller dies to cut parts of the background for additional detail. Choose smaller dies such as a postage stamp shape, an oval shape, and an oval shape with wavy edges. Position these smaller dies on the background layer so that they peek through the white layers, adding more detail to your card design. Measure carefully to ensure the cuts are in the right place.
Now that we have these layers ready, we can start working on all the elements on the card.
Step 4: Die-Cutting the Elements
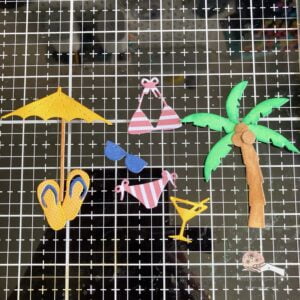
To bring your summer themed card to life, follow these steps to die-cut various elements and add shading for depth and realism.
Palm Tree
- Die-cut the trunk of the palm tree from kraft paper.
- Die-cut the leaves from green paper.
- Add depth to the trunk by shading it with Walnut Stain Distress Ink.
- Shade the leaves using Pine Needles Distress Ink.
- Die-cut three coconuts from kraft paper and shade them with Walnut Stain Distress Ink.
- Assemble the palm tree by attaching the leaves to the trunk and adding the coconuts where the leaves meet the trunk.
Cocktail Glass and Parasol
- Die-cut the cocktail glass and parasol from yellow paper.
- Add light shading to the edges using Mustard Seed Distress Ink.
- Die-cut the parasol’s pole from kraft paper and shade it with Walnut Stain Distress Ink.
/image
Bikini
- Die-cut the bikini from patterned paper. I chose a red and white striped pattern for a classic summer look.
Flip flops
- Die-cut the slippers from patterned paper with a yellow base and orange dots.
- Die-cut the outlines of the slippers from blue paper, and use these as the detailing.
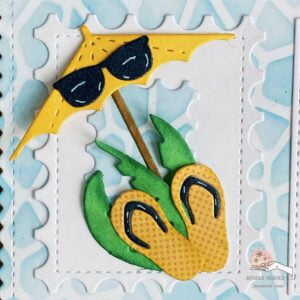
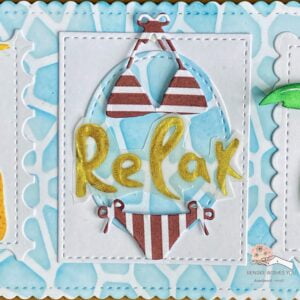
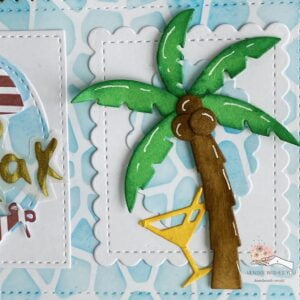
When crafting your card, consider experimenting with your choice of colours and patterns for the elements. Don’t be afraid to mix and match different shades and designs to create a unique look that reflects your style. Whether you opt for vibrant, eye-catching colours or subtle, soft tones, the key is to make the card your own.
For example, you might choose a tropical colour palette for a more vibrant, festive feel, or go with muted pastels for a serene, beachy vibe. Experimenting with different patterns for the bikini and slippers can also add a playful touch. Try out various combinations and see what resonates with your vision for the card. Your creativity is the limit, so have fun with it!
Once all these elements have been die-cut, proceed to the next step and assemble the card.
Step 5: Assembling the Card
With all your prepared elements and layers, it’s time to assemble your card and bring it all together.
Adhere the Layers
- Start by attaching the kraft paper layer to the slimline card base. This layer provides a solid foundation and sets the tone for the card.
- Next, position the pool background layer on top of the kraft layer. Elevate this background layer using foam tape to add dimension and create a layered effect. The foam tape will give your background a bit of lift, making it stand out beautifully.
Add White Layers
- Place the three white layers on top of the pool background. These layers will help add depth and interest to your card.
- Position and adhere the die-cut pieces you removed from the background onto these white layers. This adds an extra touch of detail and helps integrate the die-cut elements into the overall design.
Arrange and Adhere Elements
- Begin arranging your die-cut elements on the card:
- On the right side of the card, place the palm tree and cocktail glass. This grouping will create a balanced and inviting scene.
- On the left side, position the parasol and slippers. To add more detail, let some palm tree leaves peek out from beneath the slippers.
- In the centre, place the bikini and add the “Relax” sentiment. Cut around the gold letters of the sentiment for a clean, tailored look. Adhere the bikini to the edges of the oval shape using foam tape to give it a bit of elevation. Position the “Relax” sentiment between the edges of the bikini to complete the focal point.
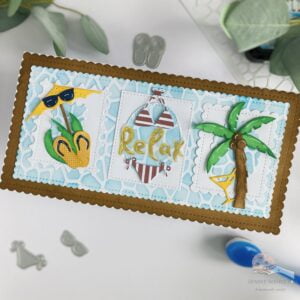
When assembling your card, think about the balance and composition of your elements. Consider how each piece interacts with the others and ensure the design feels cohesive and visually pleasing. Feel free to experiment with different arrangements to find what looks best to you.
The card is ready to be sent to the recipient.
Let’s Get Creative Together
We have gone through the steps to create a beautiful summer themed card with a swimming pool background.
Now that you have seen how to make this lovely summer card, it’s your turn to get creative! I encourage you to explore your crafting supplies and bring your unique vision to life. Whether you stick to the classic summer theme or explore new patterns and colours, the joy of card-making lies in the personal touch you add.
More summer themed card inspiration
Products used for this Summer Themed card
Affiliate Disclosure: This post contains affiliate links, which means I may earn a small commission at no extra cost if you purchase through these links. I only recommend products and services that I use and trust. Your support helps me continue to provide free tutorials and creative inspiration. Thank you for supporting my blog and helping me to keep sharing my passion for card making!
Distress Ink Tumbled Glass from Ranger
Distress Ink Salty Ocean from Ranger

Distress Ink Walnut Stain from Ranger

Distress Ink Mustard Seed from Ranger

Distress Ink Pine Needles from Ranger

Blending brushes from StudiolightNL
Spring Gnomes Digital Paper set

White Gelly Roll Pen 08

Products without affiliate links
- Stencil from Craftsensations
- Slimline die set from Aveccreative
- Beach die set from Aveccreative
- Vellum Sentiment from an old luxe paper block from Decotimecrafts
- Green Cardstock (brand Unknown)
- Blue Cardstock (brand unknown)
- Yellow Cardstock (brand unknown)
- Kraft cardstock (brand unknown)
- Foam tape (brand unknown)
- Sticky Glue from ActionNL
I would like to enter my card in the following challenges
- A Place To Start: Anything goes
- The Paper Shelter: Anything goes
- CREATIVE INSPIRATIONS: Anything goes
- Craft Rocket Challenges: Summertime
- Lil Patch of Crafty Friends Challenge …: Anything goes
- We Love Stamping: Sun, sea and sand
- Classic Design Challenge Blog: Anything Goes + Summer Holiday
- Creatalicious Challenges: Anything goes + summer



Love that stencilled water background. It is so effective. Thanks for the step by step instructions and for sharing it with us at we love stamping xx
Thank you so much