
Some links in this post are affiliate links. This means I may earn a small commission if you make a purchase, at no extra cost to you. I only recommend products I use and genuinely enjoy in my own cardmaking. Read more here.
Hey there, crafters! As the leaves begin to change and the air turns crisp, there’s no better time to embrace the spirit of autumn by creating something special. Crafting personalized cards, especially a beautiful fall birthday card, provides a great way to express creativity and celebrate unique moments in the lives of those you care about, especially for autumn birthdays
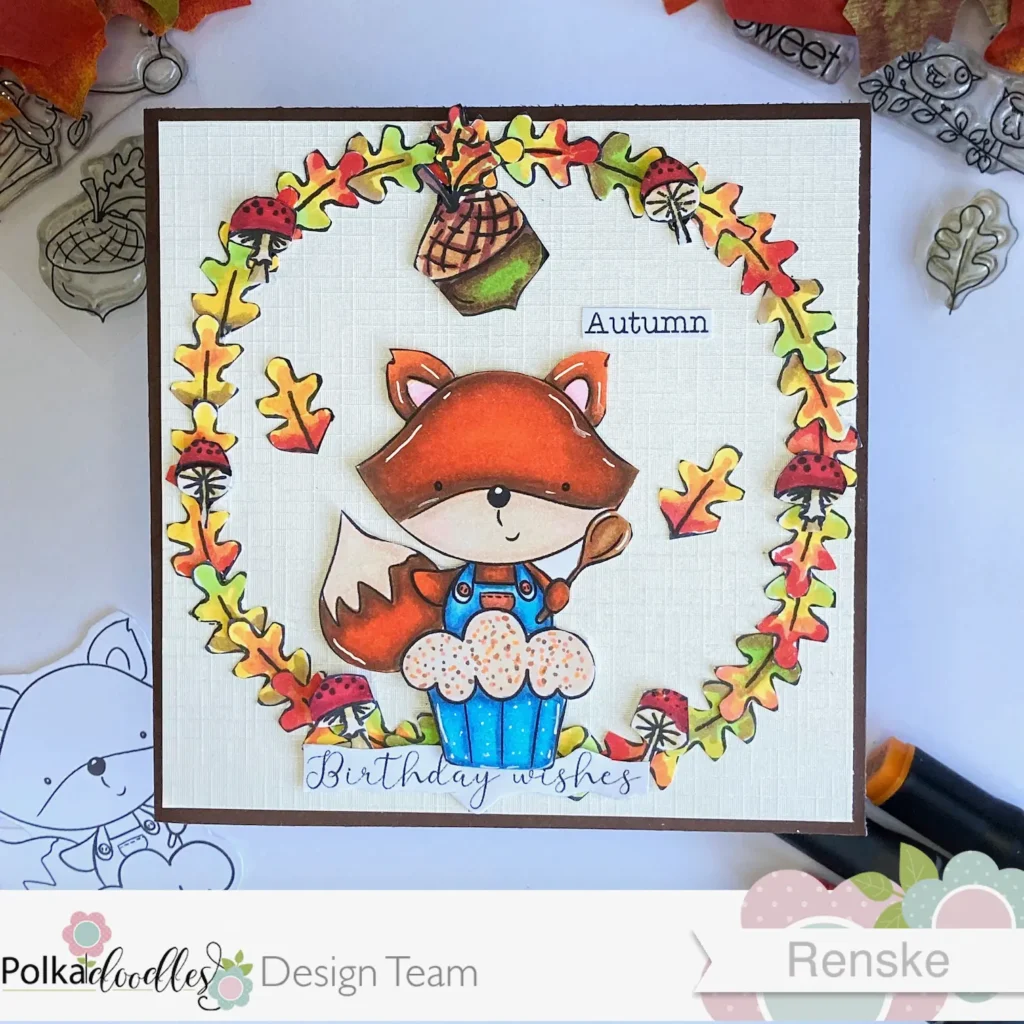
Today, I’m excited to share a gorgeous fall birthday card design that captures the season. With vibrant autumn leaves, charming details, and a heartwarming sentiment, this card is ideal for celebrating special occasions. Whether you’re seeking handmade fall card ideas or inspiration for creating your autumn-themed handmade cards, this project will ignite your creativity.
I also want to highlight the Polkadoodles challenge, where creativity and inspiration take centre stage. This challenge inspires you to explore different techniques and showcase your skills, creating an exciting opportunity to join a community of passionate crafters. Let’s start this delightful project together and find inspiration to craft our fall greeting cards!
Gather Your Essentials for this Fall Birthday Card
To create your stunning fall birthday card, gather the materials and tools that bring your vision to life. Below is a list of essential items for this project, including specific Polkadoodles products that enhance your card-making experience.
Polkadoodles products
- Cupcake Autumn Fall Fox digital stamp: This charming stamp serves as the focal point of your card, capturing the essence of autumn. You can find it here.
- Nuts About You clear stamp set: This set provides delightful accents to complement your design, adding a playful touch. Check it out here.
- Autumn Fall Greetings sentiment: This printable stamp adds the perfect message to your card. You can find it here.
Other Supplies
- Brown card stock for the card base: This will be used for the main structure of your card. If you don’t have brown card stock, try a sturdy card stock in a warm colour like orange or yellow to maintain the autumn vibe.
- Textured beige card stock for the background: This adds visual interest and depth to your card design. If textured beige isn’t available, a patterned paper that complements the autumn theme can work beautifully.
- Foam tape: Essential for adding dimension and layers to your card. If foam tape isn’t on hand, consider using cardboard or cut strips from recycled packaging as a cost-effective alternative.
- Alcohol markers: Perfect for vibrant colouring of your stamped images. If you find yourself without alcohol markers, any colouring medium such as coloured pencils or watercolour paints can achieve lovely results, giving a different but beautiful effect.
- Glue: Needed to glue elements together securely. If you find yourself out of glue, double-sided tape or adhesive rollers are excellent alternatives that provide strong bonds.
- White gel pen: Great for adding highlights and details to your designs. If you don’t have a white gel pen, a white paint marker or a correction pen can substitute for adding those finishing touches.
With these materials gathered, you’re well on your way to crafting your beautiful fall birthday card!
Step 1: Print and Colour Your Digital Stamp
The first step to create your stunning fall birthday card involves printing and colouring the digital stamp For this project, I printed the Cupcake Autumn Fall Fox digital stamp at a height of 7.5 centimetres on DCP paper, which is ideal for alcohol markers as it prevents bleeding and ensures vibrant colours.
Once printed, you can bring your fox and cupcake to life with colour. I used the following combinations:
- Fox: Orange, Barn Red, and Burnt Sienna
- Overalls and Cup of Cupcake: Mint Blue, Baby Boy and Midi Sky
- Wooden Spoon: Sand and Rose Beige
After colouring the fox and the cupcake, carefully cut them out using scissors. I opted to trim right along the black line, avoiding any white edges for a cleaner finish. To add those finishing touches, Ihighlight certain areas with a white gel pen, giving depth and detail to your characters.

This step is where your creativity shines, as you can experiment with different colours and styles. Don’t hesitate to share your creations with fellow crafters and inspire each other with unique interpretations of the fall birthday card!
Step 2: Stamping with the Nuts About You Stamp Set
In the second step, we will use the Nuts About You stamp set to add more autumnal charm to the fall birthday card. Use the leaves, mushrooms, and large acorns from this collection to add detail to the card.
Stamp around 30 leaves using black ink to create a vibrant backdrop. Stamp the mushrooms six times and the large acorn once. After stamping, colour each piece with alcohol markers using different combinations to achieve rich, fall-inspired hues.
Here’s how I coloured the different elements:
- Leaves:
- Combination 1: Cardinal, Lemon Yellow, and Orange
- Combination 2: Yellow Ochre, Orange, and Lemon Yellow
- Combination 3: Yellow Ochre, Lemon Yellow, and Yellow Green
- Combination 4: Yellow Green, Lemon Yellow, Orange, and Cardinal
- Mushrooms:
- Cap: Cardinal, English Red, and Burgundy
- Stem: Pale Cream and Brown Grey
- Acorn:
- Top: Sand, Burnt Sienna, and Natural Oak
- Bottom: Yellow Green, Burnt Sienna, and Natural Oak
After colouring, cut out each piece along the black lines for a polished look. This technique not only adds visual interest to your card but also enhances the overall theme of autumn celebrations.
Feel free to experiment with your colour choices and stamp placements to make the card your own. Sharing your creations with the crafting community can spark new ideas and inspire others, so don’t hesitate to showcase your work!
Step 3: Creating the Card Base and First Layer
In this step, we will create the card base and the first layer for the background of our images.
Making the Card Base
Now that we’ve our vibrant stamped elements ready, it’s time to construct the card itself! For this fall birthday card, I opted for a square base that measures 13 centimetres by 13 centimetres. To create the card base, you’ll need a sturdy piece of brown paper measuring 26 centimetres by 13 centimetres. Score it at 13 centimetres and fold it in half to form a strong foundation for your design. The rich brown colour sets a warm and inviting tone, perfect for an autumn celebration.
Adding the First Layer
Next, let’s add our first layer. To bring warmth and texture to the card, I chose a light yellow cardstock instead of plain white paper. This subtle colour beautifully complements the autumn theme and adds depth to the overall design. Cut a piece of textured cardstock measuring 12.5 centimetres by 12.5 centimetres and adhere it to the top of your card base.
This layer will create a lovely backdrop for the stamped elements and give the card a polished look. As you assemble your card, think about how these layers interact with the colours and designs you’ve chosen.
Personal touches like this make your card special and perfect for sharing with friends and loved ones during the fall season. Don’t forget to explore different textures and colours to find what resonates best with your creative style!
Step 4: Choosing the Perfect Sentiment
With our card base and layers in place, it’s time to add a heartfelt message that truly reflects the occasion. For this fall birthday card, I used the Fall Sentiment/Greeting Set, which provides a variety of lovely phrases ideal for autumn-themed creations. Since our design team’s challenge was to create an October birthday card, I chose the phrase “autumn birthday wishes.”
To add a personal touch, I printed out the sentiment and carefully cut the word “autumn” into a neat rectangle to make it stand out on the card. For the “birthday wishes” part, I took my time to cut around the elegant letters to allow the beautiful typography to shine through.
As you choose your sentiments, think about how they resonate with the overall theme of your card. The right words can enhance your design and convey warmth to the recipient, making your handmade card even more special. Whether you’re using stamps or printed sentiments, this thoughtful detail adds a lovely finishing touch to your autumn birthday card.
Feel free to explore other phrases or designs from the Fall Sentiment Set that resonate with your style—after all, each card is an opportunity to express your creativity and affection!


Step 5: Assembling the Card
Now that all our elements are ready, let’s bring our fall birthday card to life! For this design, I envisioned a charming wreath made of autumn leaves, so I’ll be arranging all the leaves in a circular pattern.
Creating the Wreath
To help with the placement, use circle die-cut as a guide. Place the circle on the card base, allowing it to serve as a template for my leaves. This technique ensures that the center of the leaves aligns just under the circle edge, while the other half peeks out from beneath. This way, when you apply glue to the part of the leaves hidden under the circle, they stay securely in place. Once all the leaves are arranged in a beautiful wreath, apply glue to the visible parts of the leaves to make sure they’re firmly attached.

Adding the Fox
Next up is our adorable fox! I love adding dimension to my cards, so I applied foam tape to the back of the fox to give it that pop. Position carefully over the sentiment “birthday wishes” to ensure both elements complement each other beautifully. It’s best to place them together for perfect alignment.
Placing the Mushrooms and Acorn
Now, let’s add the mushrooms! Use foam tape for these to keep the dimensional feel consistent. Two mushrooms will sit at the ends of the sentiment, while the others will be evenly spaced around the wreath for a balanced look. At the top of the wreath, place the acorn, and secure it with foam tape for that extra depth.
Final Touches
Finally, to finish the card, add two more leaves on either side of the fox, completing the autumnal scene. This arrangement enhances the design and embodies the spirit of a cosy fall birthday celebration Your handmade birthday card is now ready to spread joy to someone special!

Step 6: Finishing the Inside of the Card
To complete our fall birthday card, let’s address the inside. Since the card base is a warm brown, adding a white insert will provide a perfect contrast, making it easy to write a heartfelt message. For this insert, I cut a piece of white paper measuring 12.5 centimetres by 12.5 centimetres and adhered it to the inside of the card.
Adding a Touch of Fall
A plain white insert can feel a bit too stark, so I decided to add a charming touch by including another large acorn, just like the one on the front. I coloured it in the same beautiful combinations, ensuring it ties in perfectly with the autumn theme. Once coloured, I carefully cut it out and positioned it in the bottom left corner of the insert.
Now the card is ready to be sent to someone special to celebrate a birthday this autumn. With its delightful design and personal touch, this handmade birthday card will bring a smile to the face of your loved one.
Let’s Get Creative Together
We have made great progress in creating our charming fall birthday card! From printing and colouring the delightful Cupcake Autumn Fall Fox digital stamp to crafting a beautiful wreath of autumn leaves, every step has been a journey of creativity and fun. Now that you’ve seen how it’s done, I encourage you to gather your supplies and craft your unique card. Let your imagination run wild, and don’t hesitate to add your personal touch!
Join the Polkadoodles Challenge
I’m excited to invite you to participate in the Polkadoodles Challenge! This is a fantastic opportunity to showcase your creativity and share your amazing projects with others. The theme is Anything Goes, so let your imagination soar. You don’t have to use Polkadoodles products, but I encourage you to do so for even more inspiration!
Follow for More Card Making Inspiration
If you loved this project and want to see more, subscribe to my blog! Fill out the form below to get updates and more card-making inspiration directly to your inbox. You won’t want to miss any upcoming tutorials or creative ideas!
More Polkadoodles Autumn Card Ideas
Looking for more fall birthday card ideas? Check out these related blog posts for additional inspiration and unique designs that will help you celebrate autumn birthdays in style:
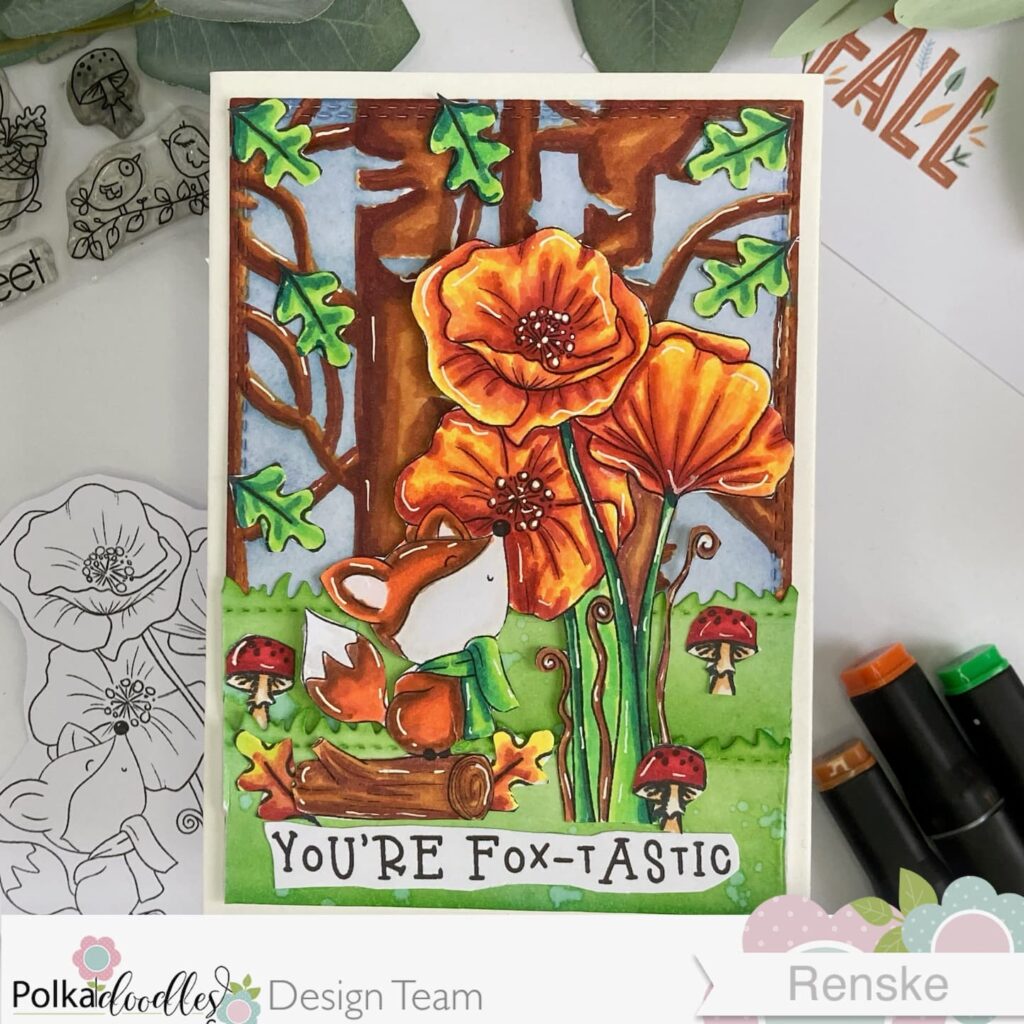
Create a Gorgeous Autumn Fox Card with my Simple Fox Card Tutorial
Another cute fox digital stamp from Polkadoodles to create a beautiful fall card.

Autumn slimline card | Polkadoodles
Another Fall Birthday card this time with the clean stamp set Nuts About You from Polkaoodles
Polkadoodles products in the spotlight
Affiliate Disclosure: Please note that some of the links in this article are affiliate links. This means that I may earn a small commission if you purchase through these links, at no additional cost to you. I only recommend products or services that I use and believe will add value to my readers. Your support helps keep this blog running and allows me to continue creating valuable content for you. Thank you for your support!
Cupcake Autumn Fox digital stamp

Nuts About You Clear Stamp Set

Birthday sentiments and Greetings

I would like to enter my card to the following challenges:
- A Place To Start: Anything goes
- Cardz 4 Galz: Any colouring medium
- Lil Patch of Crafty Friends Challenge …: Anything goes
- Stamping Sensations: Anything goes + animal magic
- Dragonfly Dreams: Happy Birthday
- Critter Crazy CHALLENGE BLOG: Anything goes + featured critter
- Crafter’s Cafe: Include an animal
- Crafty Animals: Anything goes + must use an animal
fall is my favorite time of the year. thank you for sharing this colorful creation with us at the challege here C4Galz
A fun Fox image for your Autumnal card, many thanks for sharing at Stamping Sensations challenge.
B x
Beautiful Autumn card and Autumn wreath love the cute Fox. Thank you for joining us at Stamping Sensations.
Carol DT x