

Some links in this post are affiliate links. This means I may earn a small commission if you make a purchase, at no extra cost to you. I only recommend products I use and genuinely enjoy in my own cardmaking. Read more here.
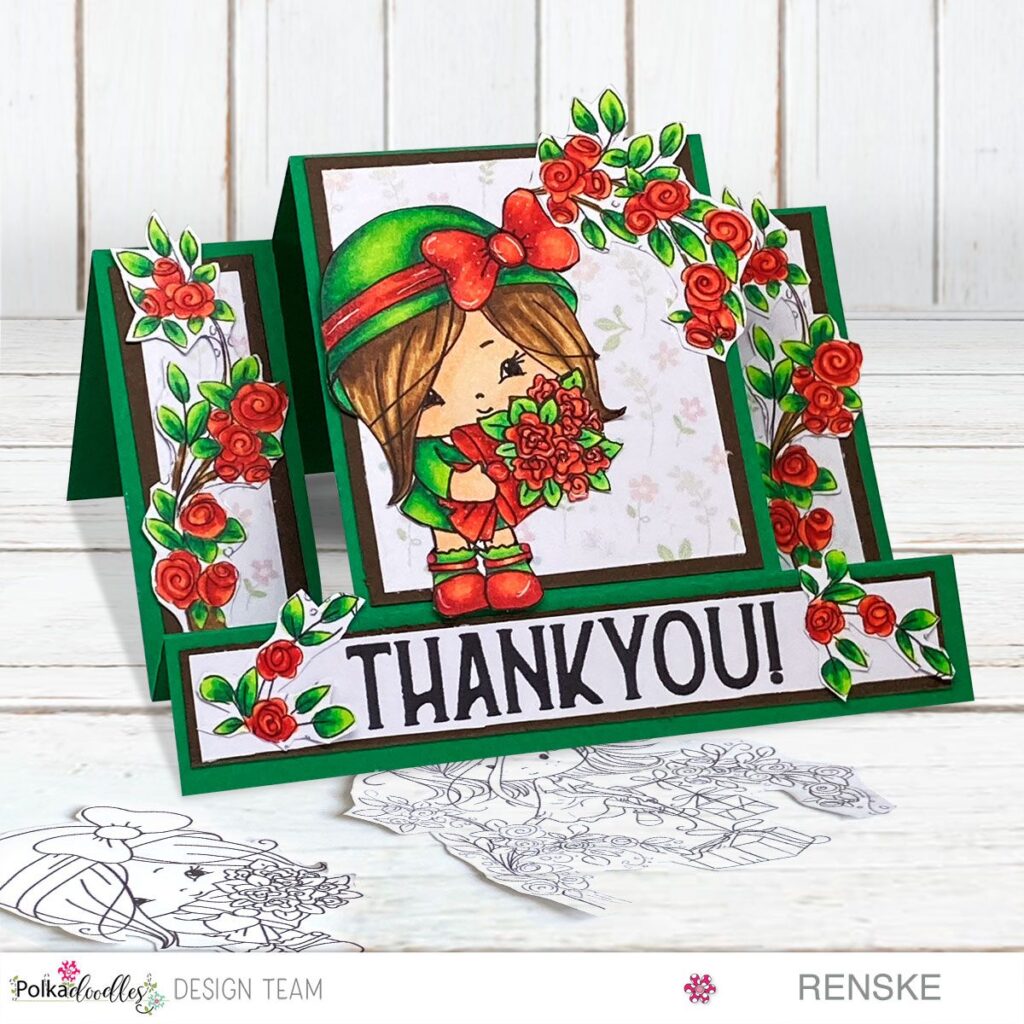
Imagine the delight on someone’s face when they receive a handmade card crafted with care and creativity. There is something truly magical about creating a piece of art that brings joy to others. Today, I am excited to share a beautiful and uniquely designed card: the double-diamond card. This card is perfect for impressing your friends and family with intricate folds and stunning details.
I am a proud member of the Polkadoodles design team. I was recently challenged to create a card featuring flowers and an unusual shape. Polkadoodles, renowned for their incredible range of digital stamps and pattern papers, provides endless inspiration for such creative endeavours. For this project, I used their charming Daffodil Flower Girl digital stamp. I also used various patterned papers. These elements helped me craft a card that truly stands out.
In this article, I will guide you through the steps for your double diamond card using Polkadoodles products. This tutorial will be informative and inspiring. Let us dive into the world of handmade cards and discover the joy of creating something special!
- What is a Double-Diamond Card?
- Question
- Materials Needed for this double diamond card
- Let’s Get Creative Together
- Polkadoodles products in the spotlight
- I would like to enter my card in the following challenges
What is a Double-Diamond Card?
The double-diamond card is a distinctive and intricate design known for its eye-catching structure and elegant appearance. Unlike traditional flat cards, the double-diamond card features a series of folds that create a dynamic, three-dimensional effect. This special card design adds a touch of sophistication. It provides a delightful surprise for the recipient when they open it.
Description of the Double-Diamond Fold Technique
The double-diamond card gets its name from the two diamond shapes that are visible when the card is opened. To achieve this, you start with a rectangular piece of cardstock. Through a series of precise scoring and folding steps, you create a structure. The central panel pops out in a diamond shape. It is flanked by two smaller diamonds on either side. The result is a card with depth and dimension, making it a stunning piece of handmade art.
Benefits of Using This Fold in Card Making
- Adds Dimension: the double-diamond fold transforms a simple piece of paper into a multi-layered, three-dimensional card that captures attention.
- Unique Design: This fold is not commonly used. It makes your card stand out among standard card designs. It shows an extra level of effort and creativity.
- Versatility: You can make each panel with different stamps, sentiments, and embellishments, making each card unique.
Question
Have you ever tried a unique card fold before? How did they turn out? Share your experiences in the comments section below! Your insights inspire others and me to try new techniques.
These innovative folds enhance the aesthetic appeal of your cards. They offer a delightful experience for the recipients. Your handmade creations become truly unforgettable.
Materials Needed for this double diamond card
Before we begin making your stunning double-diamond card, let’s gather all the materials you’ll need for this project. Being prepared will make the crafting process smooth and enjoyable.
Polkadoodles Products used
- Daffodil Flower Girl Darling Buds Digital Stamp: This charming digital stamp will be the centrepiece of our card.
- Gnome Men Fishing Digital Paper Set: We’ll use the vibrant patterns from this set to add background details.
- Pretty Printable Papers 1 – Helga Hippo: Additional pattern papers from this set will give variety and contrast.
- Spring Gnome Digital Paper Set: More colourful options to make our card pop.
- Spring Flowers Mother’s Day Friends Greeting Sentiment Set: We’ll select a fitting sentiment from this set to finish our card.
Other Essential Tools
- Sturdy White Cardstock: This will serve as the base for your double-diamond card. You can use any card stock you like.
- Circle Die with Edge: To create perfectly shaped circles for decoration. You can use any shape of die you like.
- Alcohol Markers: For coloring the digital stamp. You can use any colouring medium you like.
- White Gel Pen: To add highlights and details to your coloured image.
- Scissors and Paper Trimmer: Essential for cutting and trimming your cardstock and pattern papers.
- Die-Cutting Machine: For cutting out shapes and edges with precision.
- Sticky Glue: To assemble the different parts of your card securely.
You can find all the Polkadoodles products mentioned above on their official website. Here are the links to make your shopping easier so you can follow along with the tutorial:
- Daffodil Flower Girl Darling Buds Digital Stamp
- Gnome Men Fishing Digital Paper Set
- Pretty Printable Papers 1 – Helga Hippo
- Spring Gnome Digital Paper Set
- Spring Flowers Mother’s Day Friends Greeting Sentiment Set
With all these materials, you’re all set to start crafting your beautiful double-diamond card. Let’s move on to the fun part—creating the card!
Step 1: Printing and Coloring the Digital Stamp
Let’s begin by preparing the beautiful Daffodil Flower Girl digital stamp. It will be the focal point of our double-diamond card. Follow these detailed steps to print and colour your digital stamp perfectly.
Printing the Digital Stamp
- Print the digital stamp on DCP paper, which is ideal for use with alcohol markers. This type of paper ensures smooth blending and vibrant colours.
- Adjust the size of the stamp to approximately 9.5 centimetres in height. The width will automatically scale proportionately.
Colouring the Digital Stamp
Gather your alcohol markers and follow these colour combinations for a stunning effect:
- Skin: Tanned Skin, Peachy Blush, Salmon Pink, and Barely Beige.
- Cheeks: Blush and Blushes Skin.
- Hair: Pale Cream, Brown Grey, Walnut, and Clay.
- Flowers: French Vermillion, Orange, Yellow, Lemon Yellow, Pastel Lemon.
- Leaves: Dark Forest Green, Deep Green Forest, Lime Green, Bright Apple Green, and Green Bice.
- Dress: Mint Blue.
- Lips: Coral Pink.
Adding Highlights
Use a white gel pen to add highlights to the flowers, creating a more dynamic and realistic look.
Fussy Cutting the Image
- Carefully cut out the coloured image, leaving a small white border around the edges. This helps to avoid cutting directly on the black lines, which can be challenging.
- To make sure the back of the image looks neat, adhere the cut-out image to a piece of white cardstock. Alcohol markers can bleed through the paper. Then, cut around the edges again, following the original cut lines.
Your beautifully coloured and cut-out digital stamp is ready. You can now move on to the next step in creating your double-diamond card!


Having trouble editing or colouring digital stamps? Download my free guide for extra tips and tricks to help you perfect your digital stamps!
Step 2: Creating the Card Base
Now that your digital stamp is ready, it’s time to create the base of your double diamond card. Follow these steps to measure, score, and fold your cardstock to form the unique double diamond shape.
Begin by using a piece of sturdy white cardstock that measures 5 inches by 11 inches.
Scoring the Cardstock
- On the 11-inch side, score the cardstock at 2.5 and 9 inches.
- Rotate the cardstock to the 5-inch side and score at 2.5 inches.

Marking for Diagonal Scores
- On the 11-inch side, make a small mark at 4.25 inches and 7 inches.
- On the 5-inch side, mark at 3 inches and 7 7/8 inches.
- Repeat this on the opposite side.
Drawing Diagonal Lines
Draw lines from the pencil marks to create four diagonal lines. For accuracy, you may use a ruler to lightly draw these lines.

Folding the Cardstock
- Along the 11-inch side, create a mountain fold at 2.5-inch and 9-inch score lines.
- For the diagonal score lines, create a valley fold, so the middle section forms a peak.


Following these steps, you will have successfully created the base of your double diamond card. This unique shape will add an impressive dimension to your card, making it a standout piece for any recipient.
Step 3: Adding Pattern Papers
After preparing the card base, you can add vibrant pattern papers to bring your double-diamond card to life. Here’s how to select and layer your pattern papers for a cohesive and visually appealing design.
Choosing Pattern Papers
For this card, I chose a digital pattern paper with green, white, and blue stripes. It is from the Gnome Men Golf set by Polkadoodles. Choose patterns that complement your digital stamp and overall colour scheme. For the middle of the double diamond card, I used light green paper from the Pretty Printable Paper Set 1.
Cutting the Pattern Papers
- Cut four squares measuring 2 3/8 inches by 2 3/8 inches. These will be used to cover the outer squares of the card base.
- For the middle section, where the digital stamp will be placed, cut a piece of pattern paper. The dimensions should be 4 3/4 inches by 4 3/4 inches. Then, cut an additional piece measuring 2 3/8 inches by 2 3/8 inches.
- Create a diagonal cut from the larger piece to match the shape of the middle section on the card base. Ensure the pattern aligns and complements the design.
Adhering the Pattern Papers
- Apply adhesive to the back of the 2 3/8-inch squares. Then, place them on the four outer squares of the card base.
- Adhere the diagonally cut pattern paper to the middle section, making sure it fits perfectly within the scored lines.
Adding these pattern papers enhances the visual appeal of your card and provides a beautiful backdrop for your digital stamp. The contrasting colours and patterns will make your double diamond card truly stand out.
Step 4: Embellishing the Card
Now it’s time to bring your double diamond card to life with beautiful embellishments. This step involves adding the digital stamp, sentiments, and other decorations to make your card truly stunning.
Creating Floral Embellishments
- To add a cohesive design element, use the same flowers from the digital stamp. Place them on the front squares of the card. Print an extra digital stamp and colour the flowers using the same colour combinations.
- Cut out the flowers carefully.
- Use yellow pattern paper with black dots from the Spring Gnome digital paper set to create a decorative base. Die-cut two circles with scalloped edges from this paper.
- Die-cut two white circles that fit inside the yellow scalloped circles.
- Adhere the coloured flowers onto the white circles, and then attach these to the yellow scalloped circles.

Adding the Sentiment
- Print the sentiment “Have a Blooming Great Day” from the Spring Flower Mother’s Day Friend greeting set. Ensure it’s sized correctly to fit between the folds of the card.
- Cut out the sentiment and adhere it to the bottom of the middle section of the card base.
Placing the Digital Stamp
- Apply adhesive to the bottom part of the coloured digital stamp. Be sure to only add glue to the area that will be attached to the middle section of the card.
- Position the digital stamp so that it is centered and extends above the middle section of the card. This creates a dynamic focal point that draws attention to the beautifully coloured image.
By carefully placing these elements, you add depth and interest to your double-diamond card. The vibrant flowers, patterned papers, and heartfelt sentiments will make your card a memorable keepsake.
")
Let’s Get Creative Together
Creating a double diamond card with Polkadoodles digital stamps is an exciting journey that brings out your crafting skills. We started by carefully printing the adorable Daffodil Flower Girl digital stamp. We then coloured her with vibrant shades of yellow, green, and blue. This brought her to life. The magic continued during our project. We folded and scored sturdy white cardstock into a unique double-diamond shape. This added dimension and elegance to the card.
Layering the card with patterned papers from the Gnome Men Golf set added a delightful touch of green. It also added white and blue stripes. This created a harmonious backdrop for our centrepiece. To embellish the card further, we used additional floral elements, carefully coloured and placed on die-cut scalloped circles. The heartfelt sentiment “Have a Blooming Great Day” found its rightful place. The beautifully coloured digital stamp also took its rightful place. Together, they made the card truly special.
Join the Polkadoodles Challenge
Why not take your card-making skills to the next level by participating in the Polkadoodles challenge? It’s a fantastic opportunity. You can create your version of the double-diamond card. Share it with a community of passionate crafters. The rules are simple: Create anything you want, and you don’t have to use Polkadoodles products. You will have fun. You also stand a chance to win exciting prizes. Moreover, you might get featured on the Polkadoodles blog. So, grab your supplies and join the challenge today!
More Fun Fold Card-Making Inspiration
Looking for more unique card-making ideas? Check out these related blog posts that feature fun fold techniques and creative designs:

Happy crafting, and I can’t wait to see what you create!
Polkadoodles products in the spotlight
Affiliate Disclosure: This post contains affiliate links. I may earn a small commission at no extra cost if you purchase through these links. I only recommend products and services that I use and trust. Your support helps me continue to provide free tutorials and creative inspiration. Thank you for supporting my blog and helping me to keep sharing my passion for card making!
Daffodil Flower Gril digital stamp

Gnome Men Fishing printable papers

Pretty Printable Paper 1 – Helga Hippo

Spring Gnome digital paper set

Spring Flower Mother’s Day sentiment

I would like to enter my card in the following challenges
- A Place To Start: Anything goes
- Unicorn Challenge Blog: Not Square
- CREATIVE INSPIRATIONS: Anything goes
- Lil Patch of Crafty Friends Challenge …: Anything goes
- Stamping Sensations: Anything goes
- 613 Avenue Create: Anything goes + floral twist
- A Perfect Time To Craft Open Challenge: Anything goes
This is a fun card! Thanks for the wonderful tutorial! Thanks for sharing with us at A Place to Start!
Hugz,
Chana Malkah, Owner
Thanks a lot
Beautiful!!! Thanks so much for participating in our 613 AVENUE CREATE challenge!!! I appreciate that you play along and I enjoy visiting your blog!! Have a happy crafty day!! Deanne at A Little Bit O’ Paper
Thank you
She is beautiful I have this image and a charming one to colour as you have done xx [great card fold Renske] x
Thank you so much
Beautiful creation. Thank you for joining at Stamping Sensations.
Thanks
A very pretty pop up box, many thanks for sharing at Stamping Sensations challenge.
B x
Thank you
Fabulous fold and design, your lovely image is beautifully coloured. Thank you for joining in with our challenge at Stamping Sensations.
Chris
x
Thank you so much