
Hello, Crafty Friends!
Welcome back to my cosy little craft corner. Today, I want to share with you a handmade spring flower card created using mixed media. But before we dive into the colourful world of ink mixing and stamping, let me tell you about something special. Recently, I participated in an Instagram rediscovery hop where fellow crafters and I challenged ourselves to dust off those forgotten supplies and give them new life. This month’s hop was all about spring and mixed media, which provided the perfect inspiration for creating this card.
As we move into spring, I couldn’t resist the urge to create something that captures the essence of the season: something vibrant, joyful, and bursting with life. And what better way to celebrate than with a handmade card decorated with delicate flowers and whimsical butterflies? But here’s the twist: I decided to take it a step further by incorporating mixed media elements into the mix. By layering different textures and mediums, I wanted to create a card that not only captures the beauty of spring but also adds a touch of artistic flair.
So, without further ado, grab your favourite craft supplies, and let’s get started. I will guide you step-by-step through the process of creating this spring-inspired card. From creating the card base to stamping intricate designs and adding the final finishing touches, I will share all the tips and tricks to help you bring your own vision to life.
- Materials Used
- Crafting Magic: Step-by-Step Guide to Crafting a Spring Flower Card
- Step 1: Creating the Card Base
- Step 2: Crafting a Colourful Canvas: Bringing Your Background to Life
- Step 3. Bringing Nature to Life: Stamping Grasses and Flowers
- Step 4. Fluttering Wings: Adding Butterflies and Bees stamps
- Step 5: Birthday Wishes: Adding a Happy Birthday Sentiment
- Finishing Flourish: Bringing It All Together
- Inspire, Create, Share, and More!
- Products used
- I would like to join the following challenges
Materials Used
Let’s take a closer look at the materials that were used to create this spring flower card:
- Clear Stamp Sets: To create intricate floral designs and whimsical butterflies, I used clear stamp sets from my collection. These stamps provided the perfect motifs for capturing the essence of spring on my card.
- Chalk Inks: I used a variety of chalk inks to bring vibrant colour to the background. From geranium reds to golden sunsets, these chalk inks added depth and richness to the overall design.
- Memento Tuxedo Black Ink: For crisp and bold stamped images, I relied on Memento Tuxedo Black ink. This archival-quality ink ensured that my stamped images remained sharp and clear, even after multiple layers.
- Metallic Paint: Adding a touch of shimmer and elegance, metallic paints in white, yellow, pink, and purple were used to create splatters and highlights. These metallic accents brought a sense of magic and sophistication to the card.
- Cardstock: I used high-quality cardstock for the card base and background panel, providing a sturdy foundation. This durable material ensured that my card would hold up to handling and display.
- Masking Tape or Post-it: To achieve clean and precise stamped images, I used Post-it notes to create temporary barriers. This allowed me to layer stamps and colours without worrying about smudging or overlapping.
- Blending tools: To create beautiful transitions between the ink colors I used blending brushes. But you can use any blending tool you want.
- Black Fineliner: Essential for creating seamless ink blends, blending brushes were used to achieve smooth transitions between colours. These brushes helped to blend the chalk inks seamlessly, creating a soft and ethereal background.
All of these materials played a unique role in creating a spring flower card that bursts with colour, texture, and creativity.
Crafting Magic: Step-by-Step Guide to Crafting a Spring Flower Card
In this step-by-step tutorial, I will guide you through the process of crafting a beautiful spring flower card. I’ll cover all the steps from creating the perfect background to stamping intricate designs and adding the final touches to make your card stand out. Whether you’re a beginner or an experienced crafter, I’ll share all the tips and tricks you need to bring your vision to life. So, get your craft supplies and let’s begin!
Step 1: Creating the Card Base
Let’s start creating our spring flower card by laying the foundation. Follow these steps to make the card base using white cardstock:
- Choose a piece of white cardstock measuring 21 centimetres by 14.8 centimetres. This size allows us to create a card base that measures 4.5 by 5.5 inches when folded.
- Create a score line at the 10.5-centimetre mark along the longer edge of the paper. This will serve as the folding line for our card.
- After making the score line, carefully fold the paper along the score line to create a crisp fold. This will divide the paper into two halves, forming the base of our card.
That’s it! You now have a sturdy and perfectly sized card base to embellish with your favourite springtime decorations.
Step 2: Crafting a Colourful Canvas: Bringing Your Background to Life
Let’s add some colour and texture to our spring flower card by enhancing the background. Follow these steps to create a beautiful and vibrant background:
- Background panel: Start by preparing a background panel with a DCP paper. Cut the paper to the dimensions of 9.5 centimetres by 13.8 centimetres. This will serve as a canvas for our colourful creation and provide the perfect surface for showcasing our ink blending techniques and metallic paint splatters.
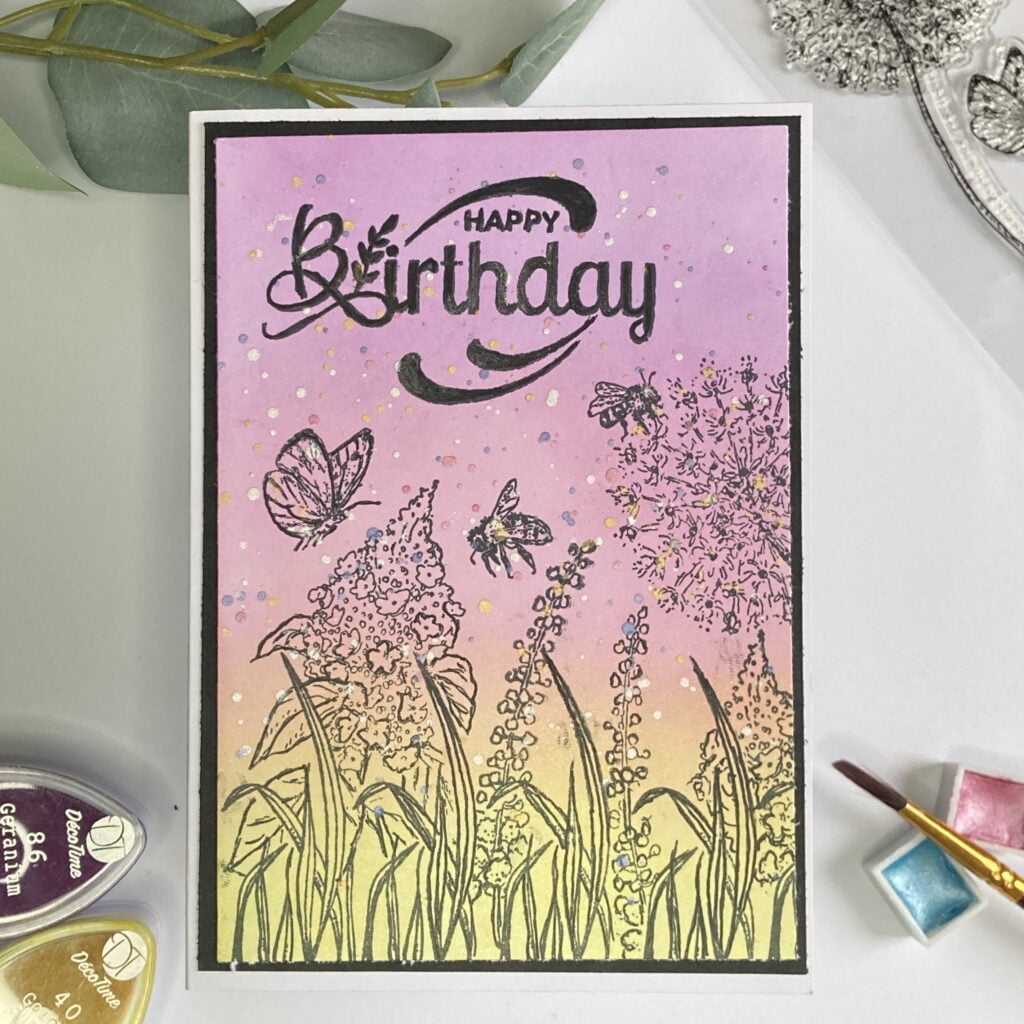
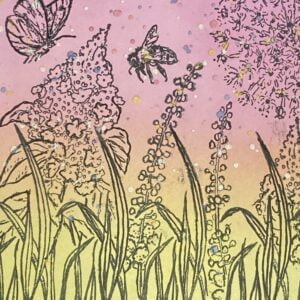
- Ink blending techniques: Choose your favourite ink in the colours purple, pink and yellow. I used chalk ink for this, but you can use any ink you have at home. Use blending brushes or any other blending tool of your choice and apply the ink to the background panel in a gradient effect. Start with purple at the top, moving to pink in the middle and ending with yellow at the bottom. Blend the colours seamlessly to create a soft and ethereal background that captures the essence of spring.
- Metallic Paint Splatters: To add some interest and texture to the background, I use metallic paint to add splatters to the background. I used the colours white, yellow, pink and purple for this. Add a little water to the paint. Apply some paint with water to your brush and gently tap the brush against your finger or a pen to create splatters in the background. These metallic accents give your card a sense of magic and sophistication.
With these techniques, you will create a beautiful background that sets the stage for the floral beauty to come!
Step 3. Bringing Nature to Life: Stamping Grasses and Flowers
To bring our spring flower card to life, we use clear stamp sets with grasses and flowers. Follow these steps to master the masking technique and create beautiful stamped images:
- Masking Technique: Start by stamping the grasses in black ink onto the background panel. Then, stamp the same grasses on Post-it notes or masking paper and cut them out to make masks. Place the masks over the stamped grasses on the background panel to protect them from overlapping with the next layer of stamped images.
- Stamping Process: Now, use the same masking technique to stamp the flowers. Place the flower stamps between the grasses and allow them to overlap slightly for a natural look. Stamp the flowers with black ink, making sure they align well with the grass and background. The masks make it look like the flowers are popping out from behind the grass, creating depth and dimension to our scene.
With the masking technique, you can create beautifully layered stamped images that capture the beauty of spring.
Step 4. Fluttering Wings: Adding Butterflies and Bees stamps
I also use stamps of butterflies and bees to complete the scene. With black Memento ink, I stamp the butterflies and bees on the background. I strategically place them around the grasses and flowers to create a sense of depth and dimension to our scene. By adding flying butterflies and bees, our spring flower card will come to life and embody the joyful spirit of the season.
Step 5: Birthday Wishes: Adding a Happy Birthday Sentiment
In this step, we will learn how to add a heartfelt message to our spring flower card by including the phrase “Happy Birthday”. Follow these steps to stamp the sentiment onto your card:
- Choosing the stamp set: Start by selecting a clear birthday sentiment stamp set from your collection. Look for phrases like “Happy Birthday” or “Best Wishes” that fit the occasion. Consider the style and size of the text to ensure it matches the design of your card.
- Stamping Process: Using Memento black ink, stamp the chosen birthday sentiment onto the card. Position the text in a central location or wherever it fits best with the layout of your card. Press the stamp firmly onto the card to ensure a crisp and clear impression.
By incorporating the “Happy Birthday” text, you’ll add a personal touch to your spring flower card, making it the perfect gift for celebrating special occasions.
Finishing Flourish: Bringing It All Together
Let’s bring all the elements together to put the finishing touches on our spring flower card. Follow these steps for assembling the card and making final adjustments:
- Assembling the Background Panel: Start by mounting the background panel onto a slightly larger piece of black cardstock (10 cm x 14.3 cm). This will create a striking frame around the colourful background, adding depth and contrast to our design. Use adhesive to securely attach the background panel to the black cardstock, ensuring it’s centred and aligned perfectly. Then, adhere this to the base card.
- Final Adjustments: Take a moment to review your card and make any final adjustments. Use a black fine liner to enhance details, such as outlining stamped images. This step allows you to add a personal touch and fine-tune the overall appearance of your card.
By assembling the background panel onto black cardstock and making those final touches, you’ll create a stunning spring flower card that’s ready to brighten someone’s day.

Inspire, Create, Share, and More!
As we come to the end of our journey in creating a spring floral card, let’s take a moment to appreciate the creative process and celebrate the joy of card making. We have explored various techniques such as ink mixing, stamping, and more to bring our vision to life. Let’s continue to inspire and share our love of crafting with others.
Join the Hop
Join me in celebrating creativity and rediscovery by participating in our monthly Instagram hop. For this card, I have embraced the theme of spring and mixed media, using forgotten clear stamp sets to create a new design. You can explore the hop and discover other participants’ creations by visiting the link to my Instagram post. Get inspired by a community of passionate crafters.
More Spring Card Inspiration
Looking for more spring card inspiration? Check out these related articles for additional ideas and techniques to try:

This is also a card made with a clear stamp from Craftsensations.

Products used
Disclosure: Some of the links in this post may be affiliate links. This means that if you make a purchase through these links, I may earn a small commission at no additional cost to you. I only recommend products and services that I personally use and believe in. Your support helps me continue to provide valuable content to my readers. Thank you for your support!”
Products with affiliate links
Bugs 3 from Craftemotions from Craftemotions

Memento Tuxedo Black Ink

Products without affiliate links
- Clear stamps flowers from Craftsensations (ActionNL).
- Mettalic Paint brand unknown (ActionNL).
- Black Cardstock brand unknown (ActionNL).
- Chalk ink from Decotimecrafts (ActionNL).
- Clear Stamps Birthday set AlinaCraft
I would like to join the following challenges
- The Paper Funday Challenges: No background paper
- Through The Purple Haze Challenges: Anything goes
- Craft Rocket Challenges: Birthday
- Krafty Chicks Challenge: All occasions
- My Time To Craft!: Create your own background
- Lil Patch of Crafty Friends Challenge …: Anything goes
- A Perfect Time To Craft Open Challenge: Anything goes
- Daisy Chain Challenges: Flowers
- The Creative Crafters: Anything goes
wonderfully designed and well thought out card. I am so impressed by your in depth tutorial, too. Thank you so very much for joining us at The Paper Funday Challenge this month.
Ah thank you so much for your lovely comment
A beautiful card Renske. Your ink blending looks gorgeous and I love the silhouette images. Thanks for sharing with us at Krafty Chicks challenge. Hugs, Denise, DT x x
Thank you
A wonderful card. I love the colour combo you’ve chosen for the background, it’s perfect for the scene that you’ve created. And those splatters are a great addition. Thanks for joining us at My Time To Craft. Hugs, María.
Thank you so much for your lovely comment