
Some links in this post are affiliate links. This means I may earn a small commission if you make a purchase, at no extra cost to you. I only recommend products I use and genuinely enjoy in my own cardmaking. Read more here.
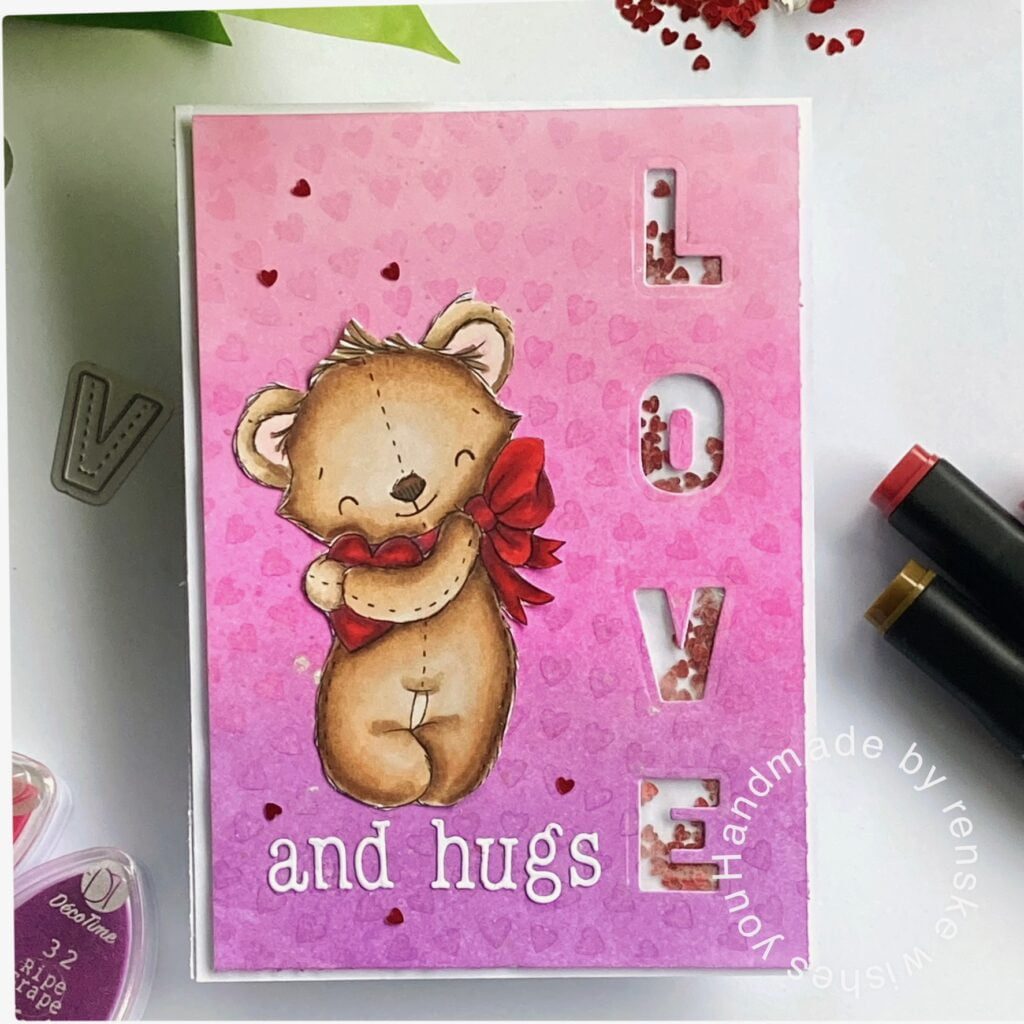
Today a new challenge started over at the CRAFT Challenge blog. We have a little Christmas break, so the challenge is for 3 weeks. The theme is “Anything goes”. This time I made a shaker card love and hugs.
Our sponsors are:

and

For this challenge, I used an image from the set “Winter Bears” from Sweet ‘n Sassy. He is so cute.
In this article, I am sharing tips on how to make this cute shaker card. You can find why I am using baking paper and how I get this tone-on-tone look. So, let’s get into it.
Measurements and card stock you need
- I made a top-fold base card. So, you need a piece of white card stock measuring 30 centimetres by 10,5 centimetres. Score at the long side at 15 centimetres.
- 2 pieces of white card stock measuring 10 centimetres by 14,5 centimetres. One we use for our background and the other piece to close the back of the shaker parts.
- 200-gram DCP paper to print your image on.
The digital stamp and coloring
I printed my image on 200-gram DCP paper and coloured it with my alcohol markers.
- The bear: Twany (106), Hazelwood (108), Caramel (253), Walnut (100) and Clay (116).
- The ears of the bear: Peach Candy (277), Pastel Pink (17) and Blushed Skin (257).
- The heart and scarf: Wine Red (01), Burgundy (247), English Red (249) and Cardinal (244).

Making the background with tone on tone stenciling
I wanted to make the background with purple and pink. I decided to do the purple at the bottom of the card and the pink at the top. I used my chalk ink from Decotimecrafts for this. I used the following colours:
- I love purple (85).
- Ripe Grape (32).
- Geranium (86).
- Neon Purple (45).
- Neon Pink (46).
- Pink Lady (61).
- Love-able (60).
After making my background with ink, it’s time to start using my stencil. I used a stencil with hearts. I placed my stencil over the background and applied the hearts in the same place using the same colors.

Now we have this cute background.
Making the shaker parts
I wanted to die-cut the word Love in my background. From the letters, I would like to make shakers. First I have to die-cut the letters out of the background.

I taped this letters on purple tape to get the letters so straight as possible on to my background. I used my anti static powder tool to get the tape a bit less sticky between the letters. So, the tape doesn’t tare my paper when I get the tape of the paper. Now I can get it through my die-cutting machine.
Behind the letters I place acetate. To make the shaker parts I must put foam tape around the letters. For that, I need thin strips. Now I only have very wide foam tape. So, I must cut it in thin strips. To do this, I put my foam tape on a piece of baking paper. Then I can cut easily thin strips without it sticking to my scissor. I place the thin strips around the letters, and the wide strips on the rest of the panel.

This is the back of my background panel. When you apply the foam tape you can put your shaker parts behind the letters. I close the back of my panel with a piece of white paper with the same measurements as my background.
And your shaker part is ready. You can now put this on your base card.
Finishing the shaker card love and hugs
Now it’s time to finish the card. I used a little letter die to make my words “and hugs”. I place my bear on top of that. For the final addition I placed some little red hearts around my bear.
I hope you like this cute shaker card. Happy crafting and I hope you will join our challenge.

More Card-making inspiration with Sweet ‘n Sassy
Products I used:
I’m listing the products I used below. I will link them when I can. Click on the link to go directly to the product. Where available I use compensated affiliate links which means if you make a purchase I receive a small commission at no extra cost to you. Thank you so much for your support.
- Digital stamp from the set “Winter Bears” from Sweet ‘n Sassy.
- Twin markers (alcohol markers ) from Decotimecrafts.
- Letter dies from Aveccreative.
- Stencil with hearts from Craftsensations.
- Chalk ink from Decotimecrafts.
- Little letter die from Craftemotions.
- Little red hearts brand unknown.
I would like to participate in the following challenges:
- Digi Choosday Cardmaking & Crafting Challenge: Anything goes
- Crafty Calendar Challenge: Anything goes
- Gem of A Craft Challenge: Anything goes
- Lil Patch of Crafty Friends Challenge …: Anything goes
- Dragonfly Dreams: Anything but Christmas
- A Perfect Time To Craft Open Challenge: Anything goes
- Classic Design Challenge Blog: Anything goes
- Crafts Galore Encore Challenge Blog: Anything goes
- Critter Crazy CHALLENGE BLOG: Anything goes
Gorgeous card Renske. Love a shaker card!
Thanks so much for joining us for our Lil Patch of Crafty Friends Challenge #195 sponsored by SheepSki Designs.
We hope to see you again soon,
Lou DT xo
JemLou Productions
Lovely work. Thank you for joining the Critter Crazy challenge. Hope to see you again.
This is so very very cute and your technique was so interesting. Thanks so very much for joining us this time at the Dragonfly Dreams chalene
Very cute card. Well done. Thank you for joining us at Through the Craft Room Door this month. Happy Holidays. Judy DT
So cute!!! Thanks so much for participating in our LIL PATCH OF CRAFTY FRIENDS challenge!!! I appreciate that you play along and I enjoy visiting your blog!! Have a happy crafty day!!
Deanne at A Little Bit O’ Paper
Adorable image, beautiful colourin- love the stencilled background. Thank you for joining in at Crafty Calendar this month
Chris
x
Echt een schatje!
Ben je alvast klaar voor Valentijnsdag, haha!
Haha zo is dat. Dank je wel.