
Some links in this post are affiliate links. This means I may earn a small commission if you make a purchase, at no extra cost to you. I only recommend products I use and genuinely enjoy in my own cardmaking. Read more here.
Welcome, Crafters and Card Lovers!
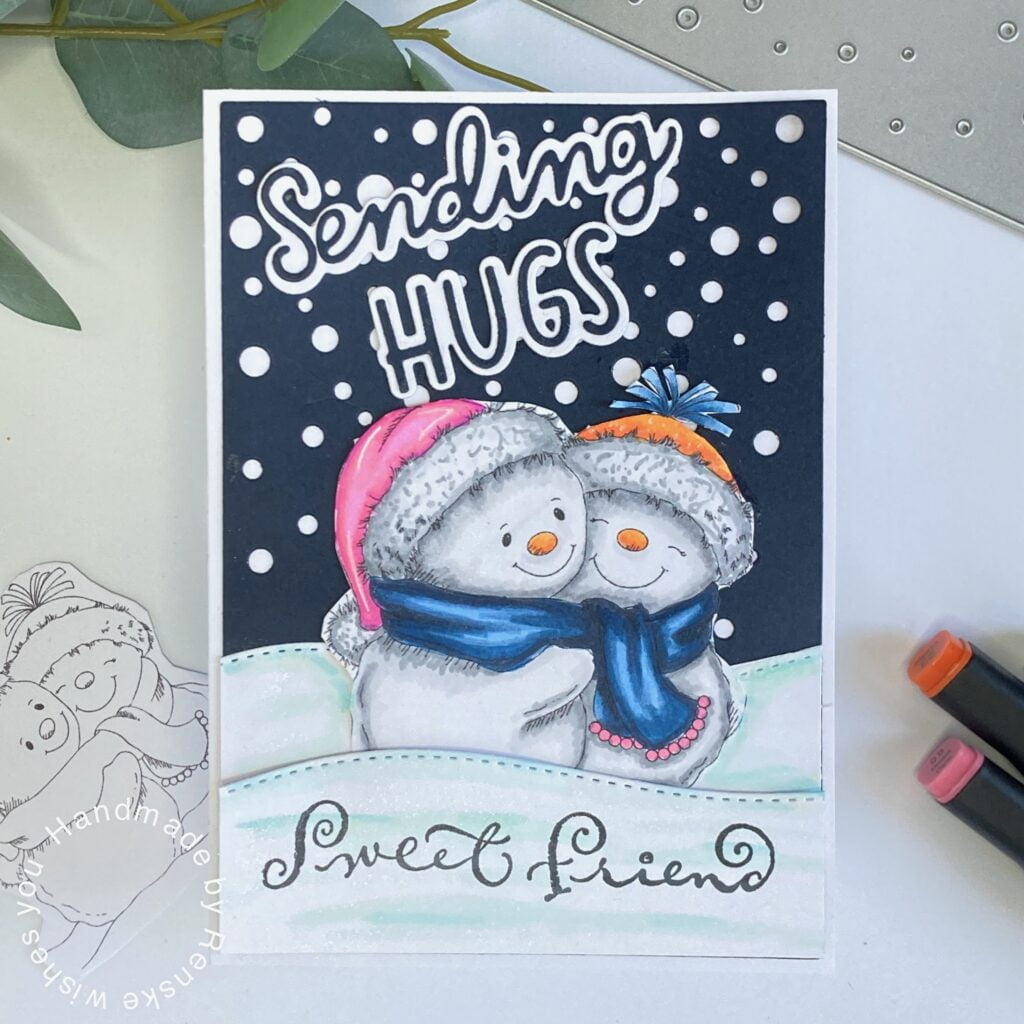
Today, I am excited to begin a delightful winter craft journey with all of you. Let us create a heartwarming snowman sending hugs card. Picture two cute snowmen, sharing a scarf and spreading the joy and warmth of the winter season.
I was inspired to make this card to capture the essence of winter hugs. Snowmen have a magical appeal, don’t they? The idea of sharing hugs in the crisp winter air laid the foundation for this cosy card design.
But this blog post is not just a display of a charming card. It’s your guide to a step-by-step crafting journey. I will lead you through the process of creating this enchanting winter greeting from start to finish.
Please note that while the specific digital stamp I used may no longer be available, fear not! The crafting world is teeming with similar stamps, ensuring that you’ll find inspiration and valuable crafting tips in this tutorial.
So, let’s start this crafting journey together – a journey filled with warmth, creativity, and the joy of sharing hugs in our little winter wonderland.
Materials, Tools, and Measurements for This Snowman Sending Hugs Card
To create a snowman card, you will need various materials and tools. The following are the main materials required to bring this celebration to life:
Materials
- Cardstock:
- White cardstock for the card base (22 cm x 15,3 cm sheet folded in half for an 11 cm x 15,3 cm card.
- Dark blue cardstock for the background die. (coordinate with your winter theme).
- White DCP paper to print the digital stamp on.
- Digital Stamp:
- A winter-themed digital stamp (or any of your choice, ensuring it suits the cuddly snowman scene).
- Markers:
- Alcohol markers for colouring the digital stamp.
- Background Die:
- A die for creating the winter background (circular pattern die used here).
- Snow hills die: To die cut the snowhills with.
- Sentiment Stamps and Dies:
- Wor dies to form the words Sending Hugs, and the matching shadow diees.
- Clear stamp sentiment. I choose the sentiment, Sweet Friend.
- Glitter Pen and White Gel Pen:
- Aqua shimmer pen for adding sparkle to the snow and accessories
- White gel pen for highlighting details
Tools
- Die-Cutting Machine:
- Used to cut the background die and sentiment dies
- Printer:
- For printing the digital stamp on white DCP paper
- Scissors and Craft Knife:
- To fussy-cut smaller details and sentiments
- Adhesive:
- Double-sided tape, glue, or glue dots for assembling the card layers
- Foam Tape:
- For adding dimension to certain elements, like the snow hills
- Ruler and Scoring Tool:
- For scoring and folding the card base
- Markers:
- Used for adding shadows and details to the snow hills
- Craft Mat:
- To protect your work surface during colouring and crafting
Let’s get started with the tutorial and make this Snowman sending hugs card.
Card Dimensions:
- Card Base:
- Use 22 cm x 15,3 cm white paper score at 11 cm, and fold to create a card base measuring 11 centimetres by 15,3 centimetres.
- Background Die-Cut:
- Sized to fit the card base.
Step-by-Step Tutorial: Creating the Snowman Sending Hugs Card
Welcome to the step-by-step tutorial for creating the winter snowman card that sends warm hugs! In this tutorial, I will guide you through the process of colouring, assembling, and bringing our heartwarming snowman to life. Each step is designed to help you add your unique touch to create a personalized masterpiece that captures the magic of winter hugs.
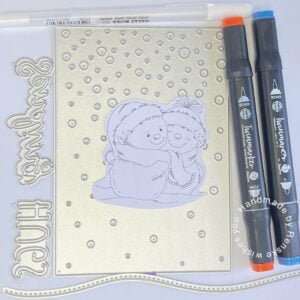
Step 1: Print and Color the Digital Stamp
Let’s bring these snowmen to life! Follow these steps to print and colour the digital stamp:
Printing the Digital Stamp
To get started, you’ll need to print the digital stamp on quality white DCP paper. Ensure that your printer settings are optimized for high-quality prints to capture all the intricate details of the digital stamp.
Choosing Colors and Coloring
Once you have the printed digital stamp, it’s time to add some colour! I used Decotimecrafts’ Twin Markers, specifically the following colour combinations:
- Snowmen: Cool Grey 5, Cool Grey 4, and Cool Grey 1.
- Scarves: Dark Denim (195), Dark Sky (191), Midi Sky (190), and Sky Blue (86).
- Pink Hat: Pastel Pink (17), Pale Pink (09), Rose Pink (08), and Vivid Radiant (86).
- Orange Hat and Noses: Yellow (34), Orange (23), and Amber (266).
- Shadows on Snow Hills: Frost Blue (184) and Cool Shadow (178).
Use your creativity to personalize the colour palette and create a snowman scene that resonates with the warmth and joy of winter.
Adding highlight and glitter
For added personality, use a white gel pen for highlights on the pink hat and apply dotted patterns on the orange hat. You can also enhance the winter magic by gently applying glitter with an aqua shimmer pen on the snowmen and snow hills.

Step 2: Creating the Card Base
Now that our snowmen are beautifully coloured, let’s move on to creating the card base.
- Choosing Card Base Dimensions: For this project, I decided to deviate from my usual card base size. The reason behind this is the background die used, which has dimensions matching my standard card base. To maintain a neat appearance and avoid cutting off any circular patterns, I recommend using a card base of 22 centimetres by 15.3 centimetres.
- Scoring and Folding: To create the card base, score the selected white cardstock at the 11-centimeter mark along the longer side, and fold it in half.
- Benefits of a Larger Card Base: Using a slightly larger card base will allow the enchanting background to fit seamlessly without any cutoffs, and contribute to the creation of a beautiful white border around the background for a clean and polished finish.
With these steps, you’ll create a card base that complements the enchanting background and sets the stage for our heartwarming snowman sending hugs card. Let’s move on to the next steps in crafting this delightful winter greeting!
Step 3: Creating the Background with a Background Die
Now let’s create the enchanting winter background with a special die. Follow these simple steps to bring the snowy scene to life:
- Selecting the Background Die: Choose a background die that matches your winter theme. I used a background die that cut out several large circles. This is perfect for simulating falling snow. But use what you have at home. Whether this is a die cut, or whether you make a background yourself.
- Die-cutting the background: Lay the dark blue cardstock on the cutting plates. Position the background die on the paper, aligning it according to your design preferences. Run the paper and die through the die-cutting machine. The machine will precisely cut the intricate pattern, creating the foundation for your winter wonderland background.
- Assembling the Background: Stick the background onto the card base. The card base is slightly larger than our background, creating a nice white border around it. The circular patterns give the illusion of softly falling snow and give your card a magical touch.
By following these steps, you’ll create a captivating background that perfectly complements your heartwarming snowman sending hugs card. Now, let’s move on to the next stages of crafting this delightful winter greeting!
Step 4. Creating the Snow Hills
Let’s shape the snowy landscape by creating charming snow hills. Follow these steps to edit the hills and add shadows using alcohol markers:
- Cutting Snow Hills: Start by selecting white paper for the snow hills. Use a wavy or curved die to cut out two distinct snow hills. These hills will serve as delightful slopes for our snowmen to play.
- Shading with Alcohol Markers: Add depth to the snow hills. Using alcohol markers, carefully apply shades along the lower edges of each hill. I used Frost Blue (184) and Cool Shadow (178) for this, creating a subtle and cool-toned shadow effect.
- Adding shimmer: Consider using a shimmer pen to add shine to the snowhills. This extra touch contributes to the overall wintry charm of the scene.
By following these steps, you’ll craft delightful snow hills that provide the perfect setting for your heartwarming snowman sending hugs card. Now, let’s proceed to the next stages of bringing our winter wonderland to life!

Step 5: Creating the Sentiments
Let’s add some heartwarming text. Follow these steps to come up with the perfect words for your heartwarming snowman sending a hug card:
- Choosing Sentiments: Select sentiments that resonate with the warmth and joy of the winter season. For this project, I used sentiment dies that allowed me to spell out “Sending Hugs.” Utilize stamps or dies that suit your desired message.
- Die-Cutting the Sentiments: Use sentiment dies to cut out the words “Sending Hugs.” Choose a contrasting colour, like dark blue, to make the sentiments stand out against the snowy backdrop.
- Stamping a Sweet Message: Stamp a sweet message on the front snow hill using a suitable sentiment. For example, I stamped “Sweet Friend” to add a personal touch to the card. Choose sentiments that evoke the warmth you wish to convey.
By following these steps, you’ll craft sentiments that add a touch of love and friendship to your heartwarming snowman sending a hug card. Now, let’s proceed to the final steps of assembling our winter wonderland card!

Step 6: Assembling the Card
Now, it’s time to put all the enchanting elements together and complete our heartwarming snowman sending hugs card. Follow these steps to assemble the card and prepare it for sending:
- Placing the Snow Hills: Start by carefully placing the snow hills on the card base. Arrange them in a way that complements the overall composition, and consider the placement of the snowmen and sentiments. Use foam tape to attach the front snowhill to create dimension.
- Positioning the Snowmen: Next, place the coloured and glittered snowmen between the snow hills. Make sure they are nestled comfortably within the wintry landscape, sharing their warm hug under the falling snow.
- Arranging the Sentiments: Finally, add the die-cut sentiments to the card, considering a placement that enhances the visual appeal. Overlapping the sentiments with the snow hills can create a seamless and cohesive design.
By following these steps, you’ll complete the assembly of your heartwarming snowman sending hugs card. Now, your delightful winter creation is ready to bring joy to its recipient!

Inspire, Create, Share, and More!
Thank you for joining me in creating this handmade Snowman sending hugs card. I hope you enjoyed the process and found inspiration in reading this article. If you have any questions, need clarification, or just want to share your thoughts, please comment below and I’ll get back to you as soon as possible.
More Card-Making Ideas
If you’re looking for more card-making ideas, check out my blog where I have a lot of inspiration. Below, I’ve linked some articles that you might find interesting. These are also Winter scene cards for even more inspiration.


Products used
Products used with Affiliate links
Affiliate Disclosure: This article may contain affiliate links, meaning I may earn a small commission if you make a purchase through my links, at no additional cost to you. Thank you for supporting my work!
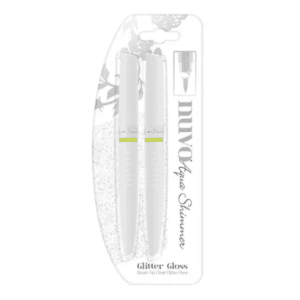
Nuvo Aqua Shimmer Pen
Products used without affiliate links
- Digital stamp snuggled up snowmen from Dis Digi Stamps. Unfortunately, this is no longer available.
- The background die from Aveccreative
- Snow Hill dies from Aveccreative
- Alcohol markers from Decotimecrafts
I would like to enter my card in the following challenges:
- Try it on Tuesday: Add some text.
- Crafty Gals Corner: Winter fun
- Fab ‘n’ Funky Challenges: Stamp it.
- The Sisterhood of Crafters: The Winter Blues.
- Krafty Chicks Challenge: All occasions.
- Crafty Catz: Anything goes + makes me smile
- Cut It Up: This makes me happy
- Allsorts challenge blog: Anything but square
- Lil Patch of Crafty Friends Challenge …: Anything goes
- Classic Design Challenge Blog: Anything goes
- The Creative Crafters: Anything goes
- The Cutie Pie Challenge Blog: Feeling sentimental
Adorable card Renske. Beautifully coloured too.
Thank you for entering the Anything Goes Challenge at Lil Patch of Crafty Friends.
Thank you
Renske… You had me at Snowmen!! I love and collect them all year round. They are scattered throughout my home during the holidays! Your card is darling. I love the background and your coloring. Adorable card which brought smiles to my face. Thanks for joining us at Cut it Up! I hope you’ll join us again! Have a wonderful day! Happy Crafting!!
Ah thank you so much for your sweet comment. Really appreciate it. I am glad it makes you smile.
What an adorable card Renske. The image is so sweet and your colouring is fantastic. Thanks for sharing with us over at Krafty Chicks challenge. Hugs, Denise x
Thank you so much for your sweet comment ❤️
What a super cute image and your card design is wonderful. Thanks for taking part at Allsorts challenge.
Thank you so much ❤️