Imagine opening a card that springs to life with a stunning 3D effect, thanks to this stepper card tutorial. This whimsical creation transports you to a charming world featuring a beekeeper, buzzing bees, and sweet honeycombs. That’s the magic of a scene stepper card—more than just a message, it’s a delightful experience for the recipient.
If you’re a card-making enthusiast eager to elevate your craft, you’re in for a treat! Our latest challenge on Penny’s Paper Crafty Challenge blog invites you to explore the enchanting world of handmade cards and papercrafts. This new challenge features generous sponsors, Polkadoodles and The Paper Shelter. [Insert sponsor logos here]

Polkadoodles

The Paper Shelter
In this tutorial, inspired by the brilliant Maria’s Crafty Corner, we’ll create a mesmerizing scene stepper card with a delightful bee theme. From cutting and assembling the card base to adding intricate bee details, you’ll learn step-by-step how to bring your creative vision to life. Whether to refine your techniques or explore new ideas, this guide will help you enhance your card-making skills and add a personal touch to your creations.
Are you ready to take your card-making to the next level with a captivating 3D effect and a buzz-worthy bee theme? Let’s dive in and transform your card into a charming piece of art to impress!
- Materials and Tools
- Step-by-Step Scene Stepper Card Tutorial
- Step 1: Creating the Card Base
- Step 2: Cutting and Attaching Patterned Paper
- Step 3: Creating the Slot for the Back Flap
- Step 4: Working with the Digital Stamp Buzzy Bee Honey
- Step 5: Creating the Scene Backgrounds
- Step 6: Creating the Sentiment
- Step 7: Creating the Embellishments
- Step 8: Assembling the Elements
- Let’s Get Creative Together
- Polkadoodles products in the spotlight
- I would like to enter my card in the following challenges
Materials and Tools
To create a stunning scene stepper card with a bee theme, you will need a variety of materials and tools. This guide provides a detailed breakdown of everything you’ll need, including specific items from the Polkadoodles collection.
Polkadoodles Materials
- Buzzy Bee Honey Digital Stamp: This charming digital stamp features a beekeeper and bee, perfect for the central image of the scene.
- Polkadoodles Spring Gnome Paper Pack: his pack provides additional decorative layers and backgrounds with coordinating patterns and colours to enhance the bee theme.
- Winnie Sunshine Delight Sentiment Set: This set includes the phrase “Today is lovely because you’re in it,” which can be adapted to “Today is lovely bee-cause you’re in it.
Basic Materials
- Black Cardstock: Use this for the card base and to discuss the honey rate, providing a sturdy foundation and contrasting backdrop.
- Colouring medium: Any colouring medium can be used for adding colour to the digital stamps and other elements. I used my alcohol markers.
- Dies and Stencils: These are for creating intricate shapes and patterns for embellishments.
- Adhesives: Strong adhesives are needed for assembling the card and attaching the elements. Double-sided tape or glue dots can be used as well.
Additional Tools and Supplies
- Paper Trimmer or Scissors: Use these to cut the paper to size and trim elements.
- Blending Brushes or Sponges: These are for adding ink or colour to the background.
- White Gel Pen: These are for adding ink or colour to the background.
- Die-cutting machine: it is used to die-cut the honeycombs.
By focusing on the Polkadoodles products, you can achieve a cohesive and charming bee-themed design for your scene stepper card.
Step-by-Step Scene Stepper Card Tutorial
Creating a scene stepper card can enhance your card-making skills by adding a delightful 3D effect and intricate details that will captivate the recipient. In this tutorial, I will guide you through the process of making a stunning bee-themed scene stepper card.
I found inspiration from an excellent guide provided by Maria’s Crafty Corner. Maria’s tutorial includes a detailed template and a helpful video that thoroughly covers the card-making process. Her step-by-step instructions are invaluable for mastering the basics. You can find her tutorial on the button below.
In my tutorial, you will find additional tips and personal insights that complement Maria’s guide. I will explain the process of making this card, share my creative techniques, and highlight key tricks. Additionally, you will learn how to use the Polkadoodles products for this specific card.
Are you ready to explore and add a personal flair to your scene stepper card? Let’s dive in and bring your bee-themed creation to life!
Step 1: Creating the Card Base
To begin making your stunning scene stepper card, we need to prepare the card base. Follow these detailed instructions from Marrie’s Creative Corne to create the foundation of your card. I will mention the steps below on how I made the foundation.
- Cut the Cardstock:
- Start with a piece of black cardstock measuring 6 inches by 11 inches. This will be the base of your stepper card.
- Score the Card Base:
- Place the cardstock on your scoring tool with the long side (11 inches) aligned at the top.
- Score at 1 inch, 2 inches, and 6.5 inches along the length of the cardstock according to the tutorial of Maria. These are 1-inch score lines. Do this to both sides. These score lines will help create the folds that form the stepper card’s structure.
- Create the Stepper Folds:
- Rotate the cardstock so the 6-inch side is along the top.
- Place the cardstock on 1 inch.
- Make a cut line between the 1-inch score line to the 6.5-inch score line. Score at 5.5 inches from the left edge, making sure to score between the cuts you made earlier. This creates the central step of the card.
- Cut the Stepper Panels:
- Return to the original orientation with the long side (11 inches) at the top.
- Align the cardstock at 4 1/4 inches and score from 1.5 inches to 4.5 inches. This will create the window area.
- Move the cardstock to 4 5/8 inches and cut between 1.5 inches and 4.65 inches to form the window edges.
- Finally, score at 5.5 inches from 1.5 inches to 4.5 inches to complete the window section.
- Folding the Card Base:
- Fold along the score lines to form the stepper card structure. The folds will create the card’s steps and layers, ready for decoration.
With your card base complete, you’re now ready to move on to the next steps—cutting and applying patterned papers to add style and flair to your card.
Step 2: Cutting and Attaching Patterned Paper
Here are the steps for cutting and attaching patterned paper to decorate your card base:
- Prepare Your Patterned Paper:
- We’re using the Polkadoodles Spring Gnome digital paper set, starting with the yellow paper with orange-brown dots for the main sections of your card.
- Cutting the Yellow Paper:
- Bottom Strip: Cut one piece of yellow paper to 7/8 inch by 5 7/8 inches for the bottom strip of your card.
- Side Strips: Cut two pieces of yellow paper to 7/8 inches by 4 3/8 inches for the two outer strips on the card.
- Attaching the Yellow Paper:
- Adhere the two yellow pieces (7/8 inch by 4 3/8 inches) to the outermost strips on the card base.
- Attach the yellow piece (7/8 inch by 5 7/8 inches) to the bottom long strip of the card base.
- Cutting the Blue Bee Paper:
- Front Section: Cut one piece of blue bee-patterned paper to 3 3/4 inches by 4 1/4 inches for the front section of the card.
- Back Section: Cut another piece of blue bee-patterned paper to 5 3/4 inches by 4 1/4 inches to cover the back section of the card.
- Attaching the Patterned Paper:
- Front Section: Layer the yellow paper (3 7/8 inches by 4 3/8 inches) and the blue bee paper (3 3/4 inches by 4 1/4 inches) together. Adhere this combination to the front panel of the card.
- Back Section: Adhere the yellow paper (5 7/8 inches by 4 3/8 inches) to the back panel. Place the blue bee paper (5 3/4 inches by 4 1/4 inches) on top.
With the patterned paper securely in place, your card base will start to reveal its charming bee-themed design. Next, we’ll focus on adding the decorative elements to complete your scene stepper card.
Step 3: Creating the Slot for the Back Flap
With the patterned paper on the back of your card, it’s time to make a crucial cut that will allow the flap of the stepper card to fit perfectly. Follow these steps:
- Positioning the Card:
- Place the card base with the longest side oriented along the top of your cutting surface.
- Making the Cut:
- Measure 9 inches along the long edge of the card base.
- Make a cut starting from 1 3/8 inches from the left edge.
- Extend the cut until you reach 4 5/8 inches from the left edge.
- Checking the Slot:
- Ensure that the slot is straight and aligns with the intended flap area. This slot will accommodate the stepper flap, allowing it to slide and create the 3D effect.
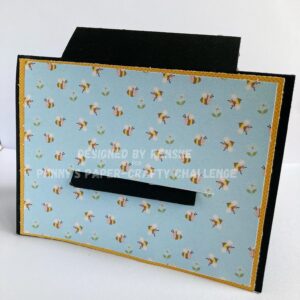
Your card base has now the necessary slot to fit the stepper flap. Next, we’ll move on to adding the decorative elements and assembling the scene for your stepper card.
Step 4: Working with the Digital Stamp Buzzy Bee Honey
After placing your patterned paper, it’s time to bring the charming digital stamp, Buzzy Bee Honey, to life. Here’s how you can transform this delightful image into a stunning focal point for your scene stepper card:
Printing the Digital Stamp
Print the Buzzy Bee Honey digital stamp at a height of 8.5 centimetres. This size will automatically adjust the width proportionally to ensure it fits well on your card.
Colouring the Image
I coloured the picture with my alcohol markers. I used the following colour combinations:
- Skin: Tanned Skin, Peachy Blush, Salmon Pink, Pale Cream
- Hair: Pale Cream, Brown Grey, Walnut, Clay
- Hat and Pants: Mint Blue, Baby Boy, Phthalo Blue
- Shirt and Honey: Pale Yellow, Lemon Yellow, Golden Yellow, Barn Red
- Shoes: Sand, Rose Beige, Burnt Sienna
- Gloves: Cool Grey 3, Cool Grey 1
- Honey Shelf: Sand, Rose Beige, Burnt Sienna
- Beehives: Leather, Sand, Rose Beige, Burnt Sienna
- Grass and Leaves: Grass Green
- Flowers: Lemon Yellow
- Grass (Background): Matcha Tea
- Sky: Cool Shadow
- Watering Can: Cool Grey 7, Cool Grey 5, Cool Grey 3, Cool Grey 1
- Middle Honey Jar: Pale Yellow, Lemon Yellow, Golden Yellow
- Outer Honey Jars: Cool Shadow, Golden Yellow, Lemon Yellow
- Funnel: Cool Grey 3, Cool Grey 1
- Head Net: Add white stripes using a white gel pen.
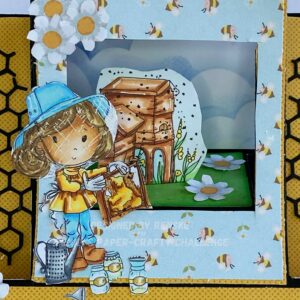
Adding Highlights and Cutting
After colouring, enhance the image with white highlights using a white gel pen for added depth and dimension.I placesd highlights on the hat, the shirt, and on the beehives.
I also drew white lines to make it stand out a bit, just right for her.
Carefully cut out the coloured image. Separate the elements into two parts: the beekeeper with the honey shelf and the beehives. This separation allows for easier placement and attachment.
Preparing for Assembly
For the beehives, leave a small extra margin at the bottom of each cut-out. Fold this margin inward to create a tab for attaching the beehives inside the card. This tab will make it easier to glue the beehives to the stepper card’s platform.
With your digital stamp beautifully coloured and prepared, you’re now ready to assemble it on your scene stepper card. This will add a whimsical and personal touch that will surely impress any recipient.
Step 5: Creating the Scene Backgrounds
Now that the main elements of your scene stepper card are ready, it’s time to create the perfect backgrounds. For this step, you’ll use two white panels to craft the backdrop of your whimsical scene.
Preparing the Panels
- Panel Sizes:
- 2 3/8” x 3 5/8” (for the sky background)
- 2 1/8” x 2 3/4” (for the grass background)
Creating the Sky Background
Take the panel sized 2 3/8” x 3 5/8” and use it to create a beautiful sky effect.
Materials Needed
- Cloud stencil
- Distress Ink in Stormy Sky
- Blending brush
The steps
- Position the cloud stencil over the panel.
- Using the blending brush, gently apply Stormy Sky Distress Ink through the stencil. Focus on creating a soft, cloudy effect by blending the ink in circular motions.

Creating the Grass Background
Next, take the panel sized 2 1/8” x 2 3/4” for the grass.
Materials Needed
- Distress Ink Mowed Lawn
- Distress Inks in Pine Needles
The steps
- Apply Pine Needles Distress Ink around the edges of the panel to create a darker, shadowy border.
- Blend Mowed Lawn Distress Ink into the centre of the panel, overlapping slightly with the Pine Needles for a smooth transition. This combination mimics the look of lush, grassy terrain.
Assembling the Backgrounds
- Sky Panel: attach the sky panel to the background of the stepper card.
- Grass Panel: Place the grass panel on the middle section of the stepper card’s interior. This panel will provide a grassy ground that supports the scene’s elements.

By adding these background panels, you set the stage for a charming and cohesive scene that enhances the overall impact of your stepper card. The sky and grass backgrounds will complement the focal points, creating a layered, dimensional effect that draws the viewer’s eye.
Step 6: Creating the Sentiment
Now that the scene is set, it’s time to add a heartfelt sentiment to your stepper card. We will be customizing a sentiment from the Winnie Sunshine Delight digital stamp set to perfectly match our bee-themed card.
Customizing the Sentiment
Original Text: “Today is lovely because you’re in it.”
Customized Text: “Today is lovely, bee-cause you’re in it.
Steps to Customize the Sentiment
- Open a Word Document.
- Paste the original sentiment text into the Word document.
- Editing the Text:
- Click on the text to access the menu bar and select “Format Picture.”
- Choose the “Crop” option to trim the text.
- First, crop out the part that reads “Today is lovely be.”
- Next, crop the letter “e” from the text.
- Place the letter “e” after “Today is lovely bee” to form the word “bee.”
- Insert a small horizontal line to act as a separator.
- Copy and paste the text again to get the remaining part: “cause you’re in it.”
- Crop this text section and position it after the horizontal line.
Printing and Cutting
Print the customized sentiment text.
Cutting Instructions
- Cut out the first part of the sentiment: “Today is lovely bee.”
- Cut out the horizontal line as a separate piece.
- Cut out the remaining part of the sentiment: “cause you’re in it.”
Assembly
- Attach the first piece of text to the bottom strip of the card.
- Position and glue the horizontal line in between the two text pieces.
- Attach the last part of the sentiment to the end of the horizontal line.
By personalizing the sentiment with a playful bee-themed twist, you’ll add a special touch to your card that perfectly complements the overall design. This customization will make your card even more unique and memorable for the recipient.
Step 7: Creating the Embellishments
To complete the charming look of your scene stepper card, let’s add some delightful embellishments. These final touches will enhance the visual appeal and bring your card to life.
Honeycomb Pattern for the Side Strips
Materials Needed
- Black cardstock
- Honeycomb die or stencil
The steps
- Use the honeycomb die to cut two honeycomb patterns from the black cardstock.
- These honeycomb patterns will be used to decorate the side strips of the card, adding a sophisticated touch that complements the bee theme.
Flower Embellishments
Materials Needed
- Red patterned paper with white flowers and a yellow centre
- Scissors or a die-cut machine (for precise flower shapes)
- Alcohol markers (for shading)
The Steps
- Cutting the Flowers: Cut out seven flowers from the pink patterned paper with white flowers. Ensure that each flower is carefully cut to maintain its shape and detail.
- Adding Shading: Use alcohol markers to add shading to the flowers. This will create depth and dimension, making the flowers look more vibrant and lifelike. Apply subtle shading around the edges and in the centre of each flower to give them a realistic appearance.
Placement and Assembly
- Honeycomb Patterns: Attach the two black honeycomb patterns to the side strips of your stepper card. Position them to frame the card beautifully and enhance the bee-themed design.
- Flower Embellishments: Arrange and adhere the shaded flowers around the card as desired. You can place them near the base, around the sentiment, or scatter them throughout the scene for added visual interest.
These embellishments will add intricate details and a personal touch to your stepper card, making it truly special and uniquely yours.
Step 8: Assembling the Elements
Now that all the components of your scene stepper card are prepared, it’s time to bring everything together. Follow these steps to assemble the card and ensure that all elements are securely attached and beautifully arranged.
Positioning the Digital Stamp
- Attach the digital stamp featuring the girl with the honeycomb, watering can, and honey jars to the left side of the window on the front of the card.
- Ensure the girl is positioned prominently to create an engaging visual effect.
Arranging the Honey Boxes
- Adhere the honey boxes to the green grass panel inside the card.
- Apply glue to the backing strip of the honey boxes and attach them slightly angled behind the girl to add depth and interest to the scene.
Adding the Flowers
- Attach two shaded flowers to the green grass panel inside the card to complement the honey boxes and create a cohesive scene.
- lace two additional flowers at the extreme corners of the sentiment area to draw attention to the sentiment and add a decorative touch.
- Arrange three flowers in the top-left corner of the window area to balance the card and add vibrancy to the scene.
Placing the Honeycomb Patterns
Attach the two black honeycomb patterns to the narrow strips on the outside of the card. Align them snugly against the card edges to enhance the bee theme and provide a polished look.

After securing all elements in place, review your card to ensure everything is positioned as intended. Make any necessary adjustments to perfect the arrangement and finalize your beautiful scene stepper card.
Let’s Get Creative Together
Creating a scene stepper card with a charming bee theme is not just about following steps; it’s about infusing your creativity into every detail. From designing the card base to coloring the delightful digital stamps, each step brings you closer to crafting a unique piece of art. By layering patterns, adding personalized sentiments, and arranging embellishments, you’ve turned a simple card into a stunning 3D experience that captures the essence of whimsy and charm.
Join the Challenge
Feeling inspired? I would love to see your own creations! Join the fun and participate in the Penny’s Paper-Crafty Challenge blog. Share your scene stepper cards or other card and papercraft projects to connect with fellow enthusiasts and showcase your talents. It’s a fantastic way to be part of a vibrant community and draw inspiration from others.
More Stepper Card Inspiration
Looking for more stepper card ideas? Explore this related blog post and get even more inspiration for your next project. Discover different techniques and themes to elevate your card-making skills.
Polkadoodles products in the spotlight
Buzzy Bee Honey Digital Stamp
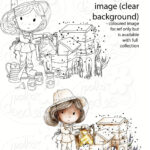
Spring Gnomes digital paper set

Winnie Sunshine Delight sentiment Bundle

I would like to enter my card in the following challenges
- Make My Monday Challenge Blog: Colouring mediums (I used Alcohol marker)
- A Place To Start: Anything goes
- Try it on Tuesday: In the Garden
- The Paper Shelter: Anything goe
- CREATIVE INSPIRATIONS: Anything goes
- Crafty Catz: Anything goes + hot colours
- Allsorts challenge blog: Season Delights or Anything goes
- Classic Design Challenge Blog: Anything goes + summer holiday
- The Cutie Pie Challenge Blog: Beginning with a B (my theme is bees)


What a sweet card bee-cause it’s adorable! Who wouldn’t love a bee-utiful card like this. Thanks for joining us at Make My Monday! I hope to see you in the gallery for our next challenge. Sue – DT
Thanks a lot
A perfect entry for our “B” challenge at The Cuties. Thank you so much for sharing. Sarah
Thanks
What a charming little scene. I love that you can see the netting over her face too. Thanks for taking part at Allsorts challenge.
Thank you
Rather belatedly, but wanted to thank you for sharing your lovely card with us at Allsorts challenge.
B x
Thank you
This is so cute! A great design and wonderful card fold. Thanks so much for sharing at Allsorts challenge!
Thank you so much
Awhh! You’ve created such a FABulous scene.
Thank you so much for joining us at Crafty Catz.
Chrissyxx
So sweet, Renske! I LOVE your pretty coloring, a beautiful summer scene! And what detailed notes for how to re-create it – wow! Thanks so much for playing at Make My Monday!
Thank you so much for your lovely comment Heather. I really appreciate it
Thanks a lot