
Some links in this post are affiliate links. This means I may earn a small commission if you make a purchase, at no extra cost to you. I only recommend products I use and genuinely enjoy in my own cardmaking. Read more here.
Affiliate Disclosure: This blog post contains affiliate links. This means that if you click on a link and make a purchase, I may earn a commission at no additional cost to you. I only recommend products and services that I use and trust, and the income helps to support this blog. Thank you for your support!
Hello crafty friends!
Welcome to my latest blog post, where I’m excited to share with you the latest release from All Dressed Up Stamps. In this article, I’ll showcase the beautiful digital stamp “Say it with flowers” and also provide you with a step-by-step guide on how to create a charming card with this stamp.
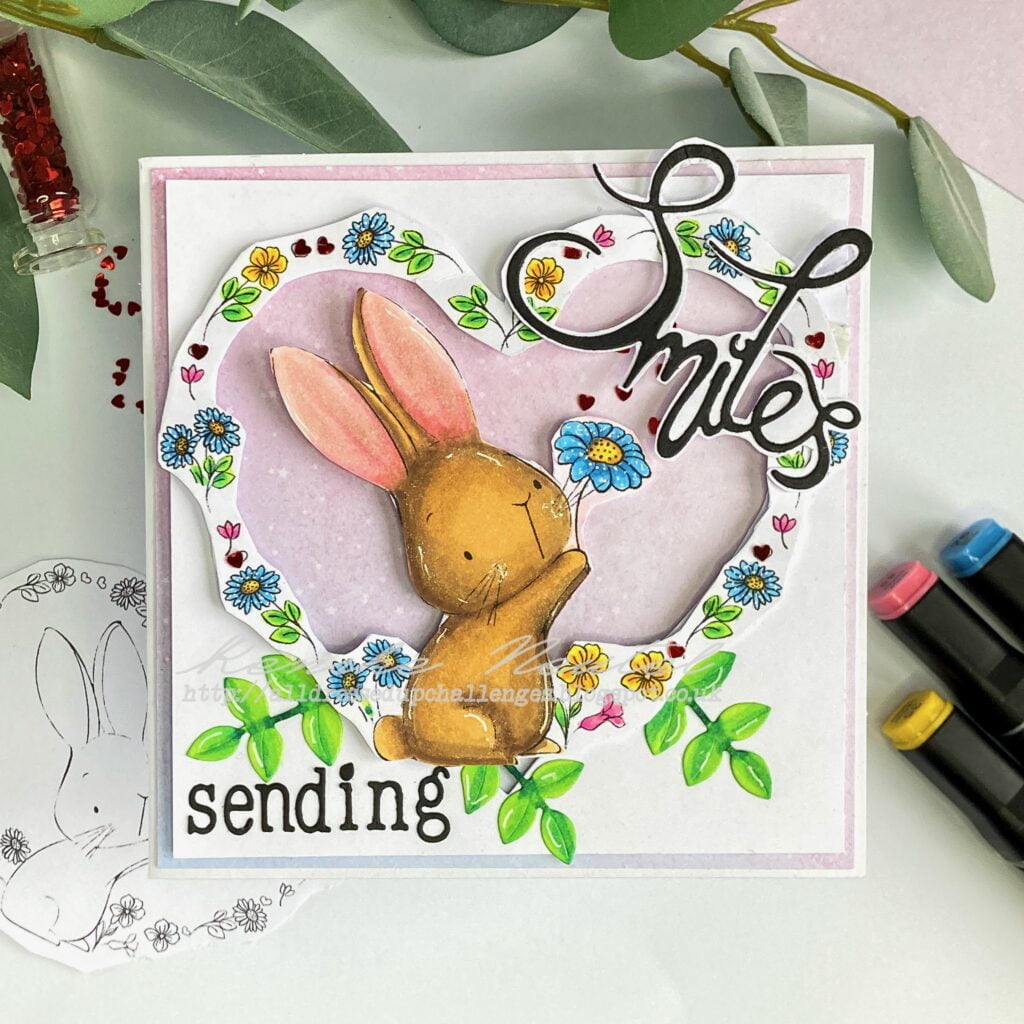
The “Say it with Flowers” digital stamp is part of the newest release from All Dressed Up Stamps, and it features a playful design that captures the essence of spring. In addition to the digital stamp we’ll use for this card, I’ll also introduce you to two other enchanting releases: “Daisy” and “Garden Wheelbarrow”. Each of these stamps has its unique charm, perfect for bringing your card-making projects to life.
Are you ready to get started with this digital stamp? First, let’s take a closer look at the newest additions to the All Dressed Up Stamps family. Check out the images below to see the beautiful “Daisy”, “Garden Wheelbarrow” and “Say it with Flowers” stamps:


Now let’s dive in and create this lovely “Say it with Flowers” card together.
Crafting Blooms: A Step-by-Step Guide to Making the Say it with Flowers Card
Let’s embark on a crafting journey and bring this charming “Say it with Flowers” card to life! In this tutorial, I’ll walk you through each step, from preparing the materials to assembling the final card. Get ready to unleash your creativity and spread some floral joy!
Gather Your Supplies
let’s prepare all the supplies we need for the Say it with Flowers card project. Here’s a list of all the required materials and tools:
Materials Needed
- Digital Stamp “Say it with Flowers”: You can grab the digital stamp from All Dressed Up Stamps here.
- Cardstock for Base Card: Choose a card base measuring 13 cm x 13 cm (or cardstock measuring 26 cm x 13 cm if you prefer to make your own base card).
- Patterned Paper: Choose the patterned paper you prefer to use. You need a piece measuring 12,5 centimetres by 12,5 centimetres.
- Colouring medium: You can use any colouring medium you want, but I used alcohol markers for this card.
- White Gel pen: You”‘ll need a white gel pen for adding highlights.
- Aqua Shimmer Pen: Prepare your aqua shimmer pen for adding sparkle (optional).
- Heart Die: Use a heart die for the heart-shaped window.
- Foam Tape: Use foam tape to adhere to elements and add dimension to your card.
- Heart Embellishments: Choose heart embellishments for extra flair.
- Alphabet letter die: We use this die to make the letters for the word sending.
- Word Die “Smiles”: Utilize a word die with the word “Smiles”.
- Leaf Die: Use a leaf die for additional decoration.
- Scissors: Have scissors on hand for cutting paper and other materials.
- Glue: Use glue to securely attach the different elements.
Tools Needed
In addition to the materials listed above, you’ll also need the following tools to complete your “Say it with Flowers” card:
- Die-cutting machine: You”‘ll need this machine to die-cut the hearts-shaped window in the card.
- Scoring board (if making the base card yourself)
Now that we have all the supplies, we can start printing and colouring our digital stamp.
Step 1: Printing and Coloring the Image
Before we start crafting, let’s begin by printing and colouring the “Say it with Flowers” digital stamp. Follow these steps to bring the stamped image to life:
- Printing the Image: Start by selecting the “Say it with Flowers” digital stamp from All Dressed Up Stamps and printing it onto DCP paper. Consider the size of the digital stamp and adjust it accordingly to fit in combination with the heart die that you will use.
- Colouring the Elements: Once you have the digital image printed, it’s time to choose your colours. Using alcohol markers, begin colouring the various elements of the digital stamp. Here’s a breakdown of the colour combinations I used for each element:
- Rabbit: Clay (116), Walnut (100), Grey Brown (104), Peachy Blush (257).
- Leaves: Yellow Green (48), Grass Green (47), and Forest Green (50).
- Blue Flowers: Baby Boy (144), Sweet Dreams (76), and Midi Sky (190).
- Yellow Flowers: Pastel Lemon (39), Lemon Yellow (35), and Yellow (34).
- Pink Flowers: Pale Pink (09), Pink (08), Peony Purple (282).
- Flower Centers: Red Barn (245), Golden Yellow (222), Lemon Yellow (35).
- Adding Highlights: Once you have applied the base colours, use a white gel pen to add highlights to certain areas of the digital image. This will help create dimension and depth.
- Final Touches: For an extra touch of shimmer, use an Aqua Shimmer Pen to add sparkle to the coloured elements. This step is optional but adds a beautiful finishing touch to the image. I used it on the edges of the bunny.
By following these steps, you will have a beautifully coloured “Say it with Flowers” image ready to be incorporated into your card design.
Now that we have completed the printing and colouring process, let’s move on to the next step: creating the card base. Let’s continue our crafting journey together!


Having trouble editing or colouring digital stamps? Download my free guide for extra tips and tricks to help you perfect your digital stamps!
Step 2: Creating the Card Base
Now that we have our beautifully coloured “Say it with Flowers” image, let’s move on to creating the card base. Follow these steps to prepare the card base and background panels:
- Preparing the Card Base: Start by selecting a sturdy card base measuring 13 cm x 13 cm. Alternatively, you can make your own base card by cutting a piece of cardstock to 26 cm x 13 cm, scoring it at 13 cm, and folding it in half.
- Cutting the Patterned Paper: Next, choose the patterned paper you like. Cut a piece measuring 12.5 cm x 12.5 cm to layer onto the card base.
- Creating the Heart-Shaped Window: Use a heart die to cut a heart-shaped window out of a white panel measuring 12 cm x 12 cm. This panel will be layered on top of the patterned paper to create a decorative frame for our stamped image.
By following these steps, you will have a beautifully prepared card base and background panels ready to showcase your Say it with Flowers image. Now that we have completed the card base preparation, let’s move on to the next step: assembling the card layers. Let’s continue our crafting journey together!
Step 3: Crafting Heartfelt Sentiments
Before assembling your Say it with Flowers card, it’s important to add some heartfelt sentiments that convey your messages. Follow these steps to create sentiments that match the theme of your card:
- Choosing the Perfect Sentiments: Take a moment to decide on the sentiments you want to include on your card. For this project, I opted for the uplifting phrase “Sending Smiles” to complement the cheerful theme of the card.
- Die-Cutting the Letters for the word sending: Use an alphabet letter die and black cardstock to carefully cut out the letters needed to spell out your chosen sentiment. I use this die to make the word sending.
- Die-Cutting the Word “Smiles”: I can make the word “Smiles” with a word die. I still have this in my pantry. But of course, you can also make the word with individual letters. I punch the word out of black paper. To create a striking contrast, I then adhered the word to white paper and painstakingly cut around it, leaving a subtle white border.
By following these steps, you’ll create a stunning Say it with Flowers card that will surely delight the recipient. Now, let’s move on to the final step and add the finishing touches to personalize the card even further. Let’s continue our crafting journey together.
Step 4: Assembling the Card
Now that we have all the elements ready, here’s how you can put them together seamlessly:
- Layering the Background Panels: Begin by adhering the patterned paper to the card base. Centre the patterned paper onto the card base, making sure that all sides have even borders.
- Adding Dimension: To add dimension to our card, apply foam tape to the back of the white panel with the heart-shaped window. Carefully align the window panel over the patterned paper and press down firmly to secure it in place.
- Placing the Stamped Image: Now it’s time to add the beautifully coloured “Say it with Flowers” image. Apply foam tape to the back of the image, focusing on areas that require additional elevation for a layered effect. Carefully position the stamped image over the heart-shaped window, ensuring it’s centred and aligned to your liking.
- Embellishing: You can further enhance the design of your card by adding any additional embellishments, such as heart-shaped embellishments and the die-cut leaves at the bottom of the heart. This will add visual interest to the card.
- Affixing Sentiments: Finally, attach the sentiments you crafted in the previous step onto the card. Place them strategically to complement the overall design and convey your message effectively. I place the letters sending in the left bottom corner. I place the smile sentiment at the right upper corner of the heart.
By following these steps, you’ll create a stunning “Say it with Flowers” card that will surely delight the recipient.

Inspire, Create, Share and More!
We have embarked on a crafting journey together and created a beautiful Say it with Flowers card from scratch. Let us keep nurturing our creativity and sharing our handmade creations with others. Crafting is not just about making beautiful cards; it’s also about finding joy in creating and connecting with others through our shared passion for crafting.
More Flower Card Inspiration
For more floral card inspiration, check out the following resources and links:
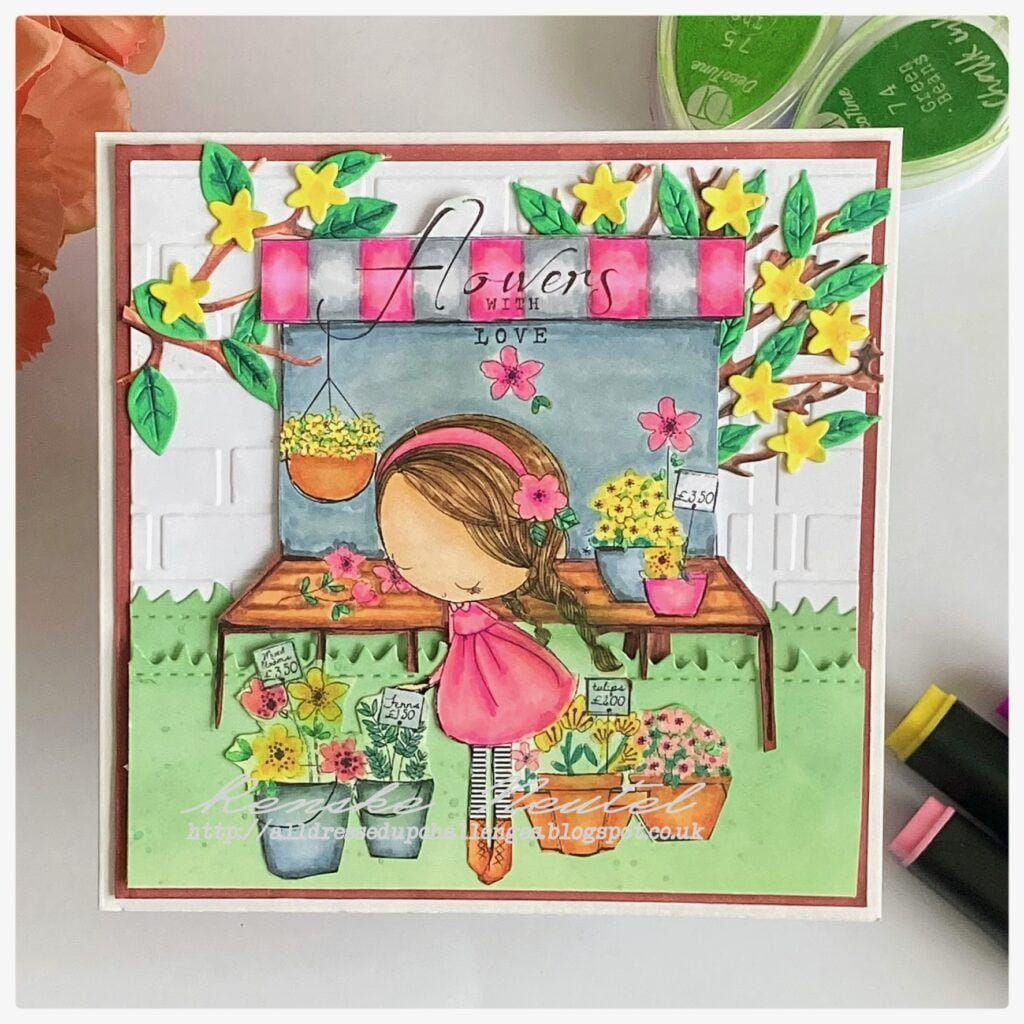
Discover new techniques, designs, and ideas to take your card-making skills to the next level. Let’s continue spreading joy and happiness through the art of card-making!
What’s your favourite part of this card-making process? Share your thoughts in the comments below!
Products I used
In this section I will link, as far as possible, the products I used for this card. I distinguish between products with affiliate links and products without affiliate links. You can find the affiliate disclosure at the top of the blog post.
Products used with affiliate links

Say it with Flowers digital stamp from All Dressed Up stamps

White Gelly roll pen 08

Nuvo Aqua Shimmer pen

Little typewriter letter die from Craftemotions
Products used without affiliate links
- Patterned paper out a paper block from Craftsensations (ActionNL).
- Twin markers (alcohol markers) Decotimecrafts (ActionNL).
- Heart-shaped die from Decotimecrafts (ActionNL).
- Foam tape (brand unknown).
- Heart embellishments (brand unknown).
- Word die Smiles from Aveccreative (ActionNL).
- Leaves die (brand unknown).
- Scissor (brand unknown).
- Sticky glue from ActionNL.
I would like to enter my card in the following challenges:
- A Place To Start: Anything goes + it’s hip to be square
- Fab ‘n’ Funky Challenges: Spring
- Simon Says Stamps wednesday/ Easter/spring
- Stamping Sensations: Spring
- A Perfect Time To Craft Open Challenge: Anything goes
- Classic Design Challenge Blog: Anything goes + legged friends
- Daisy Chain Challenges: Animals
- The Creative Crafters: Anything goes
- Crafty Animals: Anything goes + must use an animal
Pretty card. Thank you for joining in and sharing your creation with us over at <a href=" The Creative Crafters (creativecrafterschallenge.blogspot.com).
~ Wendy DT
Thanks you
What a great way to combine this heartshape and the bunny! Thank you for joining us at Stamping Sensations!
Thank you
Such an adorable card, and amazing job on the tutorial. I know how much work these can be. Thanks for sharing your project at A Place To Start !
Ah thank you so much for your lovely comment. It’s great to hear you love the tutorial. It is a lot of work, that’s for sure.
A really cute card, many thanks for sharing at Stamping Sensations challenge.
B x
Thank you
This is such a fun and gorgeous card! Thanks for playing along with us at Stamping Sensations this month.
Pinky
Thank you for your lovely comment